How to Make a Drawer & Vanity Repurpose
Learn how to make a drawer and turn an old vanity into a useful cabinet. When a kitchen cabinet is too deep for the space, look to the bathroom for answers!
It seems the quackery of The Loon knows no bounds.
Just when I thought it was safe to let my guard down…
To relax…
To unwind…
To smell the roses martinis…
Just when I thought I had a handle on the projects, and the Good Ship Navage Patch could sail along on autopilot for a while…
The Loon announced that I’d be making a dog feeding station.
“Another one?” I blurted out.
But hadn’t I just built one at the old house?
Remember this Glorious Canine Gulpatorium?
That feeding station was entirely custom, built 100% from scratch.
But we were in a new house now, and nowhere in the “Let’s-move-to-Georgia-babes” playbook did I remember reading that I’d be building more custom cabinets!
The very notion was an affront to my delicate sensibilities.
Dog feeding station, indeed!
“What’s next, woman!” I roared, “A paw-massage pad while they snarf their kibble?”
I glared at the insolent beasts.
I didn’t have a feeding station. Why on earth should they have one? Another one, at that!
I turned to Pepper.
“You!” I said, and leveled a stubby finger towards her white-fringed muzzle. “Yes, you! I’ll not do it! Do you hear me? I’ll not lift a finger! And what do you think about that, eh?”
Pepper responded:

She seemed less-than-thrilled by my answer.
And that look!
“Well, I mean…” I sputtered and tried to bolster my case with facts and hard data, but nothing sprang to mind. “You understand, don’t you, Pepper?”

Dangit!
The Fur Jerks were in cahoots with The Loon!
“Fine!” I bellowed to the Georgia summer sky. “I’ll make the damn feeding station!”
Back in the kitchen, The Loon my babes was measuring up a storm and muttering numbers to herself.
I can never tell if she’s talking to me during these flurries of activity and self-muttering, so I occasionally lob tentative “What’s that, my babes?” in her direction, just in case she mumbles some measurement I’m meant to remember.
This measuring process started before our new kitchen was finished, but we knew where the new island would be, so she based everything off of that.
I could tell by her mumblings that the numbers weren’t telling her what she wanted to hear.
I felt bad for the numbers.
After a time, she hopped on her computer and searched for base cabinets.
Back to the tape measure…
Again at the computer…
More mumbling.
The issue was this: a normal kitchen base cabinet is 24 inches deep. When she factored in the location of the island cabinets, a 24-inch feeding station cabinet wouldn’t leave much room if someone were feeding the Bark Squad while someone else was opening the island cabinets
I know. My babes plans for every eventuality!
So, what to do?
Well, my babes realized that bathroom vanity is only 21 inches deep.
I know, I know. It’s three stinking inches. How important could it be, right?
Well, to my engineer babes, that three inches was everything.
Bathroom vanity it was!
There was just one teensy little issue: bathroom vanities are supposed to have sinks, and those sinks need room, so there’s no drawer where the sink should go.
See what I mean? Just a false front.

But my babes is nothing if not resourceful. She didn’t need to buy a cabinet with a drawer – she had a donkey husband who could make one for her!
And why stop at a measly little drawer, amirite? Why not make it a doggie feeding-station and a beverage bar? It’s so obvious! Why isn’t everyone doing it?
We’ve had a wine fridge that’s been patiently aging a fine crop of dust since about 2016. My babes wanted to press it back into service, but this time for soda and beer.
She wanted DonkeyBoy McGillicuddy (that’s me) to build an enclosure for the wine fridge and attach it to the feeding station.
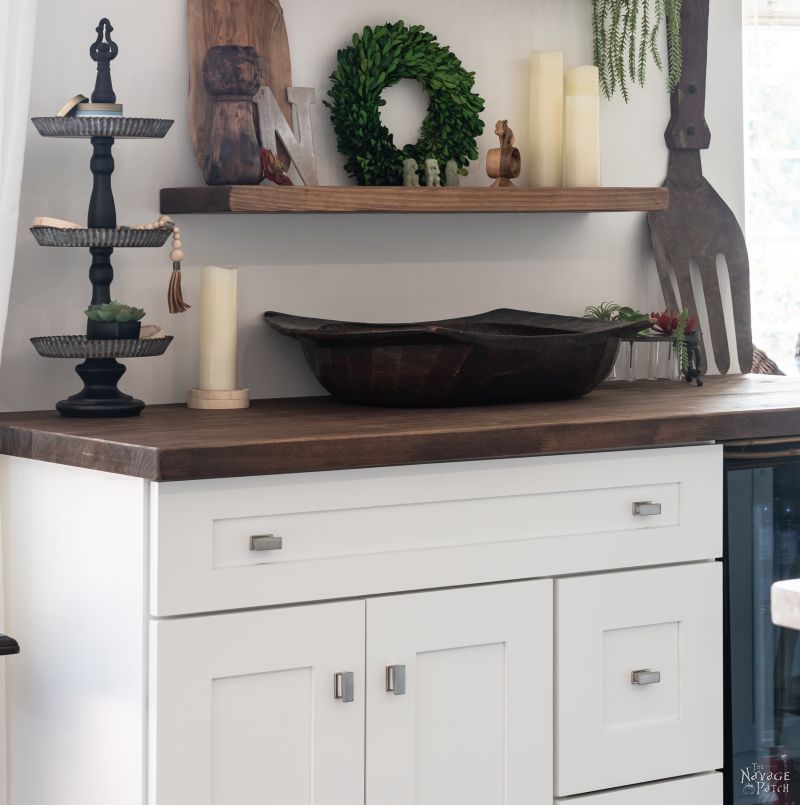
Up top, a butcher block countertop would cover the whole shebang, and it would give her some pristine real estate to display all our seasonal goodies.
Okay, I know this project has ballooned into much more than the “How to Make a Drawer” title suggests. And just wait, cuz it’s gonna change some more! But here’s where we’re at:
Feeding Station/Beverage Bar/Seasonal Display Area
- Purchase a bathroom vanity
- Modify the vanity by making a drawer where the sink would usually be
- Build an enclosure for a wine fridge and attach it to the cabinet
- Modify the wine fridge so that it has shelves for cans
- Buy/modify a butcher block countertop and install
- Pour martini and guzzle
Now, I’m sure some of you Noticing Nancies and Detail Debbies have realized that nowhere in that list is an actual feeding station, and you’re correct! Gold stars for you Hawk-Eyed Harriets!
Handan’s original idea was to have Yours Sufferingly build some sort of slide-out bowl contraption from the bottom of the vanity. This would have presented all manner of problems, not least of which would be the accumulation of filth underneath the cabinet and the inability to clean it.
So before I get too ahead of myself, let’s take gander at how to build a drawer, and then we can get back to the feeding station.
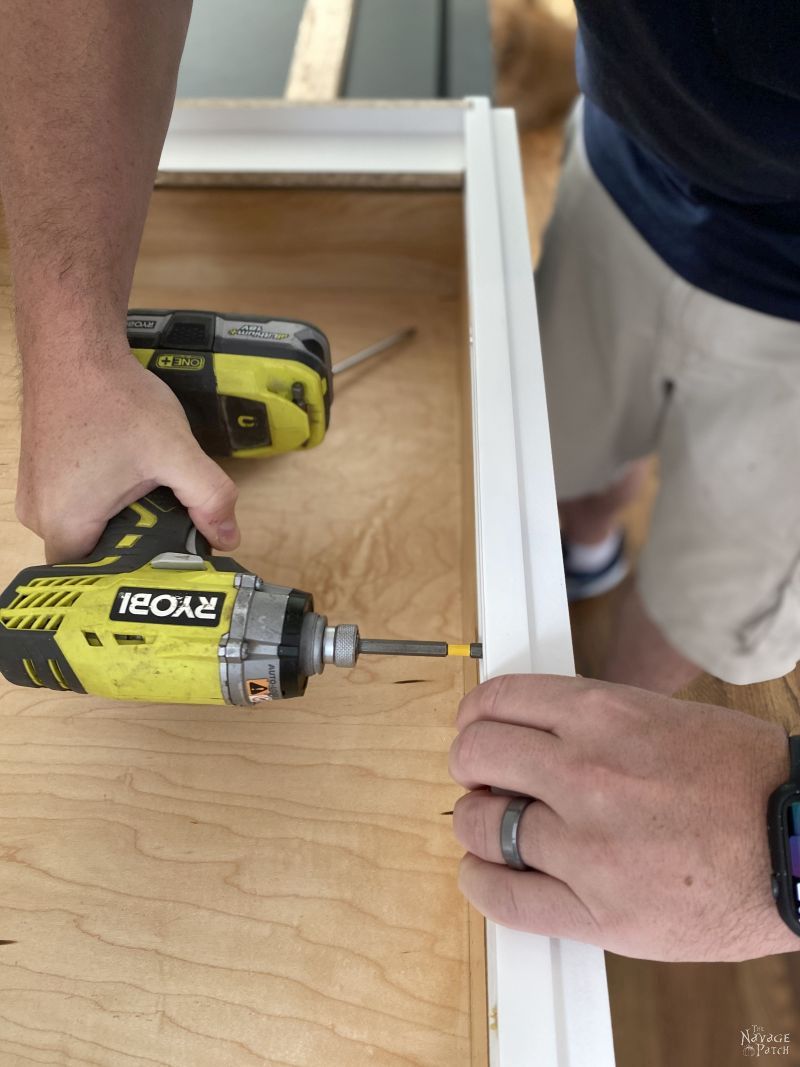
My first task was to get that faux drawer front off of the cabinet. I would be using it for the face of the drawer I would make.

I feared I would be prying it off with a pry bar, most likely ruining it in the process, but kudos to cheaply made furniture! That face was simply screwed on with 6 screws! Here’s a shot of the inside showing two of them.

Thirty seconds with my impact driver, and the screws were out, and the face was off.


I put that face aside and took some measurements.
Here’s all you need to know to make a drawer:
- Width of the opening. You’ll make your drawer width one inch less than that number. So for this drawer, the opening was 33 inches, so I planned the drawer to be 32 inches wide. We do this because standard drawer slides need 1/2 inch space, and since there are two slides – one inch! If you’re making an overlay drawer (not flush with the opening) like this one, your overlay piece may be wider.
- Height of the opening. You’ll make your drawer 1/4 inch less than that number. For this drawer, the height was 4 1/2 inches, so I made the drawer 4 1/4 inches high. 1/8 inch clearance on the top and bottom is the perfect amount. If you’re making an overlay drawer (not flush with the opening) like this one, your overlay piece may be taller.
- Depth of the opening. This is the distance from the back of the cabinet to the front of the face frame. In this case it was 20 1/2 inches. Your drawer can be no longer than this distance, and in my case, I made the drawer 19 1/2 inches deep. This left me with an inch to spare in the back, but since my drawer slides were 18 inches, it was more than enough.
- Size of your drawer slide. Generally, you want the longest that will fit in your cabinet. Since my opening was 20 1/2 inches, I could have used 20-inch slides, but I had a bunch of 18-inchers left over from an old project, so I decided save a little money by sacrificing two inches. Not a big deal.
Here are the dimensions of the drawer I made.

Without getting into fancy woodworking joinery like dovetails, there are 3 primary ways the average DIYer (that’s you and me) can build a sturdy, stable and cheap drawer in just a few minutes.
- Use a Kreg Jig to make pocket holes, then build the drawer with screws and glue. This way is very strong, but somewhere you’re going to see pocket holes, and you need to have the Kreg Jig in the first place.
- Use regular screws and glue. Also a strong option, but those screws! You may not want to look at them, and then you’ll have to fill their holes.
- My main method when I want it quick and easy: glue and brad nails. For most domestic applications, glue and brad nails are more than enough for a strong and good-looking drawer.
Once I had my dimensions, I cut my pieces from 3/4 inch plywood. When cutting a huge piece of plywood like this, I always cut the piece about a half inch too big, in case I wobble the sheet during the cut and get a curvy edge.

Then I’ll dial in the right measurement and make the final cut.

If those two pieces on top look a little fancier than the others, it’s because they are. We had some leftover cabinet shelves from our kitchen remodel, and I sliced up one of the shelves to make the sides of the drawer, since they’ll be seen any time the drawer is opened.

Unfortunately, my babes was upstairs on a Zoom call when I assembled the drawer, and I totally spaced and built the whole thing without taking a picture. But it’s the same method I used for a previous project, so I’ll show those pics.
I started by attaching the sides to the base. I ran a bead of glue the edge of one side of the base, and then I placed the side piece against it. With the two pieces near the edge of the table, I fired in several brad nails as shown below. I shot two in the corners, followed by one in the middle, and then I nailed every couple of inches.
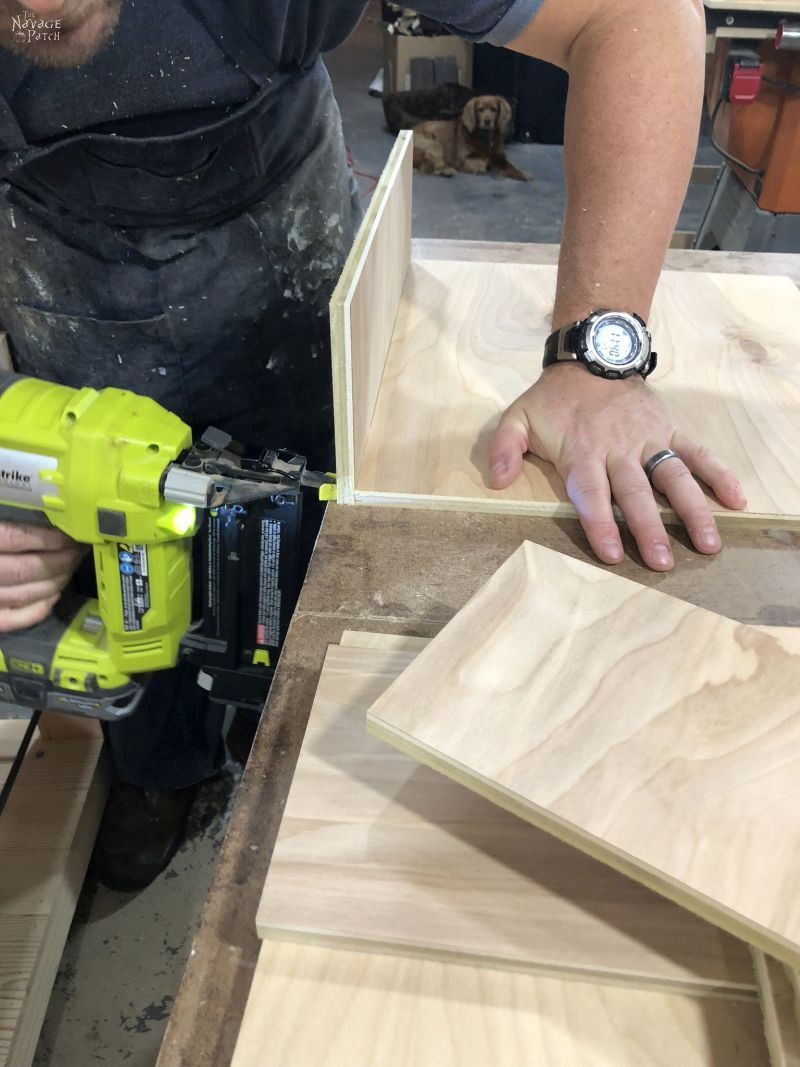
I repeated this step for the other side.
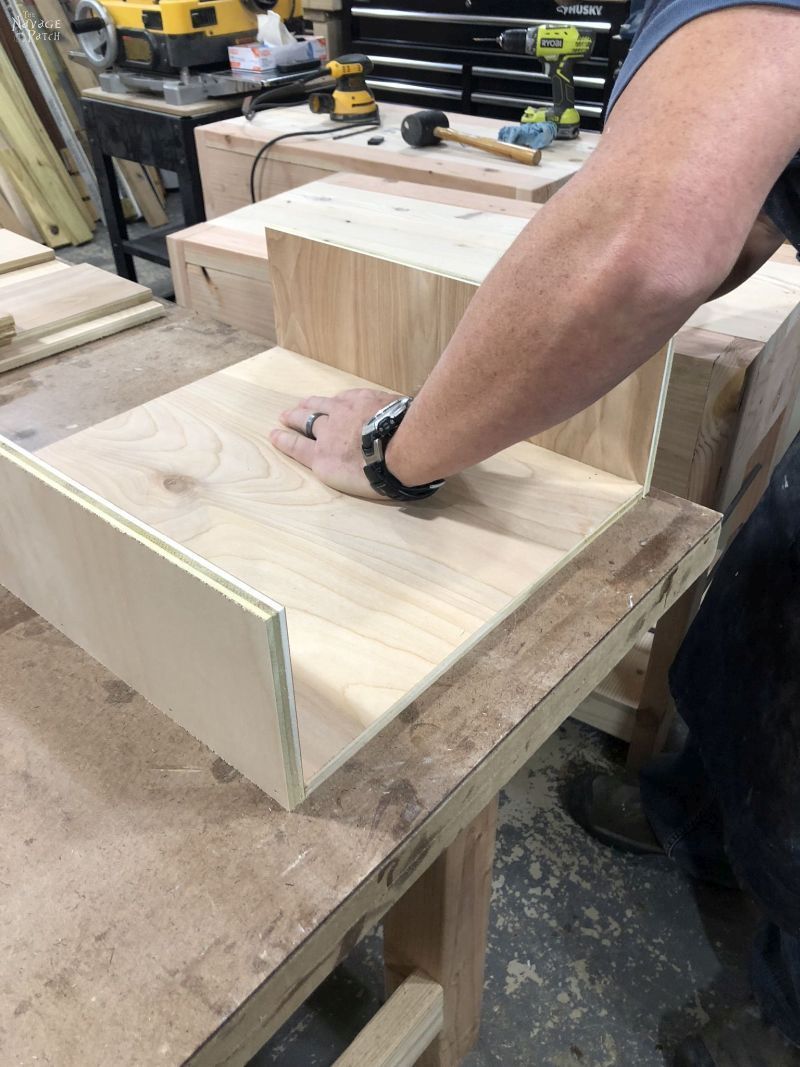
The front and back pieces sit on top of the base and fit inside the sides. I applied a line of glue around three of the edges of the sides, fit them in place and brad nailed them.
Glue and brad nails – that’s all it needs!

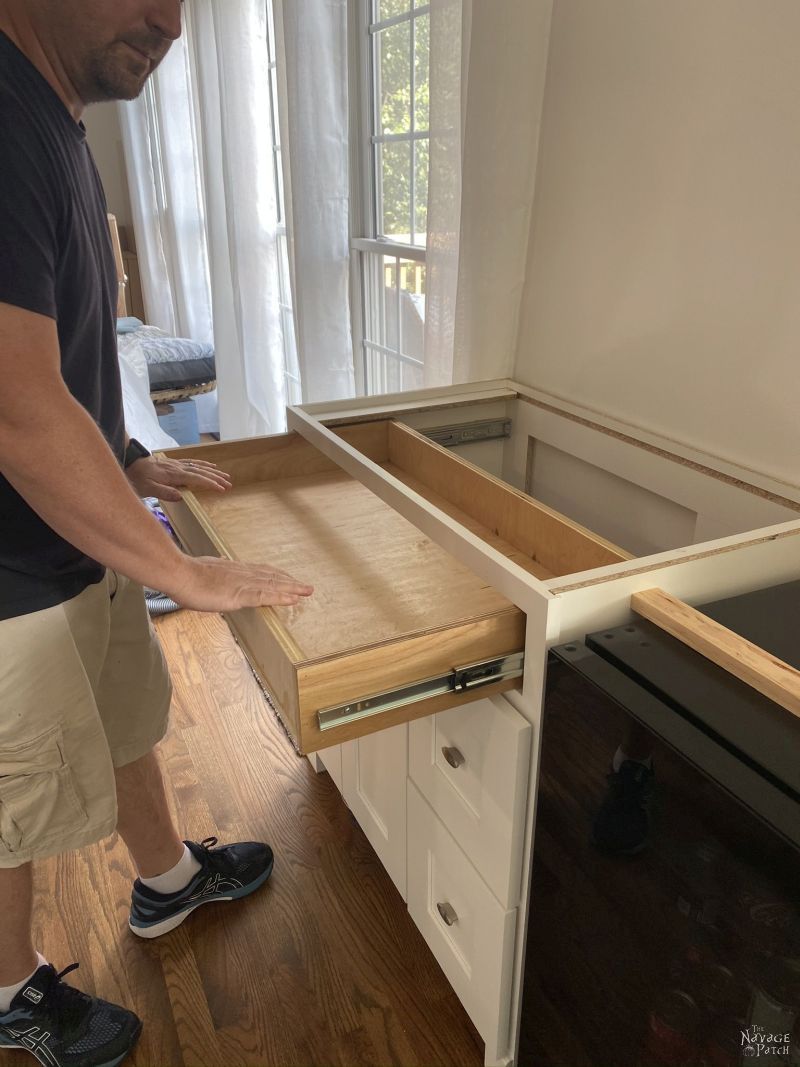
Once the drawer was built, screwed on the slides.

After installing the slides to the cabinet, I checked to see that drawer fit in the opening and that the front of the drawer was flush with the face frame of the cabinet.
Perfect!

I took the drawer back out and carried it downstairs for a couple of coats of shellac. Since it was going to be used as a tool drawer, I just wanted a quick and easy protective coat, just in case something spilled in there. It had been a time since I last used shellac, so I read the instructions.
Or I tried to.
Good lord, I’m blind as a bat, so there was no way I could read the tiny writing on the label. Instead of wasting time and energy going upstairs for my glasses, I used my go-to technique for reading small print – I take a picture with my iPhone and then zoooooooom in!

Works like a charm, every time!
The next day, I again fit the drawer into its opening.
The final step was to attach the drawer face.
Since I’d be using construction adhesive on the face, I first had to rough it up a bit, or the adhesive might not stick to the smooth finish.

I applied a good amount of adhesive. I like this Loctite PL Max for jobs like this. It won’t fail.

Normally, this is a process of applying drawer faces is fraught with danger and plagued by worry. One false move, and you’ve got yourself a crooked drawer face for all eternity.

But not this time.

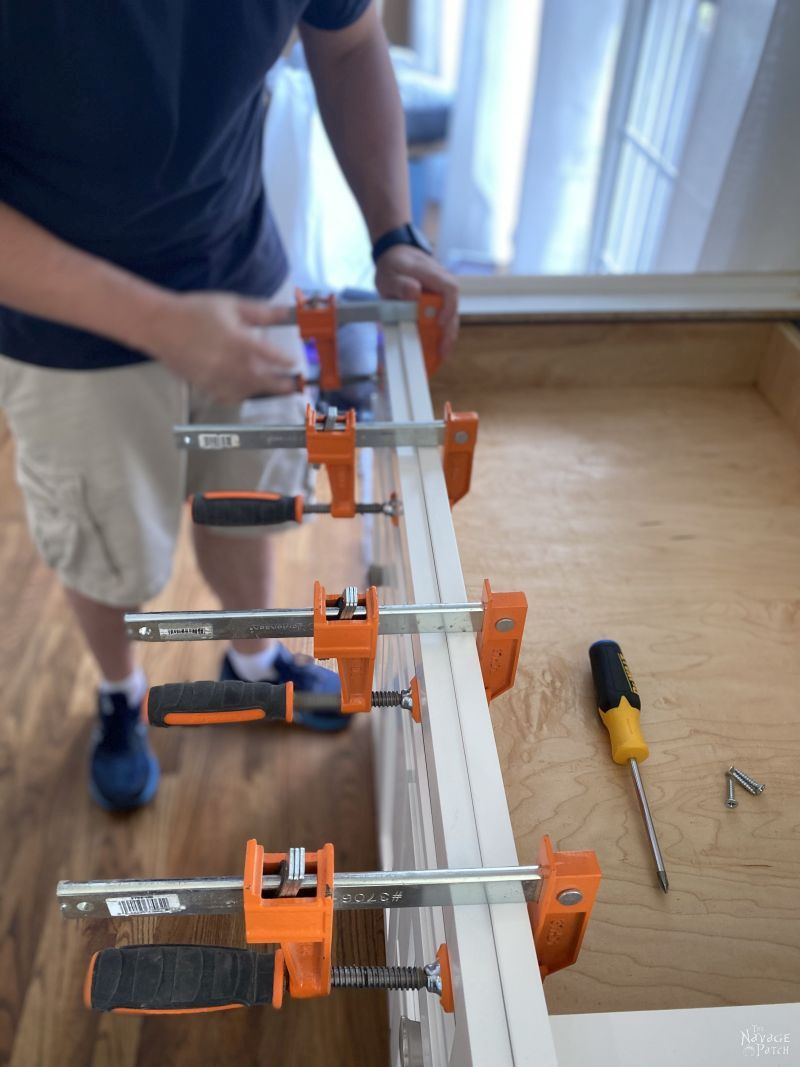
Because this face had already been screwed on, I used those same screws to hold the face in place.

The screws kept everything perfectly aligned while I positioned clamps to squeeze the two pieces together and let the adhesive cure overnight.
The next morning, I got the scare of my life. After removing the clamps, the drawer wouldn’t open.
I let out a pathetic and wounded moan, followed by a loud and piercing, “SH!T!!!”
Handan came running.
“What is it, my babes?” she said, thinking that something terrible had happened.
“I can’t open the drawer! The adhesive must have leaked out and glued it shut. SH!T!” I said. “It’s Loctite, so I’ll never get it open!”
My babes stared at me and then at the drawer. She was about to say something.
Words of sympathy?
Of annoyance?
I’ll never know.
Because it was just then that I remembered the screws.
“Oh! Wait a minute, my babes!” I said and grabbed my impact driver. “I forgot to take out the screws!”

Phew! Major crisis averted!

To complete the drawer, I installed some pulls. We didn’t like the hardware that came with the vanity, so I upgraded all the pulls.
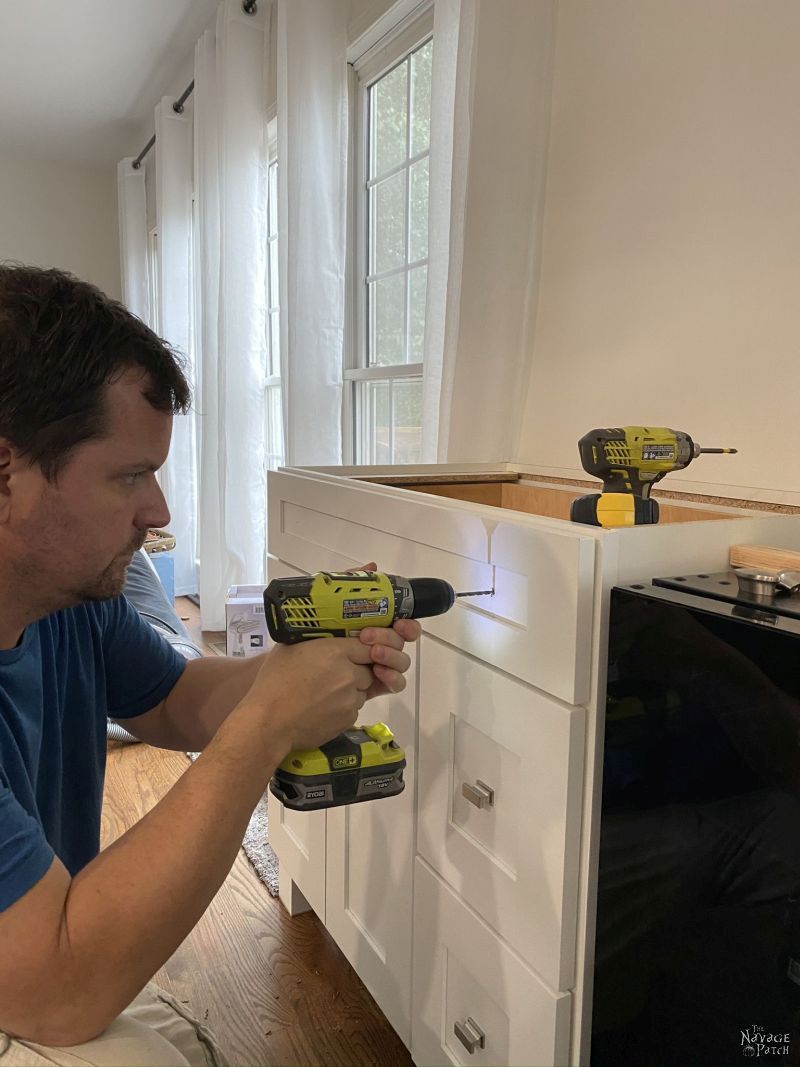
Although I actually installed the beverage cooler enclosure before making the drawer, I’ll show it to you now.
It’s a simple enclosure made from two pieces of plywood that I joined with pocket screws.

I sprayed it white, inside and out, and then I attached it to the vanity with brackets. A simple and easy enclosure.
For a countertop, we used an acacia butcher block from Home Depot. They are surprisingly affordable, and it came pre-stained. I did have to cut it to size, and I sanded the edges and corners for a more rustic look, but I was able to match the stain pretty accurately to cover up the cut face and the sanded areas.


I caulked around the edges and added shoe molding and trim.


And since everyone loves to look inside other people’s drawers…
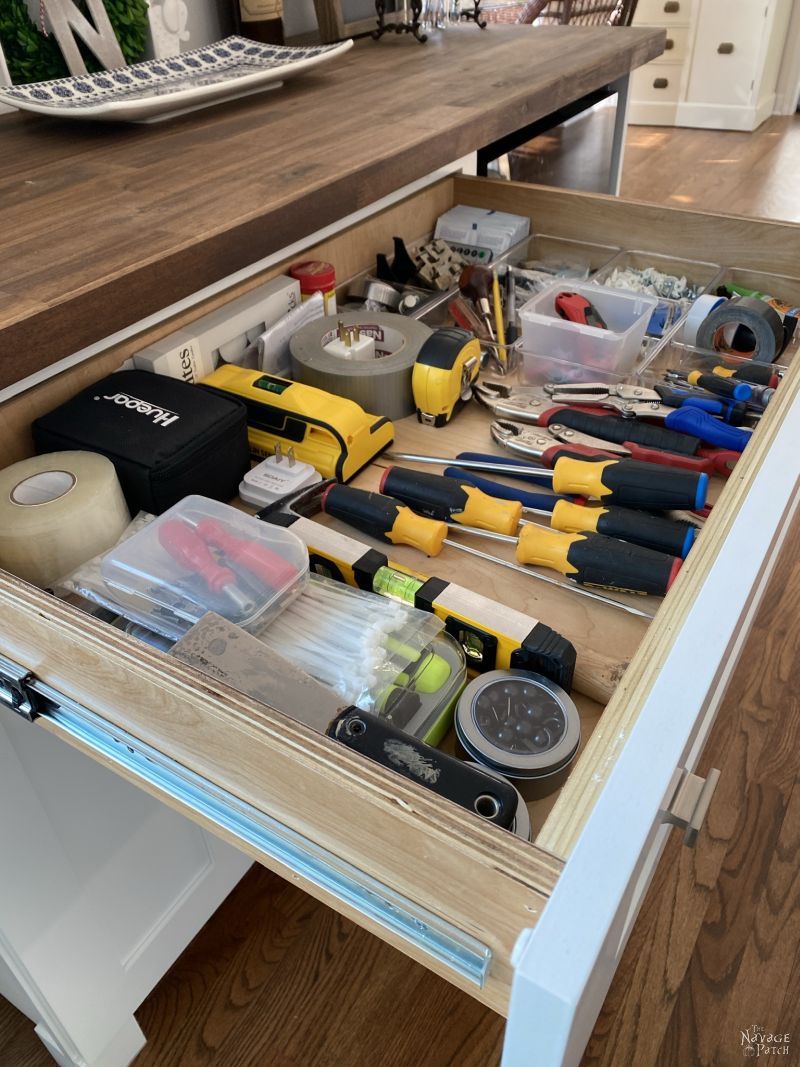
All of our upstairs tools – because I’m getting too old to run down to the basement everytime I want to screw something. o_0

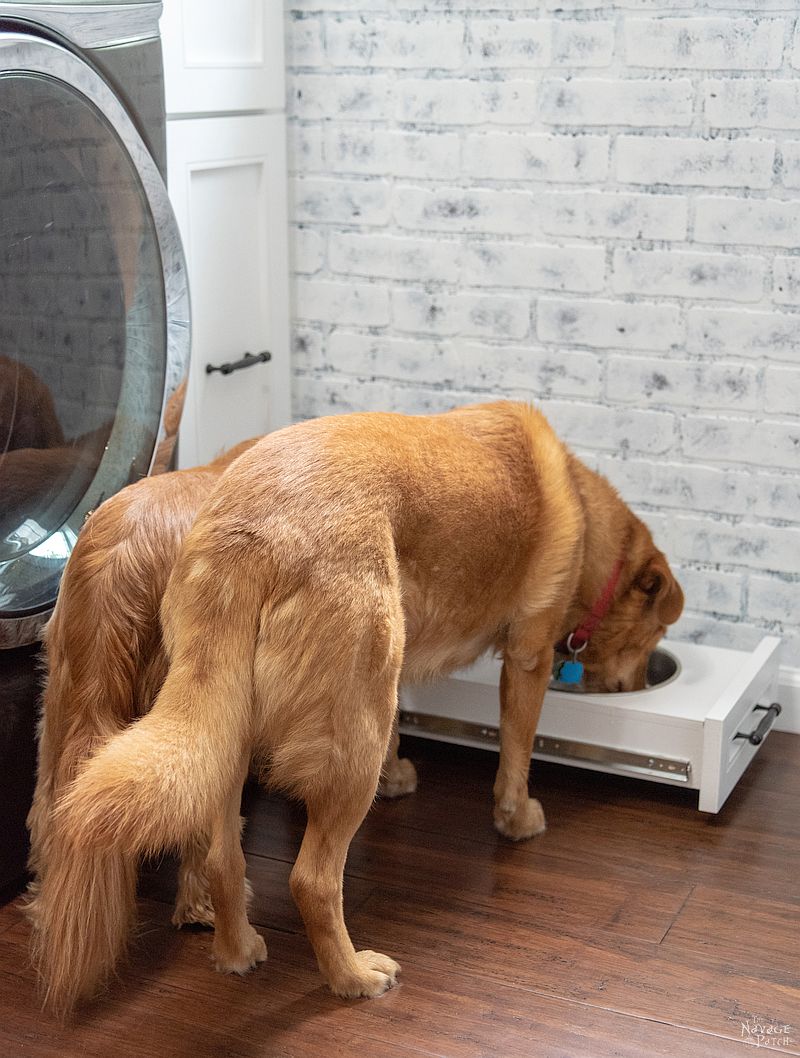
I know, I know – you want to know what happened to the dog feeding station, right?
Well, here it is.

Not much of a “station,” is it?
But plans change, and around here, they can change fast.
Case in point: just last night, Handan found and ordered an actual dog feeding station that will replace that old desk and carpet in the photo above.
How’s that for timing? I’ll have to update this post when it arrives, and I’ve placed it next to the beverage bar.
*Update!*
As promised, here is the all-new, ultra-modern, sleek, chic and totally on fleek Navage Patch Snarf Station!

So far, we love it – canines and humans! It looks great and holds all of their food and treats. What more could you ask of a Snarf Station?
Here it is on Amazon. Please let me know if you decide to buy one for your pups, so I can give you some important pointers on assembly.
We love it when you share our posts on Facebook and Pinterest!


Absolutely fantastic, love your ideas on the projects. Sure wish I lived closer so I could see these in person.
Thank you, Robert!
You, sir, are a “Saint!” franki
I know, right? That’s what I keep telling Handan, lol!
You inspire me everytime. You also take the fear out of so many projects I want to tackle.
THANK YOU!
You are so very welcome, Merlene! 🙂
I cracked up when Got to the photo of the feeding station. You two are just a hoot!!!
LOL! It’s all fixed now – photos coming soon!
Love this project. I too have tools in my kitchen, 2 drawers in fact. Zoom on the phone is priceless for all its rescues for aging eyes.
My hubby understands the pace at which projects can come up and change. It’s not uncommon for me to pop up at 10 pm and go to my garage and commence working on one. He knows I’ll be done when I’m done. I’d say we both have perfect fit spouses .
Thank you, Hope! Nothing beats a perfect fit! Have a great week!
Ahaha, those pictures of Pepper 🙂 They are priceless!
I know – she’s a riot! 😀
I love reading your humorous posts! Thanks so much for sharing your knowledge, experience, and creativity! You guys are great!
Thank you, Mona! 🙂
For some reason, I read your lecture to Pepper as if I were reading Green Eggs and Ham!!?Her face is priceless!! Love how you modified that vanity base. Do you plan on making dividers in the drawers? And hey….what’s the big idea of you hinting at the “Wait for it” moment all throughout this tutorial??? And then, throwing us off a cliff ??at the end?? Nahhhh….JK. Actually it was pretty damn funny!! Can hardly wait to see what Handan ordered!!
LOLOL! Dr Seuss! We will probably organize the drawer a little better in the future. As for the “rel” feeding station – Baris and I just built it (not from scratch) yesterday! Updated pics coming soon!
Love all your DIY ideas. I’m wondering about the butcher block you bought at Home Depot. Was it available in the store or did you have to order it? What color did you purchase, and what stain did you use to match? Thanks!
Thank you, Rebecca! We ordered that acacia butcher block from homedepot.com – here’s the link to all of their acacia butcher block countertops: https://rstyle.me/+SRQ79w_-neBWSEmj-GmHGQ
The one we bought (6 feet x 25 inches x 1.5 inches in brown) is currently out of stock. I think I used dark walnut to match the stain for the sides, but I used something lighter for the end grain- I’m struggling to remember which, as I first experimented with a few different stains on the scrap piece that I trimmed off.
Hi. Long time lurker and fan. But I am curious about the height of the bowls for dogs. I have 2 medium sized Labs, and we have bowl stands averaging about 18-20 inches high for them. This aids in digestion but some will state that this also speeds up how fast the dog eats. We’ve had no issues with the stands. So any options on switching the bowl drawer to a higher height? Thanks!
Ohhhh, that’s one heck of a multi purposeful cabinet you got there! Great choice Handan! Kudos to Barish and Greg for the assembly! What’s stored in the tilt out bin? Enquiring minds want to know!
Oh, Cindy Lee, that’s where the kibble lives! I’m so sorry I didn’t take a picture of that!
Hi Nancy, I’m so happy to hear from you! These bowls are 6 inches from the floor, and unfortunately, there is no way to reposition them. Hope to hear from you more in the future!
Love! Love! And that top! Absolutly gorgeous! How do you get your trim cut so perfect on inside corners!? Mine look like pooh when i do them. I end up using a lot of wood filler and caulk.
Thank you, Leslie! Jeez, I don’t know if there’s any secret beyond using a miter saw. How are you doing them?
That was a great read of a pet feeding station that never was. I must say I laughed out loud when I saw the actual Snarf Station.
LOLOLOL, thanks, Denise! 🙂
You guys keep stealing my heart. I love it when you and your husband get something that was meant/used fir something else, instead of retiring it, your creative vision see other uses for the piece, as in this case, and it turns out amazing!!!! Like in this case. I love this project, and I know our dogs Toby and Charlie would to. Thank you for your creativity and for sharing. Stay safe and healthy.
Awwww, thank you so much, Ivory! But my question is – if I keep stealing your heart, how do you keep getting it back???
Thanks for posting the link to Amazon for that feeding station! It looks great in your kitchen, and seems to be exactly what we will be needing when we move this summer, but I read the comments posted there, and they are a bit frightening… incomplete/incorrect instructions, mdf warping, drawer slides breaking, food storage drawer pins breaking… eeeek! You have the skills to fix up those issues but not sure I do.
Any comforting words of wisdom?? ?
Great question, Julie! Handan read the same reviews, but we forged ahead anyway. Here’s the deal – All screws and dowels need to be reinforced with glue. Some used wood glue. Others used construction adhesive. I used a combination of thin and thick CA glue (super glue) and insta-set accelerator. The panels are MDF, so the screws would tend to get sloppy over time, especially on the moving parts. As for warping – we’ll see about that. Ditto the drawer slides. As for the instructions – they’ve been fixed, but to be sure, they’re not the most user-friendly I’ve ever encountered. As for those storage bin pins breaking – I hadn’t thought of that, but I’m hoping my other fortifications will make them last longer. It comes down to this: the station is by no means perfect, but for the price, it looks great, and with a few mods while building, it can be made much stronger.
Thanks Greg! I think we too will forge ahead as it seems to be just right for the spot we have in mind.
Been meaning to reply my thanks earlier but I finally clicked on your About Us links (after being a loyal Patch follower for years!) and got sucked in to all your amazing international travels and cross-country adventures… couldn’t stop reading them until I (sadly) reached the end! ?
You are indeed a man of many talents and blessed with the perfect partner!
Keep doing what you’re doing… there are a lot of us out here vicariously enjoying every adventure! Cheers!
Oh, good! I’m so happy you found our story, Julie! It’s the hidden gem, that only the adventurous discover, lol!
We were looking at a similar feeding station at Home Depot. However, the quality had us worried. Did you do any reinforcing or modifications?
Thanks for the update! Cheers! ?
Hi Mo! Please see my answer to Julie’s comment above.
I love you guys and your projects! But please stop referring to your wife as “The Loon”. It may seem funny but it cheapens others view of your wife and insults people with mental illness. Not trying to be PC, just a Midwestern wife with mental illness. Love your stuff, keep it up!
Hi Karen,
I’m sorry that you’re taking this as an insult to people with mental illness, but I can assure you that it has nothing to do with that. Greg calls me “The Loon”, “The Commandant”, “My Babes” and “The Old Bat” (even though I’m younger than he is) in this house, and I call him “Old Man”, “The Jerk”, “My Babes” and “The Dummy”. This is husband-and-wife banter, and since we share our lives with you guys, we share our nicknames with you too. Anyone who has read this blog for any period of time can understand how much he loves and respects me and how much I love him and respect him. We’ll be carrying on with our nicknames at home and on the blog, and we sincerely hope that you can see these terms of affection for what they are.
Have a great week ahead!
Handan
Amazing work! I was researching how to make my own bathroom vanity drawers. I have a 1980’s oak vanity and I want to replace the drawer fronts and doors with pole wrap drawers and doors to modernize it. Only problem is I don’t have a table saw or miter saw! Oh well. You make drawers look easy though.
Thanks, Patti! Pole wrap is amazing stuff – I used it to make a sliding door in our guest bedroom this fall, and I’ll be using it in a guest bath this spring! Have you looked into a hand miter saw like Stanley makes?