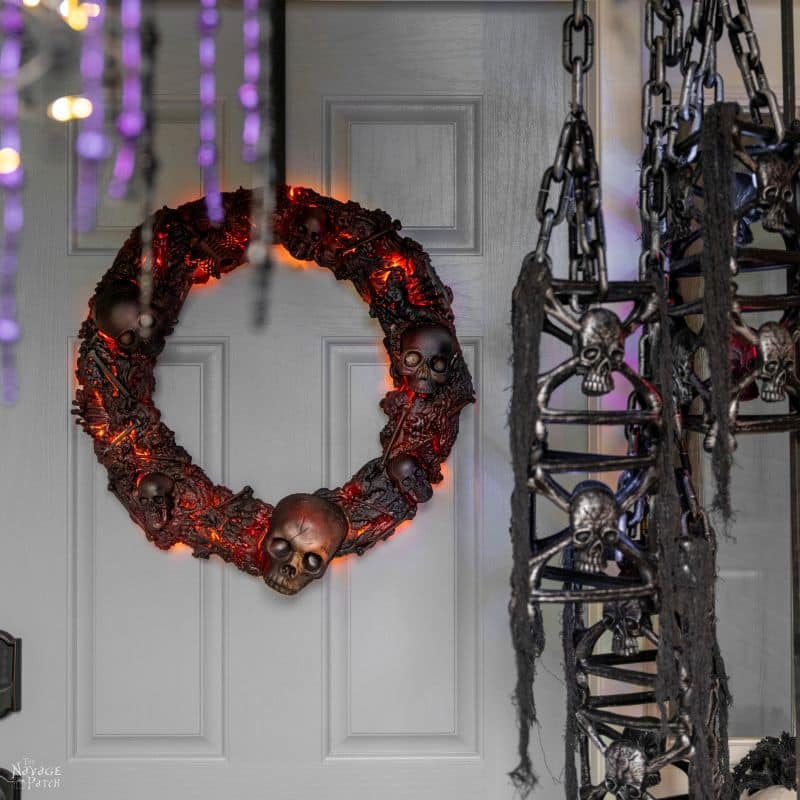
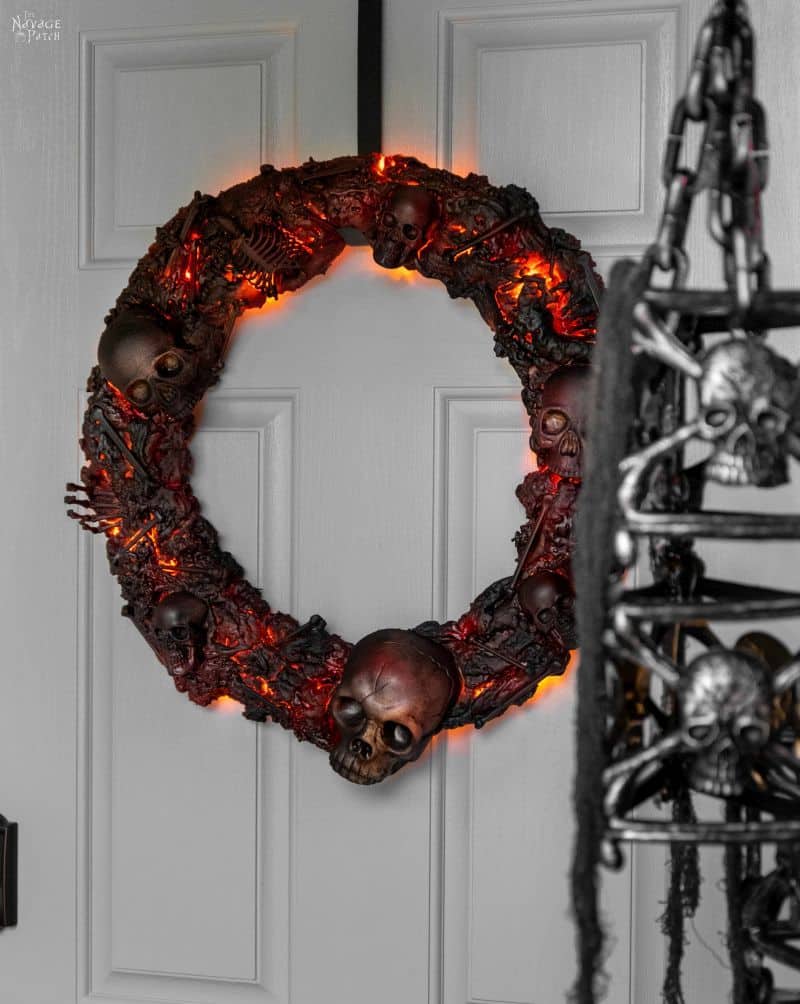
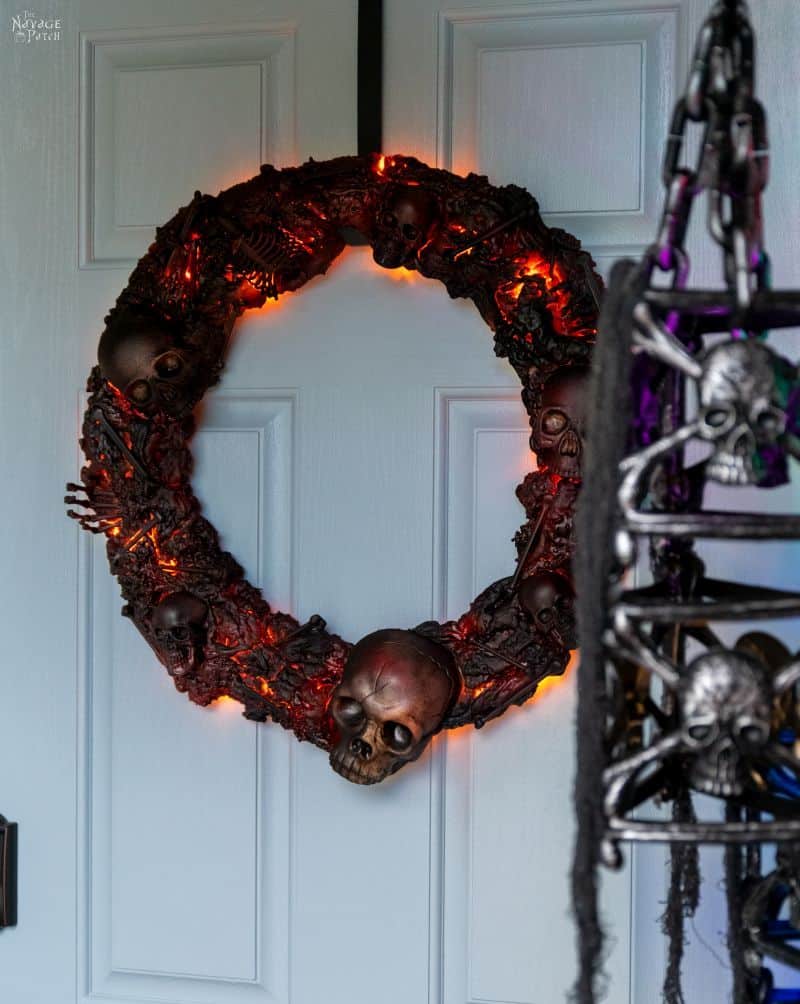
DIY Halloween Fire Wreath
This DIY Halloween fire wreath is positively smoldering! This gorgeous creation is a Navage Patch original – you won’t find it anywhere else!
If there’s one thing we’ve learned over the years, it’s that when inspiration strikes, you grab its wrist, yank it to the ground and hog-tie it before it has a chance to get up and change its mind.
Handan and I were driving to Panama City the other morning, and if your first thought was, “oh, I’ll bet they were going to Dollar Tree,” well, you’re not too far off. The primary purpose was a dentist visit, but it was all the stops after that had my babes bouncing in her car seat like a 4-year-old girl on her way to sit on Santa’s lap. Panama City is full of Dollar Trees, Walmarts, Targets and all the other things that make my babes weak in the knees. The road to Panama City is long and flat road – perfect for off-key singalongs, bouncing around and brainstorming ideas for the blog.
We’d just finished making a particular wreath the night before that was inspired by one Handan saw in Grandin Road. That wreath (which I’ll be showing you soon) had us thinking about calling it a fire wreath because of some of the brilliant reds and oranges involved in making it. And that got me thinking about making a a “real” fire wreath.
Well, fake fire, obviously – a real fire wreath would land me in jail or a hospital with padded walls. But a wreath that looks like it’s actually burning – now that would be something…new. The first image that popped to mind was Katniss and Peeta in The Hunger Games riding a chariot into Capitol City while her dress burned with cold fire.
I spent a minute trying to think of a way, but that was Hollywood CGI and not something we’d be able to recreate. Not yet, anyway. I’m still thinking about it!
Then I thought of another Halloween project we’re working on, and that’s when inspiration punched me right in the gob. I told my babes my plan, as I always do when a rogue good thought wanders into the Oatmeal Ocean between my ears. Usually my ideas are returned looking like swiss cheese after my babes has pointed out the holes and problems.
But not this time! Possibly for the first time ever, she saw no obvious faults, immediately agreed it was a great idea and started laying plans to complete it as quickly as possible. It was so simple really: wire wreath form + Great Stuff expanding foam + orange LED lights = smoldering fire wreath!
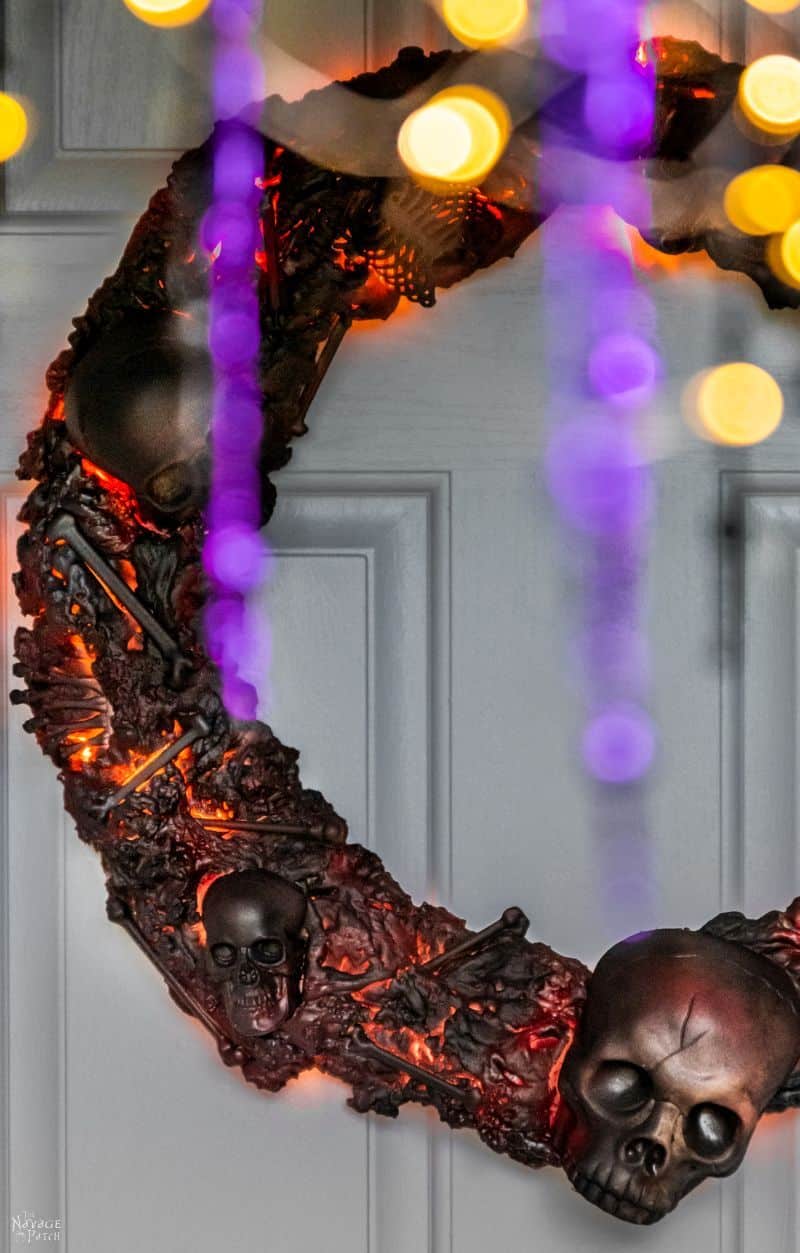
To amp up the creepiness, I’d add some skulls and bones, and to perfect the look, I’d paint it.
We had a plan for that day when we returned from Panama City, but we cleared the calendar and devoted the rest of the day (and until 1 in the morning) to making this wreath, filming it, editing the video and getting it on social media as soon as possible.
Some ideas just feel urgent, and this was one of them.
And boy, was it worth it, because this Halloween fire wreath is absolutely stunning!
Let’s have a look at how to make a wreath that no one…literally no one…else has on their door this Halloween season!
DIY Halloween FIRE WREATH SUPPLIES LIST
Affiliate links are provided below. Full disclosure here.
- LED Orange Lights (we used 2 sets of 20 LED lights from Walmart, but 1 set of 50 is better)
- Wire wreath form (Dollar Tree)
- Packing Tape (we got ours from Dollar Tree)
- Scrap cardboard
- Cling film
- Dollar Tree bones
- Plastic Skulls (we used several from Dollar Tree and Walmart)
- Expanding foam / Great Stuff (you can find this also at Home Depot or Lowes)
- Gloss or Semi-gloss Red Spray Paint
- Matte or Satin Gray and Black Spray Paint
We love to see our DIY Halloween decor out in the wild! If you make this Halloween DIY decor for your home, take a picture or video and post it on Instagram, be sure to tag us – thenavagepatch
Halloween Fire Wreath VIDEO Tutorial
Watch our short and fun video below for an overview of our Halloween fire wreath before you read the detailed step-by-step tutorial.
More Easy DIY Halloween Decor Ideas
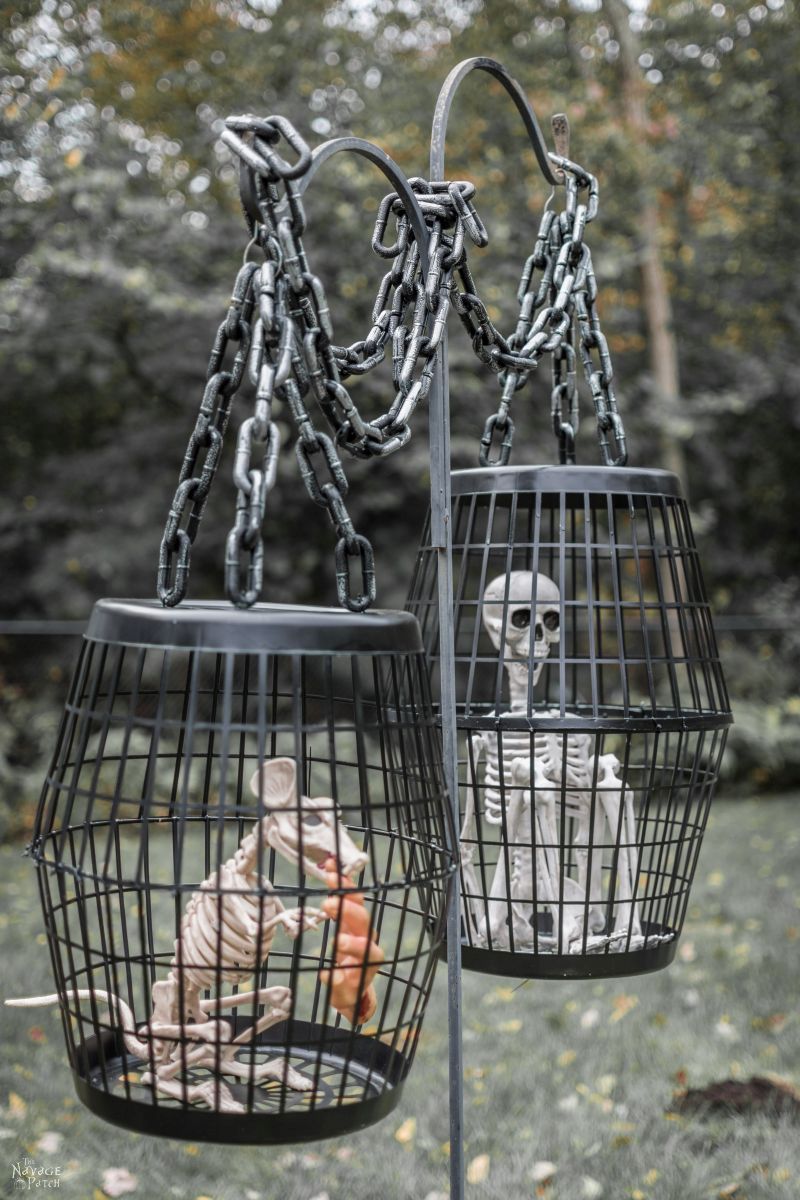

- Hanging Cage Halloween Prop
- DIY Dollar Tree Halloween Lights
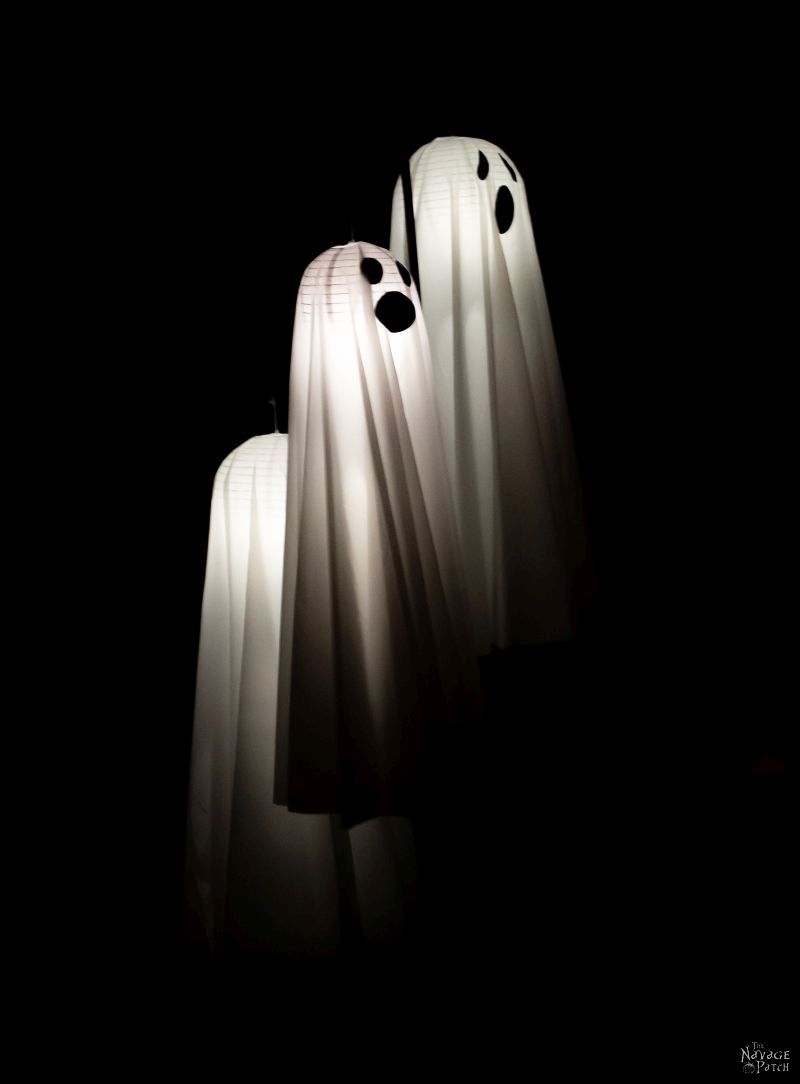
- Easy Lighted Hanging Ghosts (A Dollar Store DIY)
- Free Vintage Movie Monster Printables
- Gallery Of The Faceless – Easy Halloween Wall Decor
- DIY Cousin Itt Pathway Light
- DIY Lighted Witch Hat (Grandin Road Inspired)
- Apothecary Jars And Free Printable Labels
- Free Vintage Witch Printables
- Floating Potion Bottle
- DIY Witch Legs (Grandin Road Inspired)
- Dishes Of Darkness: Pottery Barn Inspired Halloween Plates
DIY Halloween FIRE WREATH TUTORIAL
Step 1 – Wrap the LED lights
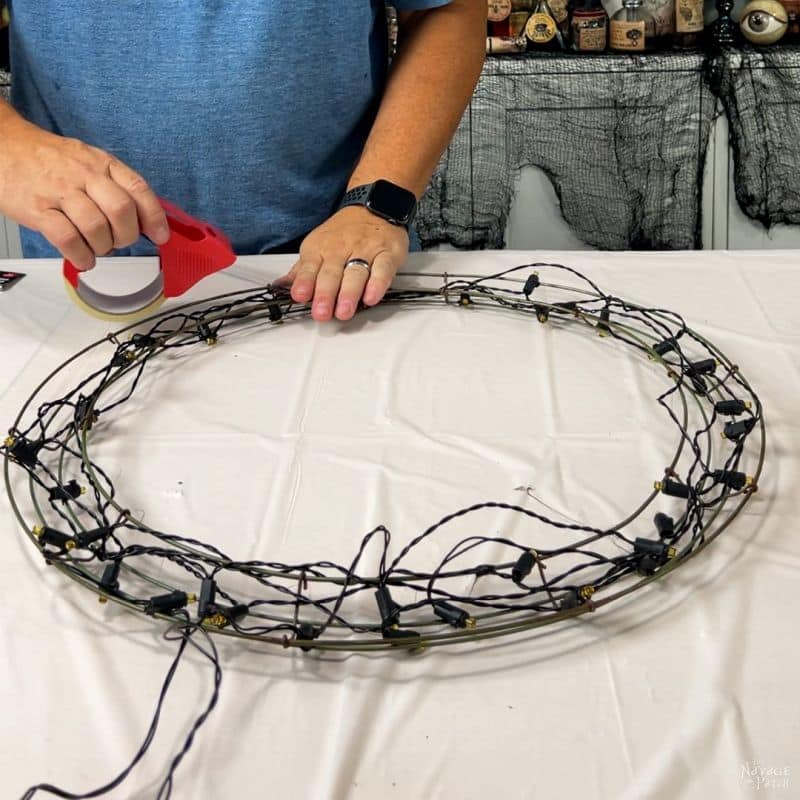
I placed my wire wreath form face-down on the table. To start wrapping LED lights, I first tied off one end to the wreath form. You could also use a dab of hot glue.
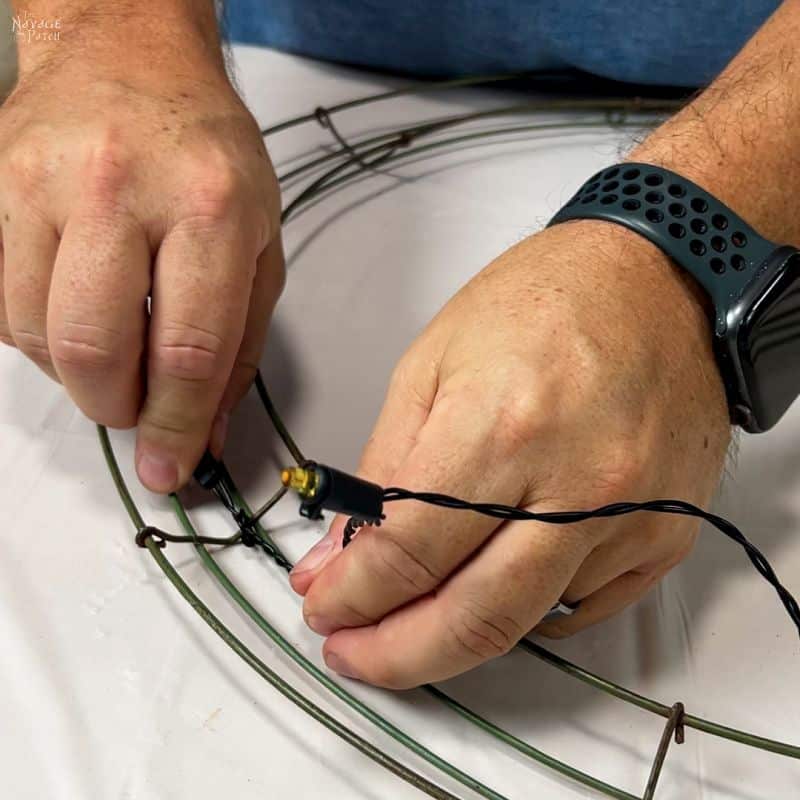
I wrapped two strings of lights around the form. For the first string, I started at the end and worked my way around to the battery pack. For the second string, I started with the battery back side, since I wanted both packs to be in the same place with the same amount of cord leading up to them. It’s probably easier for you to start both strings from the battery pack end and wrap that way.
To keep the LED lights from shifting while I wrapped, I used a little hot glue here and there to hold them in place.
The key to this wrapping is randomness. Don’t try to evenly space the lights around the wreath form. A smoldering fire will have bright spots, and that’s how you want your wreath.
It’s a little hard to understand from the pic below, but I’m starting the second strand of lights, and I’m making sure the two leads that go to the battery packs are together.
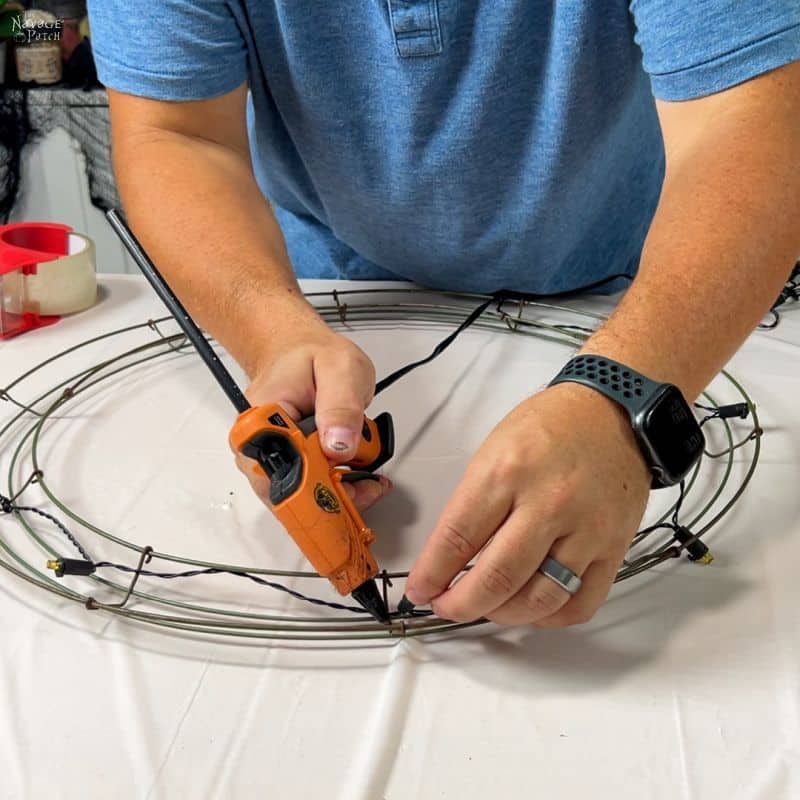
Step 2 – Tape the LED lights
When I finished wrapping the two strands of lights, I ran some packing tape over the lights. This was just to keep them in place when I flipped the wreath form over and sprayed the foam.
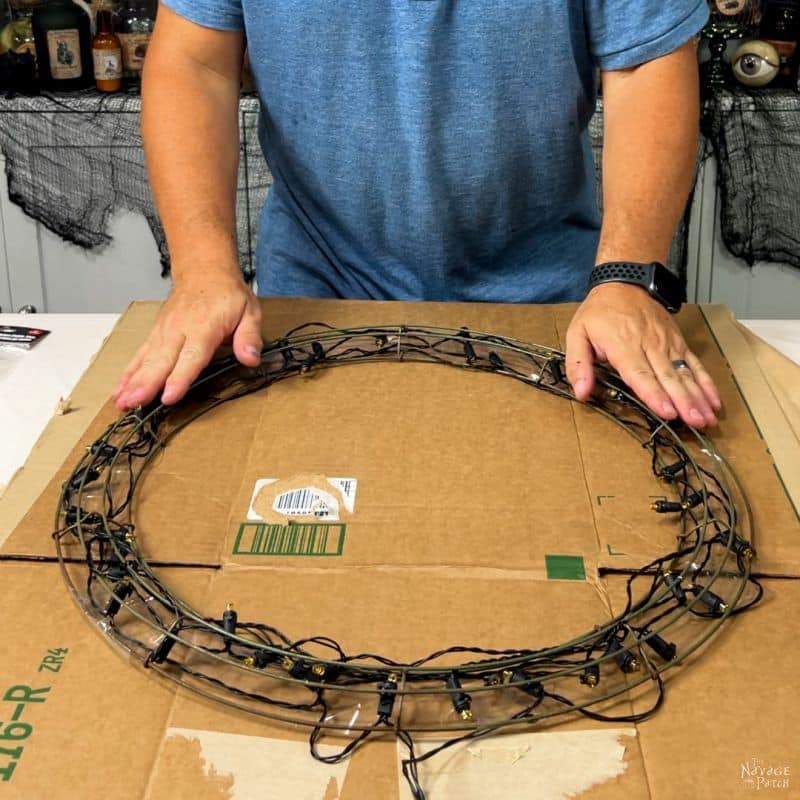
I then placed the form right-side up on a piece of scrap cardboard. The cardboard not only contains the mess of the Great Stuff, but it makes it much easier to transport the wreath outside for painting.
One thing I should have done that you should definitely do: place cling film over the cardboard. This will prevent the Great Stuff from sticking to the cardboard. When everything is dry, removing the cling film will be a breeze.
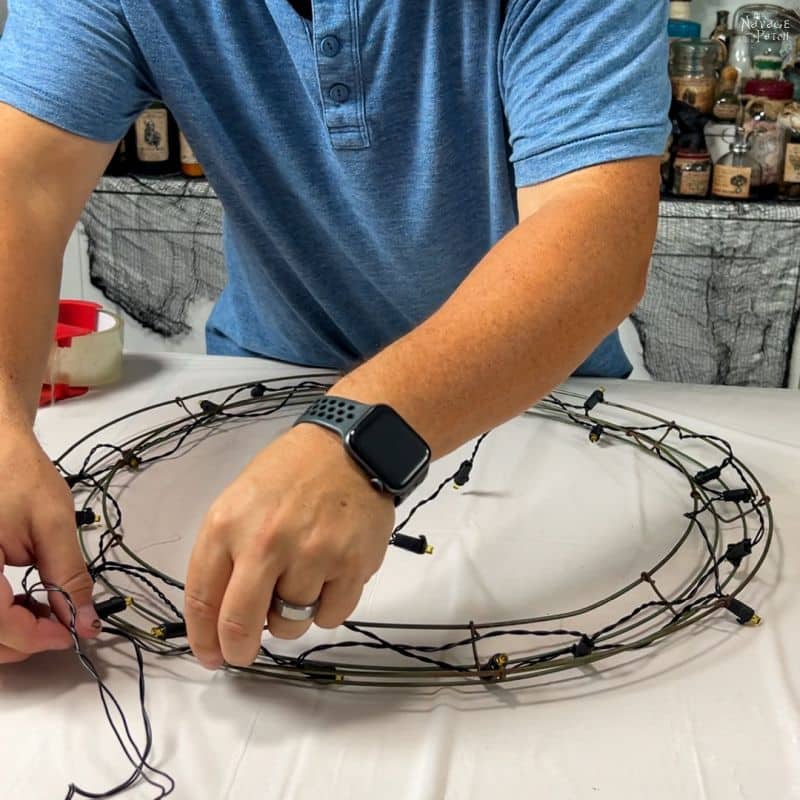
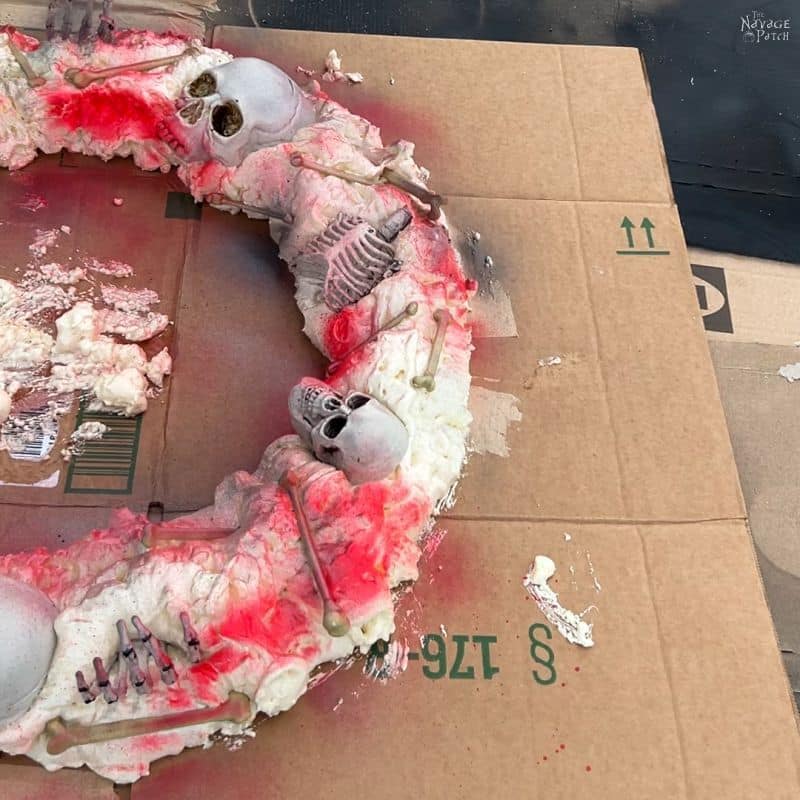
Step 3 – Prepare the skulls & bones
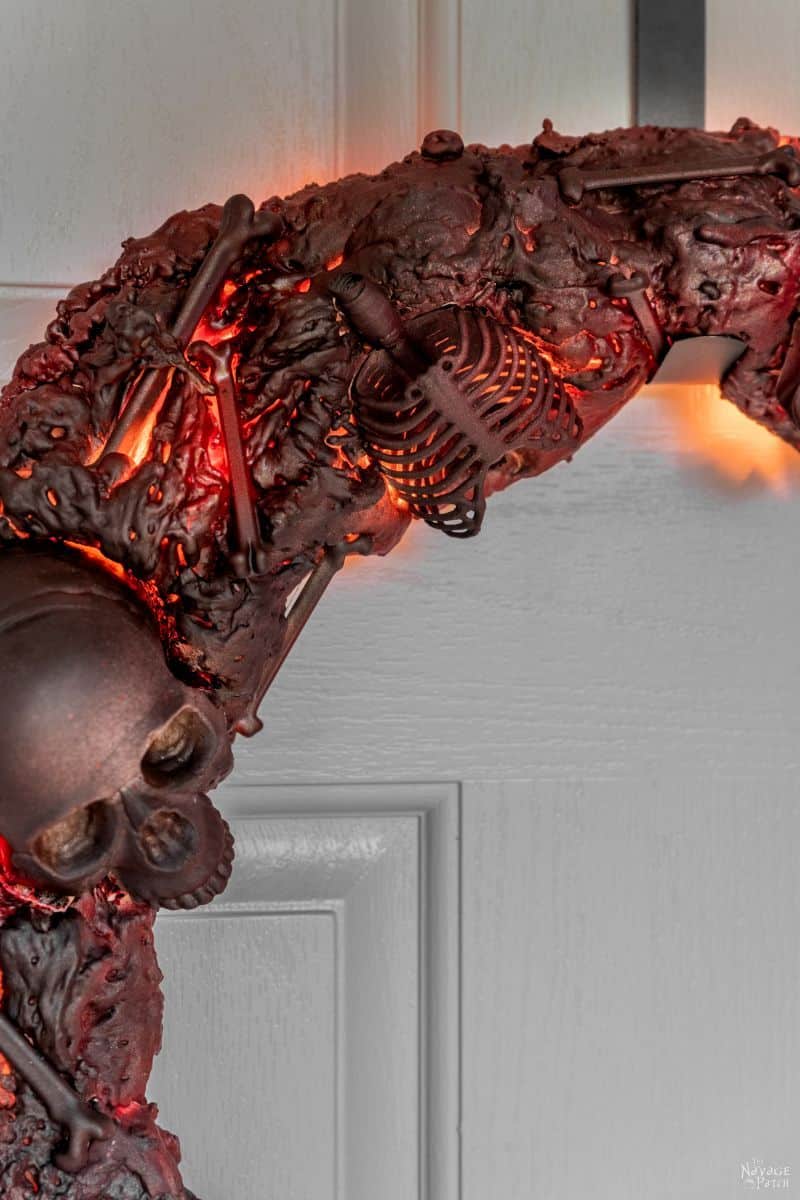
Before foaming, I first rounded up the usual suspects to see if they’d fit the bill for this Halloween fire wreath. I wanted an assortment of skulls and bones – I just had to figure how much of each and where to put them. The foam hardens quickly, so I wanted to lay everything out on the form first and then take a picture for reference.
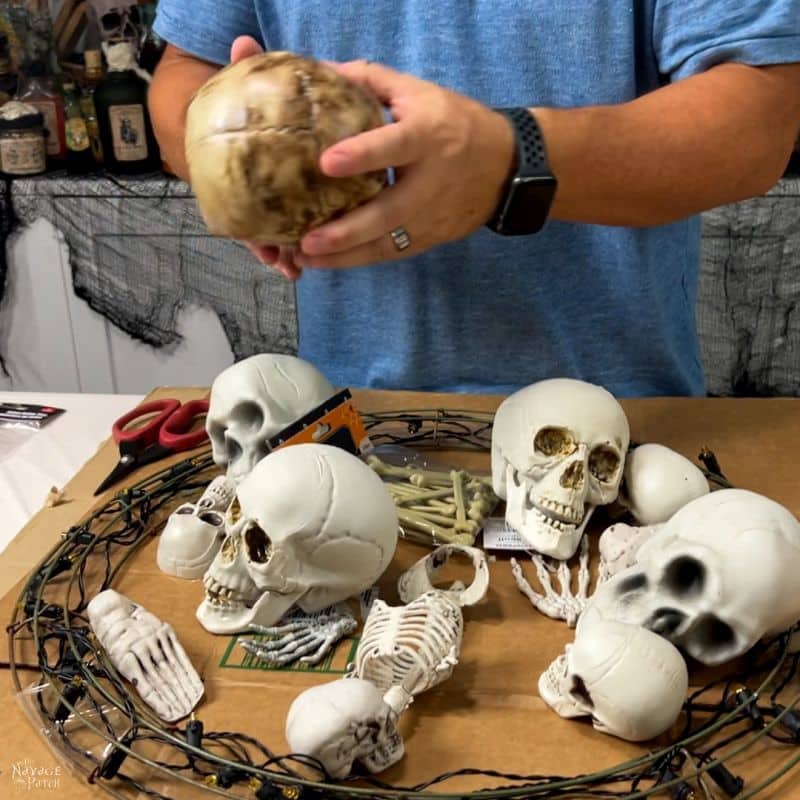
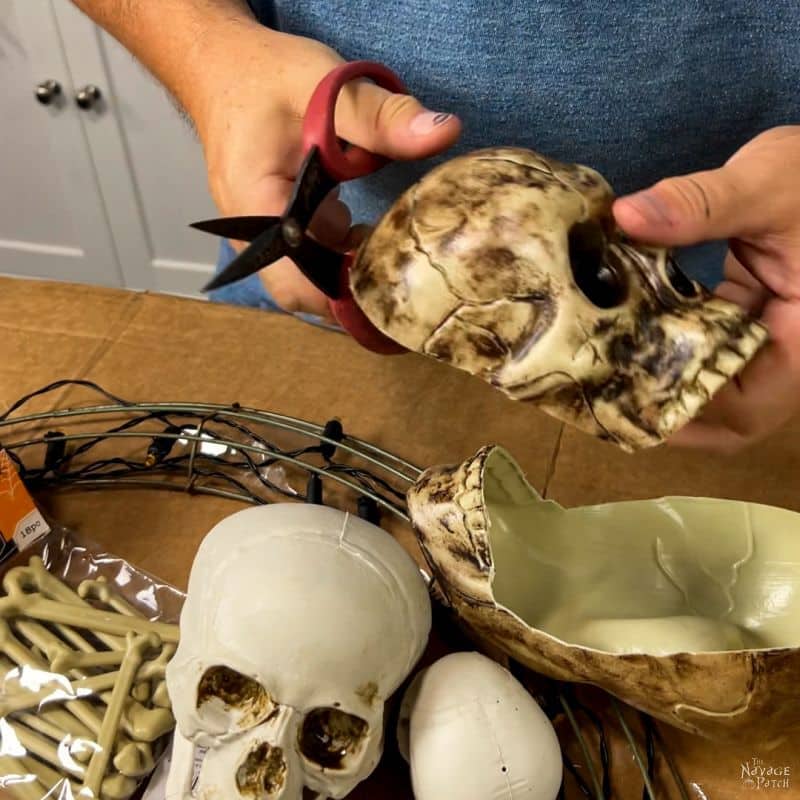
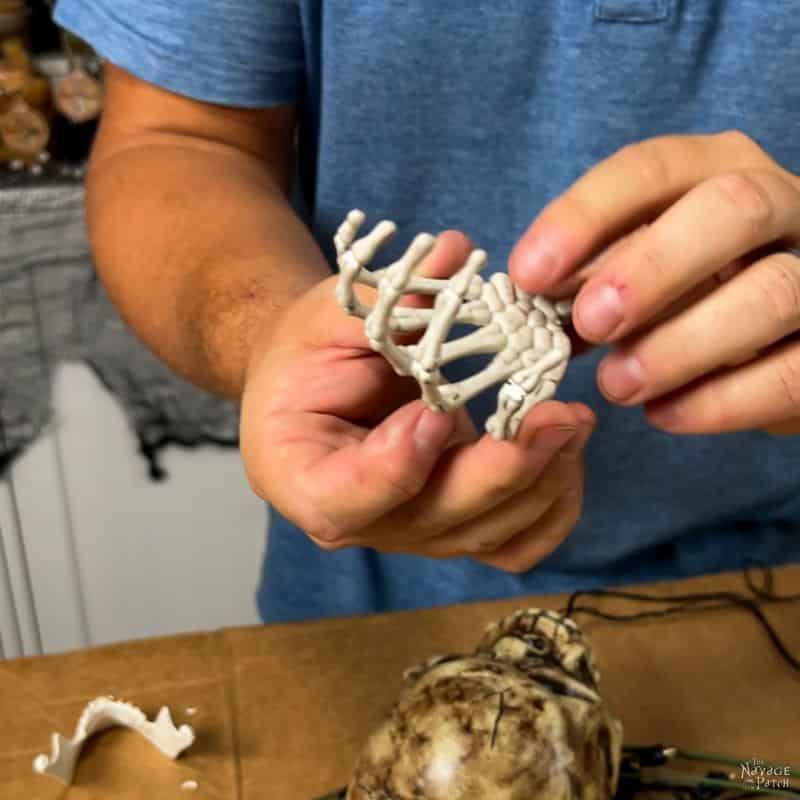
Full skulls would be too big, so I cut them in half and removed the lower jaws. Jawless skulls are way creepier than their jawed brethren!
I had a couple Dollar Tree hands that were flat as paper – totally not creepy! – so I broke all of their fingers at each knuckle and curled them a bit. To keep the shape, I put a dab of hot glue on the back of the knuckles where I’d broken them. All will be painted in the end, so I just used the black glue I had loaded in the glue gun.
Step 4 – Arrange the bones on the un-foamed form
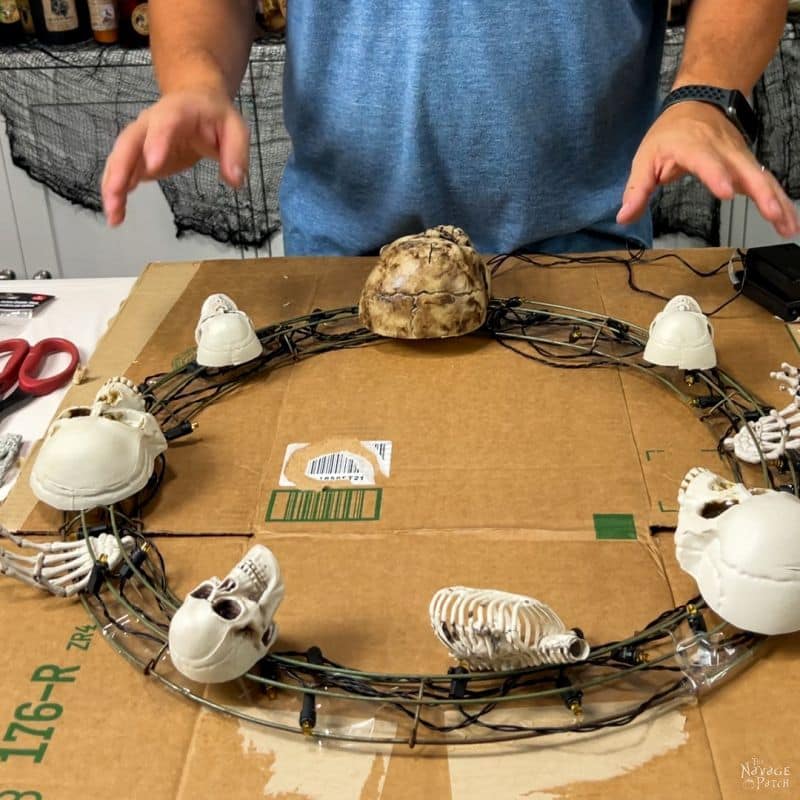
I laid out a mock-up of the final skull placement (minus the small bones I’d place after foaming). We didn’t want to cover too much of the foam so the fire would still show, so we kept the arrangement minimal.
Step 5 – Put on your PPE
I put on nitrile gloves and safety glasses before spraying the Great Stuff. You do not want this stuff anywhere near your eyes or skin! Keep a few pairs of gloves at the ready. If you need to shape your wreath, you’ll need to change into a new pair before attaching the skulls and bones.
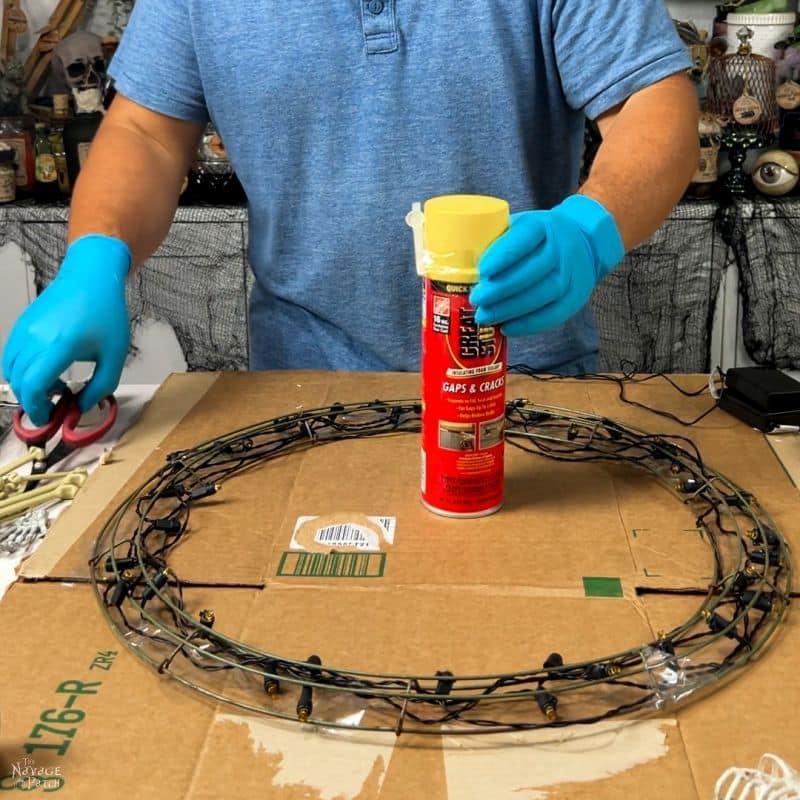
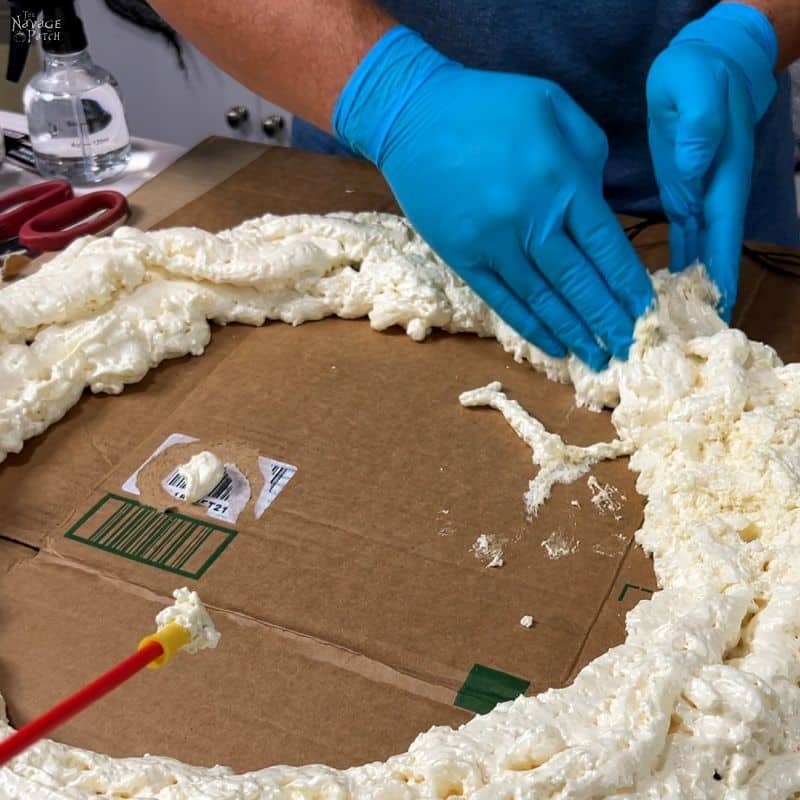
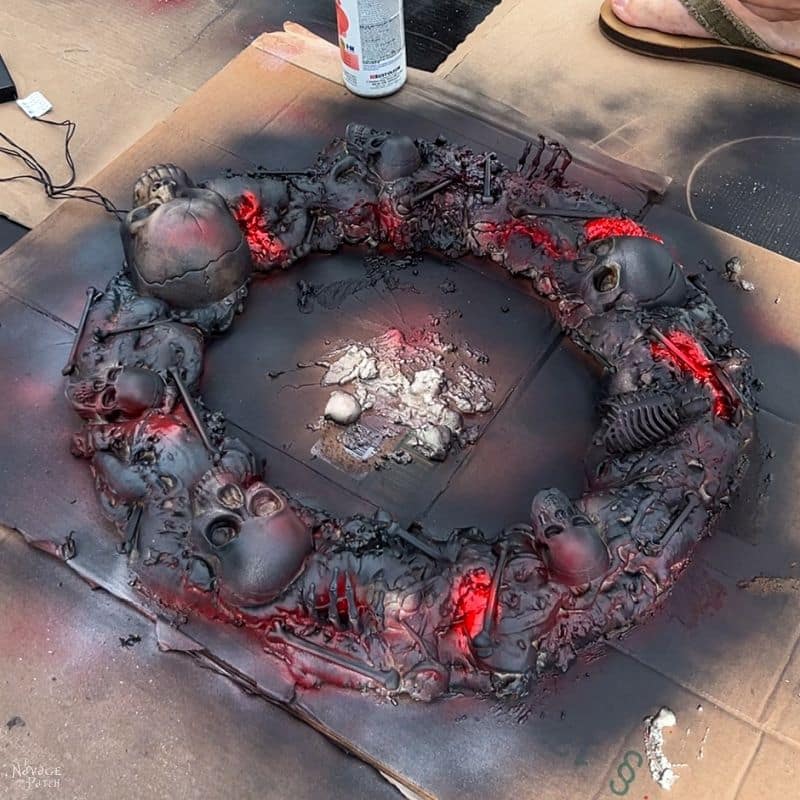
Step 6 – Spray the foam
I started filling foam inside the wreath form and then built upon that. You can see in the pic below I had a little too much in one area. That’s okay, I shaped it with my hands after I finished foaming.
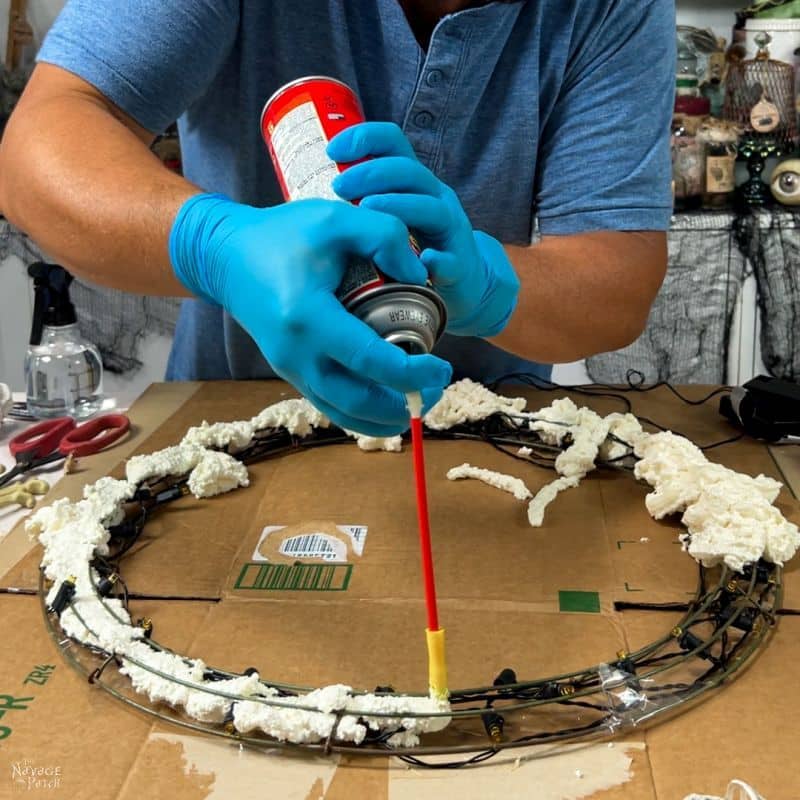
The foam started to harden quicker than I thought it would, so it’s best to do this step as quickly as possible. I lingered on this part, not realizing the foam was developing a skin.

I pulled some foam away from the side I sprayed too much on. Don’t worry of your wreath looks nothing like fire but instead looks like a terrible mistake and good god how did I let myself get talked into this! All will be fine, and it’s going to look amazing!
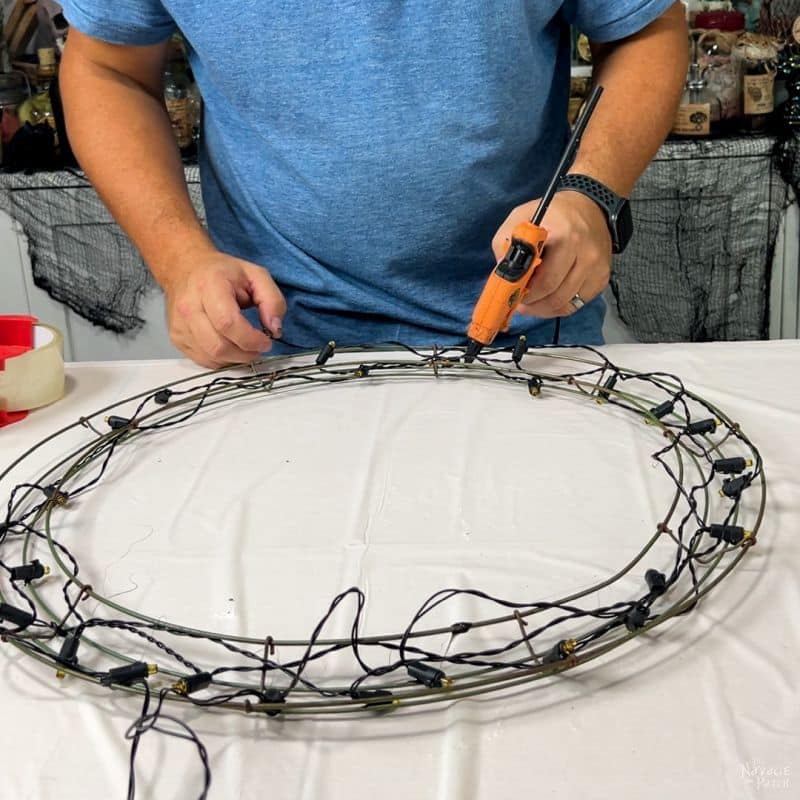
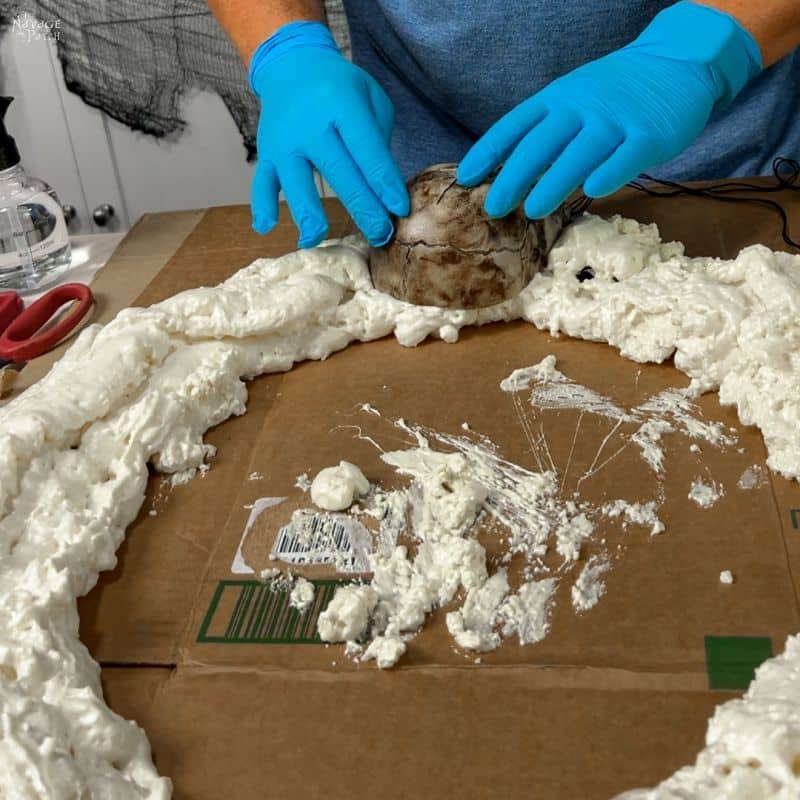
Step 7 – Arrange skulls & bones in the foam
Working quickly, press the skulls and bones into place.
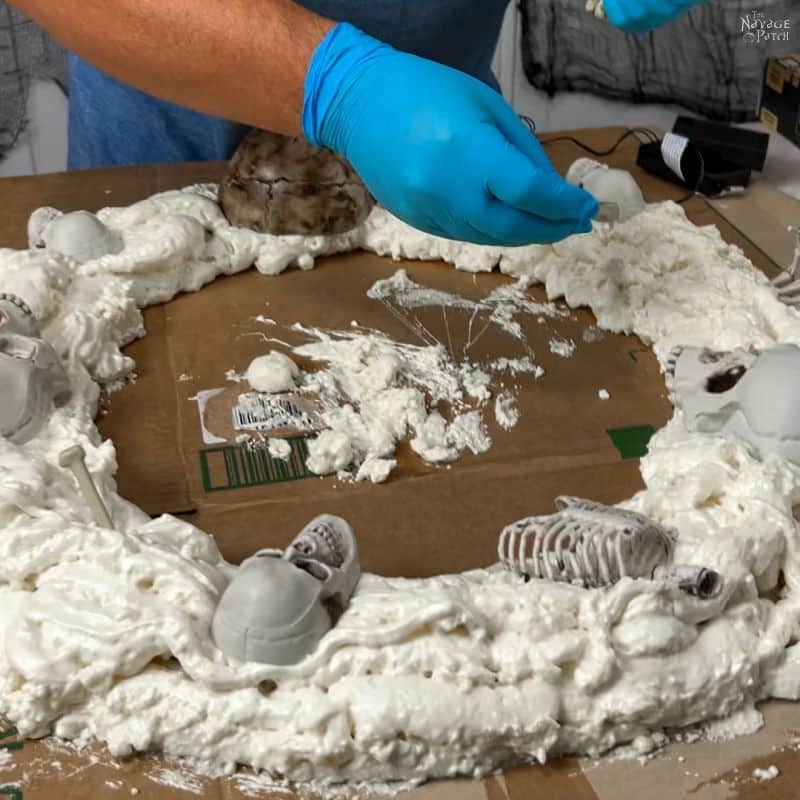
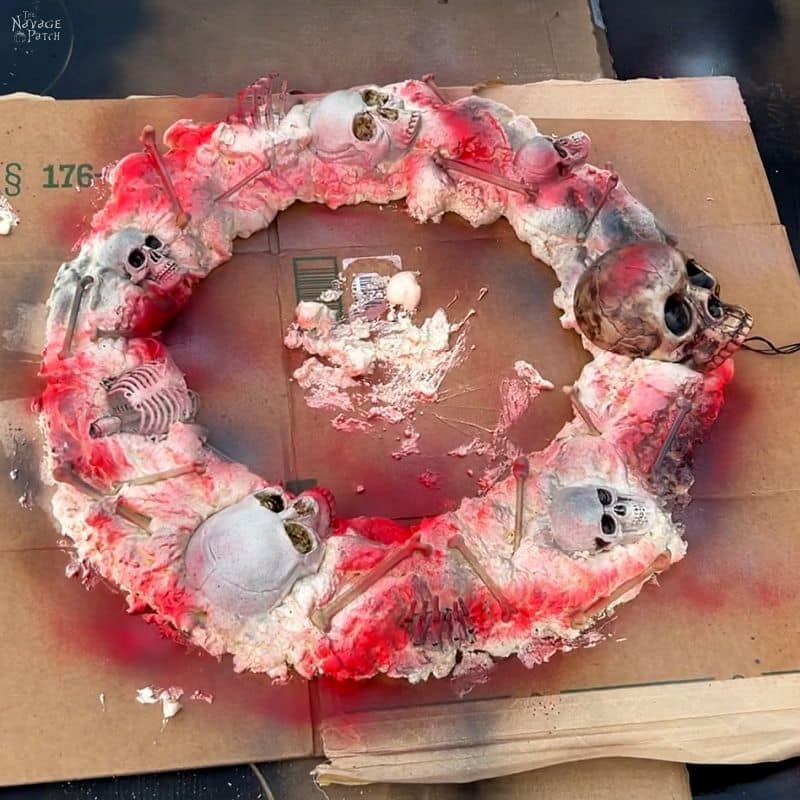
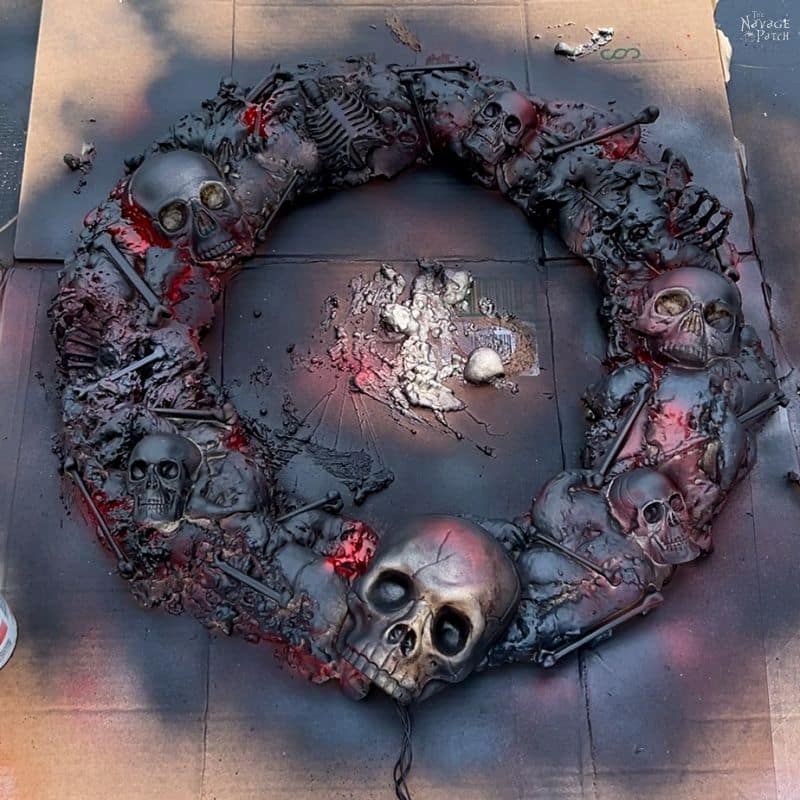
Step 8 – Let foam harden several hours or overnight
You may think you’re good to go after a few minutes (like we did), but trust me, that foam is still slowly moving. Next day I had to touch up with some paint because we rushed, and the foam kept expanding revealing unpainted foam around all the skulls!
Step 9 – Hide the battery packs
I nestled the battery packs into the back of the wreath form by cutting out a section of wire and then slicing out the hardened foam.
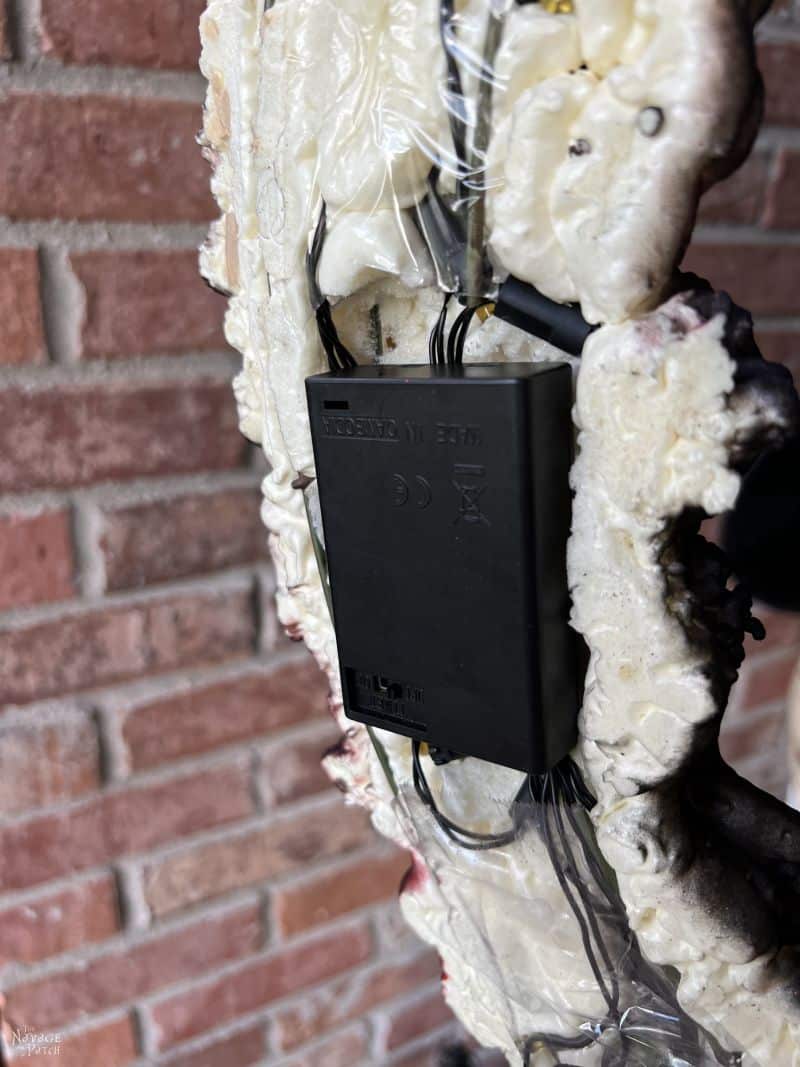
These wreath forms have pretty thick wires, so I used a pair of mini bolt cutters to easily snip them. These guys come in handy on a lot of projects. They’re worth having around!
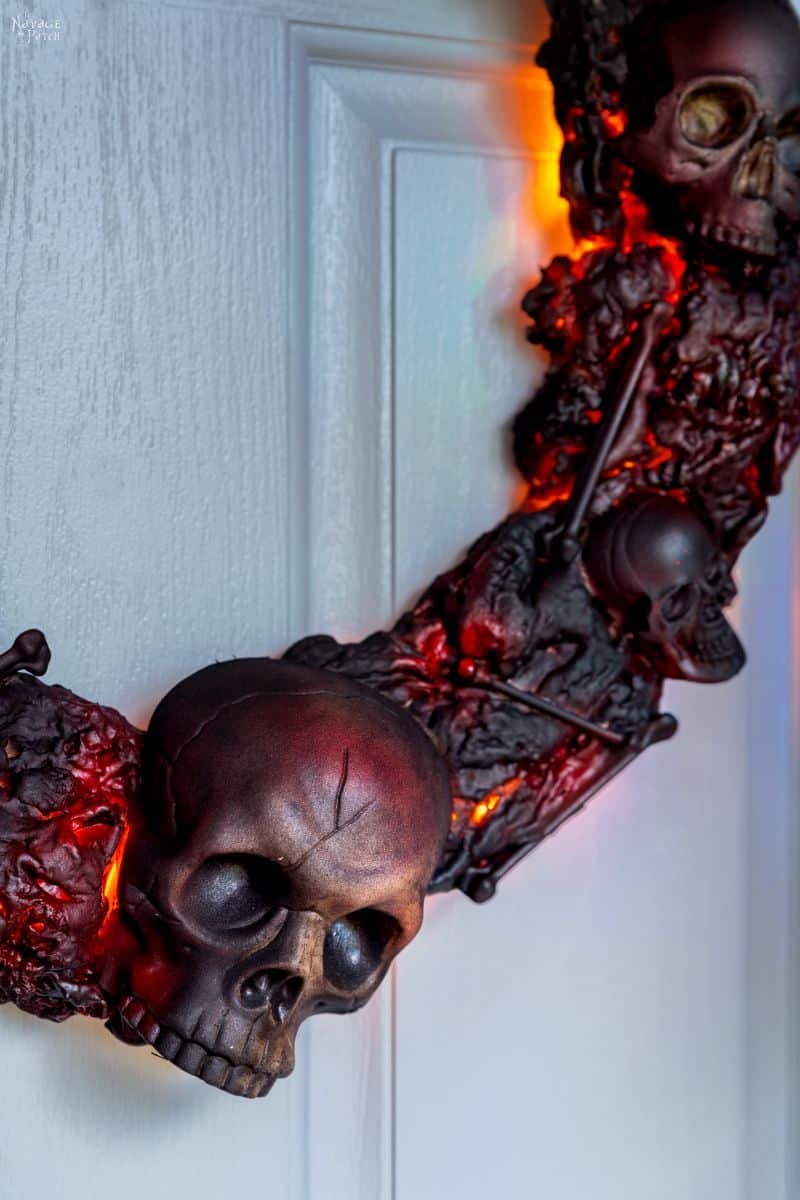
Step 10 – Paint
Here’s where the magic happens! I used glossy red paint, satin dark gray and matte black. You can use whatever you have, but I do recommend keeping the red glossy and the black matte. I used the gray least, so it probably doesn’t matter.
I started with red and sprayed it randomly here and there. I’d never done this before, so I really didn’t know what to expect.

After the red, I followed with gray. You don’t need to give any time between colors or coats.
Then I started in with the black.
This painting process took multiple runs with each color.
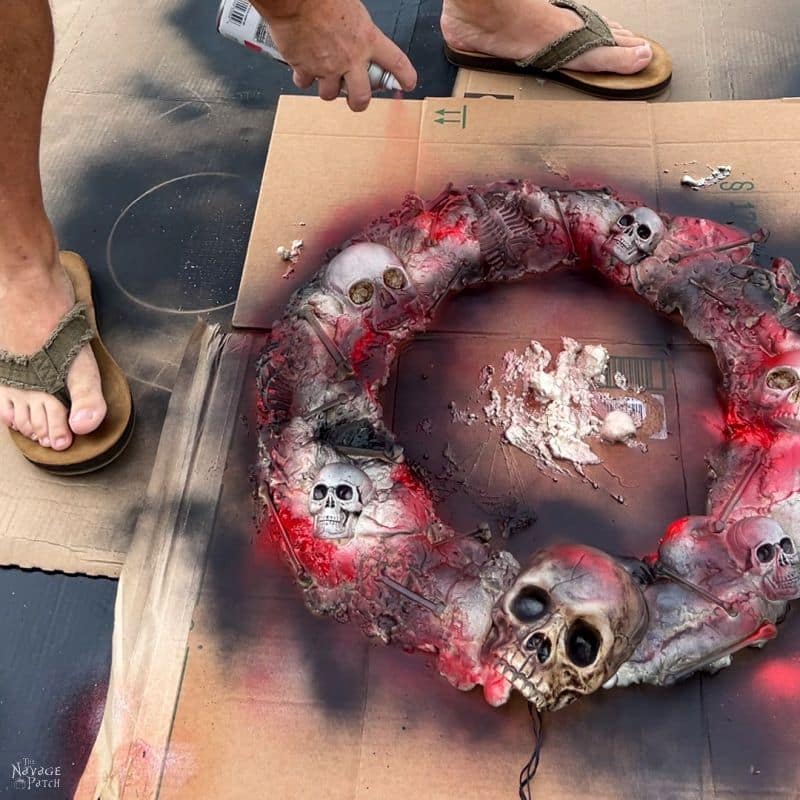
Back with the red…

Now more black.
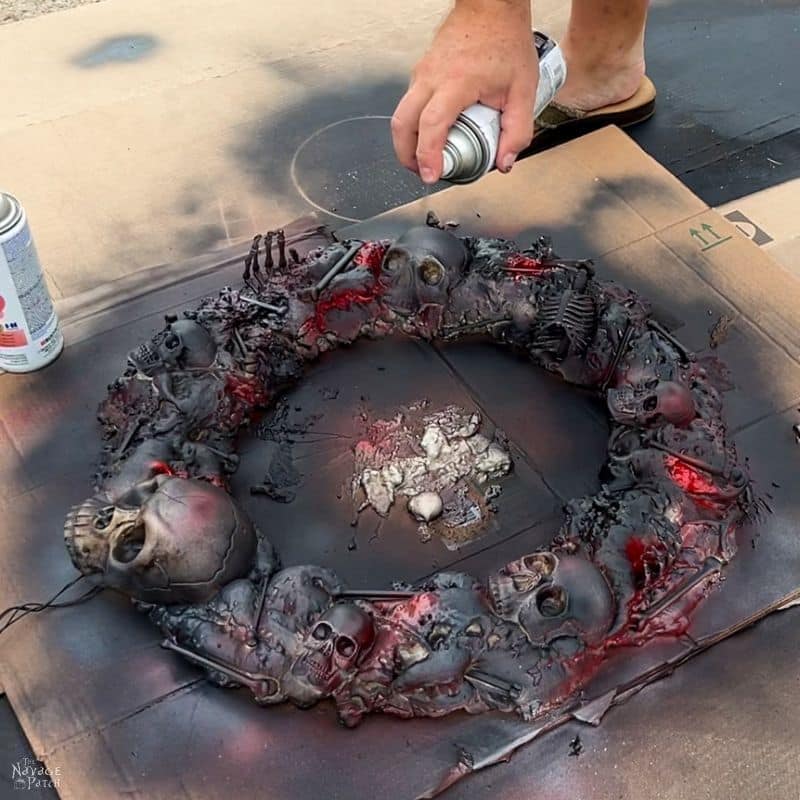
More red…
Making some deep red highlights…
Muting the red with gray and black.
Painting is the part that may give you the most apprehension – I know it did for me, until I started doing it. Here’s a video of the entire painting process in real time to give you a better idea of the layering process. Don’t worry, it’s not hard!
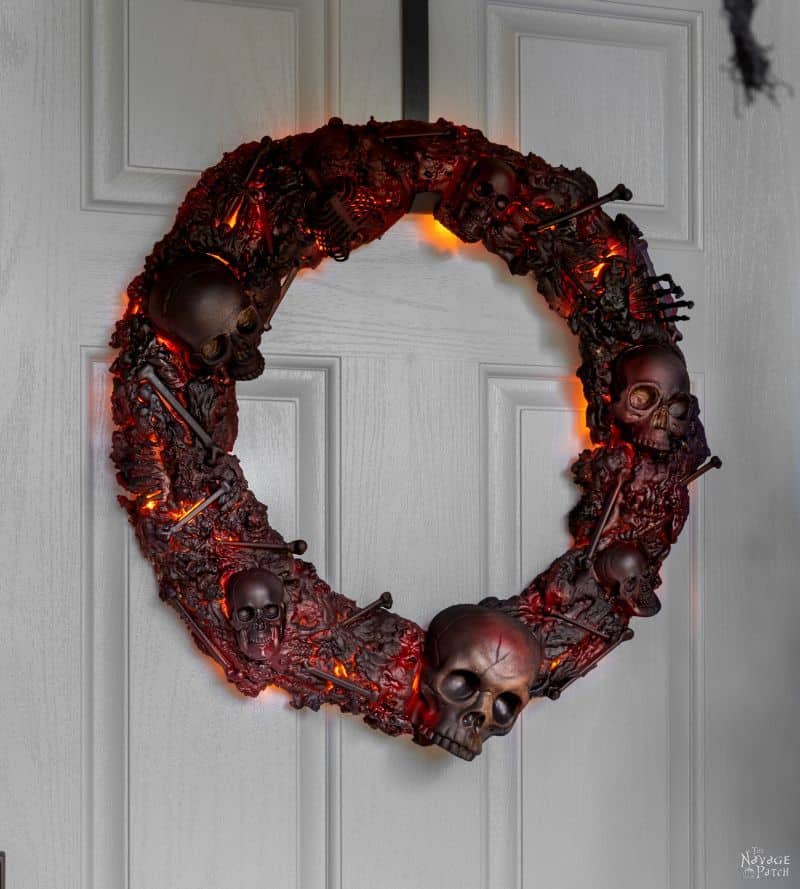
And here’s our finished DIY Halloween Fire Wreath!

It’s not visible from the pictures, but when I set the lights on pulsating mode, it looks like real fire!
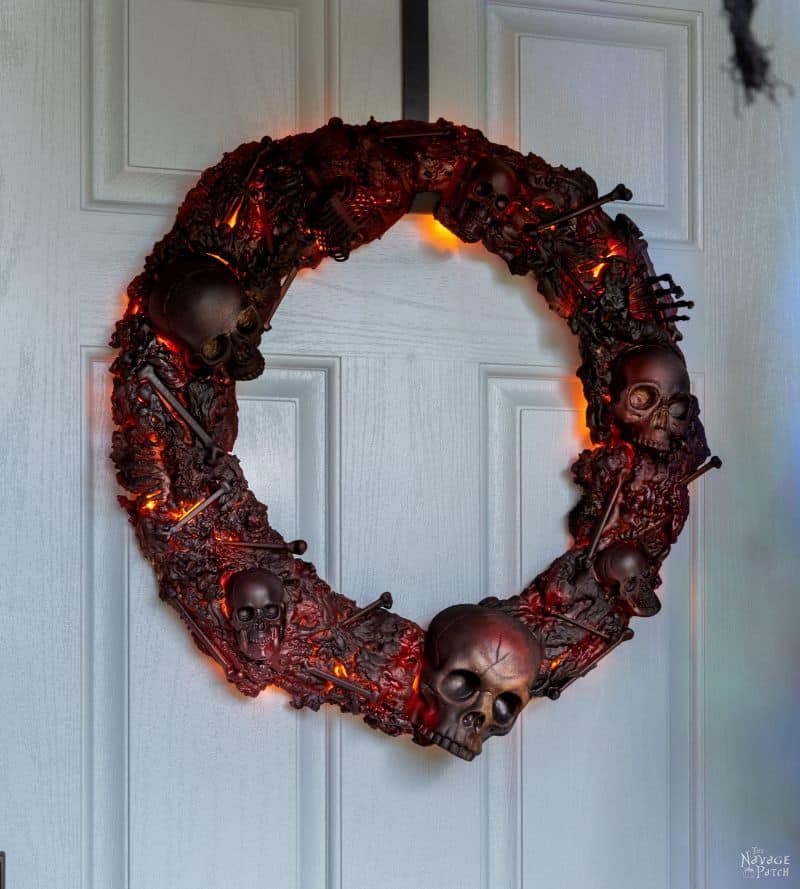
If I had to make another one, I’d cut holes in the eyes of at least one of the skulls to let the fire glow shine through. I still can do it with this one – it’s not too late!


Can we see where you put the battery packs?
Yes! I’m out now, so give me a few hours. When I get home I’ll post a pic of how we hid it! 🙂
Check the post, Malea, I’ve updated it with this information!
Very, very scary!! And so clever!!
Thank you, Anne!
THIS is freakishly awesome!!! But, I , too would love to know where you put the battery packs. Thanks for helping us with our DIY’s.
Thank you, Natalie! Check the post again – I’ve put that info in there!
Wow-Spectacular design and fabrication!
Hints of Dracarys afterburn.
Really really impressive and exciting to see ….please forgive me….not-a-gnome decor fan!
Thank you, Karen! I know gnomes aren’t for everyone. We try to have a good mix of cute and creepy this time of year!
This is friggin’ amazing, sir! I never would’ve guessed it could glow from behind the foam! With this and all of the other spooky skulls that are going to be hanging out I want to say it gives a Vlad the Impaler’s lair vibe but these days I probably would offend someone by saying that but I said it so, there it is. You know what I mean though. 🙂
Lol, you can never offend us, and I totally agree with you, Anna! It’s really amazing to see how the lights glow like fire. Vlad would be proud! 😁
Love it. This is the best kind of project–one that takes all day (and half the night) because it’s just so fun to get caught up in the creative process. But I have a question for clarification. You used the Gaps and Cracks spray foam, which I think is the one that expands to a smaller size (there are other varieties that expand a LOT more for larger spaces). Am I correct on this one? Seems like the formula with the smallest expansion would be best suited to work with the wire wreath form. I kind of what to make two of these–one with bones, and one with rubber snakes coming out of it. Thanks, Greg!
Thanks, Deb! I debated on which foam to use and ended up deciding the regular gaps and cracks. It did a great job, but maybe big gaps would also work well? I’d you try it, let me know!
As we saw here in NE, that is wicked cool! I love it. Best Halloween wreath ever.
Definitely wicked cool, lol! In California it’d be hella good 😂
Dude 🔥🔥🔥🔥🔥 I love it.
Thank you, Cheryl!
WOW! I’m not big on Halloween decor, but I will be making this for my front door! Awesome job!!!!
Thank you, Lizzy!
Greg, You and Handan never cease to amaze me. You definitely have outdone your self on this project. I can’t say enough about how awesome you did with this. I love all your projects but this is IT.. so love all your projects and have even done a few myself and even got my hubby involved which was a miracle in itself but we had fun doing it. We are here in Tallahasse,fl and don’t think anyone here will have one but I sure am going to do my best and will post a picture. Keep up the good work
Hey you’re practically our neighbor! Thank you, Diane – we knew we had a winner with this one! Send pics if you make it or post to IG and tag us! 😁
I LOVE IT! But I think if I was to make it, I might be tempted to add crime scene ribbon to it in some fashion. 🎃🕵️👮🚨
LOLOLOL! I love that!
Oh, my! You certainly achieved your goal on this ‘smoldering’ wreath! It’s absolutely stunning and I’m not big on Halloween, but I do favor this project! Parts of that technique, I think, would apply if making a fire for a cauldron of Bat and Eye of Newt Stew. Thanks for sharing your combined creative genius!
Oh yes, Rebecca, it would be a perfect technique for a witch’s cauldron! 🙂
BRAVO!!!
Thank you, Cecelia!
Watching Handan’s “delegation” finger in the video cracked me up!🤣 This project looks super easy and creepy too! Great Stuff really is great stuff! I’m working on a giant spider for my yard (or roof) with that stuff😁 thanks for the tutorial! Never too early for Halloween!!!🤪
I know, right? That finger is never far from the action, lol! Send pics of your spider – we’d love to see it!
Simply WOW … you’ve really knocked it out of the park with this one!!!
Thanks, Debbie – we’re thrilled with how well it turned out!
You are a crafting genius, a project super hero and a design wizard. This wreath is beyond next level. Thank you for sharing
Wow, thank you, Gail! I keep telling Handan all those things, but she just keeps rolling her eyes! 😀
This is so freaking good!!! I love it!!!
Thank you, Lindsey, we kinda think so too! 🙂
I love it!! Very creative and spooky.🖤💀☠
Thanks, Pam! 😀
Absolutely love your take on the burning embers. Loved it so much that I just had to forward the link to a friend whom love the faux fire under my witch cauldron last year to show her how she could use a similar idea without having to do the whole witch-cauldron-fire thibg. Maybe not such a great idea as she begged me to make her a wreath « just like his ». If you want the bones and skulls to pop a little more, may I suggest a little dry brushing with white and black.
Thank you and yes! -dry brushing would be awesome! There is so much more you can do with this wreath. I had the idea and rushed it to market. If I had the time to spend – oh my, the things I could do! But that’s why you guys are so awesome – you come up with all the good little improvements and share them with us and everyone else, and we thank you for that! 🙂
Best. Wreath. Ever. And I do like gnomes :-). My 27 y.o. son lives on his own now and won’t let me decorate for him. THIS he might let me do. Thanks!
Any mom who makes this wreath for her son should have a statue of her erected in her hometown! 😀
Halloween is my favorite holiday, love reading your blog.
You guys create the coolest stuff!
Thank you, Cole! It is our favorite, too! 🙂
Love it!! I am so making one or several! Thank you!
Thank you, Trish!
Once again, love this wreath!
Question, did you remove the pointed end of the bulbs on the light strands? Both, the Amazon and Walmart lights show pointed ends. Just want to confirm.
Ah, we didn’t – they came like that. The ones we used came from a physical Walmart – we linked to ones sold online only. It makes no difference which style you use – as long as they’re LED!
This has got to be one of the neatest Halloween wreath ideas I have ever seen! I love the look of the burning fires of Hell! 😜 I have a bit of rattle-can phobia from some previous failed projects, but this project looks like I might have a chance of making it look somewhat like your original vision, even with my shoddy painting skills! Thanks so much for sharing all your great Halloween projects!!
Thank you so much, June! I was actually terrified of the painting part, but because Handan wasn’t the one painting and therefore had no fear, she just directed me to keep adding keep adding keep adding, lol! That’s precisely why I added the 10 minute video at the end showing the painting in real time. I figured I’m not the only one who might be nervous about the painting part.
You are absolutely right. This the best wreath you have ever made. Seriously creepy cool. Well done! I want to go right out and try one. I bet it would be easy to carve out holes in the eye sockets with a Dremel.
Definitely, Lyn, and that would add another layer of creepy fun! 🙂
Along with everyone else – I loved this! Genius, Greg! Hope Handen doesn’t get too jealous. I love, love, love Halloween, and haven’t decorated outside for two years, because I’m the house to come to for spooky-grab-your-hands-treats at the front door. I figured if I don’t decorate, and leave all the lights off, they’ll know not to come. I was trying to stave off the ick from spreading. I hope I can do all the decorating this year, so I can have Halloween back! I’ll try one of these on the front door, or maybe under the cauldron full of candy on my lap! I’ll have to work on that one! Thanks so much for this awesome and inspiring idea!!
Thank you so much, Patty! It’s a great year to re-discover Halloween. Good luck with the wreath (and the kids!) 🙂
I love this! Running out to get supplies. Is it possible to add too much paint? Is the glow coming from areas that didn’t get hit with paint?
Thanks, Rhonda! Yes, it is possible to add too much, but I wasn’t sparing with it. The glow is coming from areas that were painted.
I think this is your best spooky idea yet! Not only is it scary from the skulls & bones painted black, but it looks like real fire!! Yikes!! Way to go, Navagepatchers!
Thank you so much, Charlotte! We had a lot of fun making this one!
This is AMAZING!
Thank you, Claudine! 🙂
Great job! This is the best one yet!
Thank you so much, Shannon! 🙂
Greg, is the wreath a 14″ size?
Hi Diane, it’s 18″ 🙂
Wow! That looks great and pulsating lights coming out of the eyes would look awesome. I bet you could use this same technique to make little fire lanterns to put on wreaths and little firewood logs for those Christmas villages that people put up every year. I don’t know how or where you guys get your ideas but they are always great. Thanks for sharing with us.
Thank you, Mona! Yep, there are so many applications for Christmas, and we’ve already got a few brewing! 🙂
Is that a 12″ or 14″ wreath?
I found it, 18″
This is fantastic! Love that red glow. I bet with the slowly flickering lights it really would look like fire. I might’ve just hit some of those skull and bones pieces with some very subtle dry brushing, just to differentiate from the “lava” rock. A more charred and blackened bone look, rather than fiery black lava rock look. It is definitely something I’ve never seen before in Halloween decorations – I’ve actually seen a cosplayer do something similar, funnily enough! Demonic sword, hellfire, yada yada. Looked great when the stage lights went down as I’m sure your wreath will literally spring to life as soon as it’s dark. Great work, guys!
Oh, yeah, Jay! We’ve just presented the idea – those with artistic/air brush skills can take it next level. The flickering lights would also be great and something I’d definitely do on another go around!
Ohhh. Use the doll baby heads, arms and legs.
While I agree with you wholeheartedly, there are certain persons who may or may not be very close to who absolutely refuses to decorate with baby doll parts – even for Halloween! 😀
Hi, This wreath turned out great thank you for sharing. It is also good to see your posts again. This one showed up in a Pinterest E-mail I got 🙂
Thank you, Leslie! 🙂
Made one, well I made 2. The first one I used the dollar tree size wreath, but it was two small. ( I used that one for the skull stacking planter). I used a 20″ wreath and it looks great. Thanks for all the ideas. Now on to the stirring cauldron and finishing up the skull stacking planter. Wish we could include pictures.
Awesome! Send pics to greg@thenavagepatch.com!