Pantry Makeover Reveal
It’s time for our pantry makeover reveal! We transformed our poorly-designed pantry into a storage wonderland with floor-to-ceiling shelves!
If you haven’t already, check out the pantry makeover plan and first steps!
Betrayal, madam!
This pantry makeover project was marred by insidious betrayal.
And from one of my most trusted tools, no less!
Indulge me while I set the stage for this colossal bamboozling.
After painting the pantry walls with Swiss Coffee, I was ready to lay the foundation of this entire project – namely, the wall supports that will be holding up the shelves. Now, as I mentioned in the previous post, these wall supports were to be made from 1×2 primed pine boards. Can I just say (and please excuse the aside) how frustrating it is to pay 3 times the price for 1/3 the product these days? For what I used to pay for three 2x4s, I now pay for one 1×2! It’s almost enough to make one give up the DIY life and go work for IKEA!
Anyway, back those 1x2s…
Since six shelves were planned, I’d need six rows of 1x2s on each of the three main walls plus the little piece of wall next to the pantry door. Now, any dim-witted dolt with access to even the most rudimentary level should be able to make quick work of this. He or she needs merely to measure up from the floor to the desired shelf height, slap the board against the wall, plop the level on the board and screw the board into the wall.
You don’t need a PhD in Advanced Topography or even a Masters in Civil Engineering to know this.
So obviously, when I tackled this project with my pre-primed-and-over-priced 1x2s and self-leveling laser level, I felt about as confident as Mike Tyson squaring off against a 5-year-old in Aquaman Underoos.
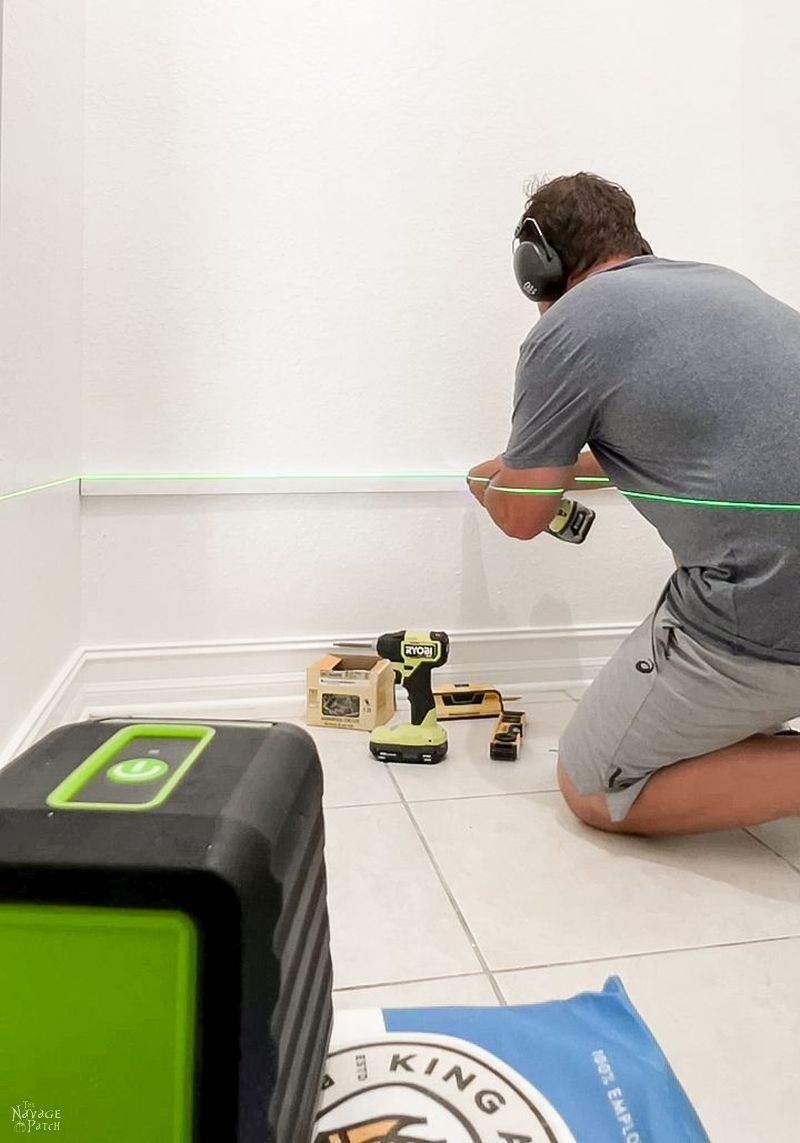
But like any good craftsman, even though I was wielding advanced weaponry on a pre-industrial battlefield, I still checked my work with an old-fashioned torpedo level. No harm in validating your superiority, amirite?

But, here’s the thing: I checked and re-checked and then re-checked again, and my pre-historic torpedo level disagreed with my alien-made space laser! Now normally, I’d snort and tell my torpedo level to bugger off, but I know that laser levels are delicate instruments, and this one had just been through two moves. I searched online, and sure enough, laser levels need to be calibrated every so often.
Well, nuts to calibration. It sounded like a long and complicated process, and my kitchen was looking like Kabul on a bad day. That’s okay though. I still remember my humble roots, back in the days before space-aged laser levels. If I could do the job with one, I could do it with the other, so I put my full faith in my little DeWalt torpedo level and carried on with the work.
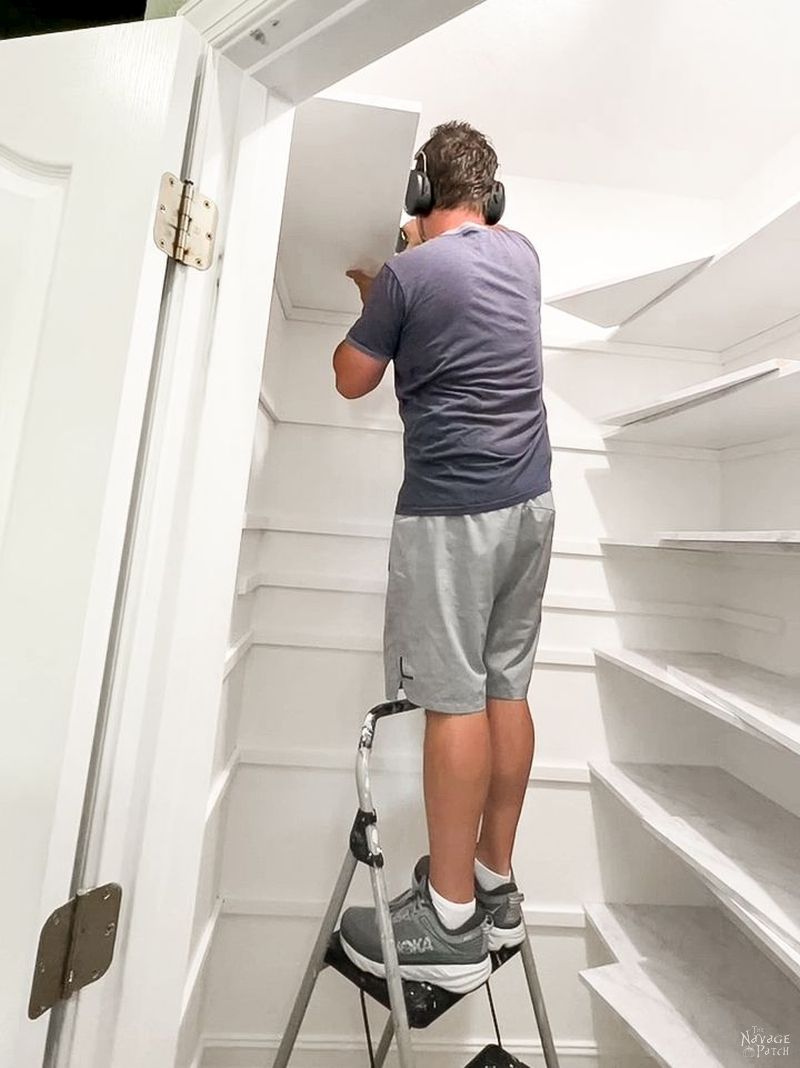
Mounting the supports was a straightforward affair. I first pre-cut the boards to the lengths I needed.
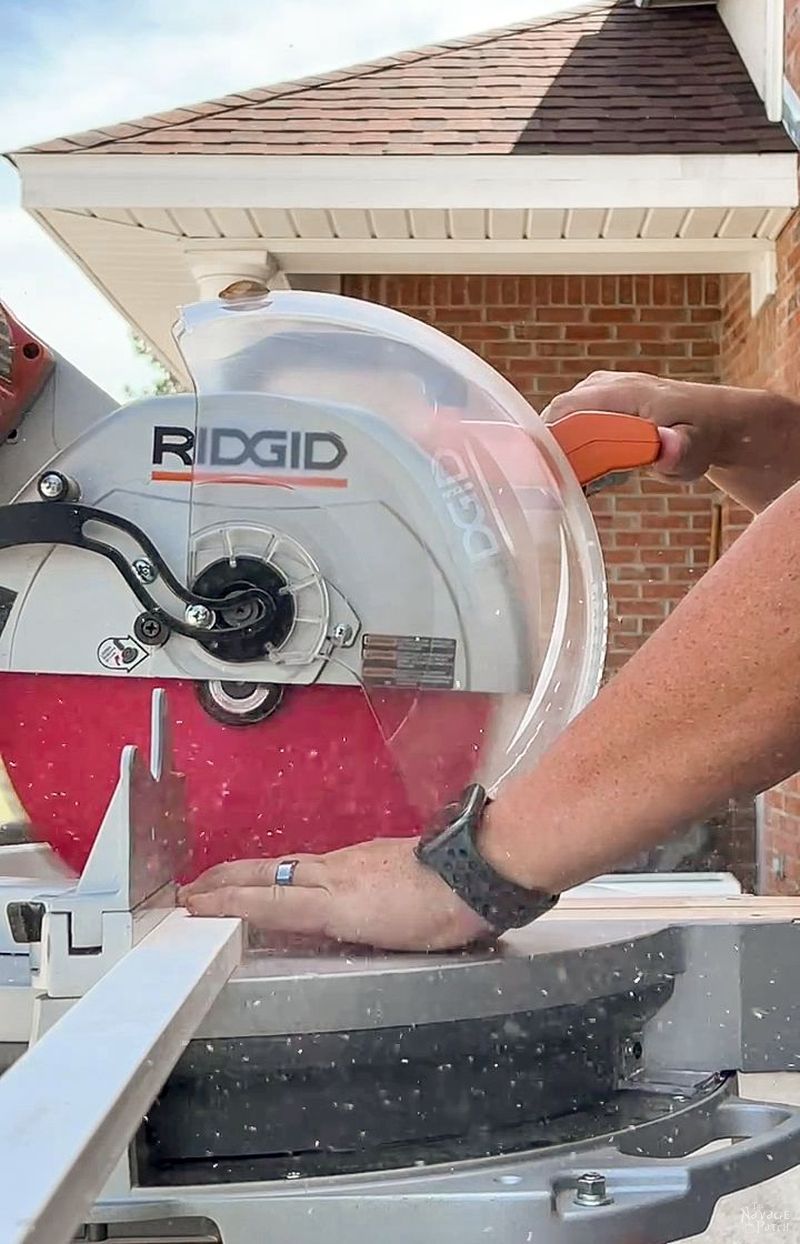
I must say, I do love working with power tools outdoors! It’s so nice not to be cooped up in a dank and windowless basement when cutting wood!

But then things got plain weird. I’m talking Twilight Zone weird.

My trusted DeWalt started acting funny – like giving me different readings along the board (even though it wasn’t warped). And weirder still, I’d get a different reading in each of its four possible orientations!
This was interdimensional vortex stuff!
I checked the DeWalt against my my 4-foot-long Johnson beam level. They may as well have been different tools playing by different laws of physics!

What the heck was going on?
Could it be..?
I cast a slanted eye at my “trusted” DeWalt.
“Et tu, DeWalt?” I said and grabbed the yellow monstrosity for a closer look. I grabbed my keys and headed to solve this conundrum.
I bought two new torpedo levels – a blue Kobalt for $10 made of plastic and aluminum, and a red Craftsman for $20 made of painted steel (or lead-infused iron – it’s heavy).
Back home, I tested all three on a problematic board. I put the DeWalt in one spot, and it assured me the board was not remotely level.

I then put the Craftsman on the board.

And lastly, I checked the Kobalt.

My suspicions were confirmed: my DeWalt torpedo level was a snake whose betrayal led to hours of delay in this pantry makeover project.
Like a jailor walking the condemned, I solemnly strode from the pantry towards the trash can. “Dead man walkin’!” I said to the empty house, and Penny’s and Pepper’s ears perked up at the spectacle.
I deposited the yellow traitor into the bin and turned back to my work.
Armed with two fully-functioning torpedo levels, I made quick work of the remaining supports. The right (and functioning) tools make all the difference!

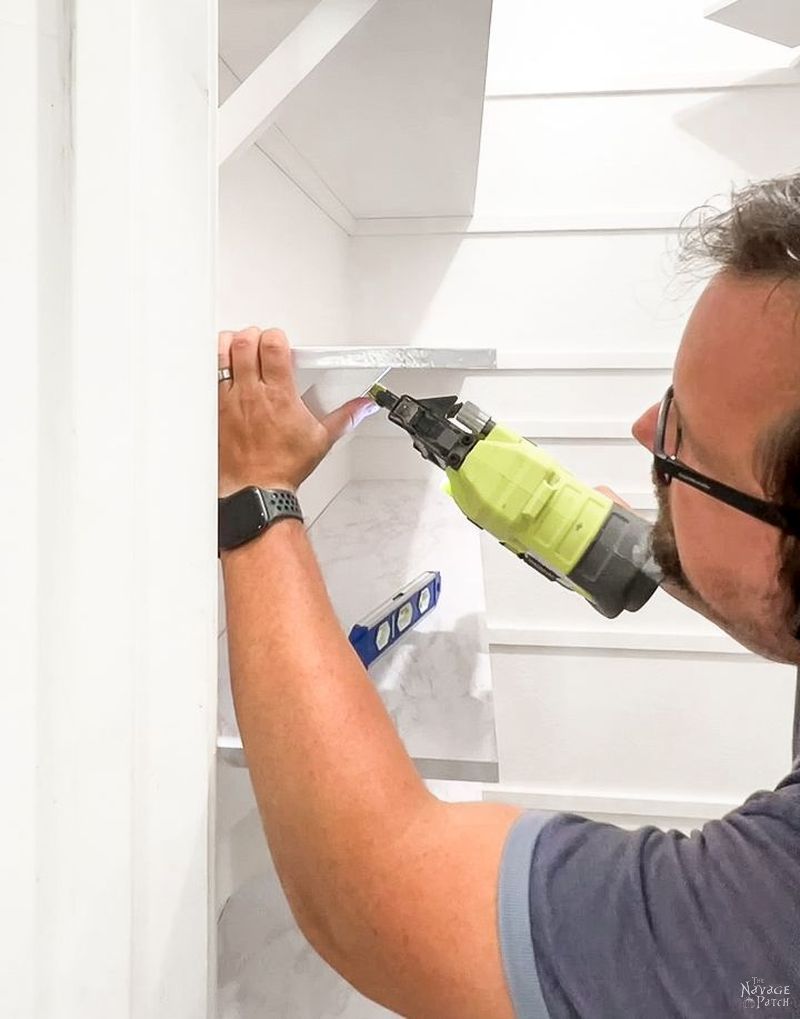
Here’s a rundown on how I attached the boards: after measuring up from the floor, I put a pencil mark on the wall and then put the top of the board on the pencil mark. With the torpedo level on the board, I adjusted it until level and then shot three brad nails to hold the board against the wall.

I then used a stud finder to mark three studs in which I pre-drilled screw holes.

I followed with a countersink bit, and then I drove in 2 1/2 inch decking screws to firmly secure the board to the wall.

I like decking screws for all sorts of construction projects. They have star heads instead of Philips, so they won’t ever strip, and I’ve never had one break on me – both common occurrences with Philips-head screws.
After filling all the screw holes with spackle and sanding them flat, I painted the supports with Swiss Coffee.

Next, I turned my attention to the shelves. The original plan was for me to prime and then paint both sides with enamel cabinet paint in Swiss Coffee color. But once we decided to cover the tops with contact paper, I only painted the bottoms.

Okay, so I guess this stuff bills itself as PVC marble self-adhesive counter paper or some such gobbledygook. I’ve been calling it shelf paper and contact paper. Whatever you want to call it, it is thick enough to do the job. Though in the weird lighting below, you can see all the bumps and imperfections of the wood underneath, in the directly-above-lighting in the pantry, those flaws are not seen.
Putting the contact paper on was a two-person job. Handan and I did it together, and I was happy for her help. It would have been a real bear trying to get that stuff on with just two hands! We found a heat gun and a brayer helped adhere the paper to the front edge.

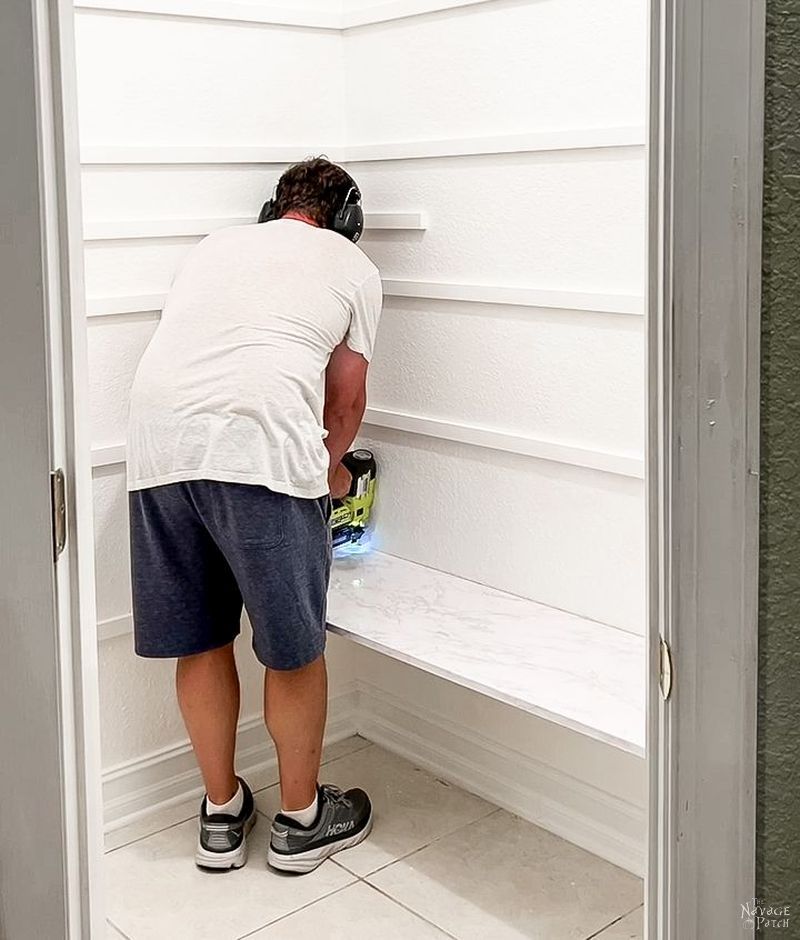
I started with the long and wide side of the pantry. Installation was a breeze. I just laid the board on its supports…

…and shot a brad nail in each corner and one to the middle back.

After the long 16-inch-wide boards, I installed the 12-inch-wide boards on the left side.
Since these boards only had two walls for support, I made angle brackets from the extra pieces of 1×2 I had on hand. I brad nailed the bottoms into studs using the same 2-inch brads I was using throughout the rest of the project.

Perfect!

I swapped out my 2-inch brads for 1 1/4-inchers to secure the top of the angle brackets to the shelves.
Since the back portion of the the shelves would only be supported on one side by a wall support, we used mending plates to support the fronts.
With my babes’ help, I installed mending plates to the small shelves before installation.

I then put the back end on the wall support and lifted the front end until it was flush with the other sides.

And then I drove three more screws in each side, and the shelf was secure.
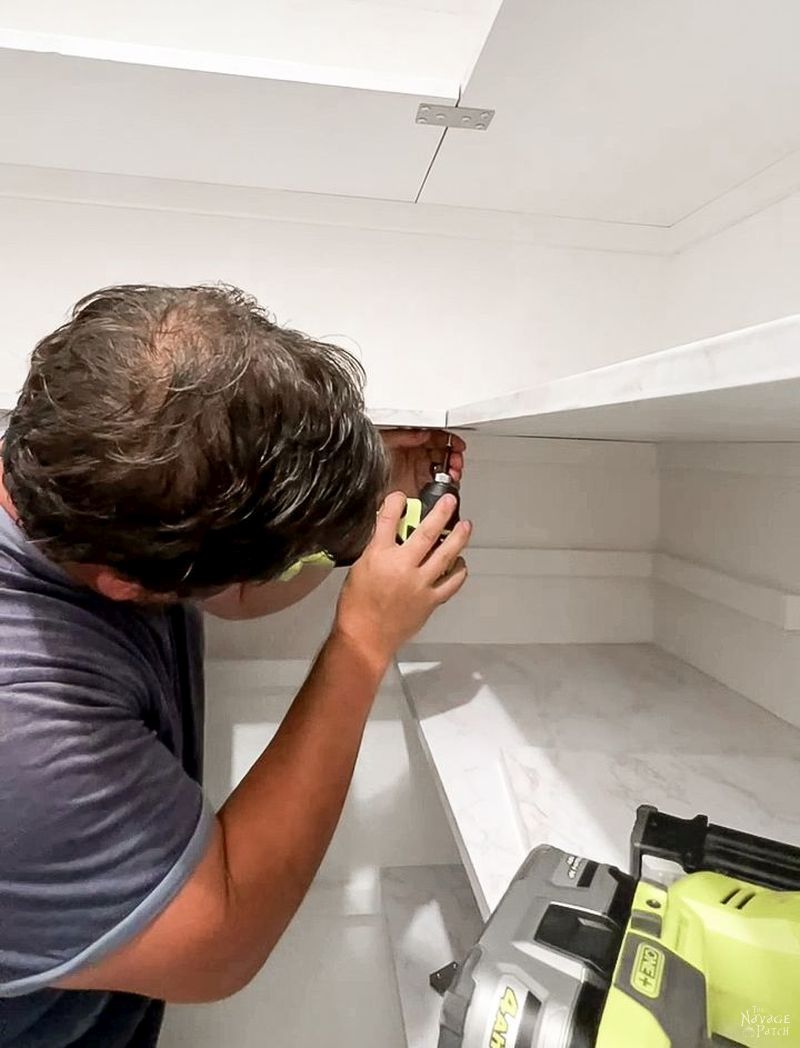
I painted the top 3 sets of mending plates with Swiss Coffee, and you can barely tell they’re there!
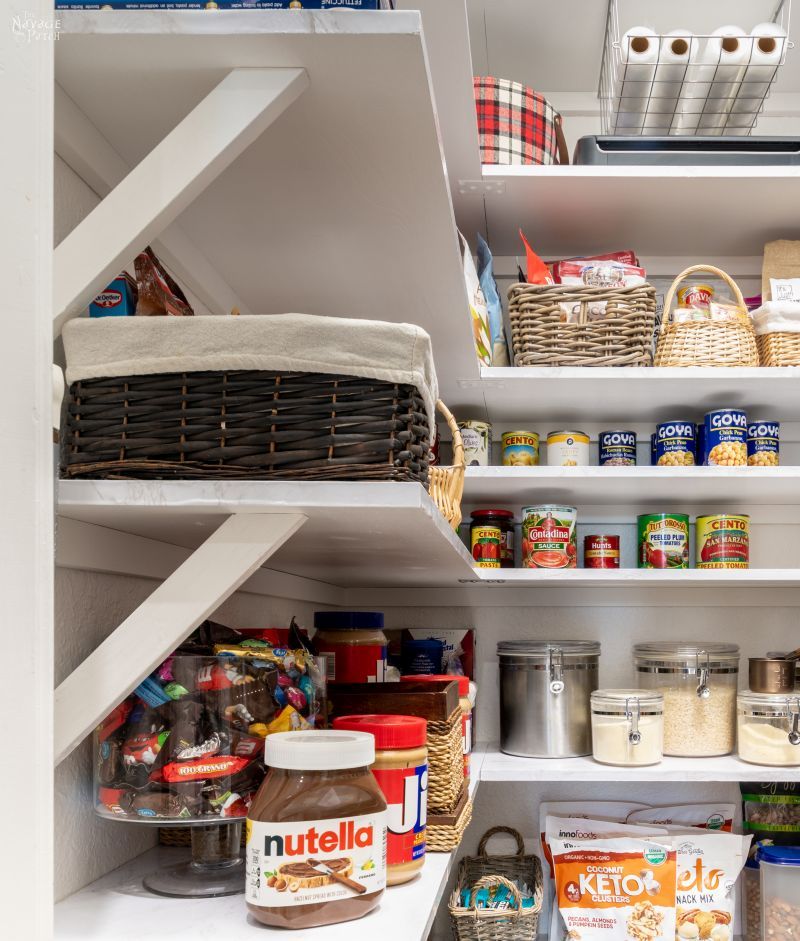
Here are our new pantry shelves before Handan started loading them up.
Now it’s time for the beauty shots of our filled and functional pantry!
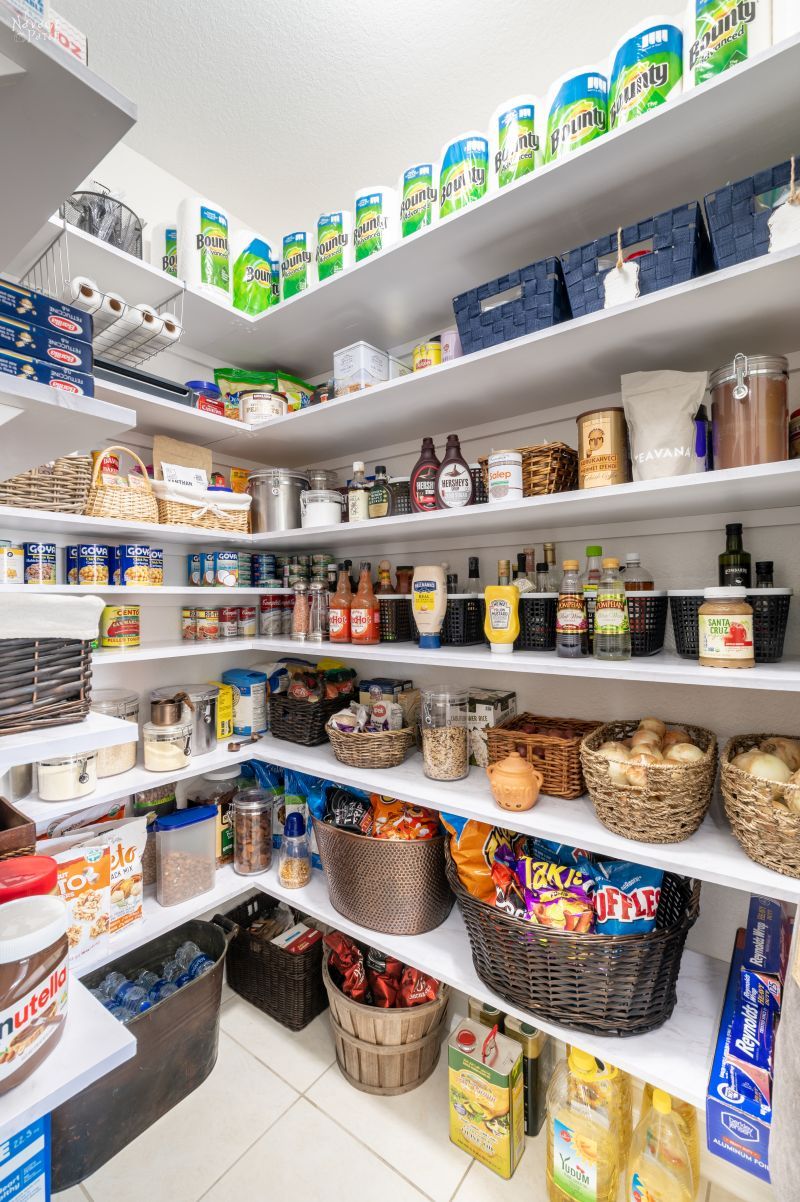
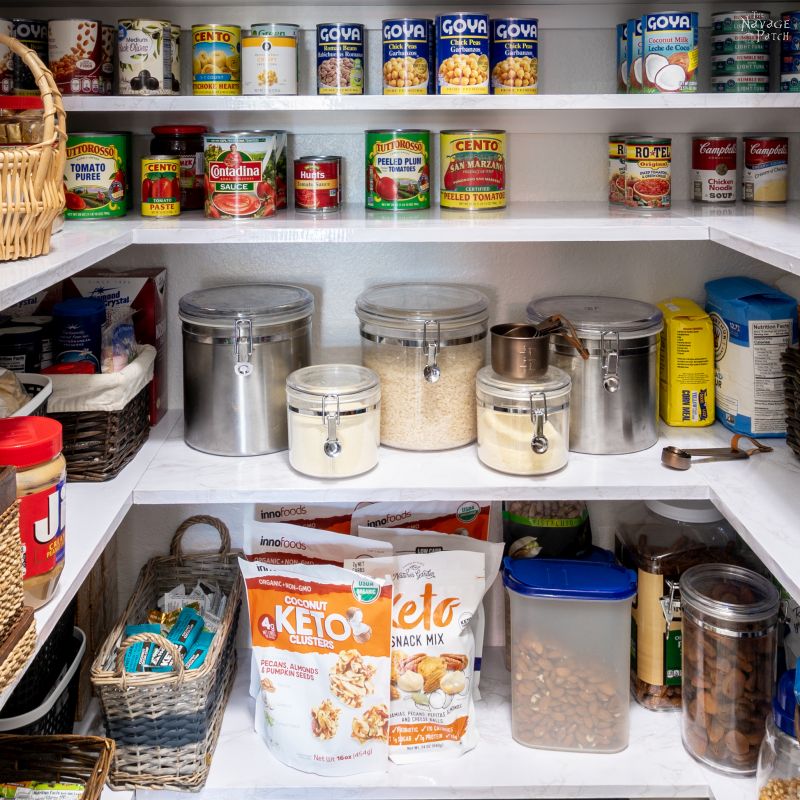
Look at all that beautiful shelf space!

You can see the extra shelf I added in the picture above – it breaks up the space perfectly for can storage.
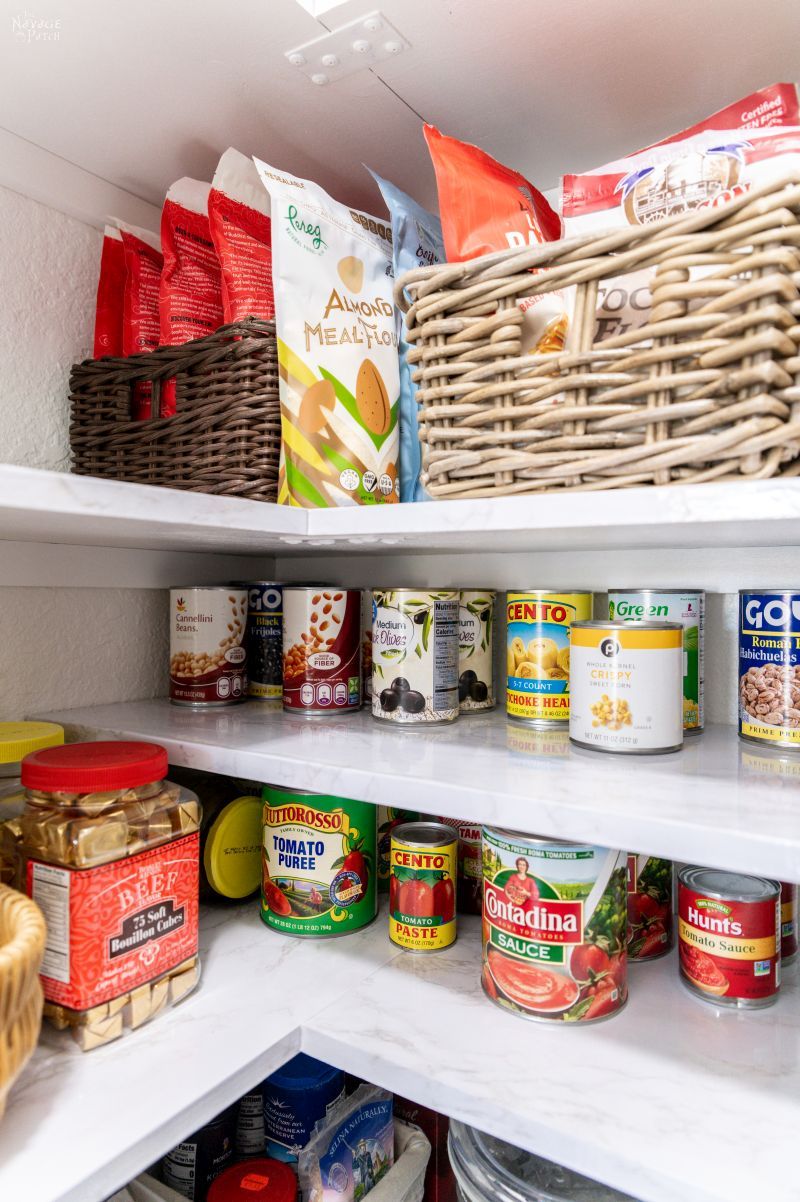
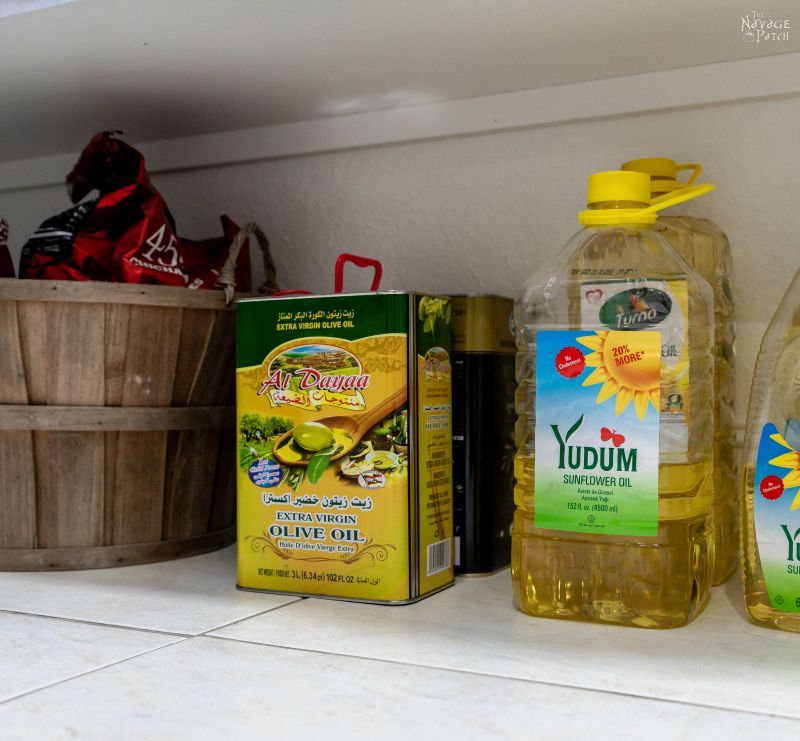
There are 18 inches between the floor and the bottom of the first shelf. This is enough room for all my tall bottles and cans of olive and sunflower oil plus any other tall bottles (like white vinegar from Costco or Sam’s).
We left 15 inches of space between the first and second shelves. This is enough to fit my babes’ beloved Frosties (Frosted Flakes here in the US). The box is back there lurking behind the Life cereal box – her other favorite!


One thing you’ll notice is that we like to keep food in its original container as much as possible. An exception to this would be flours, sugars and certain grains like rice. These are messy foods, and they are more easily handled, scooped and stored in containers rather than bags.
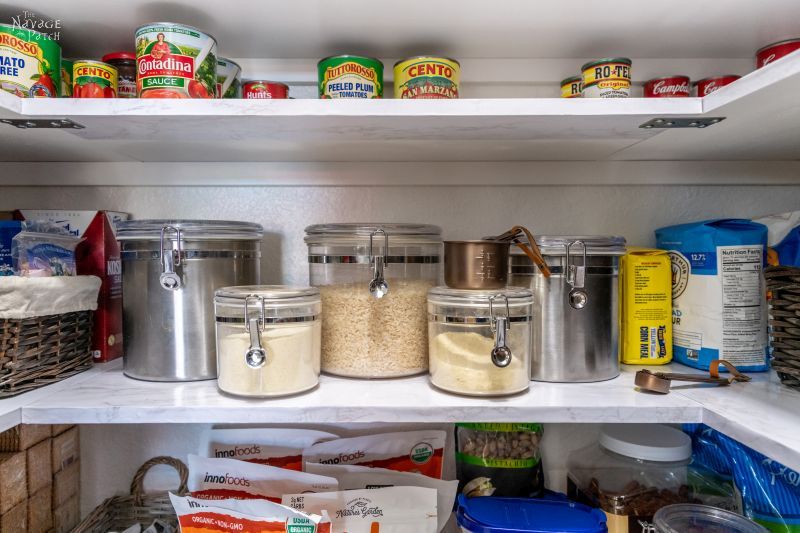
Other exceptions are certain bulk items we buy like Turkish dried apricots and almonds. The bag of apricots we bought from a Turkish food distributor in Atlanta was about as big as a king pillow, so it makes sense to portion it out into a smaller container from time to time.
As for cans – I like mine free-range, not cooped up in a box or some other sort of organizer. I like to keep my can collection accessible and fungible.
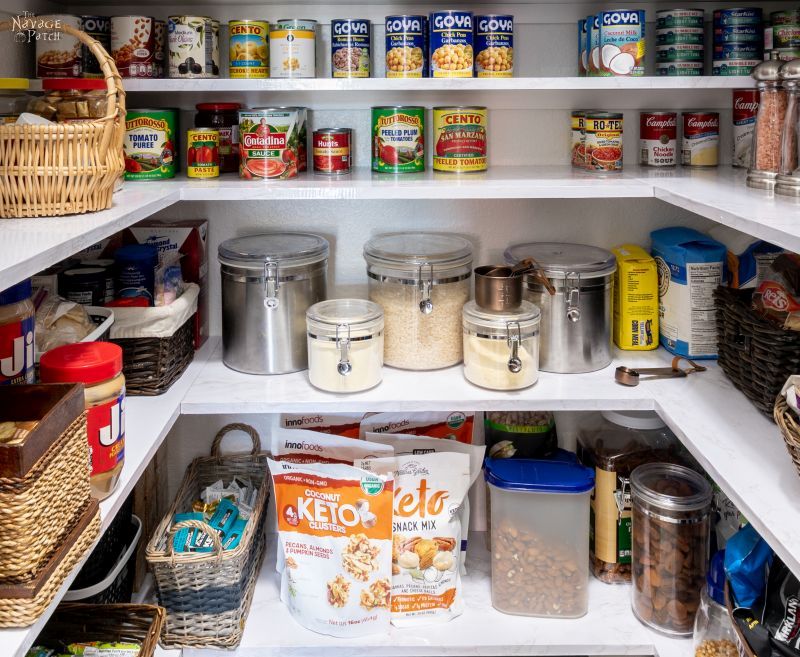
You may also note that (besides the aforementioned exceptions) we don’t go in for those rows of identical containers to store things like cereal and snacks. Our reasons for this are many, but it boils down to a few key points:
- It’s more work. Filling and re-filling those containers takes time. Ain’t nobody ’round here got time fo’ dat!
- When does it expire? It’s good to see the date on some packages. Saves a trip to the nose for a sniff test.
- We find those row upon row of identical containers to be a little too clinical looking – like you’re peering into the laboratory at a hospital, not at the food you’d like to consume.
- Last (and most importantly) – we like using our own baskets that we’ve collected over the years.
We’re using everything in this pantry, from the absolute dirt cheap, like these baskets from Dollar Tree (2 for a dollar)…

…to the beautifully-patinaed copper trough bucket shown below that we picked up at a yard sale in Connecticut.

Besides Dollar Tree, we have baskets in here from HomeGoods, Walmart, Goodwill, thrift stores, fruit orchards and countless tag sales.

I guess most of all we like to use our collected and curated baskets, because they are uniquely us. No one else will have a pantry exactly like ours.

And in an age of trend-chasing and social-media homogeneity, it feels good to buck the trends every now and then, don’t you think?


So what do you think of our new fully-utilized pantry space?

It’s allowed me to get a handle on the kitchen – in fact, I should now be able to fit almost everything from Georgia into this kitchen, thanks to this pantry!


Share it on Pinterest & Facebook!


TNP Insta-Shots
And for our Instagram folks, here’s a pose you may be familiar with. Keep an eye out for more familiar poses with each new project we finish! #bandwagon #trendchaser #InstaFame


WOW!! What a pantry, I wish I had one. It just makes life so much easier and so much more room, you did a fantastic job and I just love all your wood working post. I love making things with wood, but now I am getting up there in years so not as active as before. But I do enjoy watching your posts.
Thank you for all the tips as well.
Congrats on the new house and I cannot wait to see more of your projects.
Mary
Thank you, Mary! It really is a life-saver in the kitchen. I’m not known for being frugal or spartan when it comes to kitchen gadgets and spices, so a big pantry really helps free up the rest of the kitchen!
FABULOUS GREG & HANDAN!!!
Thank you so much, Davene! 🙂
This looks great! Now I need to do mine!
I noticed Keto products, do you guys both do Ketovore? It changed my life!
Thanks, Nicolette! We both have done it in the past, but not at the moment. It certainly works when we’re on it though!
Awesomest ever! I agree with you all about what to keep in baskets and what to leave original.
Thanks, Penney! Yeah, it just makes sense to us that way!
Wow! You’ve inspired me Greg. I can’t DIY due to my disabilities but I can draw up a plan
of my badly used space and flutter my eyelashes while allowing the moths a release from
my purse at my friend’s handyman husband.
I thoroughly enjoy following your DIY projects as well as your crafty projects.
If you can dream it, someone else can do it! Good luck and have fun with yours!
Greg…….I really, really need you to have a single brother!!!
Beautiful job!
Thanks, Wendy! I’ll check the DNA records, but I think I’m an original! 😀
Looks beautiful! I agree most things are best left in their original packages and it’s nice to pretty them up w a basket or secondary container. A couple of questions: 1. How is the support in the corners of the shelves where you have the mending plates? Also I would be afraid that the shelves would bend forward with the weight of items on the long expanses is it really just held up by the wood cleat?
Thank you, Angie! To answer your questions – 1) the area under the mending plates is pretty rock solid – those mending plates spread the load-bearing work to the side boards, which are anchored on 3 sides. 2) Regarding the long expanse on the right – we tested it, and it doesn’t sag under the weight of normal items. That said, I wouldn’t put anything too heavy in the middle front of one of those runs. We keep the heavier items towards the ends and/or towards the back. If by chance the boards start to sage in the middle over time, I can very easily add a wooden bracket in the middle just as I did on the ends of left side.
Big difference – looks great! You have patience because if my level had acted up, it would have flown across the room hopefully into the garbage can!
The container buzz these days reminds me of the Tupperware craze my Mom and women of her age group went through in the 70’s – I gave in and bought some. We use a slanted can holder because it fits between 25 – 30 cans in a 16″ x 14″ inch space.
Thanks, Julie! I could get onboard with a tiered can holder. As long as i can see everything and have easy access, I’m down with it.
I love the new pantry! I am waiting patiently for MY new pantry. My husband is an excellent builder but the price of lumber has impeded our progress from even starting on it. I have currently a wire shelf from Sam’s Club in my laundry room (very small laundry room) holding all my pantry items. No matter how I organize it and style it, it looks like dookey all the time. Ha ha I’ve already found a beautiful antique door for my future pantry. We’re not sure we will have enough wall room to mount it like a barn door slider, unfortunately. I have to have a door on my pantry though because I have 6 very unruly cats that would be in there on those shelves knocking food off and making my anxiety go off the charts! You gave me some good ideas for how to put up our shelves, though. I have also designed (in my head) a cool box with a hinged lid and plan to put our 3 litter boxes inside it with cute cat shaped openings in the laundry room for them to access it. I’m tired of looking at litter boxes in my kitchen! Let’s all hope these lumber prices go down soon so I can have my dream pantry!
Thanks, Karen! There are slightly cheaper ways to do it than we did – for instance using furring strips instead of primed 1x2s. That would have saved over $100. And using paint-grade edge-glued boards (which we did) instead of stain grade saved a bundle. This project for a pantry our size can be done for about $300 if you plan it right. Not too bad, considering the cost of everything else these days!
Greg,
What a great job! I would love to have pantry space like that. Aside from the failure of the Dewalt level; trying to slow you down, you made it look easy. I’m looking forward to all your upcoming projects.
Thank you, Michele! Once I ditched the DeWalt, things speeded up considerably, lol!
Wow, Greg! I am in absolute pantry awe (or is it pantry lust?)! LOL! Being the cook in the family, I’m sure you’ll happily spend a lot of time in that beautiful space! I really can’t believe how quickly you got it done, especially considering the laser debacle. I only wish I had a big walk-in pantry like that so I could attempt to copy. Handan did a fabulous job of organizing everything. I especially love that you DON’T have matchy-matchy containers and that everything isn’t perfectly lined up. In my opinion, the variety of baskets & bins only makes it that much more beautiful and real. And Life and Frosted Flakes are my two faves, too! Btw, I totally get why you had to do the pantry now, and I’m so happy to see the result, but I have to say, I really can’t wait to see the finished craft room!
Thank you so much, Deb! Oh, you’re right, I will be spending a lot of time in there! I love it so much already! Handan and I will get to finishing the craft room this weekend, if all goes according to plan (which it always does, right??) 😀
Looking forward to it!
A.W.E.S.O.M.E. Gregg!!!!!
Thank you so much, Connie! 🙂
Great job on the pantry! What is the original size of the pantry?
Thanks!
Thank you Mona! It’s 42 inches on the left side, 69 inches on the right and 57 inches across.
Very nice!!!! Loads better than the dreadful wire shelving! And I personally love all the mismatched baskets – makes your pantry look lived in and used, not staged!
You have given me an idea with using mending plates for the back shelves. I have a decent sized pantry with L-shaped shelving. Love all the storage it provides. However, the builders in all their wisdom added a corner brace at the front the shelves where they meet, so it created a black hole in the back corner of EVERY single shelf and it drives me batty! The shelves are otherwise supported exactly like yours. I’m thinking pantry modification is needed using mending plates so the deep corners can be free and useful! TYSM!
So happy to help, Audra! Good luck with your mods!
You have my sincerest condolences on the loss of your beloved DeWalt torpedo level–a level that had a good, long life full of adventure, and served you well. May it rest in peace…at the bottom of the dump. But you have two new ones now, and there’s nothing wrong with that! You also have one project off the list. We patiently await the next one.
One done, One thousand to go, lol!
Oh my goodness! That pantry is huge! It looks beautiful and organized and clean. That was a huge job, and I bet you are glad to have that checked off your list! Cannot wait to see your next project.
Very glad, Jill! Onward and upward!
Wow!
Thanks, Pat!
Looks great!! Having a functioning and organized pantry makes cooking even more of a joy! Bonus, the contact paper looks great and is easy to wipe down!
Chris made rolling rack shelves for under the lower shelves in ours. These allowed us to utilize the corners more (ours is a wee smaller compared to yours – but we figured out ways to expand it and make it work for us 😉).
Hoping you guys are having fun in your new digs! Cheers! 🥃
Ahhh, rolling bottom rack shelves is a great idea! Now we know how we’ll be modifying these in the future!
LOVE. IT. Now I wish I had a big pantry so I can copy you. It’s beautiful, and the storage! Nice work.
Thank you, Sheri! It kinda feels like a little store when I go in there!
Truly an enviable thing of beauty….. good job G & H 😘
Thank you so much, Cheryl!
I love your new pantry! Very envious! Beautiful job! I have a tall metal shelf unit and an old china cupboard in my cellar (where the washer is). When I restock my upstairs, we call it “going to the store” when I bring up a load of needed groceries. I love your use of non-identical containers; it definitely adds personality to a functionanl space! I love my baskets, old coffee jars, apothecary bottles, canning jars, too!
Thank you, Kathy! I think I’ll start calling it “going to the store” too. It sure looks like one!
This is fabulous!
My family has given me such a hard time over the years (jokingly) because I keep our pantry organized and the products together and “faced”. The kids used to turn cans upside down or backward to mess with me.
Now I know, I’m not alone!
Love seeing. your makeovers!
LOL, I used to give my mom a hard time because in the 90s I used to dig around her pantry and find stuff from the 80s. Now Handan is giving me a hard time because she’s finding stuff that is several years old. I’ve become my mother apparently, lol!
Your pantry is a true thing of beauty! My best friend and I both just re-did our pantries, but there were no results that even come close to this amazing space! And I wholly agree about decanting from box to acrylic container being unnecessary and too clinical. Thanks for sharing, and for the info on the levels. Very helpful.
Thank you so much, Sharon! 🙂
That looks great.
Thank you, Karen!
Love the pantry remodel and that you used your own baskets etc!
Thank you, Jean!
I love the pantry! It is exactly how I would like my pantry if I had a pantry like that. Great job!
Thank you so much, Pam!
It’s terrific from plan to actuality! ‘Perfectly practical pantry with personality’ is how I’d describe it. I love baskets of all shapes and sizes, so it’s great to see yours in use. I would add a stool for when I take inventory before going to the store and contemplating the next week’s meals. I’d love a pantry that size! Carry on, Greg!
Thank you, Rebecca! I like the alliteration! Yes, a small stool is a must, especially when the shrimp will need to go in there, lol!
Love it! Had plans for something similar in an alcove in my kitchen (formerly home of washer/dryer). That plan was dashed because the electrical box is on one wall and by code cannot be hidden in a closed space. Someday I will figure out how to get my pantry!
Dang codes always getting in the way of our dreams!
Nice leg-pop, even if the Hays code only applied to women…
LOLOLOL!
What I would do with this much pantry space… 😍😍 We have two cupboards. One was here when we moved in and it’s a double, and then we got a single to go with it because we were so short on space. We’re still short on space but it did ease up some of the problem! Space is in dire need in our house. I love how you planned out the shelf height for the items you know you use. Much smarter than taking general sizes or words, making them all the same size!
And Handan, they’re still called Frosties here in Australia! They’re delicious, aren’t they? Now I’ve got a craving….
LOL, she refuses to call them Frosted Flakes, Jay! And that reminds me, she just finished her Frosties last night when we knocked off working on the craft room makeover. I better head out today and get a fresh box or endure the wrath of a Frostie-less Handan tonight! 😀
AWESOME JOB!!!!!!!!!!
Thanks, Bev!
Wendy voiced what I’ve been thinking for over a year now!! I guess she and I need to go on a quest to find the mad scientist with cloning technology! 🙂
As for the level mishap, glad to hear you’re no longer “half a bubble off of plumb”!! But that level might be a good prop for your book cover in your memoir about all of your DIY adventures!
Love seeing how you redesign things to fit you and Handan. I have a “reach-in pantry” in a one-butt kitchen (read: galley kitchen NOT on a yacht) so I’m trying to figure out the best remod of THAT peach of a design. Maybe The Navage Patch On the Road Tour??
LOL, “half a bubble off of plumb!” I like that! I’ve spent some time on sailboats, so I know the galley kitchen you’re talking about. There’s always a way! Send us some pictures of your kitchen – maybe Handan can visualize a solution for you. She’s really good at that!
Love the pantry. Two questions. Where do you keep the stool or ladder so that us shorter people can reach the top shelves? The other one is about you laser level. Since the dewalt level was the culprit, was the laser one correct? 😉
Hi Karen, we have a little footstool from IKEA that’ll be going in the pantry. At the moment, it is holed up in one of our storage units, but I’ll be rescuing it the next time we head over that way. As for the laser level, I haven’t had a chance to properly check to see if it needs calibration, but I will be doing that soon!
Gorgeous pantry, but, then, I expected nothing less. Loved seeing your variety of containers!
Thank you so much, Kathy! I am loving this pantry – so much space! 🙂
We have a similar pantry with sagging shelves. We have been mulling over how to repair the issue besides stop shopping in bulk at Costco but I believe you have solved our problem with the shelves separating in the corners (mending plates) and the braces!!! Heading to the hardware store right now to get ready for our little weekend project.
You and your wife are always a great source of ideas and inspiration. Much love from Canada
I’m so happy to read this, Christianna! Best of luck to you guys this weekend on your project! 🙂