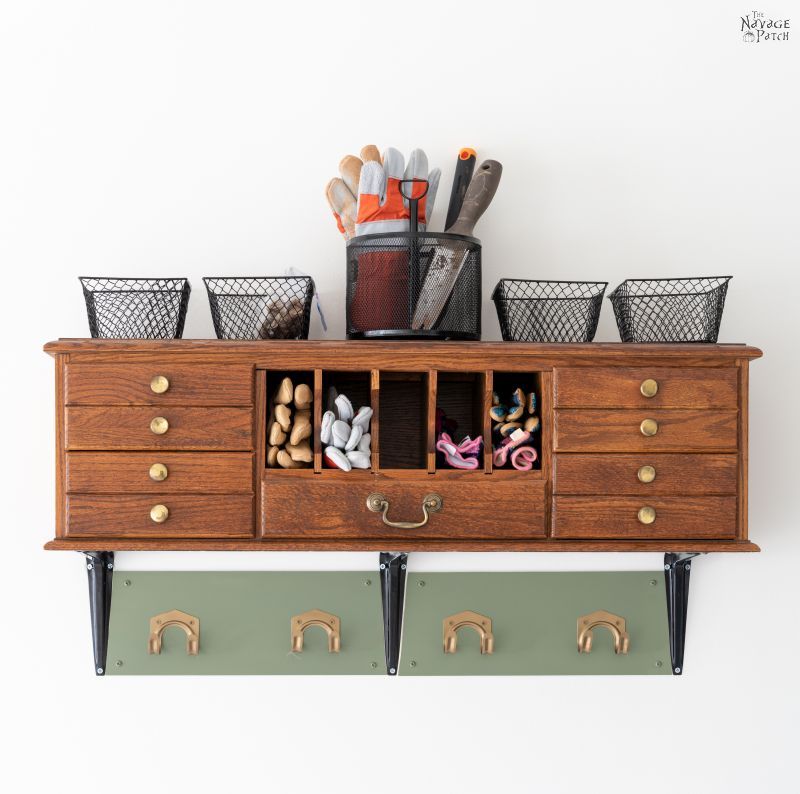
Repurposed Desk Hutch
This repurposed desk hutch has found a new home in our garage. The best part is, we didn’t have to do much work to give it a new life!
I almost sold it.
Really.
It was November of 2018, and I was trying to cut a swath through the Teetering Deathtrap of Crap in our old basement by pawning some of it off on Facebook Marketplace. I employed my usual method of snapping of few pics in the basement and then listing the items one-by-one. On that particular day, the Tuesday after Thanksgiving, I had taken a few hurried photos of several vintage suitcases, a 3-foot-tall Santa Claus, two smelly Christmas candles, one of the first decor items I ever built1, and a certain red oak desk hutch.
Now, I may or may not be a particularly smart man – opinions will differ on that point depending on whom you ask and how much liquor they’ve had when you ask them – but I’ve developed a keen sense for the kinds of things that are likely to put me in an early (and probably shallow) grave and the kinds of things that will allow me to open my eyes and gaze upon another day.
If I were to walk into the basement and grab any random armload of crap Future Craft Projects, photograph them, list them on Facebook Marketplace, meet with buyers, and exchange aforementioned crap for money, I’d almost certainly find myself staring up at the sky from a hastily dug pit while shovelfuls of dirt are tossed upon met. So I approach the process of Lessification with great care and treat it with kid gloves. If I want to get rid of something, I check with Handan first.
And then I check again, just in case she wasn’t paying attention the first time.
If my babes wants something sold, I make sure I understand what it is. If we are in the basement, I pick up the thing and say, “You mean this, right?” If we are upstairs, I get a detailed description of the thing from her and confirm I understand exactly what she’s talking about.
And then I ask again, just in case I wasn’t paying proper attention the first time.
Woe be upon the fool who mistakenly casts aside anything from my babes’ dragon hoard without her express verbal consent!
And so it will forever and eternally be an unsolvable mystery why on November 27, 2018, I took the following photograph and readied a posting for Facebook Marketplace.

The only thing that makes any sense is that I thought she told me to sell it. Or perhaps it had the misfortune of occupying the the same section of basement as the other stuff I was instructed to sell. We’ll probably never know.
But there is one thing. We still had the desk that the hutch belonged to in another part of the basement. I probably should have put 2 and 2 together and deduced that since the desk was staying, so too would the hutch.
But I just get so excited when I learn I’ll be lessening our load, so I guess I just got caught up in the moment.
I pressed Post, and my listing went live. Any one of eight billion people might have bought have desk hutch.
A week or two passed – it was December, and all thoughts had turned to Christmas. I was in the basement with Handan, most likely rooting through the Christmas section at the far end, when something tugged at a frayed edge of what was left of my mind. Something about that red oak hutch.
The creeping doubt I should have felt on November 27 finally wormed its way into my brain.
“Hey babes?” I said.
“Mmmm?” she intoned.
“Should I sell that hutch over there?” I said, indicating the very hutch that as we spoke was zig-zagging its way around the world and back again.
“What?” she said, “Of course not! We’re going to use that soon enough!”
“Yeah, that’s what I thought,” I said, casually, as I reached into my pocket to fish out my phone and cancel the listing.
Crisis averted. Death staved off another day. Another sunrise all-but-guaranteed. All-in-all, a successful day!
Well, “soon enough” turned out to be a little optimistic, but it did happen…two and a half years later.
Repurposed Desk Hutch
“On the wall?” I said.
“Yup,” she said.
“Nothing else,” I said, “just the hutch?”
“Yup,” she said.
I glanced at the garage wall and then back at the loon my wife. At this point, I’ve pretty much figured out that any time I’ve doubted her vision, I’ve come up smelling like manure. So…
“Ho-kay, my babes,” I said. Hey, it was either a hutch-on-the-wall or me building a shelf from scratch. This idea of hers would settle two birds with one stone: less work for me and another piece of the Basement Junkernaut removed!
The idea was painfully simple:
- Install three brackets on the garage wall.
- Place the hutch on the brackets.
- Sit back and collect compliments from my babes.
The reality was only slightly more complicated than the idea, and that’s because Handan tagged on a last-minute improvement to the plan.
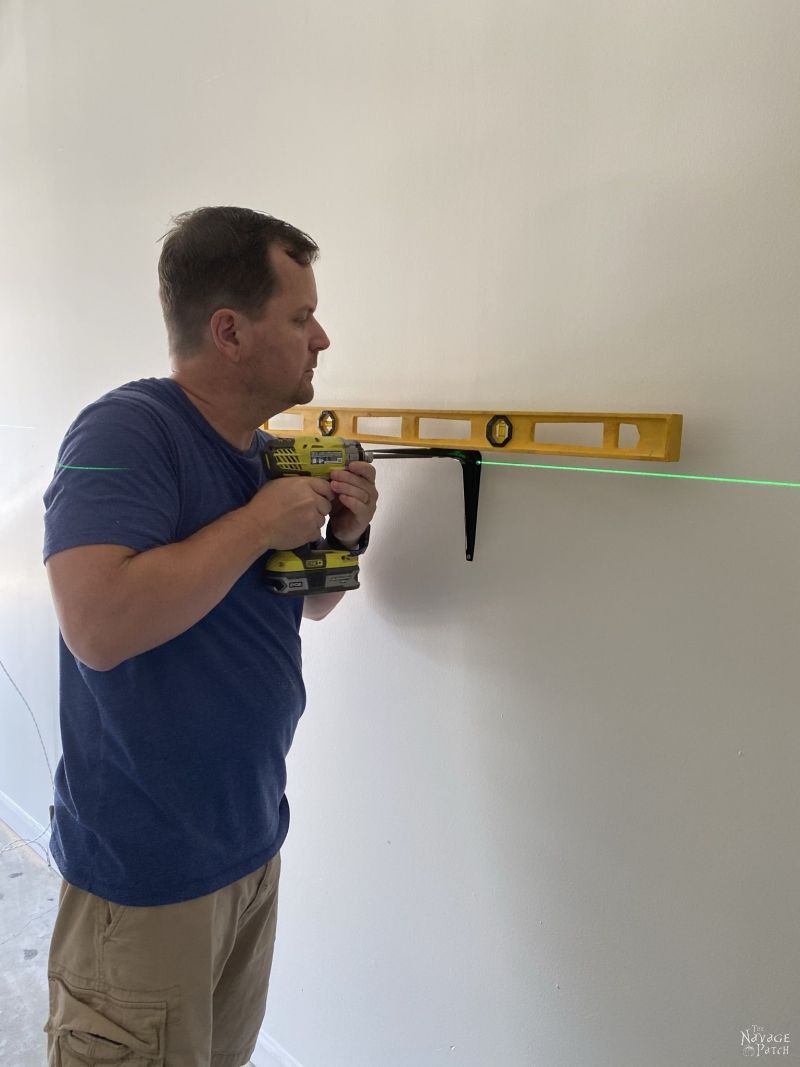
After determining precisely where along the wall and how high she wanted the hutch, I set up my self-leveling laser level and installed the three brackets.

Though I’m using a laser level, I find it useful when installing brackets also to use an I-beam level.
Next, I plopped carefully placed the hutch on the brackets and secured it in place with screws. You’d think we’d have a few pictures to commemorate such momentous occasion, but my babes was so wrapped up with filming me that she forgot to photograph me. Welp, I supposed you’ll just have to watch the video below to see the rest! ?
Now, we could have left it at that, and I’d have been content as a cat on a sunny windowsill. But my babes?
Not content. Happy, yes – she loved it. But not satisfied. It was….lacking in some way.
Then the idea came to her.
“My babes, can we take it down so you can put a thin board between the brackets and the wall,” she said. “I want to hang some hooks.”
I shot her a look that could have been fired from Dirty Harry’s 44 magnum.
“No!” I said. The notion was ridiculous. Who did this curly-haired crackpot think she was? Take it down, indeed!
And right about now, madam, you are thinking, Oh, poor Greg – he just doesn’t know when to quit. Of course he took it down!
But this time, madam, you’re wrong! I did not take the damn thing down!
Instead, my babes said, “Okay, then can you cut me two boards to fit exactly between the brackets?”
Inwardly, I sighed. Outwardly: “Yes, my babes,” I said and went about gathering intelligence for my cuts.
The best way to make a non-square quadrilateral cut like this is first to trace the shape you need to cut. Some cardstock and a pencil did the trick.

There! All traced out and ready to cut!

I made a similar tracing for the right side and then took my templates to the basement and cut out the shapes using a bandsaw. It probably would have bee easier to remove the hutch from the wall and do it Handan’s way, but I had put my foot down on the matter, and down was where my foot was going to stay!
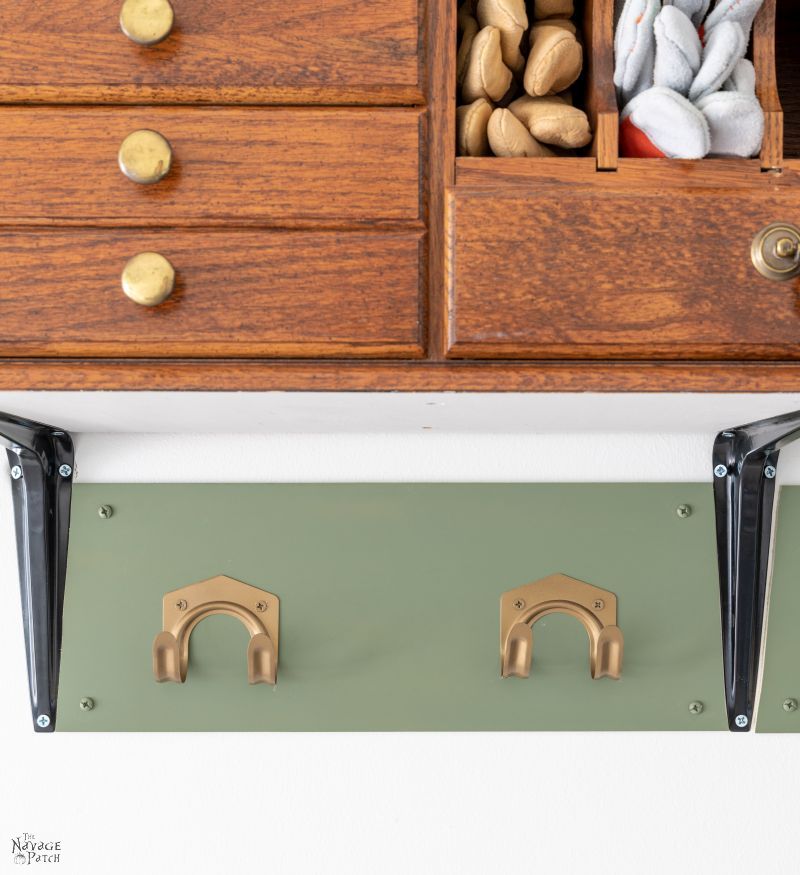
Once I had the pieces cut, I sprayed them with Rustoleum Army Green Camouflage paint.

This is a beautiful flat green paint. We’ll be using more of it in the future, and I’d also like to check out the other colors in the camouflage line of paints.
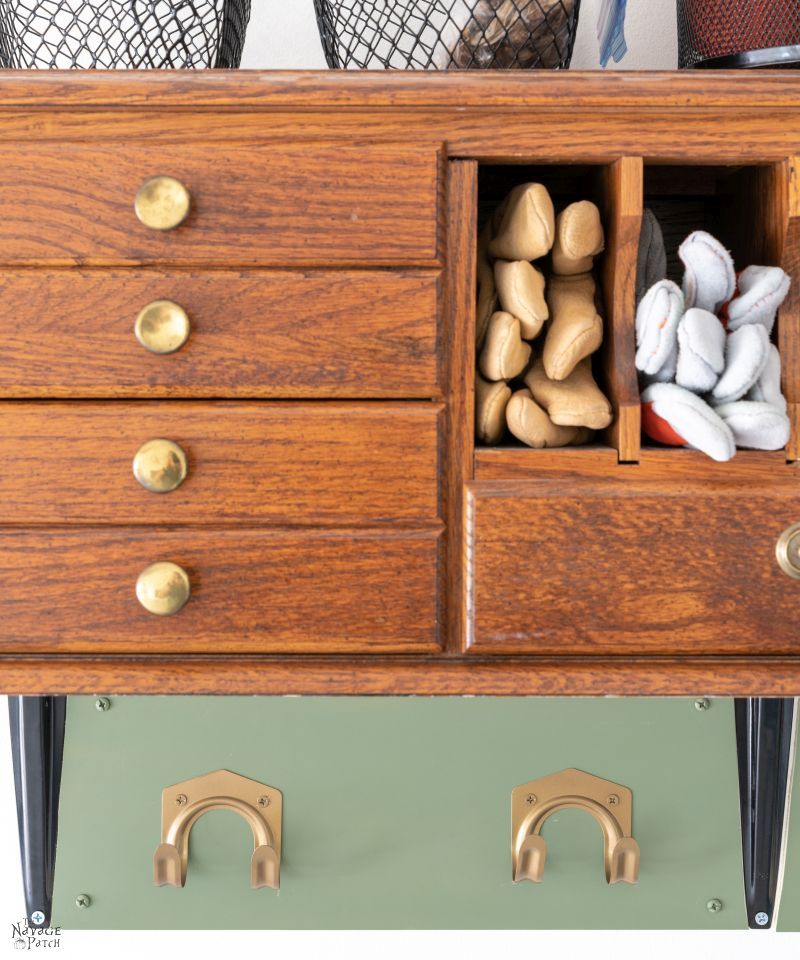
While the boards dried, I painted the hooks with Rustoleum Satin Bronze. We used Dollar Tree universal tool hooks – 5 hooks to a pack!


When the boards were dry, I attached them to the wall using drywall anchors.

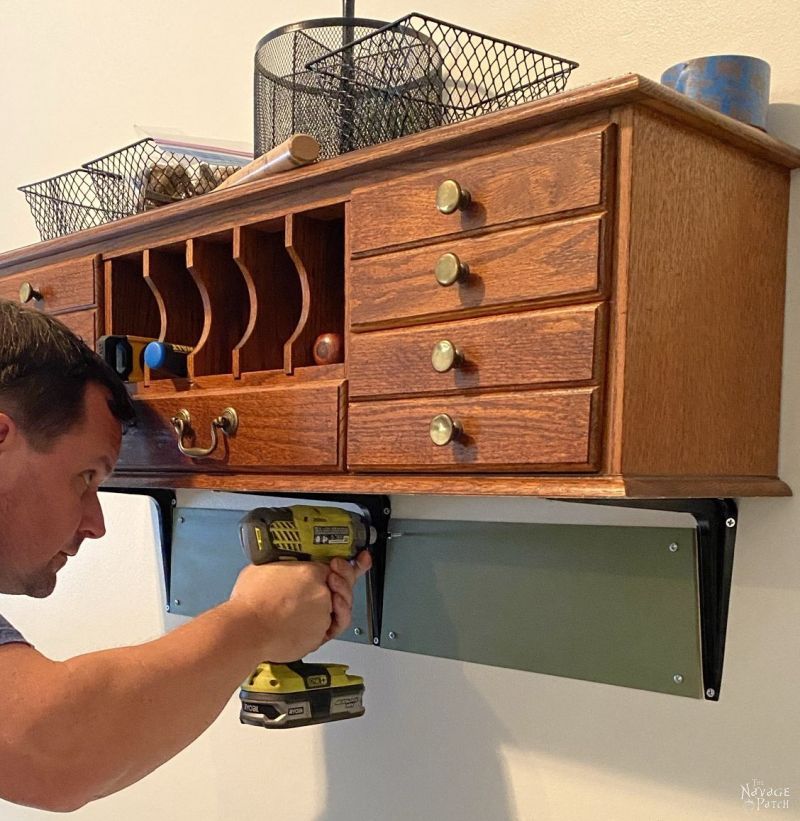
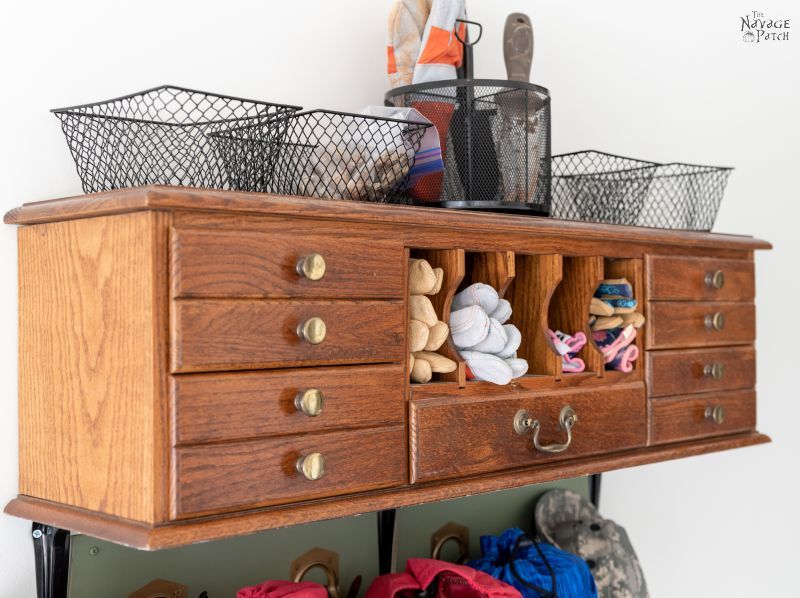
The last step was to attach the brass hooks to the green boards, and then my babes’ repurposed desk hutch garage shelf was finished!
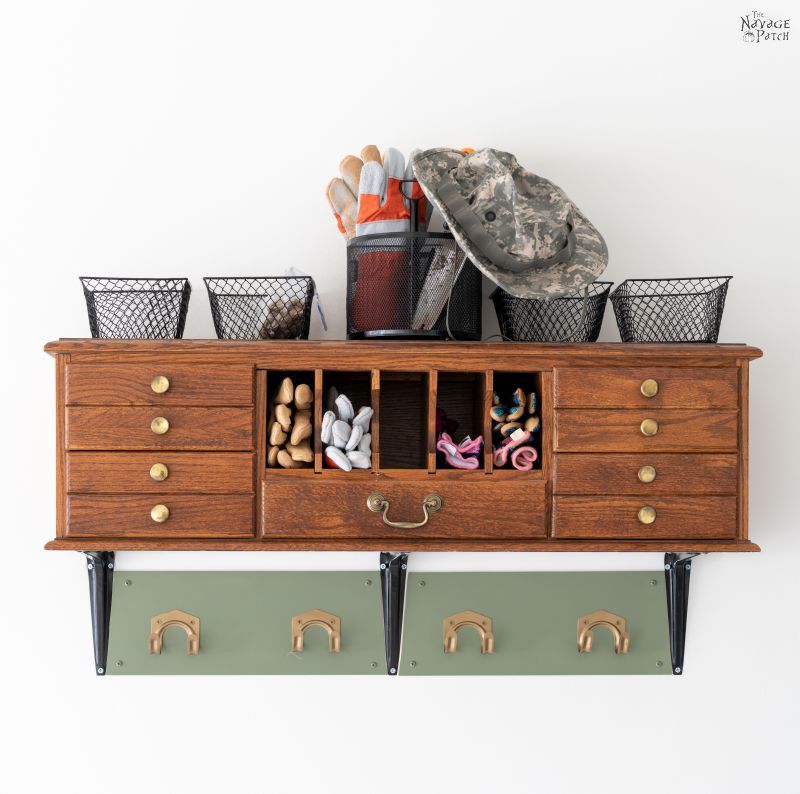
The hooks hold our lawn chairs. Now that our garage is all spruced up, we can use them to have cocktail parties in here!

Instead of letters, these little cubbies now hold our garden and work gloves.


Handan can’t get enough of that camo green and satin bronze combo. Look for it in future projects!
Once again, my babes has proven that her wackadoodle ideas are not so loony after all.

*******
1About that “first decor item” I built. I recently showed you the very first DIY I ever did, but that was a simple paint job. I also told you about the first thing I ever built, but that wasn’t a decor item – it was functional. The first decor item was another thing altogether. Handan and I were younger versions of our much better current selves. We were new homeowners taking a sporting stab at furnishing our home in our own unique way.
Unique, madam.
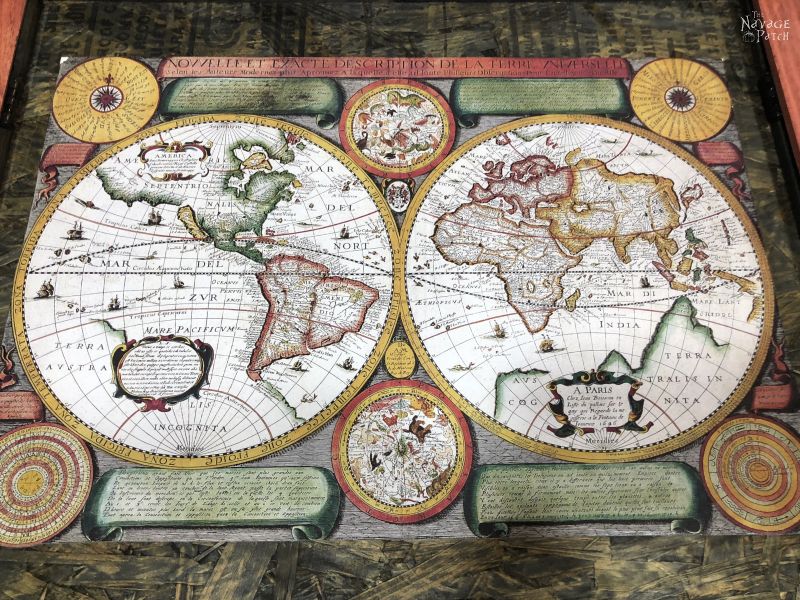
Where others might consider going to a store and buying something…normal…for their walls, I made this for my babes. On the outside, it’s just your ordinary everyday….erm barn doors?

Ah, but open the barn doors, and behold! The ancient world! It makes perfect sense when you think about, right?
Right??

And in case you hadn’t noticed already, I mounted Handan’s beautiful ancient map printable on a piece of stained OSB (oriented strand board – it’s like plywood’s embarrassing estranged relative that keeps getting arrested for public indecency). And if the OSB weren’t bad enough, I used a piece that still had the mill stamp on it!
What on Earth was I thinking?
So yeah, that was the first decor item I ever built. Red barn doors housing an old map mounted on mill-stamped OSB. It boggles my mind that Better Homes and Gardens never came knocking…


Exceptional. Just brilliant! It helps so much when you show us the “how to” part. I’m off to the garage to try something similar! No desk hutch but I am going to put on my thinkin’ cap! Have a great one!
Thank you, Linda! Handan is full of great ideas, it seems! 😀
Great idea; however, IMO the green boards don’t make sense; I would have painted them to match the walls and spray painted the angle brackets gold to match the hardware OR spray painted all the hardware black to match the angle brackets.
Thanks, Diana! The green may make a little more sense as more of the garage makeover is revealed! ?
Oooh, I love that hutch. Glad it got saved. I am the purger in my household, while hubby tends to sneak things back from the trash pile and puts them back in the garage or basement. Mind you, he has no use for these items, just thinks he might in the future. He never uses the stuff that I have ever seen, so I have to keep sneaking stuff back out to the trash or Goodwill. Once it’s out of sight, it is out of his mind luckily.
Oh, you’re so lucky! I wish I could sneak things past Handan, but she’s like North Korea…eyes everywhere!
I LOVE the colo choices! Great job!
Thanks, Christine! 🙂
Great project! That hutch top is too pretty to be out in the garage but it can be used almost anywhere! Nobody has enough letters to file nowadays–except me who still pays bills by snail mail!!!! To be able to find a PAIR of gloves is a Godsend!
Thank you, Kathy! I gave a quick makeover to the desk that goes with the hutch for Handan’s home office, but she didn’t need the hutch, and there’s nowhere else it will fit inside, lol! Besides, our garage is getting so neat and clean that it fits right in! ?
Love the idea, but those black brackets need to be satin bronze ASAP!
LOL, we could, Pamela, and we might have, but just keep reminding ourselves that it’s just the garage! 😀
I am so grateful for creative minds like Handan’s. I am very adept at copying other peoples ideas, but never got the “hmmmm, I think this would look cool if we…” gene. ? This is such a great idea and an even better use of the space and materials. I LOVE the camo green/satin bronze combo, too (stealing it – the idea not the actual stuff, lol). Do you think the hutch would look good painted green as well? I think it might unless the wood used in the locker project is red oak, too. I can’t remember. Thanks again for sharing!
I’m grateful too, Pam! I think the hutch would look good in green, but we wanted to keep it simple. When she had the idea and even when I first mounted it, the plan was just to have the hutch and maybe some hooks screwed to the underside for hanging stuff. The green and bronze idea came later!
Hey Greg ,Did answer.Could not get into e- mail about burnt house. I can’t not remember the codes to get into things. And gotten burned up. Shelley.
Hi Shelley, have you been able to check email lately? I’ve sent a few things your way!
Love it! Everything looks so neat….Can’t wait to see it in person!
Thanks, mom! 🙂
Hi, I’m a new follower. Your reno reminds me of something my mom did. When she got new cupboards in the kitchen, she put the old ones in the garage. I thought that was brilliant. I said, “When I have a house, I’m going to do that too.” I can’t wait to see your reveal of the whole garage. You guys have such interesting, creative ideas that it makes your blog an “I’d better look at what they are doing now”.
Thank you so much, Lisa and welcome to the Patch! 🙂
Got to hand it to Handan, she is one smart cookie!!
Tell me about it! And she married one dumb cracker, lol! 😂