
Raw Wood Table Reclamation
It’s back to basics with this raw wood table reclamation. After all the primer, paint and wax, sometimes it’s good to get back to raw wood!
It was my first. My very first.
Oh, sure, every so often I reference some old DIY that I completed in the bland and boring years before The Navage Patch, but this table was the very first!
I remember the day well that we bought this little side table – it was a warm Indian Summer Saturday morning in Glastonbury, Connecticut. Handan and I headed across town to the hills and orchards of South Glastonbury to check out a big estate sale we’d seen advertised during the week. We’d recently moved into a condo and were searching for inexpensive furnishings.
We hit the jackpot.
They had amazing stuff for sale! So much wooden furniture, and all of it raw wood! We ended up buying two mismatched side tables, two claw-foot tables and two wooden trunks. I’m sure we bought more, but those are the only pieces I remember.

Back home, I could hardly wait to get started. I had big plans to paint the two side tables. First, I needed paint, so I drove to our local ACE Hardware and paid a visit to the Benjamin Moore paint department.
Mind you, at this point in my life, I had no earthly idea what I was doing when it came to DIY. The only thing I’d ever painted were houses (you can read all about that particular trauma here), and once when I lived in an apartment in Cambridge, Massachusetts, I painted the walls of my bedroom. I’d never painted a piece of furniture, nor did I have a clue about the process.
I knew about primer, so I bought some just in case. And I figured I couldn’t go wrong with Benjamin Moore. I picked out a few colors that seemed nice to me – a few blues and blue/grays and an off-white of some sort.
With supplies at the ready, I began my DIY career without fanfare and with very little notice besides a call down to the basement from my babes wondering what the hell I was doing down there.
That very first table I painted wore a lot of hats over the years. Before we moved to Georgia, it had settled into stable relationship with Handan’s sewing machine. Here it is just before we embarked on our first craft room makeover in the old house.

But in our new house, it had yet to be put into service. Instead, it had been sitting in the basement topped by half-empty moving boxes and generally doing no good to anyone, especially my babes.
You see, that original paint job – the one I was so proud of in 2013 – had worn out its welcome. The side table would never see the light of day looking as it did. After several months of thoughtfully cast stink eyes and contemplative hairy eyeballs, Handan reached a decision as to its fate.
“My babes!” she said. “Can you strip the paint off this table? I know you like the paint, but I’m ready for a change.”
“I liked the paint eight years ago, my babes!” I said. “I couldn’t give a farting fig about it now! You want it stripped? Consider it done. Soon. Ish. I’ll check my calendar.”
“No hurry, my babes,” she said. “Whenever you get the chance.”
Not too long after that conversation, I took the little table into my workshop and got to work. Over the next several, I worked on it in fits and starts whenever I had time between other more pressing projects.
What was billed as a simple paint removal to restore a raw wood table turned into something a little more complicated, but in the end we got a beautiful piece of furniture with a ton of character. I’ll show you the process.

Raw Wood Table Reclamation
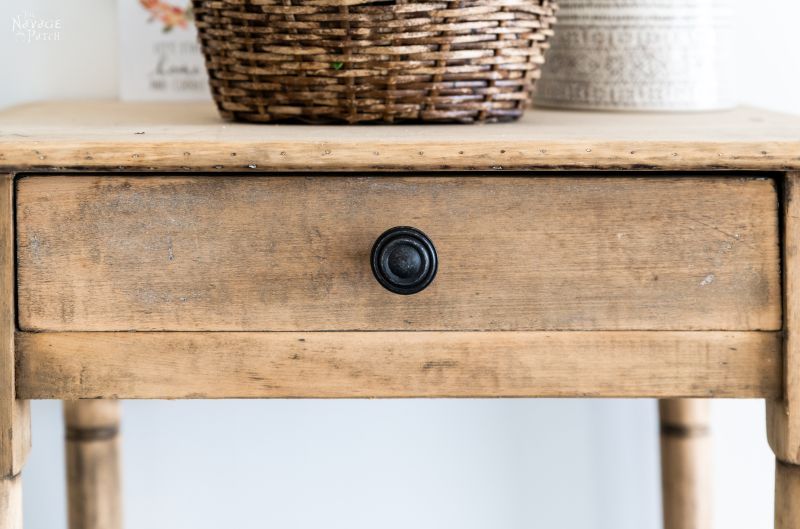
Here’s another look at the painted table.

I had two options to get the table back to its raw wood state. One was to sand off the paint. That would have been fine for the flat tabletop, but the legs were another story. Turned legs are hard enough to sand when they’re bare. When they’re painted, you’ll have more fun punching yourself in the face than attempting to sand off the paint. You’re familiar with the old proverb, “A moment on the lips, a lifetime on the hips?” Well, there’s a little-known corollary about turned legs that says, “Paint makes it grand, but a lifetime to sand.”
Or maybe I just made that up. Nobody knows.
Option two was paint stripper. Fortunately, the days of needing to don battle gear and respirators when working with paint remover have largely fallen by the wayside. Today’s eco-friendly and slightly less toxic strippers are easier and safer to work with.
But they still make one hell of a mess. There’s no getting around the mess! We’ve found Blue Bear gives good results, and the smell isn’t too offensive.

Their line about it being made with 100% American-grown soybeans always gives me a chuckle. It’s certainly not made from 100% soybeans, that’s for sure. If soybeans alone could do what this stuff does, we’d be living on a pretty sparsely-populated planet. It doesn’t seem to be sold on Amazon anymore (soybean supply chain issue?), but here’s one made from oranges…or possibly just a bunch of chemicals. The packaging sends mixed messages, so I guess it could go either way.
Anyway, stripping is messy business, so I covered the table with a disposable plastic drop cloth and donned a pair of nitrile gloves. Since my hands were covered in phone-melting stripper and Handan was working upstairs, I don’t have any pictures of me slathering the stripper goo all over the table, but here’s how it looked the next day.

The stripper seemed to have done a bang-up job on the legs! They reminded me of surrealist art.

I’d left the chip brush and a little leftover stripper in a cheap Solo cup overnight. Next day – no more cup! Behold the mighty power of soy!

I ran a scraper along this face – it was so satisfying to see the paint slough off! Yep, definitely surrealist. This table was straight out of a Salvador Dalí painting.
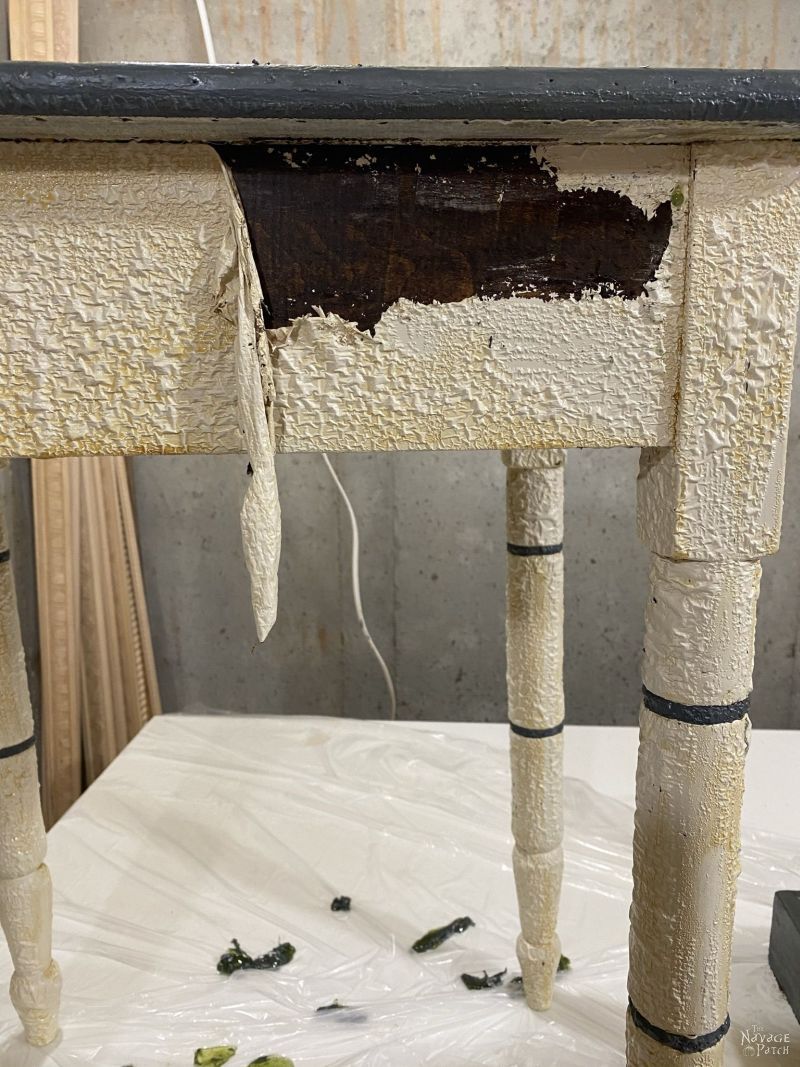
But up top, things were looking a little different. Maybe I used two different brands of paint? It didn’t look like the stripper did much of anything.

Still, I had a run at it with a scraper and did manage to get some paint off.

After more work on the legs, it was apparent that I didn’t let this table marinate in stripper goo for long enough.

It needed another coat soy gel.

I applied more paint remover to the top and to the areas that still had paint on the legs then let it sit for two days. The extra stripper and time seemed to do the trick.

For the most part, the paint slid right off.

But there were still little nooks and crannies all over the legs and top that still held paint. I could have left it like this, and it would have looked shabby chic taken to an absurd extreme, but I wanted something a little more refined.

I puzzled over my next steps. The table was still too slimy to hand sand or use any sort of mechanical sander. Then I remembered a set of circular drill brushes that Handan had bought for me years ago in the CT house to clean the black stone composite sink. One of those brushes just might be able to get into the turned rings on the legs and remove the stubborn paint.

Here’s one of the legs before I hit it with the rotating brush. Besides paint that was still adhered to the wood, the entire table was covered in scruffy, gooey, slimy, shaggy areas that wouldn’t wipe clean with the rag. I hoped the brush would take care of those areas, too.

And here’s that same leg after brushing. Big win for the drill brush!

This was the best I could get with the brush, There were still some places with paint, especially around the edges of the top, that the brush just couldn’t budge. Still, I could have left if here and had a nice, rustic looking table.
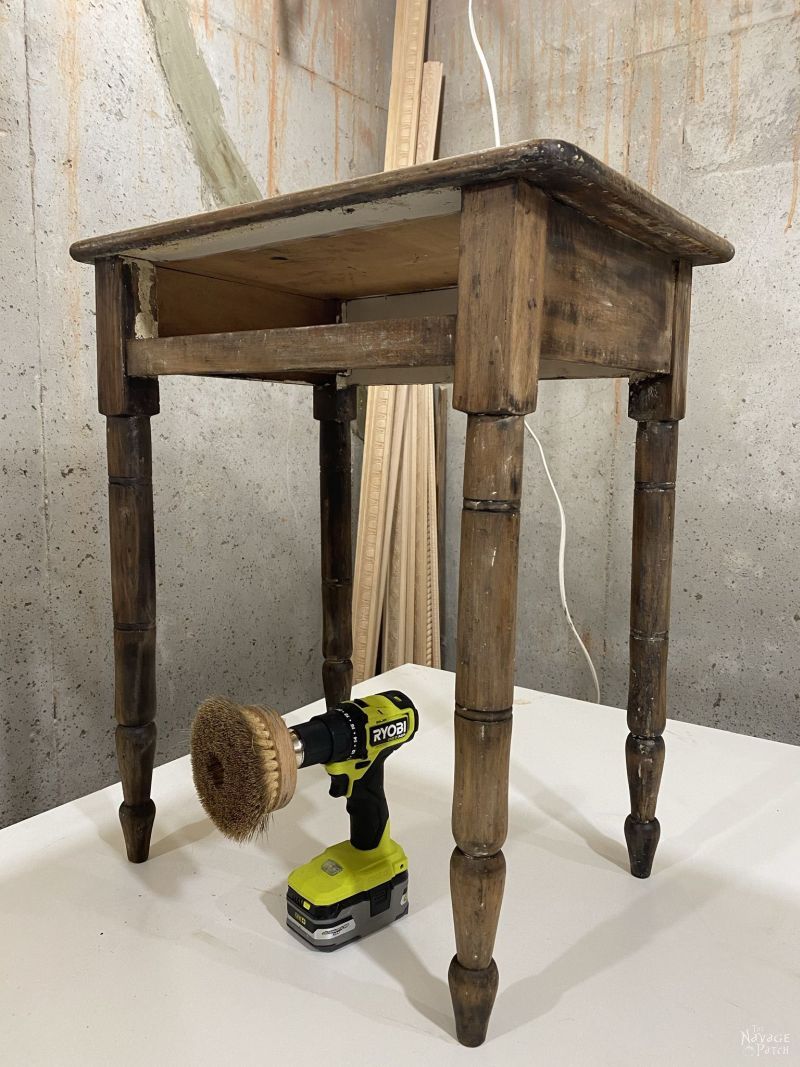
Instead, I used my random orbit sander and 220 grit sanding discs to lightly remove any remaining paint (that wasn’t nestled in a deep gouge) and to feather the color to a slightly lighter shade. I worked with the sander at an angle so only the small part of the edge touched the legs.

After sanding, the table was still damp from the stripper, so I just stuck it in a corner of the basement and left it alone for a few weeks. We didn’t have a plan for it – Handan just wanted the paint gone.
Later, as we worked on our garage makeover, my babes and I both hit upon the same idea for the raw wood table – right next to the entry door. I gave it a coat of Modern Masters Dead Flat Varnish and then carried it to its new home.

You can see just how much the color lightened up when the stripped finally fully evaporated.

We think it’s the perfect touch for our cozy little garage mudroom and entry.

After years of painting nearly everything in sight, we’re starting to once again value the look of simple raw wood.
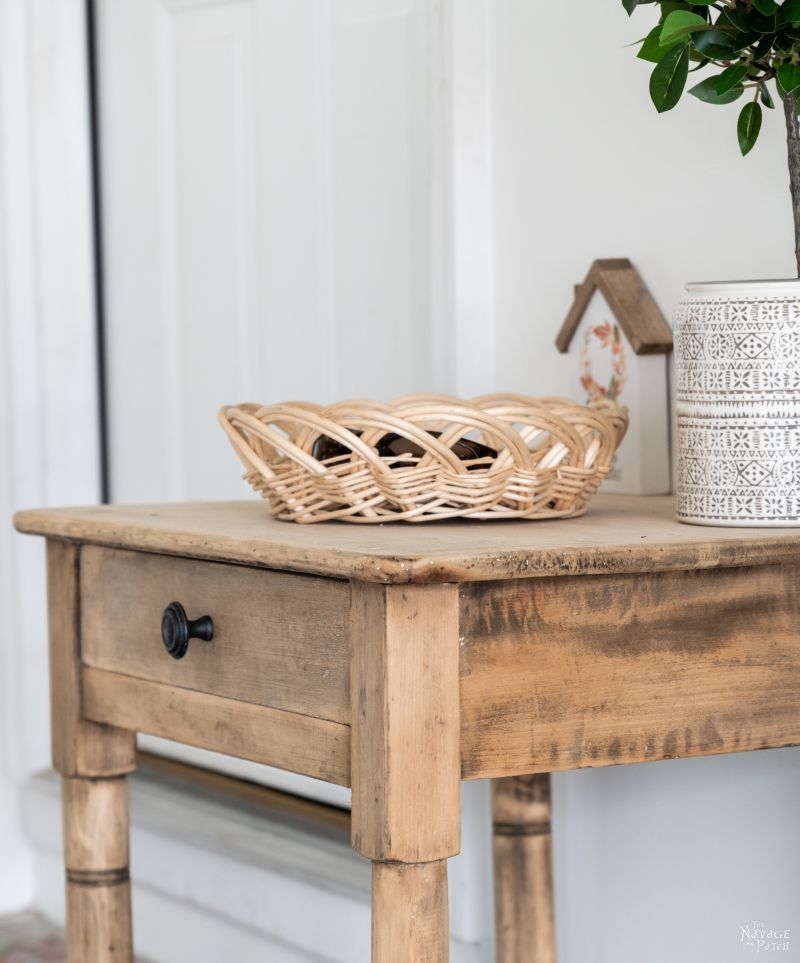
And the benefit of reclaiming a previously-painted piece is that you can control how much or how little of the paint you want to keep. I think the little bits here and there add a lot of character.

It does take a bit of work, but it’s worth it!

Do you have any painted furniture in your house that you might consider returning to a raw wood state?

Let us know in the comments!


We love it when you share our posts on Facebook and Pinterest!


apply paint stripper then cover with plastic or newspaper to slow it from drying. also check out you tube video That Shabby Guy and what he does to strip paint. really amazing.
Thank you for the helpful tip, Nat! You got me curious, and so I watched many of That Shabby Guy’s videos, but I couldn’t see a video where he is stripping paint off a curved surface like a table leg. All his pieces in his paint stripping videos seem to have perfectly flat surfaces and he never seems to use stripper on the furniture legs, but perhaps I missed it. Do you know if he has a video showing how to strip spindles or table legs? That would be very helpful for all of us 🙂
i love an old piece of furniture stripped. Just a little helpful hint, after scraping the stripper and paint off, use Mineral Spirits to clean it and then water. It looks great.
Oh I used a ton of mineral spirits to clean up the mess left behind from that stripper – still took a long time to fully dry out, lol!
Looks great stripped and in this place in your garage. We don’t have any painted furniture in our house. Even though I liked the look, our furniture was very nice stuff that I couldn’t justify painting over the finish (Drexel and Harden mostly and some very nice inherited pieces too). Plus I always thought that wood would (ha ha) return so playing lazy helped too. But I’m on the look out for smaller pieces such as your table to bring in to the mix. So thank you for some very good directions on how to achieve the raw wood look and for working around the turned legs. Maybe I’ll do a coffee table and hide the glass and brass for a while.
Yep, raw wood (or even polished wood) will never fully go out of style. Paint has its place, but wood will always reign supreme in my book. Hope you find a fun piece to work on!
Super stripper! I must admit I’m so finicky I’d have got the little bits left in the holes off too, but that’s me, a pita! It looks really great, thanks for what you showed there. I adore real wood stuff, always thought it was a crime (sorry!) to paint wood, we have wood on our walls here. It’s great too with linseed oil heated with terebenthine, then rubbed or sprayed or painted on it. It has an oil painter’s smell for a while, but it makes the grain really stand out well.
Thank you, Star! Do you add the turpentine to thin the linseed oil so you can spray it, or does it have another purpose? I’ve haven’t heard of that combo for wood before…I may have to try it! 🙂
Hey Greg I have used twine to get into the grooved areas of turned legs. Think of it like floss.
That is a great idea, Melita – thank you!
I have saved myself all kinds of time and money by getting a heat gun.
https://www.facebook.com/Ree2Race/photos/1222041674573588/
https://www.facebook.com/Ree2Race/photos/1222041711240251
Isn’t it funny? One person paints a piece of lovely wood furniture, another is stripping off the paint again! Used furniture can be a story and a journey and sometimes a real pain in the ass! ?
Correct on all points, Jay! As long as you like the outcome, it’s a job well done.
Absolutely gorgeous!
Thank you so much, Ivory! 🙂