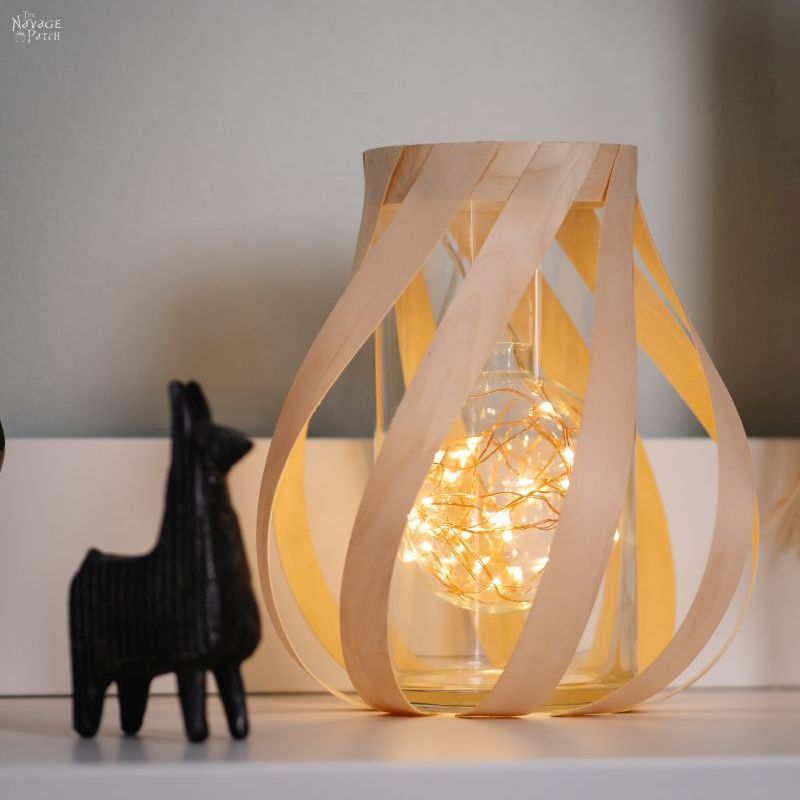
DIY Wood Veneer Lantern
This beautiful and elegant DIY wood veneer lantern is made from a simple Dollar Tree vase and wood veneer edging.

Okay, look, this was never supposed to be a blog post. I just want to clear that up right away. So if there are some missing pictures, don’t get all Judge-y Judy on me, alright?
Sometimes we make stuff only for Instagram – usually in the form of short videos called Reels over there in IG world. So if you only follow us here on this patch of internet we control, you may also want to check out what we do over there in Zuck’s back yard. It’s a vast and roiling utopia of fabulous fame, fantastic fortune and filtered phonies. Click here to follow us there.
Anyway, I was saying that we made this wood veneer lantern for our Instagram crowd (another fine bunch, but surely, madam, not nearly as fabulous as you), and we had no plans to blog about it.

But then a few people asked in the comments if there was a blog post about it, and then a few more DM’d me to ask the same thing, and then even more people emailed me to ask the very same question.
You have spoken (well, written, to be more precise), and we have listened (or read, if you want to be all technical about it). Your wish is our command, enquiring madam! You want a blog post, you get a blog post!
So forgive the video-captured photos as I dismantle the Instagram Reel to present you with our wood veneer lantern tutorial.
DIY Wood Veneer Lantern Tutorial

- Dollar Tree straight-sided vase
- Wood veneer edge banding (we got ours at Home Depot, but I’ve linked to Amazon)
- Gel super glue (the absolute best deal for gel super glue is Dollar Tree, but I’ve linked to Amazon)
- Insta-set accelerator spray (I’ve been a fan of Bob Smith, but I just found and linked to a much cheaper brand)
- Small clamps
- Clear glass or plastic Christmas ornament
- Battery-operated LED fairy lights
Veneer edge banding is mostly used to hide the layered edges of plywood, but we’re finding it’s great to craft with, too!

I started by cutting a length of veneer the same as the circumference of the vase.

Next, I applied super glue to the inner side of the veneer.

Then I wrapped the veneer around the top edge of the vase. This top band serves two purposes – 1) it’s a better anchor point for the upcoming veneer strips than plain glass and 2) it looks good!

There’s nothing necessarily hard about gluing a band around a vase, but because nature saw fit to hobble us with only two hands, clamps make the job even easier. I put one mini clamp right in the middle.

Then I turned the vase and wrapped the rest of the veneer towards me, securing each end with a clamp.


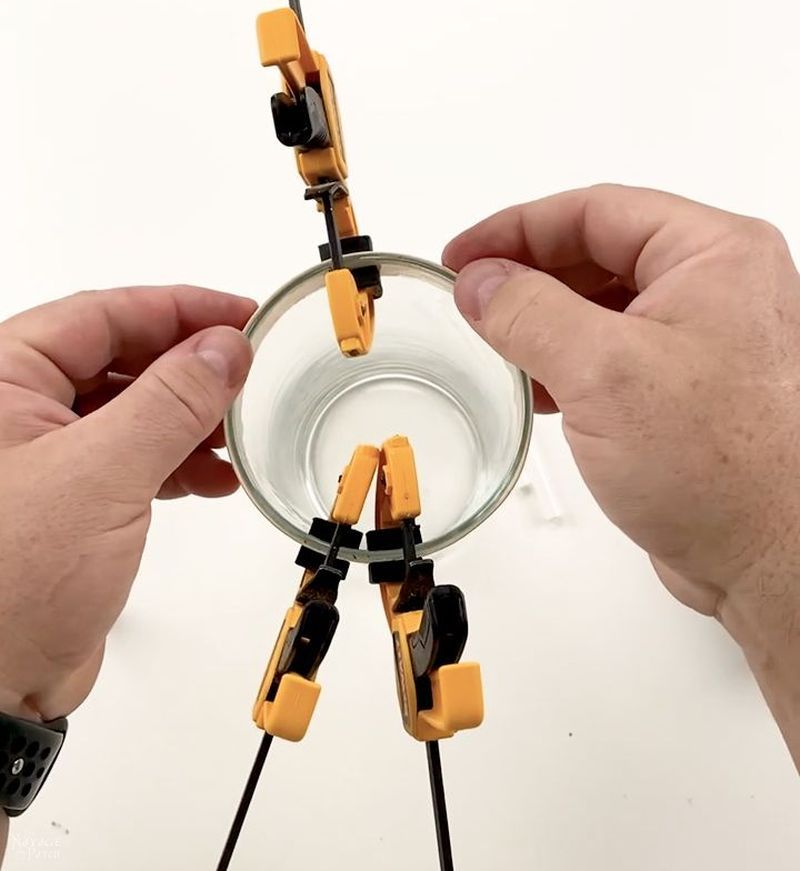
Since gel super glue takes a relatively long time to set, I sped up the process with accelerator.

All banded and ready to go!

I cut 8 pieces of veneer – each 9 inches long with a 45-degree angled cut on one end.

I put super glue on the angle end of the veneer.

And then I pressed it against the veneer band, making sure the top edges were lined up.

Accelerator makes the craft go quicker!

I added the next piece directly across from the first piece. Then I added pieces of veneer between those first two.

I added the second 4 pieces in between the first 4, and the flipped it over to start gluing the bottom. You can see in the picture below I attached them.

I put super glue on the end.

Then I pressed it in place.

Then, holding it in place with the back of a clamp, I sprayed it. This was to prevent bonding my finger to the vase, which may or may not have happened before I thought to use the clamp technique.

After I finished gluing the last of the veneer strips in place, I inserted a string of fairy lights into a glass ornament and placed the ornament in the vase. As luck would have it, the ornament wedged itself halfway down the vase, so it looks suspended in air.
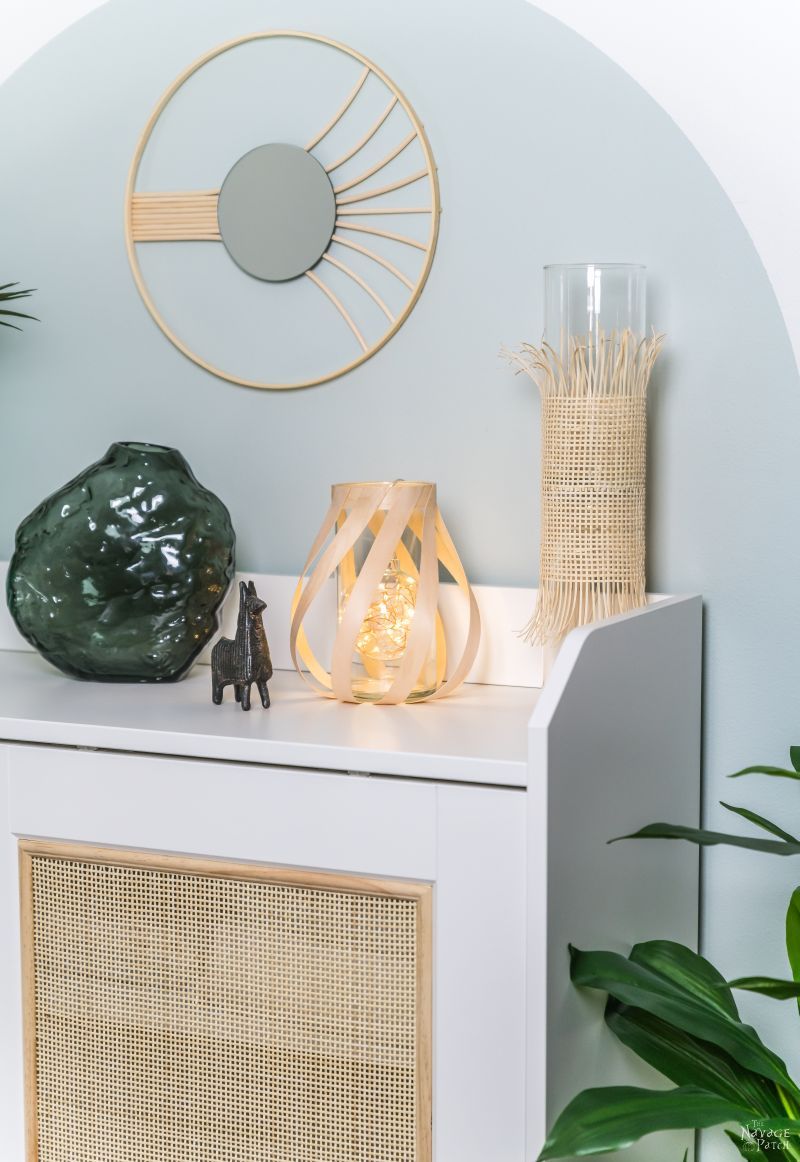
And that was it! A simple lantern made from humble materials, but it looks fantastic!

I hope all you fine madams of Instagram liked the more in-depth tutorial, and for our readers who don’t do the ‘Gram, here’s the Reel that started it all.
It looks great sitting atop our IKEA linen cabinet with the custom DIY cane weave doors!


Thanks for bringing it to the blog! I love it this lantern, but not a ‘Zuckerberg-Gram fan, so I would not have seen it there. What tool do you recommend for cutting the veneer smoothly?
Thank you! I used a razor blade, but scissors would also work.
I LOVE it, but… Do you think it would be possible to paint a wash of color or stain the veneer first? I don’t see why not, but just wondering. Thank you for the inspiration!
Absolutely, Anna! We wanted to keep it simple for this one, but you can totally do that!
Absolutely the best craft project I have seen in FOREVER! Great job guys! I love this one!
Wow! Thank you so much, Leslie! 🙂
What is the accelerator and how do you use it?
Hi Jana, I’ve linked to it in the post. You just spray it on super glue, and it sets instantly!
Awesome lantern!!!! Thanks for posting the how to instructions. Your creativity never ceases to amaze me! Another amazing idea!!
Thanks, VJ! 🙂
Just curious, but how/where did you manage to hide the battery portion of the fairy lights?
Yeah what Gail said?
Of course, Arlie! 🙂
It’s tucked just behind the lantern, so we ran the wire up and over the top and down the back side. You can see it if you walk up to it and look for it, but to the casual eye, it’s not seen.
What a gorgeous lantern! And a very creative and unique idea, too! I hope you don’t mind if I make a version of it for a wood themed project! I’ll certainly give you credit!
Thank you so much, Gail – I don’t mind at all! 🙂
Love this! They would make awesome pendants, too.
Yes! It would make an awesome pendant light!
Looks great!! I have the same question about the battery pack for the lights.. How did you hide it. Please show picture(s).
Thanks!!
Thanks, Mona! I’m not home at this very moment, so I can’t post a pic, but I just ran the wire up and over the top and down the back. The battery pack is on the “ground” just behind the lantern.
This looks fantastic! I’ve wanted to make something similar for a patio light but couldn’t figure out how to get thin enough wood that would bend. I didn’t even think of veneer strips! Very clever, good Sir! I might’ve put the band at the top on last over the top of the veneer strips, or maybe put a second band over the top. And one of those cork rounds on the bottom, just to finish it off and protect the bottom/cupboard. I’m also curious about the battery pack! One day they’ll have lights that can be charged up with no visible battery, I’m sure, and it will be fantastic!
I really love this and I’m so excited to have finally found a solution to my wood problem. Once again, you’ve saved the day!
Hey Jay! Good idea about the second strip. We also toyed with putting a strip around the bottom, but decided to keep it simple. Cork bottom is a great thought, especially for outside use. The battery pack is behind the lantern. If you were to look up close you’d see it, but it’s well-hidden for pics and the casual eye. Hope you make one for your patio (and it’d make a great pendant light, too!)
Y’all come up with some of the easiest and cutest ideals. I’m glad you decided to do a blog for us. Love all the things y’all do. Be safe and have a great weekend.
Thank you so much, Jill! I’m so happy you like the project! 🙂
Well, someone already asked my question of where the batteries were! Great project. I’d love it stained a medium brown or painted aqua with a white wash (beachy vibe). Thirty plus years ago, my entire life was stained MinWax Provincial! But it goes beautifully with the caning in the doors and natural wood of the mirror!
Oooh, I like your beach vibes color scheme for it, Kathy! I think that would look great!
I love it. It looks so light, airy, and modern.
Kinda like me? 😂
Very creative and appealing! What is the height of the cylinder vase used in this project?
Thanks, Julie! The vase is 7 1/2 inches tall.