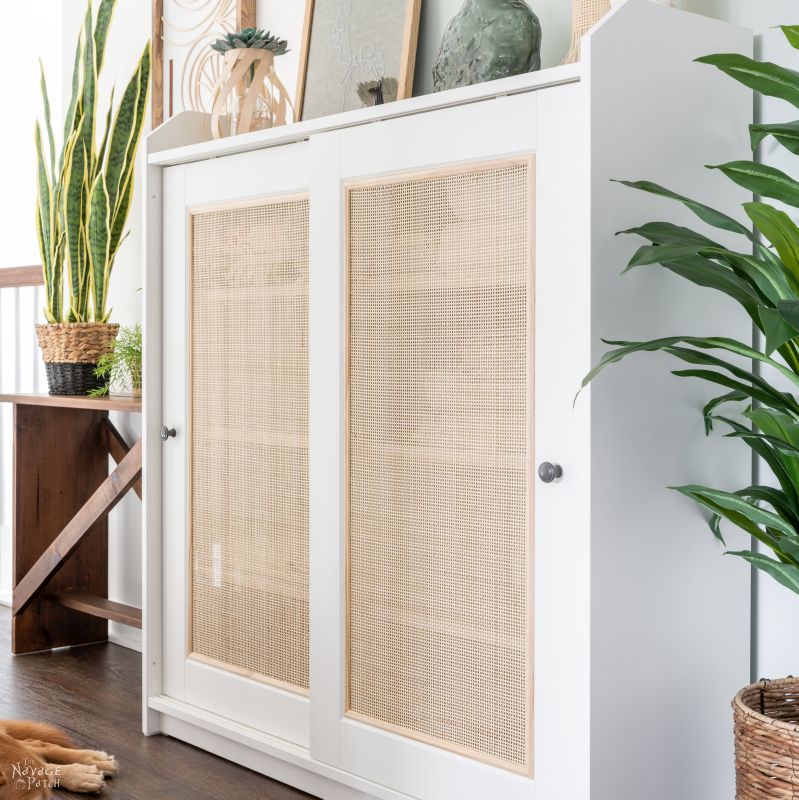
DIY Cane Cabinet (IKEA Hack)
This DIY Cane Cabinet is a brilliant IKEA hack that will work on any cabinet with a glass door. We’ll show you the best way to do cane on glass!
Let there be cane
And Handan said, Let there be cane: and there was cane. And Handan saw the cane, and it was good.
Thus began our journey into the world of cane, a journey that started on July 4th and continues to this very day.
Because cane, madam, is addictive.
Oh, it all started very innocently. My babes just bought enough cane to cover two doors of an IKEA cabinet we’d bought and planned to put in the upstairs hallway to hold linens. (On a side note, can someone please explain to me why we still call them “linens?” Please correct me if I’m wrong, but aren’t most sheets and towels made from cotton these days? Do any of you fine and distinguished readers actually own linen sheets? If so, I’d love to hear about them! Meanwhile, I’m going to think about starting to call them “cottons.” I mean, it makes sense, right?)
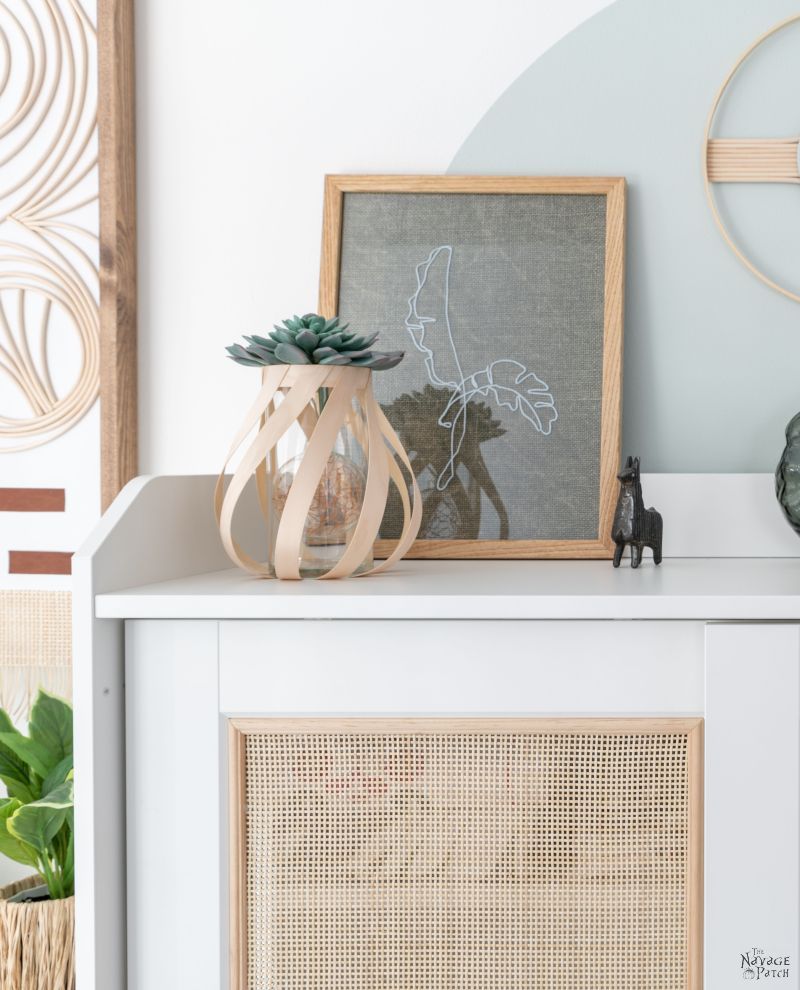
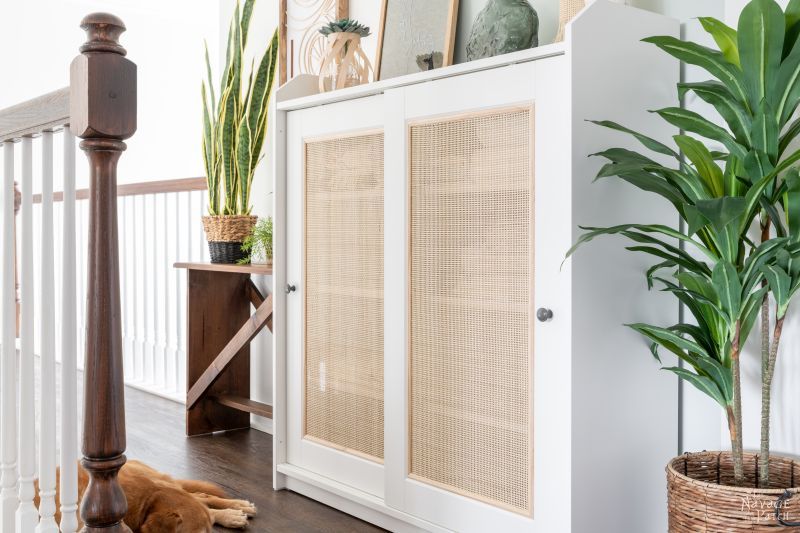
Anyway, we had this IKEA Hauga to hold our…cottons…or linens….or whatever you want to call them. But the doors were just plain glass, and who wants to gawk at a bunch of folded bedsheets each time they walk by, right?
So my babes thought it would be a grand idea to put some cane on those doors to spruce up the plain-white IKEA look and to hide the contents inside.
Now, I’ll be honest with you here. The moment she said (and I’ll try to remember her exact words and quote them accurately), “Squawk, squawk, SQUAWK, cane doors on IKEA squawk okay my babes? SQUAWK!!!” That’s pretty much exactly what she said, as far as I can remember. So the first thing I thought of was that stereotypical cane. You know, the stuff you most likely have somewhere in your house – perhaps on the back of a chair?
I thought of that – specifically I thought of the chairs in my parents dining room – and said, “But won’t you still be able to see through it? Those holes are pretty big.”
And that’s when I got my first lesson on cane webbing.
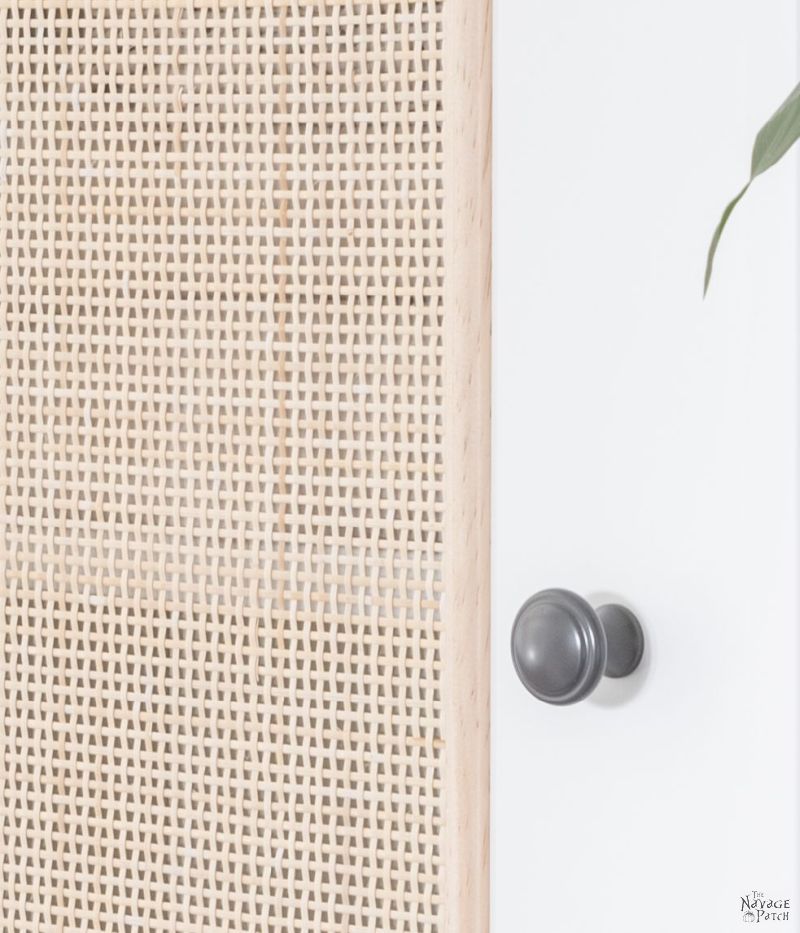
So apparently there are a few different types of cane webbing, and the kind my babes had in mind for this IKEA hack is called radio weave cane webbing – sometimes also called open box weave. I looked it up, and it appears that open box weave and radio weave are two different things, but for the life of me, I can’t see the difference. If anyone knows, please educate us all in the comments!
Anyway, radio weave has much smaller holes than open weave (that’s the stuff on my parents’ dining room chairs), so we wouldn’t have to worry about seeing the contents of the linen cabinet.
The caning begins
We embarked on this project on July 4th morning – more than enough time to whip out two fabulous-looking doors, shower, barbecue and then head out for some fireworks and festivities, right?
Right?
If you nodded your head and whispered right, then no chicken dinner for you, madam.
What transpired on our glorious Day of Independence was nothing short of a disaster.
But. BUT!
It was a very educational disaster, and it led to an incredibly productive July 5th! I talk about what happened on the Fourth in the video, and I write about it at the end of this post, for those who are interested.
- Cane webbing
- Measuring tape
- Scissors
- Two bath towels
- Decorative molding ( we got ours at Home Depot)
- Miter saw or miter box
- Glass cleaner
- Gel super glue (we used about 4 or 5 bottles of Gorilla, but you can get Dollar Tree brand for about 1/2 the price – you’ll need a lot of them though, since they are sold in smaller tubes.)
- Bob Smith Insta-Set Accelerator
- Small clamps (optional but recommended)
DIY Cane Cabinet Video Tutorial
We intended for this to be a video-heavy post…in fact, we intended to make it into a long-form YouTube video to show the process.
And that’s exactly what we did.
But I cannot and will not ever leave those who love the written word without at least a big handful of them – even on video-only posts. I love to write, some of you love to read, so there will be some posts like this one in the future where we’ll all get what we want, but there will be a nice long video to watch as well.
Video, madam. It’s like the “plastics” that Mr. McGuire says to Dustin Hoffman’s Benjamin in the beginning of The Graduate.
“There’s a great future in video. Think about it. Will you think about it?”
Yes, we’re thinking about it, Mr. McGuire. The world has spoken, and the world wants more video.
And if the world wants more video, who are we to say no?
(But you’ll always have my written word, too. I promise!)
DIY Cane Cabinet Written Steps (but you also need to watch the video!)
Step 1
Measure and cut the dry cane 1/16 inch in from all sides of the glass. In other words, if the glass is 32 inches by 15 inches, cut the cane to 31 7/8 inches by 14 7/8 inches.
Step 2
Measure and miter-cut the molding, dry-fitting all the pieces to ensure a snug and perfect fit.
Step 3
Soak the cane in water for about 10 minutes.
Step 4
Lay the wet cane on a towel and cover with another towel, pressing down to absorb as much water as possible.
Step 5
Starting one either the top or bottom of the door (the short sides), line up the edge of the cane with the bottom of the glass. Lay one of the mitered edging pieces on the cane and note how much of the cane it covers. Remove edge piece and then run a generous line of super glue along the line the corresponds with the middle of the edge piece, making sure enough glue goes into the holes in the weave and touches the glass.
Step 6
Place the edge piece on top of the glued cane and press down firmly. Starting from one end, spray insta-set accelerator under the front edge of the molding.
Step 7
Repeat steps 5 and 6 for the opposite side. Note that the cane will be bunched up in the middle of the glass. This is good! This is what you want.
Step 8
Wait about 20-30 minutes for the cane to start shrinking again. You want to see the cane laying just about perfectly flat against the glass, but not yet tight.
Step 9
Repeat steps 5 and 6 for the remaining long sides.
Step 10 (optional but recommended)
Place 3 clamps on each the top and the bottom while the super glue cures for 24 hours.


What happened on the Fourth
We just didn’t realize how strong cane is when it shrinks. That was the driving problem on the Fourth.
We’d seen some people just lay cane over glass doors and use spline and hot glue around the edges. Spline is edging for cane, and it’s very thin – maybe a quarter inch at most.
The problem with laying the cane straight onto the glass is that woven cane in its natural state is not very flat and smooth. It’s kinda wavy gravy with bumps here and swells there. Sure we could have slapped it on there and called it a day, and I could have made it look good in video by passing a camera over it quickly, but anyone looking at it in person would see that the cane was all floppy and loose.
And nobody likes floppy cane.
Nobody.
So our idea was to wet the cane first so it would relax a bit.
We wet it.
And it relaxed.
But it was not as smooth as we wanted. This led us to iron the wet cane, and that worked like a charm. We had the perfectly flat cane we envisioned when we set out to do this project.
So with the cane weave still wet (and unbeknownst to us at the time – very stretched), we measured and cut it to the exact size of the glass.
That was mistake number one, and it was a doozy.
Mistake number two followed quickly on the heels of mistake number one: we used hot glue.
Now using hot glue (aka, mistake number two) was a two-pronged mistake. For starters applying it neatly was, in a word, impossible. There was no earthly way to get enough hot glue on the cane so that the cane would stick to the glass and the spline would stick to the cane without creating a mess of hot glue that would squeeze under the spline and get all over the cane.
Handan saw me struggling with this process early on and offered to help. She fancies herself a hot glue expert and thought our troubles stemmed from me not working the glue gun correctly.
I turned over the gun and watched as she failed just as miserably.
In the end, with no evident way to complete the task without making a mess, we just soldiered on making a mess – me on glue gun duty, and Handan trailing behind with tweezers and cuticle cutters.
That’s right, what should have taken 20 minutes took a several hours.
And once we realized the cane was shrinking faster than we could work, we had to repeatedly lay a wet towel on the cane to keep it stretched. Even then, we thought that all would be well in the end if only we could finish the gluing.
Well, we finished, eventually.
And it looked good – it really did.
We thought we’d done it!
We thought we’d won!
Feeling victorious, I set the door aside and we sat down in the living room for a little R&R before we tackled the second door. Secretly, I worried how I would sell this project on the blog. Who in their right mind would want to spend hours picking dried hot glue out of cane weave with tweezers and cuticle cutters?
Well, that was a problem for a later date. We had earned a little celebration. We had…
CRACK!
A loud cracking noise shot into the living room from the kitchen
“Dammit!” I said and lunged up from the sofa. I knew immediately what had happened. There was only one thing it could be.
My fears were confirmed when I laid eyes on our caned door. One of the short sides had pulled away from the glass.
This led to a scramble to fix the problem that involved two trips to Home Depot and lasted until dark.
We were able to peel off the spline and the cane, and Handan again cleaned everything with her cuticle cutter. That woman has the patience of a saint sometimes!
We tried super glue and spline.
CRACK!
We tried epoxy where the super glue had failed.
CRACK!
This was when we figured out we had to rethink our process. This was when we thought about cutting the cane when it was dry and then wetting it. And this was when we decided to use decorative molding instead of spline. It was the only way to save the first door.
As the sun set and Americans were busy cramming hot dogs down their necks and guzzling Bud Light, Handan and I finished the first door with super glue and decorative molding.
And the only crack we heard came from the neighbor kids setting off fireworks.
*****
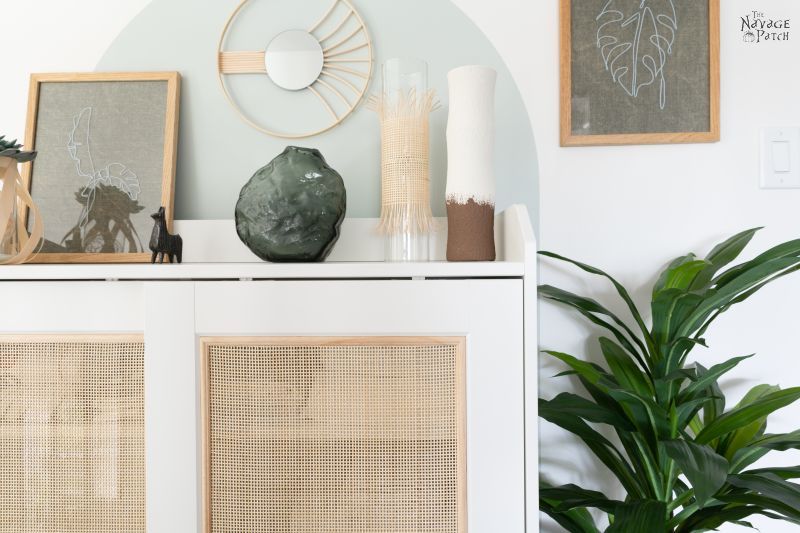
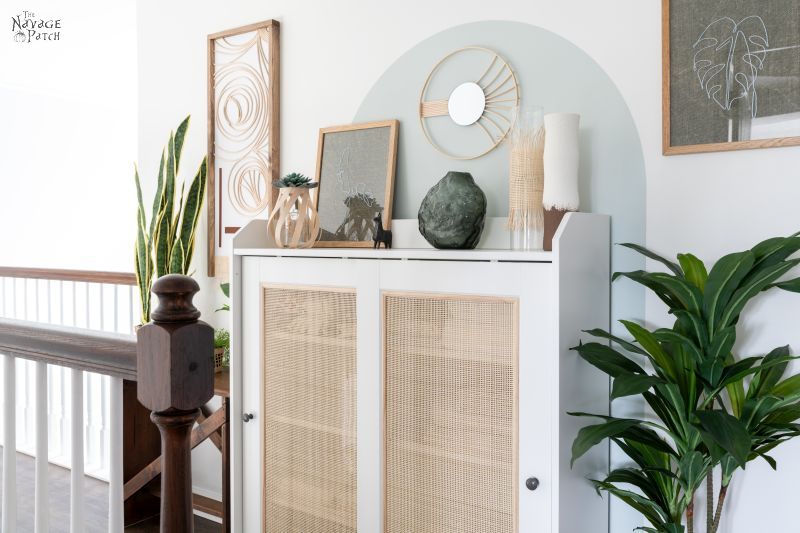
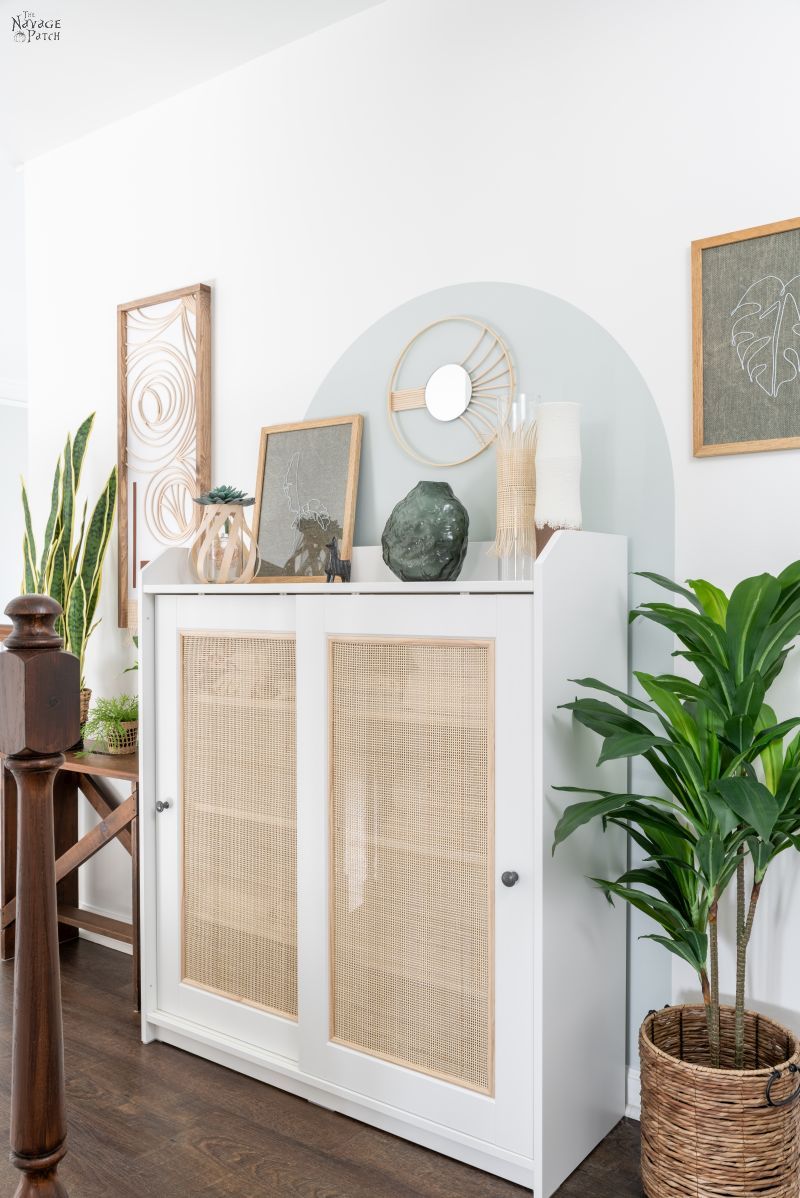
Oh, and there’s just one more thing. The following pic is for Bernice and anyone else who wonders what that little hallway area with the painted arch accent wall and this cane cabinet looks like from downstairs. I took this pic after dinner last night while sitting in my assigned spot on the sofa. Not a bad view!
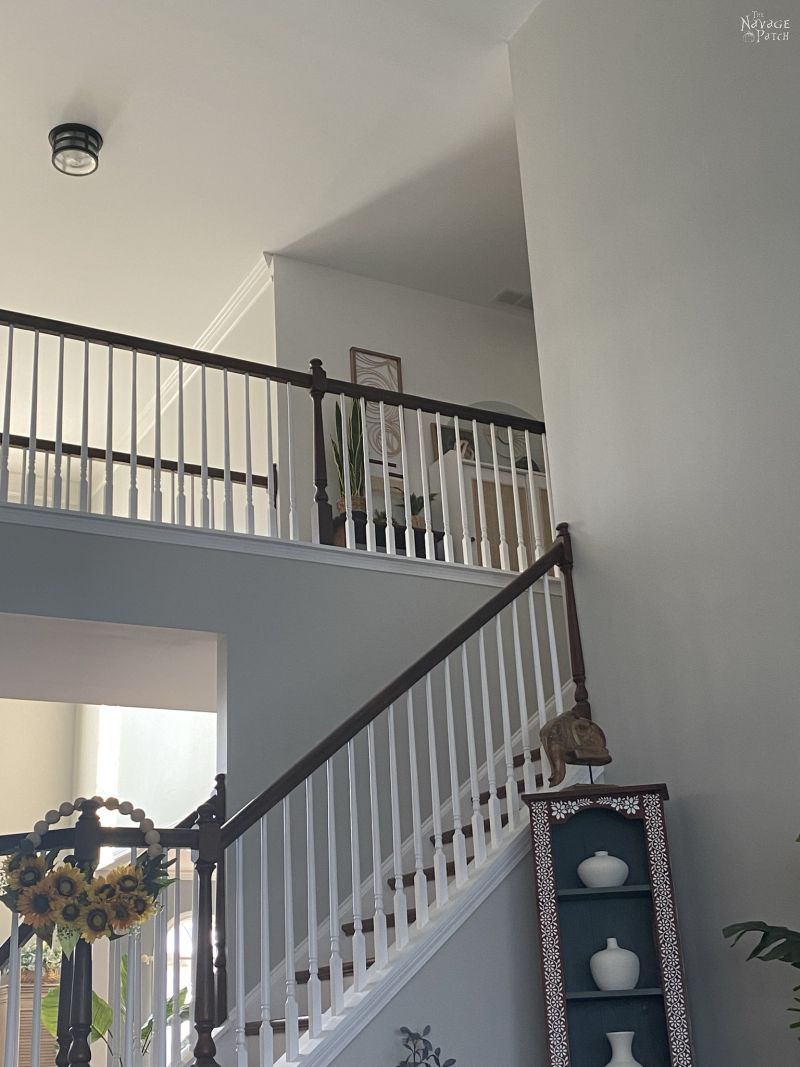


I love how this looks! Ideas for when I put similar cabinets in my basement. But first my house decided it needed a second new roof 18 years after the last one. Ah the joys of home ownership. And yes, there are many types of caning. Do see below:
https://www.vandykes.com/chair-hardware-parts/c/1643/?gclid=EAIaIQobChMIkbaz2u_J8gIVC4nICh1xfQcpEAAYASAAEgIZYPD_BwE
I definitely prefer the smaller mesh too.
Thanks, Laurie! Ooof, 2 new roofs – that’s a big nut! Yep, the joys never end… 🙂
Greg, Great job! You can’t be perfect ALL the time! And it helps all of us to know that some projects don’t always go according to plan…thanks for sharing.
Thank you, Phyllis! Failure is the best teacher. If we hadn’t screwed the first one up so bad, we would not have had the opportunity to learn so much about how cane moves and just how strong it is when it contracts!
Where do you buy caning?
Hi Cheri, I linked to the Etsy shopped we got ours from in the post. 🙂
Linen is made from cotton fibers. Linen describes the weave. Think ‘linen suit’. Towels and sheets used to be very similar. Most of the difference is today’s terrycloth. I really enjoy the humor in your posts and the love you two obviously share
Hi Susan, I thought linen was made from flax, like linseed oil. It’s a thicker and tougher fiber, but when washed over and over, it becomes soft as cotton but lasts much longer. Given its characteristics, I would expect actual linens (not cottons braded as “linen”) to be far more expensive and luxurious than anything made from cotton. I don’t know if I’ve ever seen real linen if you can now pass cotton off as linen.
Real linen sheets do exist today! You’re correct that it is made from flax, Greg. It is scratchy at first, so experience, as you know, lead to an acceptable alternative process — just wash it every day in hot water (no softener for two weeks. Iron for a full day or use your mangle, purchased precisely for linen linens! Et voila! Smooth as J_f peanutbutter! I can no longer afford linens, but enjoy my cottons almost as much.
Wow, I definitely have never experienced real linens. Sounds like a lot of effort, but it also sounds like it’s worth it!
I have linen sheets & so did my grandmother! She was French & was born in the French Quarter of NOLA. She had exquisite taste; I got that gene. Champagne taste, beer budget.
Linen sheets, like linen suits (the first thing I bought with my first real estate commission in 1976) breathe! When the weather is hot & sticky, linen lifts you away from the fibers; they breathe and you stay cooler! Luxury sets can cost a pretty penny, but BrookLinen sells a nice set at a reasonable price. Summer in the South calls for linen sheets. You deserve it!
—- Leslie in SE NC on the Coast
I see linen sheets in my very near future! 🙂
Ugh, I am so missing (and craving) Ben & Jerry’s Wavy Gravy ice cream after reading this 😆
This is such an awesome hack!! Have you submitted it to the Ikea Hackers website? If not, you really should! (https://www.ikeahackers.net/)
Cheers!
LOL, I remember Wavy Gravy! I wasn’t aware of that site. Thanks, Mo – we’ll check it out!
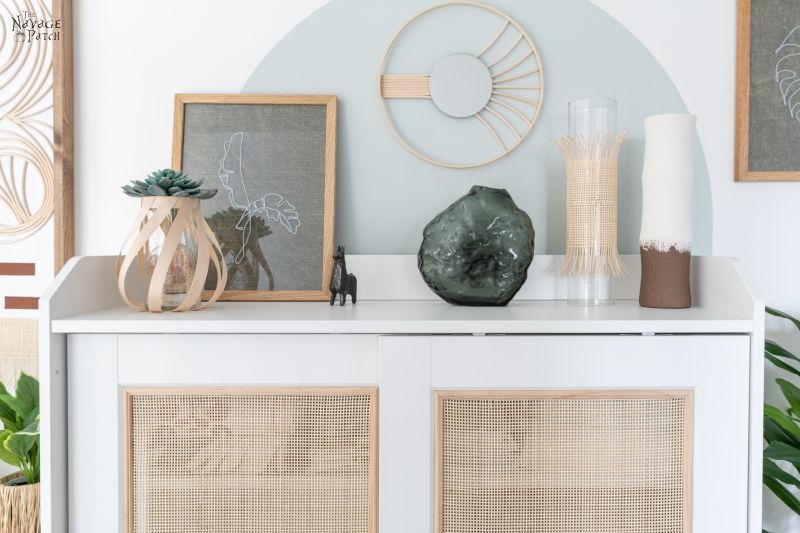
Turned out beautiful. Thanks for letting us know you are human and things don’t always work as first expected. Love the swirly vase. Did you make that and can we expect tutorial? BTW I think your dogs are camera hounds (pun intended)
Thank you, Debi! Oh things rarely word out the first time when I’m doing projects, lol! Yes we made that swirly vase, and yes we’ll have a tutorial on it soon! 🙂
Beautiful!
Thank you! 🙂
Beautiful! I’m bringing home an old (not exactly an antique) pie safe, that needs some tlc, and will be reproduce into an old-farmhouse style China cabinet. The doors are where it needs the most tlc, so I’m hunting for ideas, and this is simply lovely, and a possible route, for me, now! Thank you!
(Now, can I tease you about the 70s porn music?🤪🤣 Lol!)
I think this technique would be great for an old pie safe! Please send us pics if you do. LOL, that is some great lounge music I picked – easy listening at its finest! 😀
Greg & Handan,
You two are the best!!!!!! That cabinet looks so beautiful. Your dedication to the project was amazing. I love everything you do.
Thank you, Marian! Yeah, this one was a little tough at first, but once we figured it out, it wasn’t hard at all!
These days most “linens are “polyesters”. If you cant find real linens, try bamboo. I think they are more comfortable than cotton.
By the way, I like the cabinet!
Thanks, Joanne! Yeesh, these terms get confusing when there’s no longer a set definition! 😀
Greg, I adore your projects especially when you correct mistakes. Not everyone can own up to those, you know. Like myriad others, your writing style is what keeps me reading everything you post on your blog. But your inventive and nicely finished DIYs are the bait that lured me into the world of Bandana, Bari’s and Greg, amirite?
Read a few comments about pop up ads blocking your work. It’s something I’ve noticed more lately. In this particular post, I read the following: “can [ad] cotton these days?”. Hmmm, interesting question. Can cotton? Had a good laugh when I realized the ad was blocking your pithy question al.ost entirely. So, I counted the ads: 2 AARP, 3 Breyers Ice Cream, 4 Starbucks, 5 Old Navy, 2 Discover Card, 1 arthritis drug. Installed a new ad blocker and was down to one extra ad. Not bad for 3 minutes and no cost. 🙂
Oh my, those doors are fantastic! I have a laundry cabinet that needs doors and because I didn’t want to see the big red and white bottles I’d thought to use burlap (cabinet is also wet glove storage and needs to breathe)
but radio weave cane looks so much better. Thank you for the install tips!
Thank you, Jean! It’s a great hack that looks fantastic! 🙂
What a beautiful gem. I gotta have this in my home. Thank you so much for sharing
Happy 2022
Thank you so much, Ivory! Happy 2022 to you too! 🙂
hello! 🙂 this is so beautiful! am i correct in that 6 feet of the cane webbing should be ordered to complete this project? thank you!!
That is correct, Jill. Good luck! 🙂
thank you, Greg! 🙂
Thanks for the tutorial.
How is it holding up now that it’s been several months? Did it stay just as taut and secure?
Would love to try this on a piece of furniture that’s too expensive to replace if I mess it up 😅
After we figured out the secret, it’s holding up great! Better to err on the side of too loose than the side of too tight though!
Awesome project idea.
Please try to read this post on a mobile phone. There are so many pop ups and ads flying around I couldn’t do it
I am attempting this same project. I am curious. Why not soak the entire roll of cane and then cut to size once it is dry?
Thank you so much! This was so helpful! 🙂
you are so very welcome!
Hi there – I love your project and how it turned out!
So much so that I tried to replicate it myself… and failed…. Twice. 🙁
I would really appreciate your guidance here : the main issue is that the rattan doesn’t stick to the glass panel.
We’ve tried 2 different types of glue : gorilla glass glue, and the super glue you used in the video – but none of them seem to work. Even when pressure down for over 5mn, the glue doesn’t dry and the rattan doesn’t stay in place.
In your video it looks like you only need to hold the rattan in place for 2mn, is that correct? or was that longer? Would you say the accelerator spray is a definitely needed here?
The second question I have is about making the rattan wet : that seems to make it even harder for the glue-rattan-glass to stick together. We’ve tried to glue dry rattan directly to the glass (a small piece), and that worked quite well. However : you are right in that it doesn’t lay very flat and does’nt look so good…
How long did you let the rattan dry for after soaking it ? Should let rattan dry a bit longer before trying to apply glue onto it?
Thanks again for your guidance towards a beginner DYIer!
Hi Alex, a few things come to mind here:
1) Make sure the glass is squeaky clean.
2) Make sure you follow the steps laid out in the post.
3) Accelerator is a must in my opinion.
4) Furthemore, I strongly recommend clamping the pieces overnight or up to 24 hours. Super glue may dry quickly, but it needs 24 hours to fully cure.
5) You may be trying to glue when the cane is still too wet and stretched. Read the steps again for more detail on getting that part just right.
Good luck!
I love what you did using caning on your glass cabinet. I just wanted to know what the dimensions are to the trim that you used