Master Closet Makeover Plan
It’s time we tackled our Master Closet and gave it the makeover it so sorely needs. In this post, I’ll lay out the plan and explain why we chose this route.
There’s no equality in our master closet.
Not anymore.
Oh, sure, when we moved in, the two halves were equal. There was her side:

And there was his side:

Both equally endowed with wire shelves and carpet.

The sides were equal in nearly every way, and there was great peace and tranquility within the vaguely salmon-colored walls of the master closet.
But then came moving boxes, and in them all manner of shirt and pant and dress and shoe and boot.
There was a great unbalancing, as she had more clothing (Much. Much. More.) than he, but not more space.
So while he was able to unpack all of his garments and fit them in an orderly fashion on his side…


She on the other side was only able to fit a fraction of her garments…


The other garments (many of the shoe and boot variety) languished in boxes. Three here…

Two there…

And 6 more in the guest bedroom.
And while he dressed himself each day with a full selection of clothing at his fingertips, she was forced to choose from a mere percentage of her actual clothes.
As a smart madam may surmise, this arrangement was not entirely agreeable to her.
And so it came to be that he feared for his safety as the months rolled by, yet still he took no action to rectify the inequality.
Some called him crazy. Some thought him a gambler. Others claimed he liked to live dangerously.
In truth, he was just lazy, and preferred martinis to makeovers.
But recently, he was roused from his great torpor when 14 heavy boxes were delivered from IKEA. He could put it off no more.
He owed her that much, at least.
Master Closet Makeover Plan
This project has been in the works since we moved in. We always knew we’d be giving the master closet a makeover, it was just a matter of when. And we did have just a few other things going on this past year, so it kinda fell by the wayside. But as the world wakes from it’s viral slumber, offices are starting to re-fill, and Handan’s is no exception. Soon, her work-from-home days will be over, and she’ll be back among the commuting masses. This means she’ll need a lot more to choose from than what she currently has unpacked.
It means the master closet makeover is upon us.
Now, she’s been toying with this idea and that idea for the master closet makeover since last summer. Her first thought was to use the same ClosetMaid system that we used in Baris’s small bedroom closet.

But while that system was a good solution for his small closet, we needed something a little more robust and cost-effective for our master closet.
As she usually does when designing a room, my babes turned her Turkish eye towards IKEA – the cause of, and solution to, so many of my problems.
It should come as no surprise that IKEA has a closet system. It’s called PAX, and it has the attendant ecosystem of wardrobe frames, shelves, drawers and doors. She considered it – after all, it’s literally designed for the exact purpose we required. But there were some drawbacks.
To wit, the wardrobe frames are offered in two depths – 22 7/8 inches and 13 3/4 inches. The former would encroach upon the dressing and maneuvering space and make the closet feel claustrophobic. The latter depth is actually perfect, but for one fatal flaw: while optional drawers are available for the deeper wardrobe, none are available for the 13 3/4 inch model. And drawers are a must.
Next, she considered the BILLY line of shelves – after all, you can’t beat the price! The plan would be to place a few of them along the walls, separated by 3 feet or so and then add hanger rods between them. The problem though is that BILLY shelves are only 11 inches deep, and that means in order to hang clothes so the hanger doesn’t hit the wall, we’d have to install the mounting brackets and rod on the front edge of the side panels, and from an aesthetic standpoint, it’d look a little wonky.
Besides, BILLY has no drawer option, and as I previously noted, my babes needs drawers! Well, so do I, come to think of it.
So PAX was out, and BILLY was out. My babes was stumped, so she decided to dive a little deeper into IKEA, and that’s when she found BRIMNES – the solution to all our master closet needs.

It was the right depth – 13 3/4 inches. This means that the rod brackets and rod won’t be in our face when we’re standing in front of it.
Also, each BRIMNES already comes with 2 drawers – no need to add them on later for an additional cost!
But best of all, BRIMES is cheaper than PAX and only a little bit more expensive than BILLY (but considering how much more you get, I consider it to be cheaper than BILLY). At $99 per bookcase, it’s a bargain!
Okay, so BRIMNES it is. Let’s talk about what we’re gonna do with them.
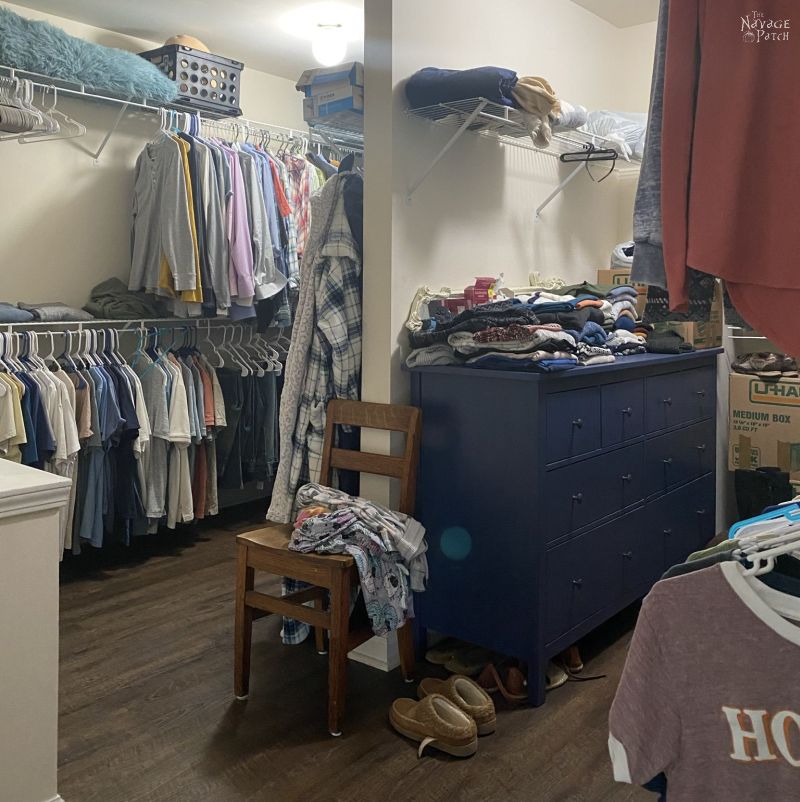
But first, let’s start prepping the room for a change. As you can see by the photos of the closet with clothes, we already put new flooring in there. It’s an LVP product that we put all over the second floor, excluding the guest bedroom.
My first task with this makeover was to clear out the closet. This meant I had to schlep everything out and plop it in the bedroom. Before I talk about that, I know you guys love poking your digital noses through other people’s business, so here’s a few shots for you to enjoy.

Up on that wire shelf is a stuffed turtle that I’ve had since I was a baby. He, along with my stuffed Humpty Dumpty (shown somewhere in this post), shepherded me through early childhood and protected me from legions of monsters in the closet, under the bed, and lurking in the crawlspace attic. Next to him are two faucets we bought from Costco last summer in anticipation of our master bathroom remodel. No word yet on when that will happen, but at least we have the new faucets covered! Hanging in the background is Baris’s cap and gown. Yep, he’s all grown up and will be graduating in a month! Astute madams can figure out where he’s going to college based on what’s hanging in our closet. Ah yes, and underneath my stuffed turtle, there are 3 rain ponchos from our 2017 trip to Universal Orland and Disneyworld. A few coats back from the cap and gown is my high school varsity football letter jacket. No, I am not, nor was I ever, a jock. I only played football because we were required to play a sport each term, and I didn’t have anything else to play. Fortunately, by my senior year, I figured out that theater could replace a sport, so I got into improv comedy and acting. But for 3 years before that, I was a human punching bag.
Now, you may be wondering why we’re not going to be using the two blue HEMNES dressers shown in the picture above – after all, they’re in perfect shape, and they are designed to hold clothes! But the thing is, my babes wants white. And much more importantly, she wants less drawer space and more hanging space.
Yes, yes, I know I said earlier that drawers were a must – she just wants fewer than we currently have. One HEMNES will be transferred to the guest room and the other will pullstorage duty either in the garage or the basement.
So last Independence Day was my first ever living in a state where fireworks are legal. I shared my enthusiasm with Handan and Baris, and we all went fireworks shopping…twice. Once on the 3rd and then again on the 5th. It’s never too early to load up for the next year! This year, I want to pop up to South Carolina with B ‘n’ H before the big day. I hear they have the really big stuff over there! Hehehehehe.

Okay, time to schlep. Half done!

Fully schlepped!

Next, I removed the wire shelving. I really can’t stand this stuff. I’ve been battling it since our first house, and I’ll probably be removing it from our last.

Good riddance to bad shelving!


And the worst part about this horrid stuff is how it leaves the walls like swiss cheese!

Finally! A blank canvas!

Okay, before I fill those holes, let’s talk about the plan a little more. Along the left-most wall in the picture above, we’re planning to put two BRIMNES, separated by about 3 feet. There will be hanger rods between each BRIMNES and between one BRIMNES and the wall at the top and mid-point, so we’ll have two levels to hang clothes. There will also be one BRIMNES placed against the middle wall. That setup will be roughly mirrored on the other side of the master closet.
Across the tops of all the units will be a long shelf sitting on brackets. There will certainly be more additions, but that is the rough plan and the major scope of work.
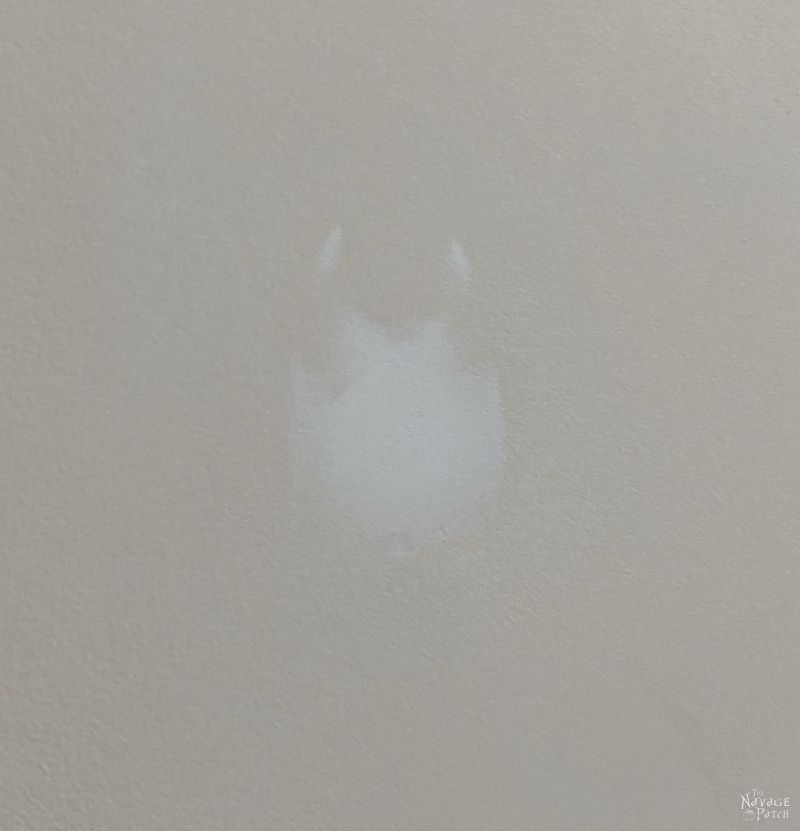
Now, back to the walls. There were a boatload of holes to fill, and the worst part of filling wire shelf holes is that most of them stick out of the drywall like the one below:

Trying to sand these these down is an exercise in maddening futility. You just never get them totally flat. Fortunately, there’s a solution for that!
All you need is something round, like the back of a screwdriver handle.


Place the end of the handle against the hole…

And give it a few taps with a hammer. You now have a beautiful concave depression that’s easy as pie to fill with joint compound. Note that if using a screwdriver, it will likely become unusable after so many hammerings. The one above has been repurposed as a hole-repair tool. Its screwing days are over (o_0)

When filling so many holes, I prefer joint compound (drywall mud) over spackle. It is much easier to spread, and it saves a lot of time applying. My method is super-easy, but it does take a day and an overnight. I first fill all the holes flat, meaning I scoop out some mud, slap it on with a taping knife, and then I scrape over the whole area to leave the wet compound flush with the wall. After several hours (if I apply in the morning, I come back in the afternoon), the mud has dried and shrunk a bit, leaving a much smaller indentation. I then go back around and add more mud, this time leaving just a little excess, meaning I don’t scrape it flush with the wall – rather I leave the mud a little proud of the surface. I let the mud cure overnight.
The next day, I sand.
But instead of killing my shoulder with a sanding sponge, I hook up my random orbit sander to my shop vac and hit all the mud spots with 150 grit sandpaper.

Each hole takes about 5 seconds to get perfectly flush with the wall. When painted, there is no evidence the holes ever existed. By the way, I’m wearing ear plugs in the picture below. The empty closet was a painful echo chamber, turning the slightest sound into a weapon. I learned my lesson from the coat closet makeover. Though my hearing has mostly returned, I’ve still got a pretty loud ringing in my left ear. From this point forward, I wear earplugs or over-ear protection for almost all DIY.

Soon, I’ll be giving our garage a makeover, and I will make a video of the entire process. It really makes it so easy when faced with several dozen holes.
Here’s the video!
Since we’re going to want the wardrobes to sit flush against the wall, I removed the baseboard from the walls against which they’ll be placed. Later, when the BRIMNES’ are all in place, I’ll measure and cut the baseboard to fit around the wardrobes.

You never know what you’re going to find once you start tearing out original construction.


I prepped the room for painting, then decided I’d paint the ceiling too, so I ended up removing the light fixtures and heating registers.

The original ceiling color was the same as the wall color – the aforementioned vaguely-salmonish white – so I decided to paint the ceiling with the wall paint to save time. As with much of the house, I went with Sherwin-Williams HGTV Bohemian Lace from Lowe’s.

Since I didn’t have to worry about keeping the ceiling paint off the walls and the wall paint off the ceiling, I used my ceiling roller for everything. It made the job fast and easy!


And that’s where we stand now.

All is painted and awaiting the next phase of our master closet makeover.

Stay tuned for the next installment in which I’ll share a totally unorthodox (but really clever) idea Handan had for a new laundry chute door!


I HAVE BEEN FOLLOWING YOU TWO FOR SEVERAL YEARS…LOVE YOUR IDEAS AND solutions.
i am making a new walk-in closet and need Hanna’s set up ( I have too many clothes and also need drawers. )
PLEASE HURRY UP AND GIVE SOLUTIONS TO HANNAS CLOSET –CHOP CHOP
KEEP THE GREAT STUFF COMING ..BRILLIANT
PS I LIVE IN ENGLAND AND DO HAVE AN IKEA…THANK GOODNESS !
LOL, it’s coming soon, Sandy – hang in there! 🙂
I love the previous comment LOL!!
I too am eager to see your (Handan’s) closet solution. We have the dreaded wire shelves as well, and a refresh is on our project list. I was anticipating using one of the expensive closet systems you can buy online, so I am very excited to get some less expensive inspiration from you.
Chop chop!! 🙂
LOLOL! I guess we’ll have to pick up the pace a little! 🙂
Fantastic, I can’t wait for the next installment! Great ideas.
Thanks, Marcia! Next installment coming soon!
Greg, silly you. You thought you only had one woman pushing you to get tasks done. I too found cig butts under a kitchen cabinet. Everytime I pulled my trash drawer out I got an awful smell. Had to pull apart and found the culprit. Amazed at what workers will do. Great to know about the Brimnes
It seems I’m going to have to rearrange my posting calendar to appease you guys! 😀
I look forward to seeing how this project turns out. You have given me some amazing ideas! And the fact that you show how you do each project is so helpful! Have a great day & thank you for sharing all this!!
You are very welcome, Renee – it is our pleasure to share our projects with you!
Greg – even IKEA furniture can be painted white. Poor dressers.
Don’t I know it, lol! Truly, it’s not so much about the color as it is the shape. You’ll see soon enough! 🙂
I do not envy your hole-filling! When we bought our current house, the previous owners had removed the builder-grade closet stuff and installed a very lovely system (truly, it is lovely). HOWEVER, they neglected to fill all of the holes left from the previous system. And as you said, there were SO many. All filled now, but it was a chore!
I can’t wait to see your finished closet! I know it will be amazing.
Hi Dana, I’m telling you, with my method, filling several walls full of holes is easy as can be! The hardest part was dismantling the shelving! 🙂
Hokies and Golden Retriever lovers. I think it’s time I moved in. Greg can you make me a mother-in-laws space???? I might even help with your projects. As always, enjoying your projects and walking us through it. Be blessed!
Help with the projects? I’ll make the room ready today! 😀
I have to say that I don’t like wire shelves. My daughter is moving to Northwest Georgia and is currently building a home. What do they put in the homes..yep, wire shelves. I can’t believe it. They are paying a boatload of money and they get those dreaded shelves. Here where we live, built in shelves are the norm. And they are always nice. They don’t even have an option to add them through the house. So when you post the completed project I’ll be sending that post to her. We are both crafty and enjoy wood work, and have built furniture together, so she wouldn’t have a problem putting in a closet of her dreams. I just wish I could help her. I live on the opposite side of the United States. Thanks for all your posts. You both are so talented and have an eye to what will work best in your home. I’m so impressed!
I guess some people don’t know there are better options out there than wire! I’m sure you two will have blast re-imagining her new closet. Good luck with it, Melody! 🙂
I love ripping out wire shelving! My very first DIY was my master closet! I used a couple of closet kits from Sauder and loved how they turned out. My new place here in Florida will be getting new closets so I’m taking notes! I love IKEA!
It is satisfying to see them go! More info coming soon! 🙂
Can hardly wait to exhale with excitement, because I know your closet/closets will be aaaaamazing!
It’s shaping up awesome already, Ivory. More coming soon! 🙂
Wow another fabulous project!. I hate those wire shelves got rid of them years ago, and yes filling those nail holes was a pain. Wish I had known about the screwdriver tip.
I love the LVP flooring. Can you share the brand please., I am looking for LVP and have not found one that does not scratch. Since I have a dog, I want scratch proof. No sense putting in a floor that I will have to replace in a year.
Hi Dee, sorry for the late reply! Ours is Prolex LVP – specifically Weathered Chestnut from their Gateway collection. I don’t think any LVP is 100% scratch-proof (no matter what they say), but the Prolex is holding up beautifully. It’s a huge step above anything sold in HD or Lowes.
Hi Greg,
We just bought a house in North Carolina, and moved from California. I’ve been taking serious notes on your handiwork. My hubby probably isn’t happy with you. This is my first time with a walk in closet! I’m ecstatic but suffice to say, the wire shelves leave a lot to be desired. Can’t wait to see your outcome.
LOL, I hear that a lot, Megan! We’ll be sharing more of the project soon! 🙂
I would give my first born male child (if I had one) for a walk-in closet this big. The biggest closet in my house is one that runs under the eaves of a gambrel roofline across one wall of the master bedroom (two sections of sets of bifold doors with a slanted back wall in the closet. Dang 50s era New England capes.
Yep, I know exactly what you’re talking about, Laurie!
Ahh, to have an well-organized closet is one of the simple pleasures in life. What a great start–can’t wait to see how this all comes together. Question–what is the built-in thing to the left of the closet door (when you walk in to the closet). There are glimpses of it in the photos, but I don’t think you mentioned anything about it, so now I’m wondering. But the walls look great after the patching and paint.
Hi Deb, that’s the laundry chute, and it’s the subject of the next post. Have a look!
Hello Greg and Handan,
I was wondering if i missed your adventure when you moved back here in the US. I started reading your story and got hooked to it..I love the humor and was really laughing hard in
with the THor and Store part…:)…Were you able to bring Thor and Zeus with you?..And yes, please hurry up with your closet project so we can have your ideas too..
More power to you.
Mae
Hi Mae, we moved to the States in January of 2013. 🙂