Easy DIY Chandelier Makeover
A chandelier makeover is a cheap alternative to buying a new one. We’ll show you the easy way to spray paint a chandelier to save you time & money!

For a DIY family like ours, a new house comes together with a long list of projects that must be tackled before the house truly becomes our home.
As much as I’d like to sling a few boxes over the threshold, toss a sack of used underwear into the bedroom, order a large pepperoni pizza and call the job done and the house a home, I know those halcyon days of bachelorhood are in my past.
In my present, I have my babes, and my babes likes things to be just so in a new house.
And look, I’m not saying she’s wrong. Far from it! The woman has an impeccable eye, and she’s well on her way to transforming another house into our little slice of heaven.
Usually I completely agree with my babes’ declarations.
“You will paint these walls, my babes.” She said, flicking her finger to each of the dining room walls.

“Damn right I will!” I said in absolute agreement. The walls were hideous. I would paint them posthaste!
But sometimes I don’t fully grasp her vision or see the genius in her plan.
Hanging in the middle of those glaring red dining room walls was a bright, golden chandelier – the type a builder hangs to add a touch of class to a room or perhaps to lead the eye away from his mistakes and inability to build something square.

Nothing too fancy – just some brass-plated curvy metal with plastic tubes for candles – in other words, A Builder-Grade Special.
When we bought the house, I naturally assumed I’d be lowering that eyesore down from the ceiling and into its well-earned grave. It served honorably, but really, hanging around this long looking like that?
It was just embarrassing.
To keep it hanging would be like me feathering my hair, splashing on some Paco Rabanne cologne, rocking a popped-collar Izod, pulling on a pair of parachute pants (with pegged legs), slipping on a faded jean jacket with a big Duran Duran button skewered through the left breast pocket and then tagging along with Baris and his friends. Maybe I’d pop a retainer in my mouth to complete the look.
I assume a lot of things around here, and lemme tell you sister, very rarely do those assumptions pan out.
So you can imagine my shock (and horror) when I saw the following entry on my Babes-Do project list: Chandelier Makeover.
I blinked rapidly, thinking that something must have lodged in my eye that was distorting my vision.
The loon my wife couldn’t possibly want to salvage that hot brassy mess!
I held up the list and shook it in the loon’s my dear wife’s general direction. “Now, see here!” I said, “What’s this all about?” I tried to imagine the hideous amounts of labor involved in making over something as ornate and curvaceous as that chandelier. What was next? A french horn refresh project?
The woman’s gall knew no boundaries!
Suddenly I wanted nothing more than to flop my flabby white carcass onto the nearest sofa and have a good restorative and contemplative nap.
There was just one problem…
WE DON’T OWN A SOFA YET!
GAH!
I spat at my stupid rotten luck.
With nowhere to run and nowhere to hide I turned to face my craptacular fate.

“We’re keeping that twisted hunk of crap?” I still couldn’t believe it.
“My babes.” She said in that way she has of saying things.
Now, look, according to Google’s statistics on The Navage Patch, there’s a 94% chance that you, dear reader, are a woman, so you almost certainly know exactly “the way” of which I speak!
“My babes.” She said, “It will be so very easy, and it’s going to look awesome! They’re going to love your chandelier makeover!” Please note (94% chance of being) madam that the “they’re” she’s referring to is you!
Do you see know how much you’ve affected our lives? Not only do we think of ourselves and what we like, but we think of you and what we hope you will like!
Anyway, I perked up at the word “easy.” It’s become one of my favorites.
And she wasn’t kidding. It would be easy.
But truth? I still wasn’t sold on the outcome.

In my mind, I’d built up a nasty prejudice against the golden-hued thing.
I couldn’t see past its dated appearance. I couldn’t see anything but a scrawny golden chandelier whose time to shine had faded during the Y2K pandemonium. This was the chandelier that would have gotten sand kicked in its candles back on the beaches of 1950s California.
Still, if my babes wanted me to spray paint a chandelier, who was I to say no? If it would make her happy, it would make me happy, even if it looked like the same wimpy thing in a slightly different outfit.
As is always the case, I learned a thing or two during this chandelier makeover, not least of which is not to judge fixtures too harshly by their shiny brass or gold appearance. I’m guilty of that more than I care to admit. One glimpse of the shiny stuff, and I’m all “Oh no! Uh-uh! Not in my house!”
But now I know there’s another way.
Acceptance and tolerance, madam, are for human beings.
Spray paint is for gold and brass fixtures.
How to Spray Paint a Chandelier

- Old Chandelier – the uglier, the better
- TSP cleaner
- Spray bottle
- Microfiber cloth
- Painter’s tape
- Rustoleum Self-Etching Primer (or regular Rustoleum Spray Primer)
- Empty cardboard box to hold chandelier (or a place to hang it outside)
- Spray paint of your choice for chandelier (we used Rustoleum Antique Brass)
- Spray paint of your choice for candles (we used Rustoleum French Cream)
- New chain
- New bulbs
Step 1 – Take down the chandelier
Look, I know this is one of those duh statements, but madam, on the off chance you delegate this task to your mustachioed sofa sprout, well…I wouldn’t want to see him destroy your high-gloss table, silk runner and newly-upholstered chairs with a fine mist of oversprayed paint. We men may have a lot of things going for us, but common sense isn’t always one of them. My wife told me so!

Oh yeah, one more thing – make sure the light switch is in the OFF position before embarking on this step. Be sure to tell your significantly dumber other – he’ll probably forget.
(And yes, you’re totally getting an illegal sneak-preview of our dining room makeover in this post. I’m going to have to insist on you forgetting everything you see here when you’re done reading.)

Step 2 – Tape & clean the chandelier
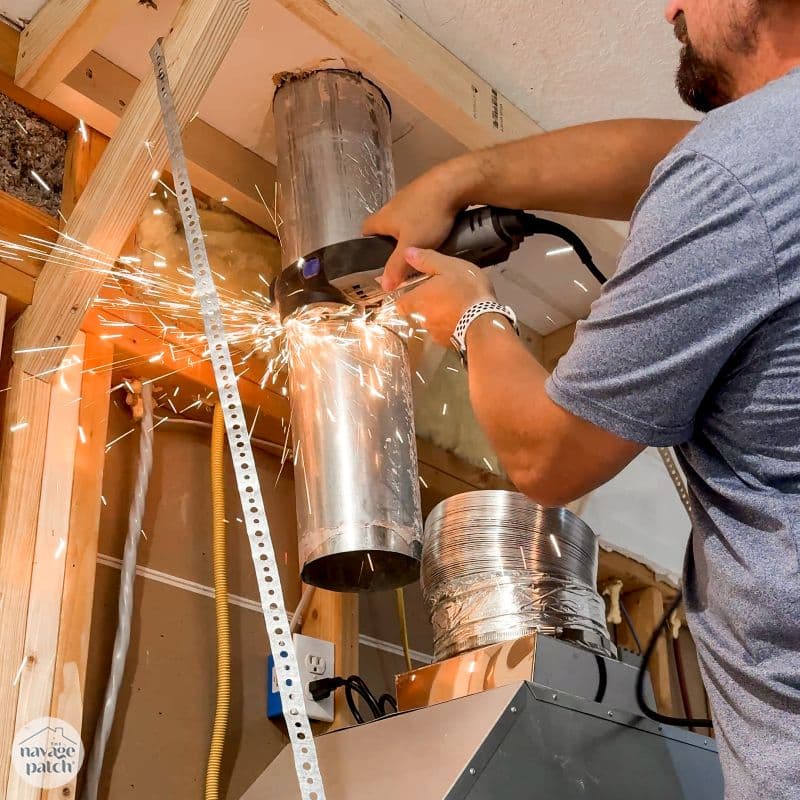
First things first – remove the chain. While you could technically paint it, why bother? It’ll be a total pain in the ass, and you can just buy one for about $5. So take my advice and don’t try to paint the chain. You’re going to have a bad time. And when women have a bad time, husbands suffer, so for the love of all that’s holy, just buy the damn chain already!
Okay, now that we’ve settled that, the next step is to tape off those areas you don’t want painted. The light receptacles are an obvious choice. We also opted not to paint the cord. Yes, it was gold, but we reckoned it wouldn’t really be seen in the final product.
One note – I first cleaned the cord with a TSP-soaked rag before taping it up. The thing was greasier than a teenager working at a pizza shop.
Now, for the chandelier – to clean such a twisted and convoluted fixture, I mixed up a batch of TSP in a spray bottle.

TSP is the best degreaser on the planet. It single-handedly ended the 1950s.

Once I had saturated the chandelier, I let the TSP sit for a minute or so, and then I wiped it off with a TSP-sprayed microfiber cloth. This was one greasy chandelier. I can only drool when thinking about all the delicious meals that contributed to that oily patina over the past 20 years.
Breaking News: Chubby Man with Balding Legs Sprays Chandelier! Film at 11!

I cleaned the chandelier and removed any remaining dirt and grease with a microfiber cloth that I rinsed in a tub of water.

After removing all the filth and gunk, I let the chandelier dry.
Step 3 – Prime time
One thing is certain – our wispy little chandelier is made of metal that was covered with brass plating. What I’m less certain about is if there is any sort of polyurethane finish on the brass plating.
Regardless, since the chandelier will never be touched again once hung, I decided to prime it with self-etching primer.

This stuff is fantastic for DIY metal painting projects, as it eliminates the need to scuff the smooth metal with sandpaper first. But if the chandelier has a poly coating on it, then the acidic component in the etching primer will be doing a whole heap of nothing. Still, the primer component will help the paint stick, and as I said, we won’t be handling the chandelier once it’s hung, so I used it instead of a more traditional primer.
File it under: Can’t Hurt, Might Help.
I held the cord out of the way – no sense priming or painting it.

When I finished two light coats on the top side – spaced about 10 minutes apart – I left it to dry for a bit longer.

Then I flipped it over and primed the underside with two light coats.

I let the primed chandelier alone for an hour or so and then hit it with 3 light coats of Rustoleum Antique Brass.


Handan just loves catching these dramatic action shots of me!

By the time the third coat rolled around, so had the clouds, the lightning and the thunder – a seemingly common afternoon occurrence here in Georgia. Humidity wreaks havoc on painting projects, so I carried the chandelier down to the basement, hung it from a light hanging from the ceiling joists, laid a tarp underneath and continued painting. If you have room in your basement or garage to set up the chandelier this way, I highly recommend it – it was a total breeze to paint. Just don’t do it like I did. Please wear an organic solvent respirator if you’re going to be spray painting indoors. Do as I say, not as I do!
In my defense, I ran around in quick circles, firing spray paint at the chandelier as I went. Before the fumes got too thick, I hightailed it back upstairs to safety. I spent too many years breathing fumes in the old house before figuring out the proper way of doing things. I have no intention of damaging my lungs and brain any further!

While the spray painted chandelier hung in the basement, I went to see about the candles. Of course, I forgot to take a single picture of the candle painting, but I started by spraying them with regular Rustoleum spray primer. I followed that with 3 light coats of Rustoleum French Cream.
Nothing fancy – those plastic tubes just needed a quick refresh.
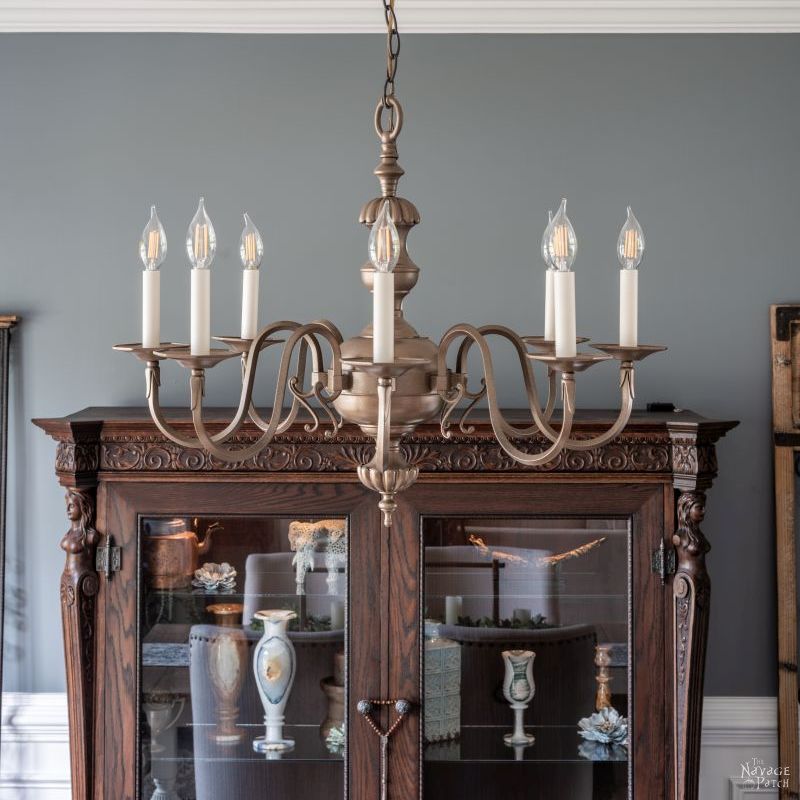
When all was dry, I brought the chandelier upstairs, attached the new chain and hung it in its place.
Handan loves to take pictures of me when I’m concentrating on something and then have a good laugh about it afterwards. This picture was no exception.

Then she’ll feel guilty about laughing at my resting bitch face and ask me to smile for a follow-up photo.
Usually I oblige. On a side note, I think it’s time to get some sun on my legs. Jeezum Crow, I’ve got lobster sticks for legs! Just call me Tommy Two-Tone!

Anyway, I screwed in some new bulbs, replaced the plastic candle tubes and our chandelier makeover was in the books.


So what do you think? Now that you know how to spray paint a chandelier, will you be pulling down your Builder Grade Special and giving it a makeover?


We love it when you share our posts on Facebook and Pinterest!


Looks great! And, I promise to forget the gorgeous dining room …. the one I completely checked out. LOL
LOL, thanks, Laura! 🙂
Once again, a great makeover. Now I’m inspired again to transform my pendant lamps in our Lounge, Dining Room and Foyer. They are all similar styles, but different finishes – and they need a coat of spray paint. I’ve wanted to do it for years. Thanks for the tips!
Couldn’t be easier, Junette, and now’s the best time to tackle all the projects around the house you’ve been meaning to do!
Now I know what to do with our builder grade gold chandeliers. I was wondering about painting them white. What do you think?
Absolutely!
This was very timely! I just purchased a similar fixture at the Habitat Restore for $12. My plan is to spray paint it black. Thank you for all the tips. Yours turned out great!
Oh good! I love it when the timing works out just right, lol! Good luck with yours, Collier! 🙂
The gold. So glad it’s gone! OH that wall coloring. Nope, didn’t notice at all.
Thanks for another lesson!!!!
Me too, Tracy! The gold and red combo in their was just not my cup of tea!
Looks great!! And I just got a new dining room fixture to replace the old shiny brass one!! The antique brass looks so much better! It really brings out all the details of the chandelier and makes it look much more expensive!! Also- I would have never guessed you could paint the plastic candle sleeves!!
Thanks, Anne! I agree – it does make it look like a fancy shmancy antique! 🙂
Beautiful makeover, BUT I have a big NO NO NO NO NO NO for you. You are wearing flip flops on a ladder! You know how dangerous that can be. Put on tennis shoes like you have in other scenes. Shame, Shame, Shame. But good job on the light. LOL
You’re right! Guilty as charged! Thanks for keeping me honest! 🙂
Looks great ..thx FOR sharing ..the dining room looks great..but I did not look
LOL, thanks, Melody! 🙂
Looks great! I love how the antique brass is giving off a rose gold vibe on those gray walls I’m not supposed to be noticing! 😉
Thanks, Audra! Remember – you saw nothing. NOTHING! 😀
LOVE IT!!! Now the chandelier in my bedroom is getting a makeover with the same color. Might even paint the curtain rods. Handan has some awesome ideas and you do an excellent job of carrying out the plan. I’m in a total interior and exterior remodel/redecorate so keep giving me some great ideas!!
Thanks, Stacye! We’ll keep writing if you keep reading! 🙂
Will this technique work on outside light fixtures?
It certainly should, Debbie, though I’d recommend some sort of protective coating. If it is something that will be exposed to sun, raing, snow, etc, I’d take the extra step of sanding the metal first. Nothing like a sunlight and freezing temps to destroy pretty much everything!
Awesome job!
Thanks, Tracy!
okay…”a friend” found an old chandy in the dumpster of a townhouse remodel…I NEEDED a chandy in the boathouse pavlion…your directions are “spot painted on!” I now have a “Candy Apple Red” chandy that compliments the “haint blue” ceiling perfectly, IMO!! Spray On!! franki
You taught me something today, Franki! When you wrote “haint blue,” my mind immediately called up the image of an old woman warning people about haints. I always thought it was just an old-timey term for ghost. After looking up haint blue, I learned all about the haint blue color (which I’ve seen throughout my life but never really noticed or considered), the Gullah, the reason for the haint blue ceilings (to keep the haints and boo hags away by mimicking either the sky or water), the claim that they also deter bugs and spiders (some validity to this claim, as the early haint blue paint was a milk paint made with lye – a bug deterrent). Awesome! Another piece has been fitted into my life’s puzzle! 🙂
Well done Greg, it looks classy instead of crass. Pinning this one for future use!
Thank you, Mary! Crass to Class – I like it! 🙂
This was brilliant! Enlightening! Perfect timing! I just moved into my dream home and was met by a similar chandelier. Greg, it HAD to go! I donated it yesterday and hope someone finds this blog and gives it new life. Now…the rest of the story: it had a cousin in the next room that had lines and curves to make Jennifer Anniston cry. I knew I could make it work with some love and spray paint, but I didn’t know HOW. Thanks to reading this blog today, now I do! Thank you! Handan, you Inspire me to stretch myself, trust my instincts, and never stop hoping my Brian will read the lists I so copiously type into our shared Cozi app. After I read him this article about the Easy Chandelier makeover, he believes I can do it. Me too, after learning about TSP!
Oh, wow, what timing, lol! Well, I’m glad to hear that you have another and that you’ll be giving it a makeover! It’s really easy, but have Brian help you anyway. It’s fun to do these things together! Good luck with yours, and send us a pic when you’re done. greg@thenavagepatch.com
As usual, Greg, a remarkable result!
Question for the expert: More years than I care to admit (35, actually), we bought a solid brass chandelier & other smaller solid brass fixtures for small foyer, a couple of hallway ceilings…you get the idea. ? is, can these be sprayed, as well, IF following your very professional & understandable directions??
Solid brass can certainly be prayed, especially with the Self-Etching primer. Some people would call you nuts for wanting to paint solid brass, but I say, if it makes you happy, DO IT! Good luck, Bonnie!
I know…I’m probably in the minority, loving solid brass as I do. However, it has resided in our attic for at least 10 years & I can’t make myself get rid of it. Thanks for your advice. I’m always amazed at Handan’s creativity & your ability to bring to life such wonderful results. I’ll look forward to the next episodes. The best to the three of you & your furbabies in your new home.
Wow, this looks completely different. The shiny brass was so busy you missed all the cool details of the fixture. I love the antique brass color and your commentary is hilarious. Reading your posts is always enjoyable! Welcome to summer in Georgia!
Thank you so much, Ellen! I agree about the original shiny brass. So far, the summer here is tolerable. Yes, it’s humid as heck, but I’m getting used to it, and it’s a small price to pay for living in such an awesome town and state! 🙂
I do like your finished chandy but I’m not ready to paint my 30 year old tacky brass plated kitchen chandy yet. I think the color Handan chose is perfect for that fixture. However, The $2 3-light chandy I got at a local auction is gonna get painted flat black and have 3 solar lights fitted into the candle holes to hang on a shepherd’s hook.. As it was small, I put it in the dishwasher (at this house, everything but children and small animals have been through the dishwasher–Legos, plastic toys, etc.) I have seen chandies painted gloss red, turquoise, and flat black; all great in their settings. Agree with the comment about the sandals on a ladder; as a klutz, I’ve learned the hard way–too many times!
I like the dishwasher tip, Kathy – I’ll have to try that sometime (as long as the thing I’m cleaning is not electric, lol). Don’t worry – no more sandals on a ladder for this guy!
Greg, from ‘toss in the bin’ to just gorgeous! Is there any chance of bubble wrapping the cabinet in the photo and sending it to Australia please?
Suzanne (Australia – of course)
LOL, I’m pretty sure we bubble wrapped it to get it here (as well as several other types of wrapping). That piece was one of the reasons we didn’t hire movers – just so much that could have gone wrong! I’m happy to report it made the journey south without a scratch! Now to get it to Australia…well that’s a different story! 😀
When I saw you were painting it another brass shade I wasn’t sure but I really like it! My last house was brass everything (it was the 90’s!) and when we moved into this house in 2003 we changed all the brass to silver/chrome and now it seems gold is all the rage. To me it looks like brass and I just can’t go back! This colour however is beautiful! I love it when things can be saved from the dump!
LOL, yeah, the prevailing taste will always change faster than your will to change, so just pick a color you like and stick with it!
YES, yes I will Greg. Thanks for something else on MY list.
Well i finally got around to reading thisblog, i’d saved it and it got lost among umpteen Pinterest emails i’d saved. I love the new look chandelier it’s fabulous, if i hung it in our living room the bottom end woiuld be about 6″ above the floor :-).Sorry us ladies cause youy so much work Greg, you married a brilliant lady such a creative imagination.
I sure did, Catherine! 🙂
You might consider a fabric sleeve on the chain to hide the chain & electrical cord.
Oooh, I had no idea such a thing existed! I’ll have to check them out. Thanks for the tip!
Certainly an improvement: both the wall paint AND the chandi makeover! However, what can you tell us about that GORGEOUS piece of antique furniture* that’s behind it? I LOVE it!
*waiting for 7th grade boy boobie jokes. 😉
Thanks, Steph! Oooh, I’m so glad you asked about that piece. That’s one of my finest achievements, and you can read all about it right here –> https://www.thenavagepatch.com/antique-china-cabinet-restoration/
And yes, there are in fact some boob jokes in the post! I just had to! 😀
Love the transformation but is it just me or did you not spray the chain and cord? Could I spray chain and cord, would it adhere? I am assuming yes. I am changing from silver to golden tone and so the chain and cord would look out of place if I don’t paint it…… Thanks!
You can spray the chain no problem. Just make sure it’s squeaky clean first. As for the cord, as long as it won’t be moved or flexed or bent once installed, you may be ok. The issue is painting flexible plastic or rubber. Where the plastic or rubber bends, it compresses on one side and stretches on the other, usually causing the paint to flake off. If you’re going to try, I’d paint the chain and cord separately, then weave them together and touch any places that may have flaked on the cord.
This is such a cool update! I would love to do this to the light over our kitchen table. We are having our kitchen cabinets refaced this week so maybe once we finish up that project! Thanks so much for sharing your cute home!
Did you spray paintvthe chain and cord?
Hi Lis, forgive the late reply! No, I bought a new chain that almost matched.
I enjoyed this makeover. So much good information! I knew about TSP (WONDERFUL product!) but didn’t know about the self-etching primer!! (Can this be used in lieu of sanding to make paint stick on lots of things – like plastic surfaces, for instance? Wouldn’t that be a wonderful timesaver 😀
The cream-color paint on the candles is subtle, but much nicer!
This would be a great way to make some different styles of lights “go together” more fluidly in a room!
I enjoy your articles!