DIY Christmas Countdown
Our DIY Christmas Countdown is a fun way to mark the time until Santa’s Big Day! This simple project is made with mostly Dollar Tree materials, so you’ll have more money left over for gifts!
I’ve been bamboozled!
Hornswoggled!
Betrayed!
*****
It all started last weekend when my babes informed me that I’d be making a Christmas Countdown.
“You mean an Advent calendar?” I said.
“No, my babes,” Handan said. “You’ll be making a wooden sign with Dollar Tree letters, and it will have a little chalkboard to write the days.”
Christmas Countdown, huh?
This was bad news. I was planning to thaw some steaks, pour a martini and deposit my carcass on the sofa while something dark and spooky played out on the television.
In short, a perfect Saturday.
But now The Komandant wanted to muck up my plans with a reincarnation of our Witch’s Candy Shop sign.
I needed a way out.
Think, man! THINK!
I attempted to inform her that just as a watched pot never boils, a watched chimney shall produce no Santa.
“Therefore, my babes,” I concluded with a flourish, “The whole concept of a ‘Christmas Countdown’ is flawed and doomed to failure! Do you want to be responsible for millions of barren trees and empty stockings? Hmmm? Do you?”
Satisfied my argument had shut down this ridiculous plot to overthrow an otherwise perfectly lazy Saturday, I picked up a glass and prepared to fill it with ice.
“I didn’t think so,” I said, as a smug smile crept up my face.
But before the first cube belched from the ice maker, a new sound…
I didn’t even have to look. I’d know that sound anywhere.
It was the sound of her eyes boring into the back of my skull.
I lowered the glass and turned around.
My babes stood before me, Dollar Tree letters in one hand and flat wooden ornaments and cutouts in the other. Her eyes moved from mine to the floor beside the kitchen island.
My eyes followed.
There lay the foundation for the project – an edge-glued board.
I sighed and bade a mental farewell to my martini and horror movie. If my babes wanted a Christmas Countdown, my babes was gonna get a Christmas Countdown!
“It’s okay, my babes,” Handan said, “Pour yourself a martini. This will be so easy!”
*****
Now, lest you think the aforementioned bamboozling and hornswoggling happened when I lost my Saturday to this Christmas Countdown, let me assure you madam, the hoodwinking hasn’t yet been revealed! Read on to learn of that particular treachery!

SUPPLIES LIST
- 16″ x 36″ edge-glued panel
- Dollar Tree wood letters (you’ll need 3 packs)
- Dollar Tree DIY wood sign truck
- Wood cutout ornaments from Dollar Tree (optional)
- Dollar Tree chalkboard
- Other Christmas embellishments (optional)
- Faux greenery pick (we got ours for a dollar at Hobby Lobby’s discount bins)
- Acrylic paints of your choice (optional)
- Sandpaper or random orbit sander
- Pre-stain wood conditioner
- Stain (we used Minwax Special Walnut)
- White spray paint (flat)
- Hot glue gun
Just as we did with our Halloween Candy Shop sign, we first laid out our design plans on the edge-glued board.

We both agreed that it looked good. [Hahaha – I think I know where this is going LOL – Handan]
Next step – down to the basement to sand and stain!
I rounded all the edges with my random orbit sander to give the board a softer look, and then I applied a coat of pre-stain wood conditioner. Pine gets notoriously splotchy when stained without first pre-staining, so whenever possible, I do this step.

After 30 minutes, I stained the board with Handan’s favorite – Special Walnut.

I’m thinking of staining her entire wardrobe Special Walnut. Do you think she’d like that?
I also removed the stand from the chalkboard and stained it as well.


While the stain dried, I sprayed the letters white. We chose to go with “DAYS UNTIL CHRISTMAS,” but hey, feel free to mix that up!

I then headed back upstairs to get my kindergarten on with some acrylic paints.

Does it seem to you like I’ve been going Full Kindergarten a little too frequently this fall?
There was that time with the scissors and the bats.
And just recently with the Dollar Store Christmas Garland!
I have friends in business suits who do Important Things and sit on Boards of Directors and make Really Big Deals.
Meanwhile, I Paint with Acrylics and sit on a Craft Room Stool and make a Really Big Mess.
But I get to work in my pajamas (if I so choose), spend my days with my babes, and make people smile.
So who has the better job? 🙂
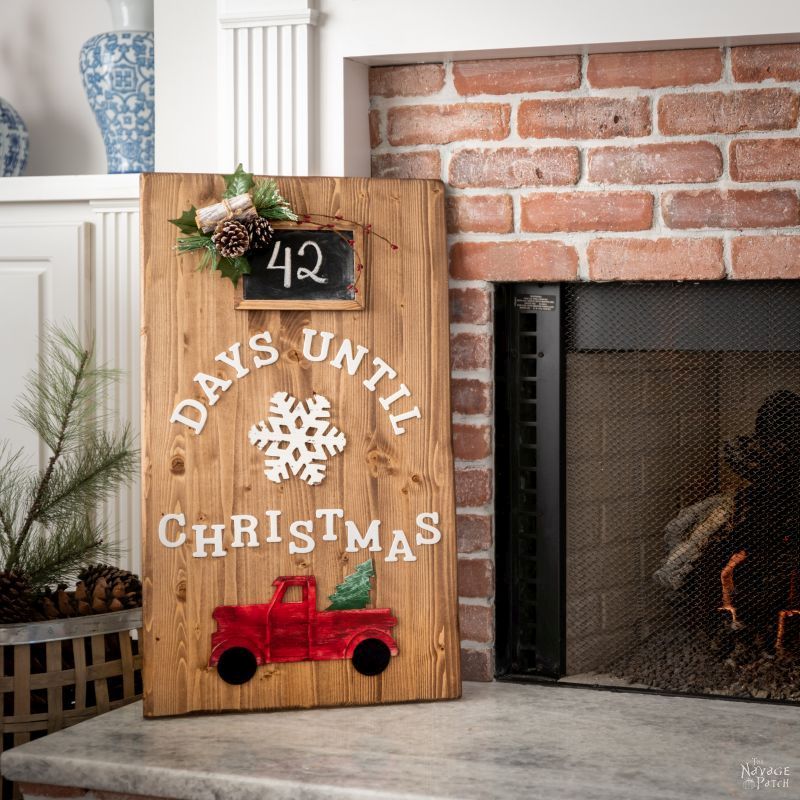
I know that the vintage red pickup with a tree in the back is a Christmas cliche staple, but I wanted to do for something different. Maybe an electric blue with a neon green racing stripe. I thought it would look rad and really make this countdown rock!
After sharing my idea with Handan, I grabbed my brush and red paint and set to work.


It was looking a little too red, so I spiced it up with some black paint on the body. Yeah, this looked vintage enough.

I also painted all the wood cutout ornaments, just as we planned in the beginning.

I was an unstoppable craft-painting machine!

I even perfected my very own “Vintage Brush” technique!

I couldn’t wait to glue these suckers onto the board, like we planned. [LOL – I totally knew where this was going hahaha – Handan]
By Saturday night, the stain had dried, so I brought everything up from the basement. I laid the board on the kitchen island and then placed the letters, the chalkboard and all the little ornaments and embellishments in their places.
I thought it looked pretty good! It was colorful and festive. But I wondered if Handan would like it. She was working in the other room.
I left to go shopping and returned home a short while later.
When I entered the kitchen, something was different.
My Christmas Countdown…someone had removed all the ornaments and just left the letters and chalkboard plus a white snowflake that hadn’t been there before.
“My babes?” I said.
“Ah, yeah. I think it looks better this way, don’t you? It’s more elegant! Now, can you cut it from here?” she said, indicating that I should chop almost a foot from the top.
“Ummm, okay.” I said and carried the board downstairs.
After I sliced off the now-unwanted piece, sanded the original board again and re-stained it, I asked Handan if she had first taken a picture before dismantling my work.
She hadn’t.
The treachery! [I forgot… ok, actually I didn’t forget, but I just didn’t think of it… you see – while the project was finished in your mind, the whole layout was still a work-in-progress in mine! -Handan]
My work was erased with no record of its existence save these few paltry words.
Sure, it was a little too bright and colorful, and sure, her new layout did look much better, but we pride ourselves on showing our failures as well as our successes here at The Navage Patch!
I should have thought to take a picture when I arranged the mockup, but alas, I forgot as well.
So unfortunately madam, you’ll never see the first iteration of this Christmas Countdown, as it was swept away by the fickle Winds of Change. [Let’s just say it was a little tooooo colorful -Handan]

But, hey, that’s okay, you’ll still get to see the final version, and if you choose to make one of your own, you may adorn and embellish it any way you please!
Such is the beauty of DIY and crafting!
After re-staining the now-smaller board, I took it back upstairs and started in on the letters. I laid out the “CHRISTMAS” with a straight edge for reference. We thought it would be fun to make the word a little freeform.

When I had it how I we wanted it, I glued each letter with hot glue. Unlike our Candy Shop sign, this one wouldn’t be outdoors, so a little hot glue was all it needed.

Big Head strikes again! [LOL – first he bitches at me for not taking photos…then he bitches at me for taking photos…decide, will you?…hahaha -Handan]
[The Woman has an uncanny knack for making my head look like the Hindenburg. Let’s just hope it doesn’t share the same fate! -Greg]

The letters only need a tiny dot of hot glue at the corners.

RBF Crafting – it’s my specialty! [LOL – it indeed is…full focus…look at him…I love it, hahahaha -Handan]

I used whatever scraps I had lying around to mark where each letter went before removing it to apply the glue.


Next, I glued the pickup in place, but since the Christmas tree made it unbalanced in back…

…I first glued a random embellishment of equal thickness to the front end of the back side of the pickup.


Before gluing, I scientifically measured to ensure I had the pickup centered.

Then I glued it down.

Next, I glued the chalkboard in place.


We wanted the “DAYS UNTIL” part to be curved, but instead of eyeballing it like we did for the candy shop sign, we came up with a better and easier solution for our Christmas counter. This plate was the perfect size.

Letters done!

Next up – a snowflake we got at Michaels for a dollar on clearance.

At this point it was finished and ready for glory. But the next day, I caught Handan looking at it funny.
“What’s wrong?” I said.
“It’s missing something,” she said.
She then began trying to fit a bunch of Christmas picks here and there near the top, but it was just looking too crowded.
“My babes?” she said. I knew where this was going.
“Mmm hmmmm?”
“Can you maybe try to move the chalkboard down a wee bit? Maybe? Maybe?” she said.
I knew it! We had agreed on its placement, but now the plan had changed. [Like I said… it was a work-in-progress in my mind hahaha -Handan]
Again!
Gah, the woman will be the death of me!
“Yes, my babes,” I said.
I carefully pried the chalkboard free with a putty knife. Thank god I hadn’t used wood glue!

Then I scraped the dried glue from the chalkboard with a razor.

I repositioned it lower. This would give more room up top for the greenery my babes now wanted.

Here’s the green stuff. Handan bought this from Hobby Lobby’s discount bin, but you can use any Christmas floral picks you have.

Snip snip down to size.

And a big blob of hot glue to keep it in place.


To add a little red into the mix, I unwrapped a berry rope garland from Dollar Tree, and I cut two equal lengths.

After twisting the ends together…

I slid them into place and squirted in some hot glue.

All that remained was to condition the chalkboard.

I had no idea such a practice existed until Handan told me about it when I made our Outdoor Magnetic Chalkboard. Here I am conditioning that chalkboard in our old house.
Close your eyes. This won’t hurt a bit.

I tried to convince Handan to write the number, but she insisted I do it.
Man Hands to the rescue!

Not bad, not bad!

And that’s it! Our Christmas counter is sitting on our new hearth counting the days until Santa’s arrival. I’m pretty sure my babes will be getting a stocking full of coal. 😀


The total cost for this project was $14 for the board plus $8 for all the rest. If you happen to have some scrap wood to make your own board, then this craft becomes really cheap for how great it looks!


And if you want to make it a little more colorful and busy with ornaments, then you go right ahead, just like I did in the beginning! [Pooor my babes – he does all the grunt work, but never gets to keep the sign layout to his liking…his wife always barges in and tells him that she wants it differently…she never gives him peace with his craft projects…never…LOL -Handan]


What do you think of our DIY Christmas Countdown? Is it something you may make this holiday season?
We love it when you share our posts on Facebook and Pinterest!


Too funny! Of course it looks better this way ??. Such creativity from the dollar tree! I went to 2 of ours after your last post in search of finds like yours but nothing ?. I have 2 more to check ??. Always look forward to your posts!
Thank you, Susan! Yeah, Dollar Trees can be hit or miss. We’ve been lucky here in GA to have a ton of good ones, but back in CT, it took us a couple of years to finally find a big, well-stocked one (that happened to be just a couple of miles from the dinky, run-down ones we’d been going to!)
Aren’t you a clever cookie..lol..I love it, but I just wouldn’t be able to pull it all together..The piece of wood (wouldn’t know how to even go about that!) , the sanding, the staining, etc..My hubby isn’t handy either..Could I borrow you?
Thank you, Colleen! Of course you can borrow me! I’ve been thinking of setting up a little Holiday side hustle as a craftstitute. 😀
Great sign. Thanks for the tutorial and the laughs.
Thank you, Cheryl! 🙂
You’re such a kick? Luuuv reading your posts!!! AND you give great craft inspiration!
Thank you, Marsha – I’m here to please! 😀
I love it! Your “Babes” has some fantastic ideas!!!
She sure does, Nanci! 🙂
Indeed! You do make people smile! And you make your crafting fun and reasonably easy
to make…you and Babes keep on keeping on…maybe I’ll catch up with at MY Dollar Tree!!
Thank you, Sue, then I consider my job a success! 🙂
Greg, I always laugh at your writings. They make my day! The project turned out great. Your wife has so many wonderful projects ideas. Please keep them coming!!
Thank you, Missi, we sure will! 🙂
Very cute–and of course her final FINAL ideas are the best! Thanks for the laughs. I actually used your fork-tying bow video for a bow that just wasn’t working for me last night. Thanks for that too!
Thank you, Kristi, and you’re welcome! 😀
I love reading your blog and your wonderful and simple ideas for the holidays! I feel like I could totally do this? And now you’ve planted the seed to make another one of these signs for my husband’s “countdown to retirement”. Hmmmm, I wonderwhat kind of embellishments would that require??
That’s easy! Just hot glue some airplane booze bottles all over it, each with a number written on them. If it’s a month to retirement, then 31 bottles, labeled 1 through 31. On day one, he pulls off bottle 31 and drinks it after work. For day 0, you’ll need a big bottle. And he can start in on that one any time he likes! 😀
Ever since you posted the dollar store witch sign I have started making some similar signs for Christmas. I couldn’t find everything for the witch sign. It was all already gone.
This is one of my favorite crafts ever and mine cost me $5. LOVE your blog!!
PS. I lived in Suwanee on Suwanee Dam road at Bayswater Common from ’92 to 2000. Suwanee had a population of about 2,000! We didn’t even have a grocery store when we moved there! I hear it has changed quite a bit! I loved that town more than any place I’ve ever lived.
It’s such a great craft, isn’t it, Lori? You get so much for so little! Oh my god, we walk by your old house every single day on our daily walk! We head up Moore Rd to NGHS, then down Suwannee Dam Rd to Sims Lake, a lap around the lake and then back home. I’d venture to say, you wouldn’t recognize the place now!
Congrats. The truck DOES look like it was painted by a kindergartener.
Hi, Diana! I remember you and your comment from February: “Reading your article is 10 minutes of my life that I can’t get back. I do not find your “stories” amusing.” Just wondering why you’re back if my stories don’t amuse you? 🙂
Very cute. But it’s missing something… maybe some colorful ornaments…? ?
LOLOL! Exactly! I think Handan put them aside for a future project…we’l see! 🙂
Love it! You all are a laugh a minute!! I get a kick out of reading what you all do!
And I always like what you make! Have a great weekend!
Thank you, Brenda – you too!:)
I saw this post yesterday morning and knew instantly I needed to make this for my front porch. I just finished my version and LOVE it! Thanks for the inspiration! 🙂
Awesome! Glad to hear it, Kelly! 🙂
I get a kick out of reading what you all do, and I always like what you make have a great weekend. I have started making some similar signs for Christmas. I couldn’t find everything for the witch sign. It was all already gone. I actually used your fork-tying bow video for a bow that just wasn’t working for me last night. Thanks for that too.
Thank you and Happy New Year!
I adore your wit! Y’all are the cutest. Love the project also!
Thank you so much, Laura! 🙂