The Pond Project | DIY pond and backyard makeover | DIY garden edging | How to lay edge stones | How to edge garden beds | Tips on landscaping | DIY garden decor | DIY koi pond lining | How to maintain a koi pond | Spring planting and transplanting | Pond and backyard reveal | Before & After | TheNavagePatch.com

The Pond Project – Part 2

· ·

CONTINUED FROM>>

The Pond Project | DIY pond and backyard makeover | DIY garden edging | How to lay edge stones | How to edge garden beds | Tips on landscaping | DIY garden decor | DIY koi pond lining | How to maintain a koi pond | Spring planting and transplanting | Pond and backyard reveal | Before & After | TheNavagePatch.com
The Pond Project – Part 1

The longest journey begins with a single step, but the longest landscaping project began with a single rock.

The Pond Project | DIY pond and backyard makeover | DIY garden edging | How to lay edge stones | How to edge garden beds | Tips on landscaping | DIY garden decor | DIY koi pond lining | How to maintain a koi pond | Spring planting and transplanting | Pond and backyard reveal | Before & After | TheNavagePatch.com

That rock was followed by another, bigger, rock, which in turn was followed by one bigger still. This was followed by dizziness and cursing which preceded profuse sweating and heart palpitations.

Thus began the pond project on a raw morning in late March, as winter’s grasp squeezed New England with waning strength on borrowed time.

I was pale and lethargic from a winter of beef stews and Netflix. My body drooped and my mind sagged as I looked upon the rings and piles of rocks boulders I needed to haul into the woods before the project could begin in earnest. This was the donkey work. I brayed and got to it. This is about three quarters of the rocks I moved. There were more in the pile, but I’d since moved many of them back to the pond by the time I took these pictures.

The Pond Project | DIY pond and backyard makeover | DIY garden edging | How to lay edge stones | How to edge garden beds | Tips on landscaping | DIY garden decor | DIY koi pond lining | How to maintain a koi pond | Spring planting and transplanting | Pond and backyard reveal | Before & After | TheNavagePatch.com The Pond Project | DIY pond and backyard makeover | DIY garden edging | How to lay edge stones | How to edge garden beds | Tips on landscaping | DIY garden decor | DIY koi pond lining | How to maintain a koi pond | Spring planting and transplanting | Pond and backyard reveal | Before & After | TheNavagePatch.com

That first day, I think I hauled only a single cart full of rocks, perhaps two, before my body and mind went on strike. Boy, was I out of shape! But over the following days, I cleared the rocks (with occasional help from Barish) from one end of the pond. When all the rocks were removed (except around the main pool where the fish live), Handan and I began cleaning. Okay, let’s be honest, Handan did most of the cleaning as I stood around looking, feeling and being useless.

The Pond Project | DIY pond and backyard makeover | DIY garden edging | How to lay edge stones | How to edge garden beds | Tips on landscaping | DIY garden decor | DIY koi pond lining | How to maintain a koi pond | Spring planting and transplanting | Pond and backyard reveal | Before & After | TheNavagePatch.comThe Pond Project | DIY pond and backyard makeover | DIY garden edging | How to lay edge stones | How to edge garden beds | Tips on landscaping | DIY garden decor | DIY koi pond lining | How to maintain a koi pond | Spring planting and transplanting | Pond and backyard reveal | Before & After | TheNavagePatch.com The Pond Project | DIY pond and backyard makeover | DIY garden edging | How to lay edge stones | How to edge garden beds | Tips on landscaping | DIY garden decor | DIY koi pond lining | How to maintain a koi pond | Spring planting and transplanting | Pond and backyard reveal | Before & After | TheNavagePatch.com The Pond Project | DIY pond and backyard makeover | DIY garden edging | How to lay edge stones | How to edge garden beds | Tips on landscaping | DIY garden decor | DIY koi pond lining | How to maintain a koi pond | Spring planting and transplanting | Pond and backyard reveal | Before & After | TheNavagePatch.com

We improvised a dam using bags of patio base and dish towels. I’m sure you can imagine how well it worked. Later, we upgraded to something much better. This was so we could keep the fish swimming free in their end of the pond, while we worked on the other end.

The Pond Project | DIY pond and backyard makeover | DIY garden edging | How to lay edge stones | How to edge garden beds | Tips on landscaping | DIY garden decor | DIY koi pond lining | How to maintain a koi pond | Spring planting and transplanting | Pond and backyard reveal | Before & After | TheNavagePatch.com

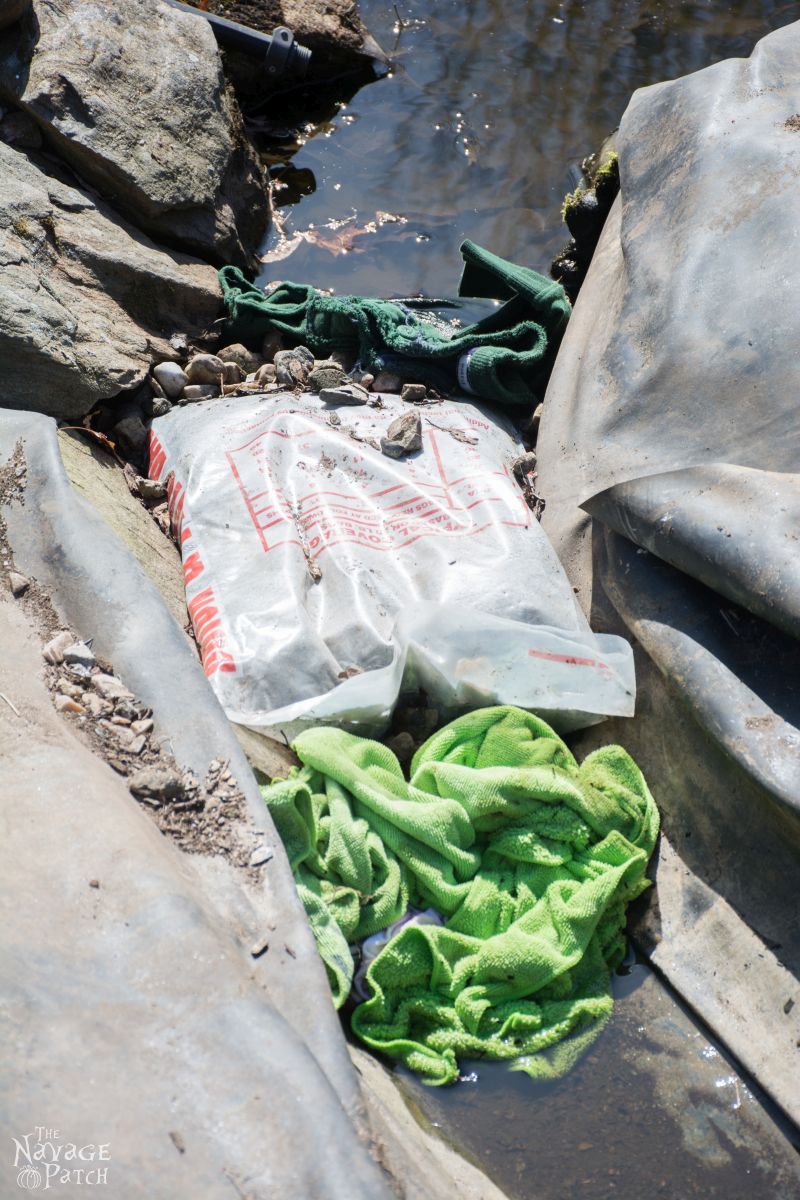
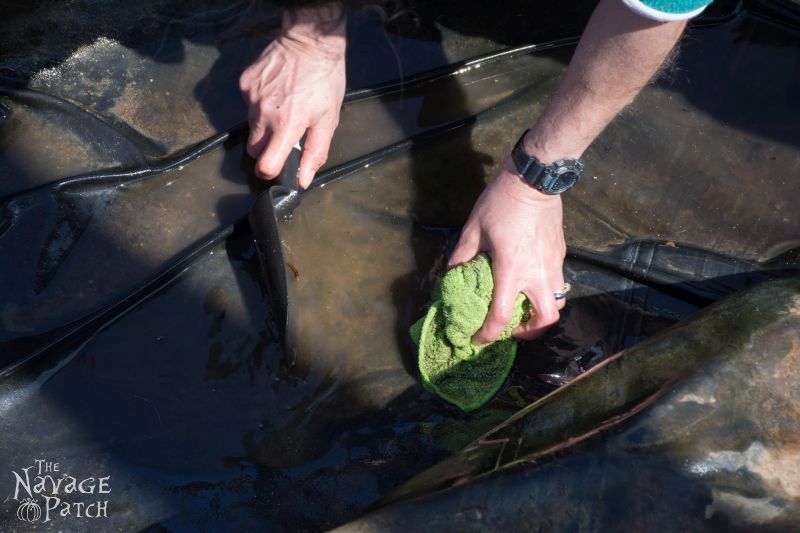
Handan cleaned the liner as best she could using dish towels and clean water sprayed by me, aka Hose Boy.

The Pond Project | DIY pond and backyard makeover | DIY garden edging | How to lay edge stones | How to edge garden beds | Tips on landscaping | DIY garden decor | DIY koi pond lining | How to maintain a koi pond | Spring planting and transplanting | Pond and backyard reveal | Before & After | TheNavagePatch.com The Pond Project | DIY pond and backyard makeover | DIY garden edging | How to lay edge stones | How to edge garden beds | Tips on landscaping | DIY garden decor | DIY koi pond lining | How to maintain a koi pond | Spring planting and transplanting | Pond and backyard reveal | Before & After | TheNavagePatch.com

When everything was clean and dry, we started laying the Rock-on-a-Roll. This stuff comes in 8 ft sheets. It is a porous liner that resembles natural rock. It is not meant to be waterproof, but to be placed atop the pond’s liner. Over time, it will discolor like natural rock with algae, and it will allow aquatic plants to grow on its surface.

The Pond Project | DIY pond and backyard makeover | DIY garden edging | How to lay edge stones | How to edge garden beds | Tips on landscaping | DIY garden decor | DIY koi pond lining | How to maintain a koi pond | Spring planting and transplanting | Pond and backyard reveal | Before & After | TheNavagePatch.com

To adhere the Rock-on-a-Roll to the existing liner, we started out using pond and landscape foam.

The Pond Project | DIY pond and backyard makeover | DIY garden edging | How to lay edge stones | How to edge garden beds | Tips on landscaping | DIY garden decor | DIY koi pond lining | How to maintain a koi pond | Spring planting and transplanting | Pond and backyard reveal | Before & After | TheNavagePatch.com

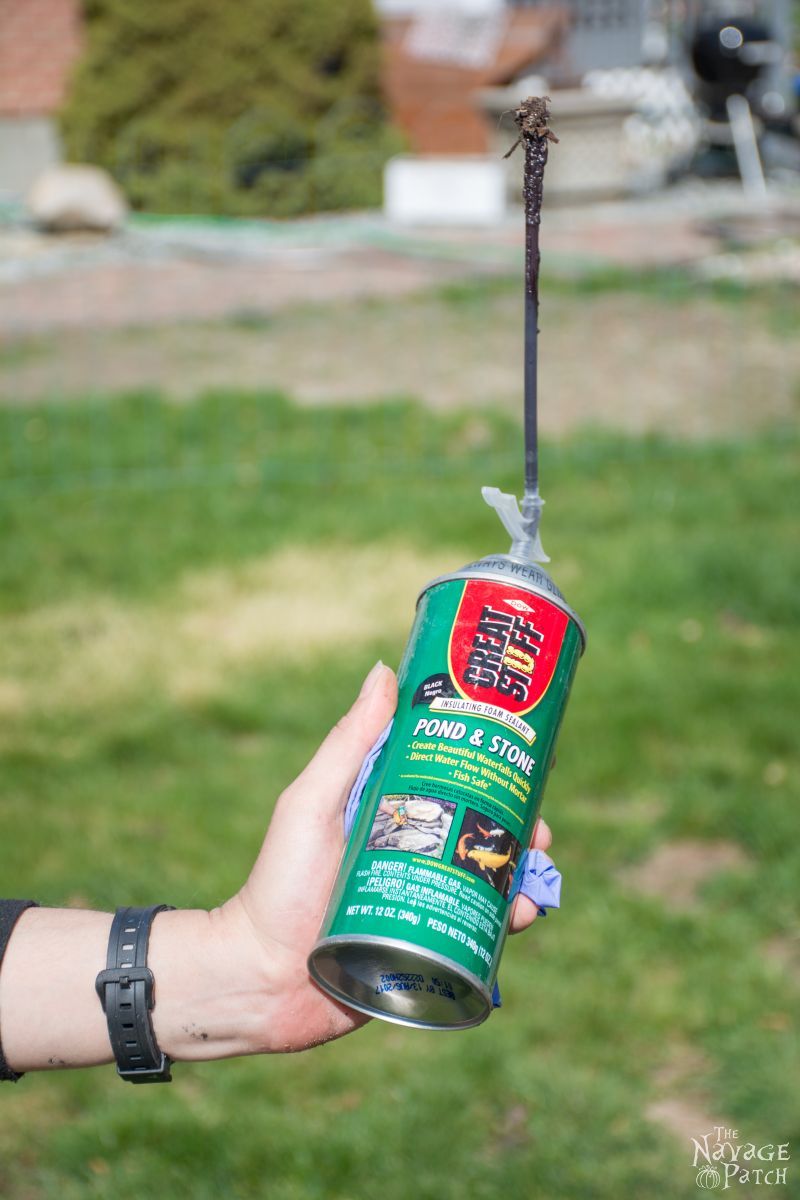
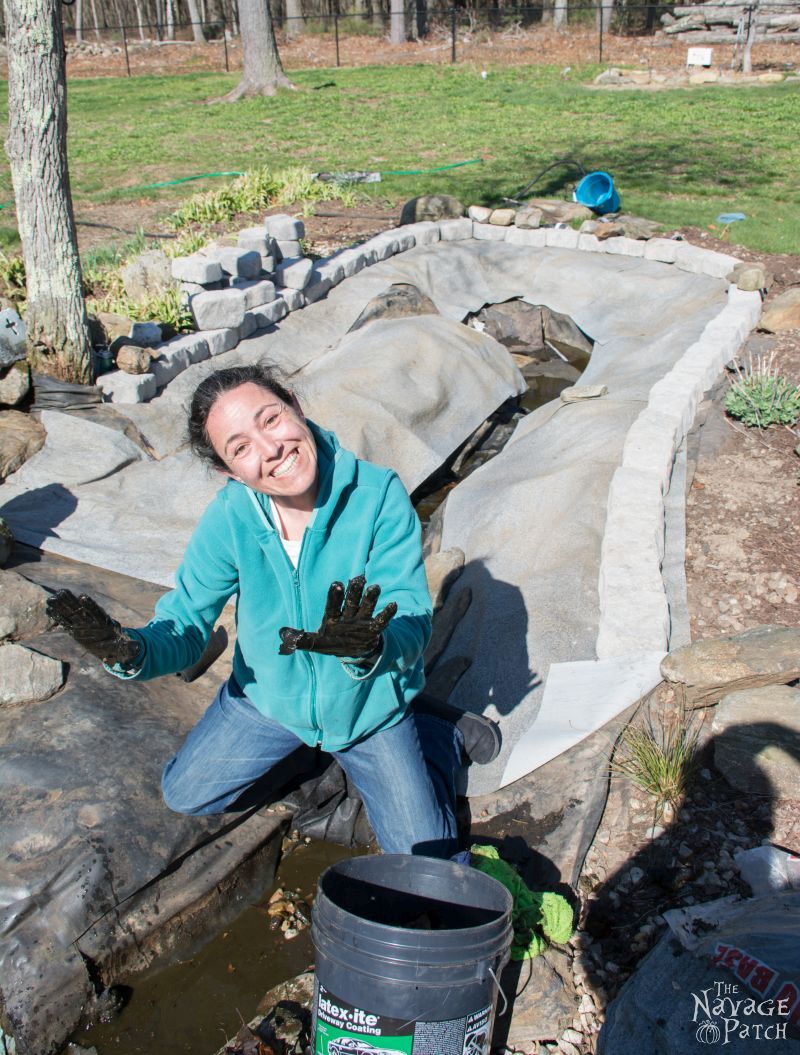
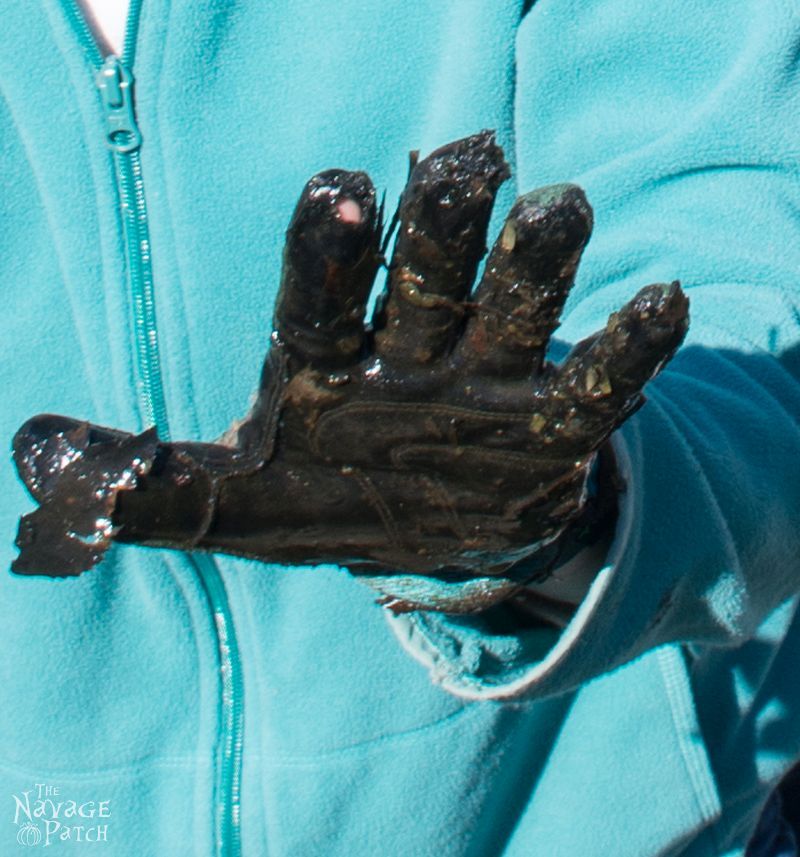
It works well, but it takes a while to set. Also, you really don’t want to get this stuff on your skin, as it takes days for it to come off. Handan got just a little on her hands. This is how they looked after a couple of hours of washing and scrubbing.

The Pond Project | DIY pond and backyard makeover | DIY garden edging | How to lay edge stones | How to edge garden beds | Tips on landscaping | DIY garden decor | DIY koi pond lining | How to maintain a koi pond | Spring planting and transplanting | Pond and backyard reveal | Before & After | TheNavagePatch.com The Pond Project | DIY pond and backyard makeover | DIY garden edging | How to lay edge stones | How to edge garden beds | Tips on landscaping | DIY garden decor | DIY koi pond lining | How to maintain a koi pond | Spring planting and transplanting | Pond and backyard reveal | Before & After | TheNavagePatch.com

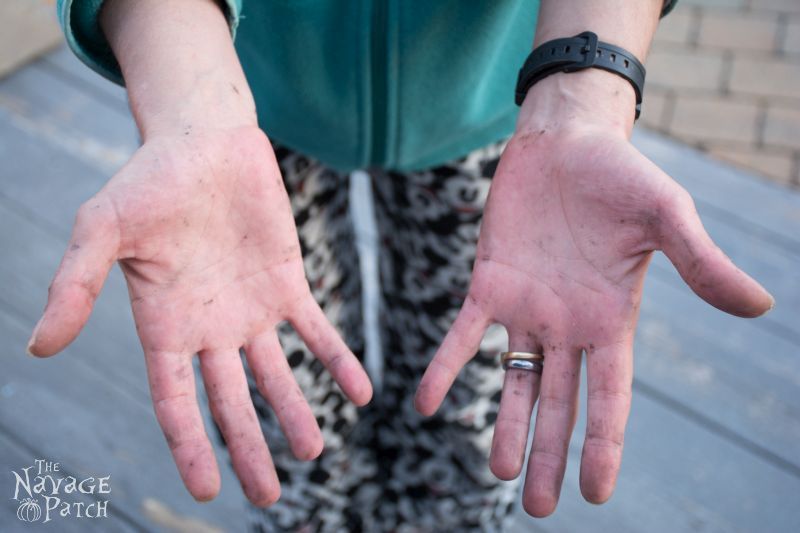
Red, raw and a little painful for her, but the stuff was still there. Do yourself a favor and wear those long yellow dish gloves when working with this landscape foam!

We used landscape bricks to form a border around the pond. We also used them temporarily to weigh down the liner so the landscape foam could set up and harden.

The Pond Project | DIY pond and backyard makeover | DIY garden edging | How to lay edge stones | How to edge garden beds | Tips on landscaping | DIY garden decor | DIY koi pond lining | How to maintain a koi pond | Spring planting and transplanting | Pond and backyard reveal | Before & After | TheNavagePatch.com The Pond Project | DIY pond and backyard makeover | DIY garden edging | How to lay edge stones | How to edge garden beds | Tips on landscaping | DIY garden decor | DIY koi pond lining | How to maintain a koi pond | Spring planting and transplanting | Pond and backyard reveal | Before & After | TheNavagePatch.com

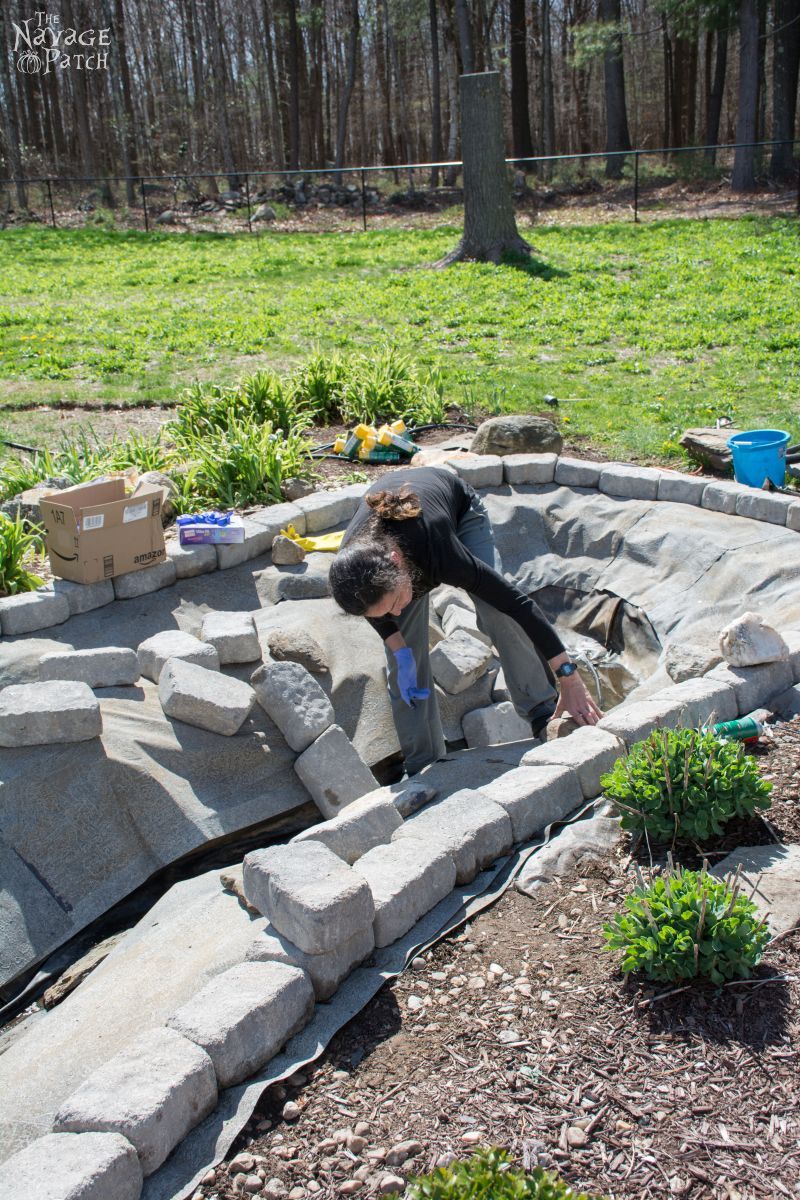
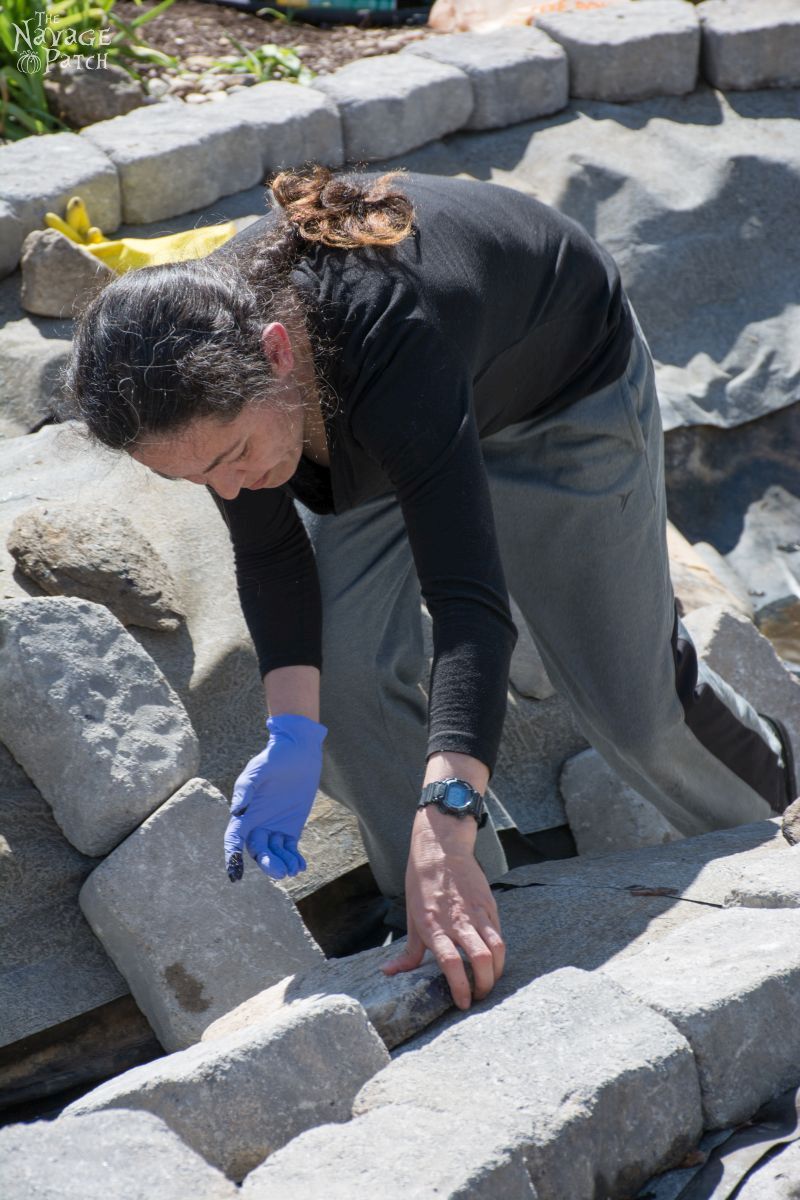
Messy, but getting there!

The Pond Project | DIY pond and backyard makeover | DIY garden edging | How to lay edge stones | How to edge garden beds | Tips on landscaping | DIY garden decor | DIY koi pond lining | How to maintain a koi pond | Spring planting and transplanting | Pond and backyard reveal | Before & After | TheNavagePatch.com

Handan is the real workhorse of the family!

The Pond Project | DIY pond and backyard makeover | DIY garden edging | How to lay edge stones | How to edge garden beds | Tips on landscaping | DIY garden decor | DIY koi pond lining | How to maintain a koi pond | Spring planting and transplanting | Pond and backyard reveal | Before & After | TheNavagePatch.com

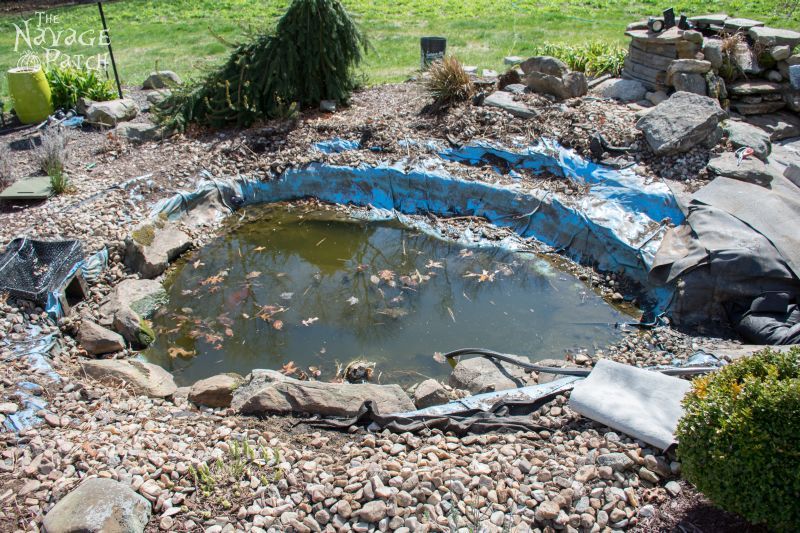
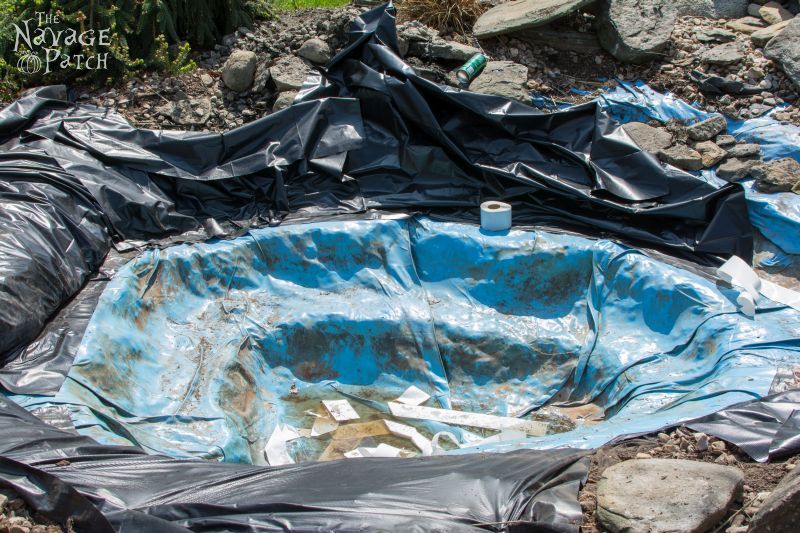
We finished laying the Rock-on-a-Roll on the one side, then started to clean the main pond where the fish lived. This was a real pain in the butt. I had to move literal tons of rock, and then we had to clean decades of accumulated muck, slime and aquatic plants. Here’s how it looked before.

The Pond Project | DIY pond and backyard makeover | DIY garden edging | How to lay edge stones | How to edge garden beds | Tips on landscaping | DIY garden decor | DIY koi pond lining | How to maintain a koi pond | Spring planting and transplanting | Pond and backyard reveal | Before & After | TheNavagePatch.com

Most of the usable space in that pond was filled with rock and mud and decomposing leaves. Poor fish.

Handan got busy cleaning.

The Pond Project | DIY pond and backyard makeover | DIY garden edging | How to lay edge stones | How to edge garden beds | Tips on landscaping | DIY garden decor | DIY koi pond lining | How to maintain a koi pond | Spring planting and transplanting | Pond and backyard reveal | Before & After | TheNavagePatch.com The Pond Project | DIY pond and backyard makeover | DIY garden edging | How to lay edge stones | How to edge garden beds | Tips on landscaping | DIY garden decor | DIY koi pond lining | How to maintain a koi pond | Spring planting and transplanting | Pond and backyard reveal | Before & After | TheNavagePatch.com

As always, with a big smile.

The Pond Project | DIY pond and backyard makeover | DIY garden edging | How to lay edge stones | How to edge garden beds | Tips on landscaping | DIY garden decor | DIY koi pond lining | How to maintain a koi pond | Spring planting and transplanting | Pond and backyard reveal | Before & After | TheNavagePatch.com

Despite the nasty conditions.

The Pond Project | DIY pond and backyard makeover | DIY garden edging | How to lay edge stones | How to edge garden beds | Tips on landscaping | DIY garden decor | DIY koi pond lining | How to maintain a koi pond | Spring planting and transplanting | Pond and backyard reveal | Before & After | TheNavagePatch.com

Meanwhile in the pond…

The Pond Project | DIY pond and backyard makeover | DIY garden edging | How to lay edge stones | How to edge garden beds | Tips on landscaping | DIY garden decor | DIY koi pond lining | How to maintain a koi pond | Spring planting and transplanting | Pond and backyard reveal | Before & After | TheNavagePatch.com

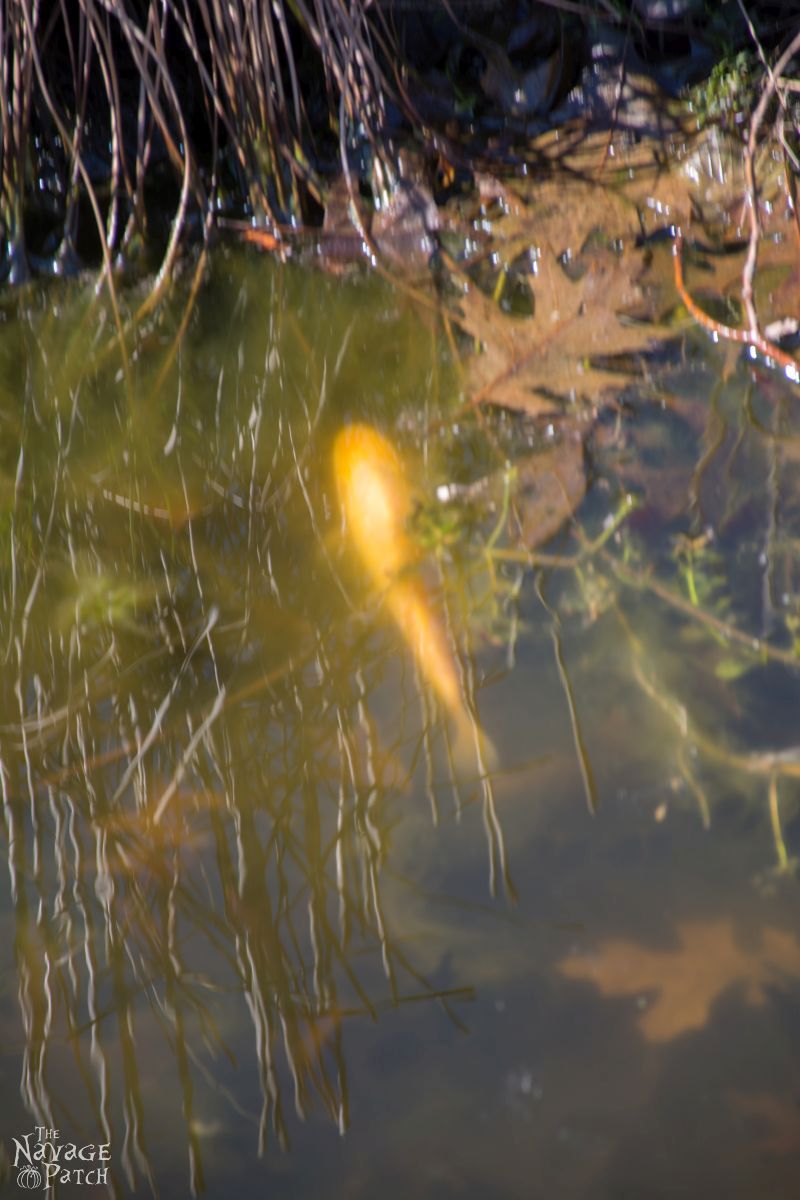
Poor fish. Won’t someone help them?

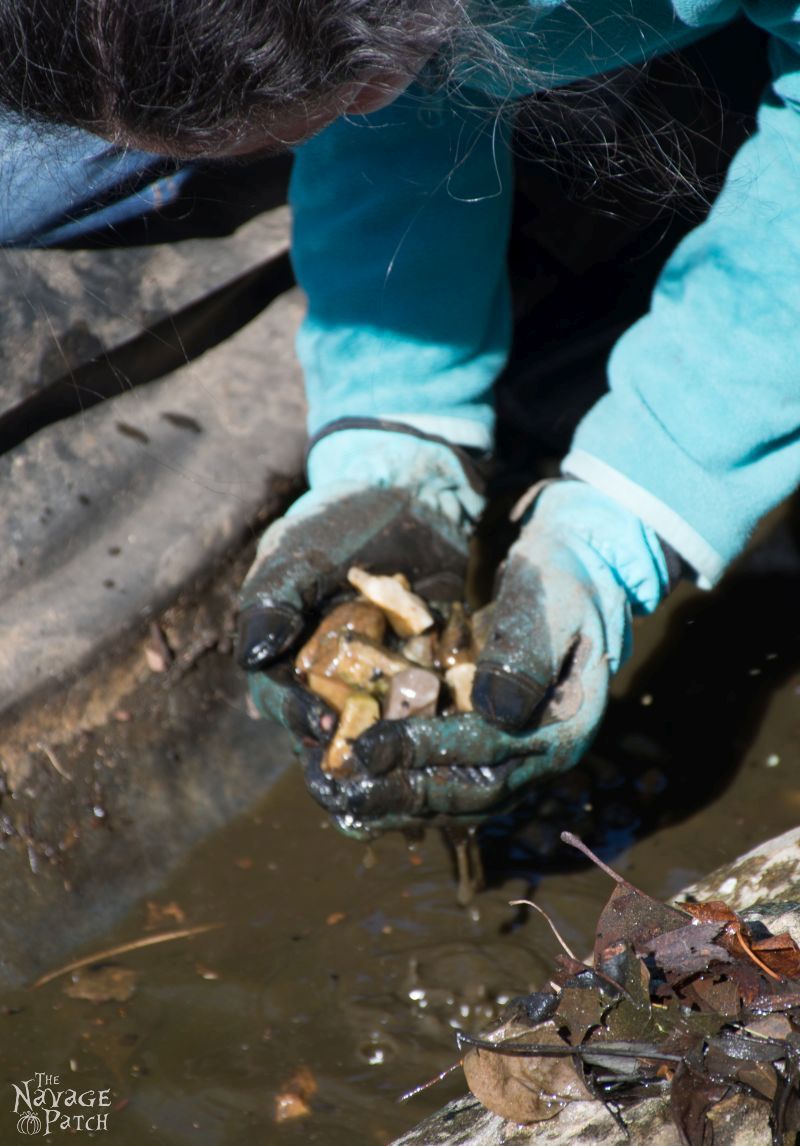
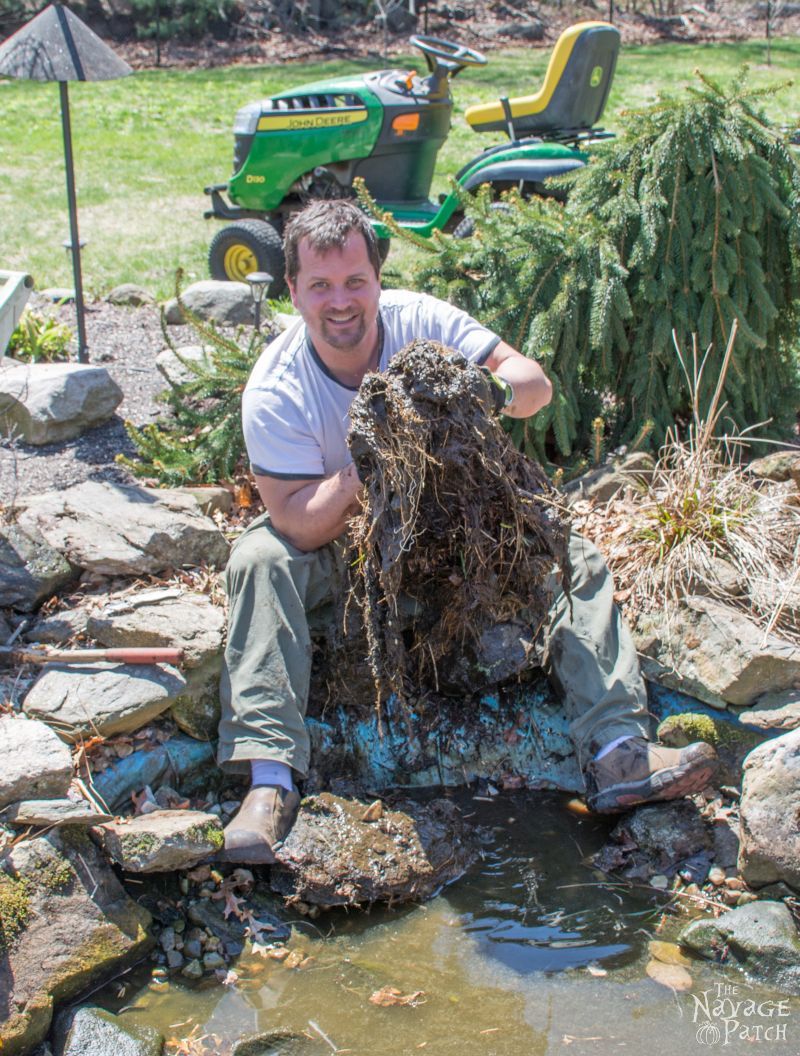
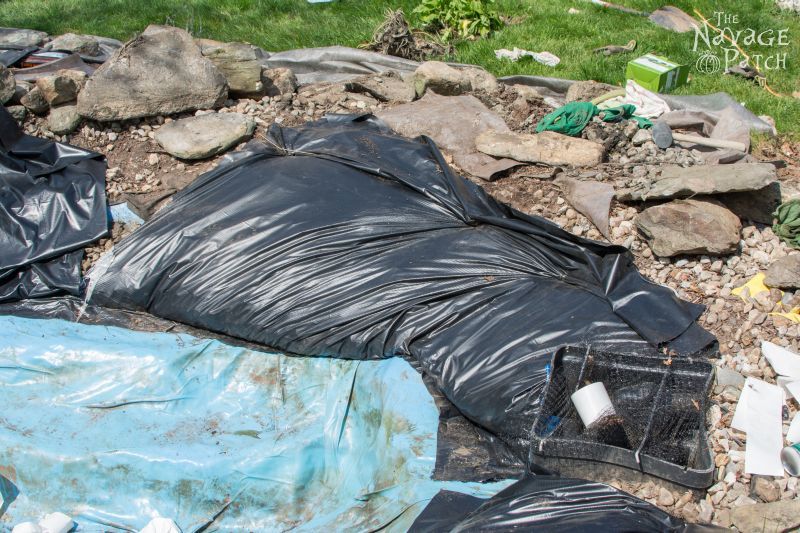
I started to remove the grasses growing in the pond. What I thought would be a quick yank and toss turned out to be an hour-long struggle to the death for the first clump of grass. The second clump went more quickly, but tired me even more. These things grew roots around every damn rock they encountered!

The Pond Project | DIY pond and backyard makeover | DIY garden edging | How to lay edge stones | How to edge garden beds | Tips on landscaping | DIY garden decor | DIY koi pond lining | How to maintain a koi pond | Spring planting and transplanting | Pond and backyard reveal | Before & After | TheNavagePatch.com
How did I get myself roped into this?
The Pond Project | DIY pond and backyard makeover | DIY garden edging | How to lay edge stones | How to edge garden beds | Tips on landscaping | DIY garden decor | DIY koi pond lining | How to maintain a koi pond | Spring planting and transplanting | Pond and backyard reveal | Before & After | TheNavagePatch.com
Hey, look what I caught!
The Pond Project | DIY pond and backyard makeover | DIY garden edging | How to lay edge stones | How to edge garden beds | Tips on landscaping | DIY garden decor | DIY koi pond lining | How to maintain a koi pond | Spring planting and transplanting | Pond and backyard reveal | Before & After | TheNavagePatch.com
Here you go, my babes. I got this for you. Enjoy!

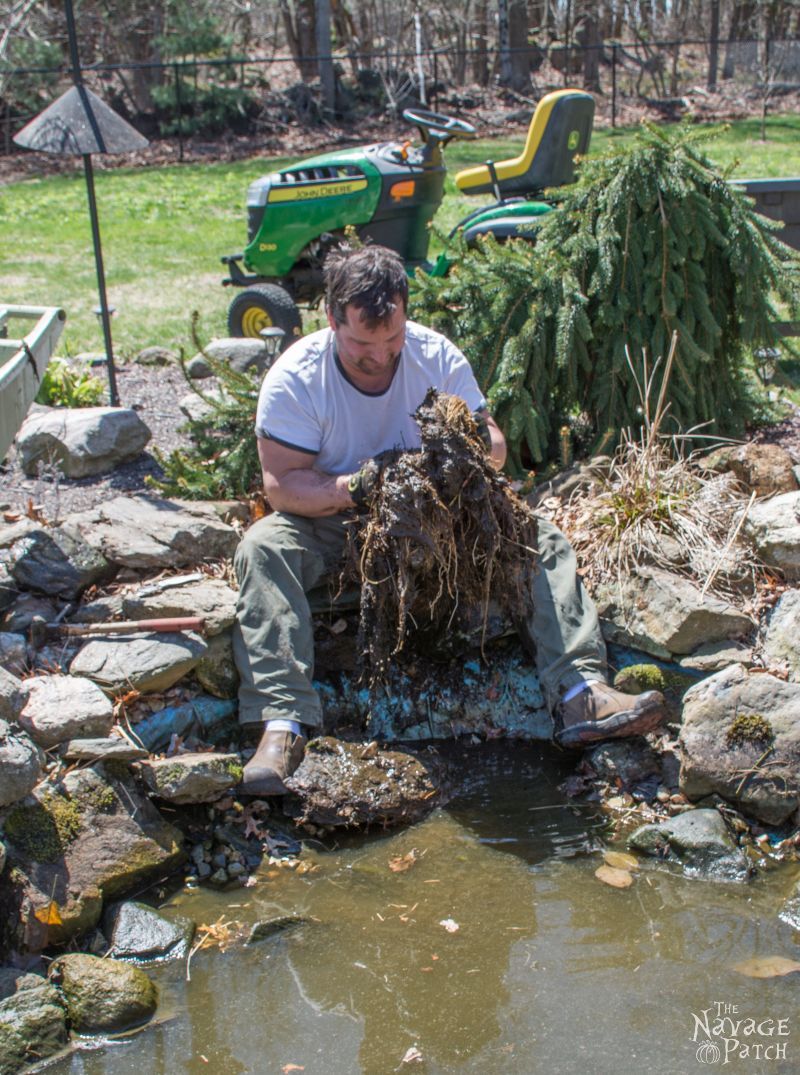
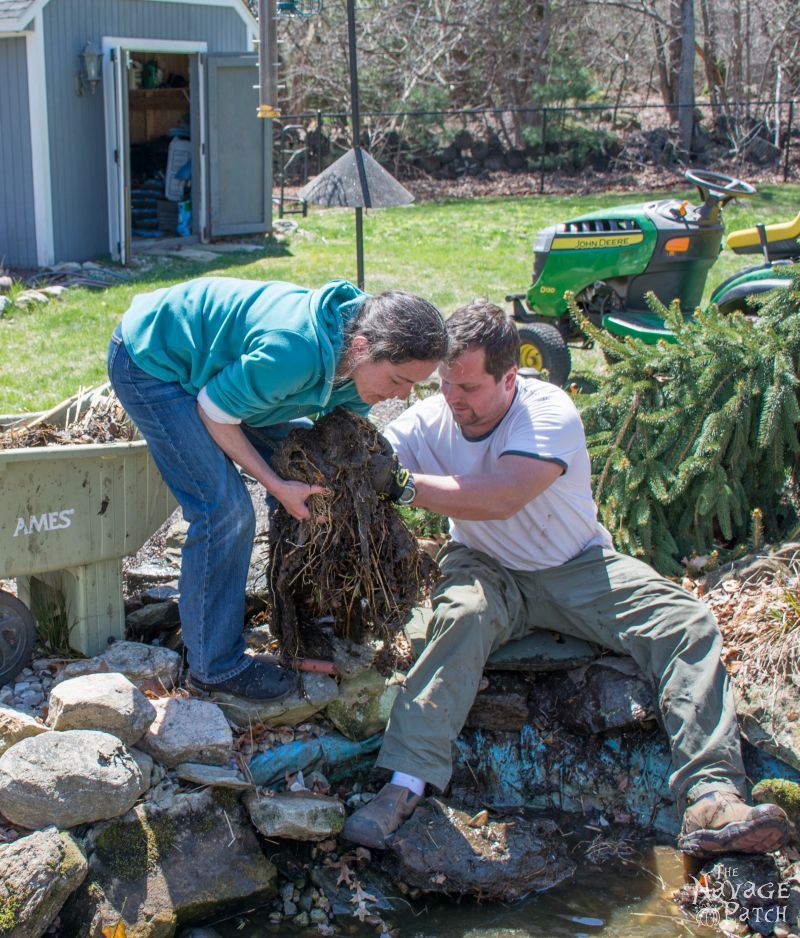
We started to drain the water. The fish were still in there. Poor things. But the only way we could catch them in order to transfer them to the other side was to drain most of the water. And still they were hard to find among all the rocks and muck!

The Pond Project | DIY pond and backyard makeover | DIY garden edging | How to lay edge stones | How to edge garden beds | Tips on landscaping | DIY garden decor | DIY koi pond lining | How to maintain a koi pond | Spring planting and transplanting | Pond and backyard reveal | Before & After | TheNavagePatch.com

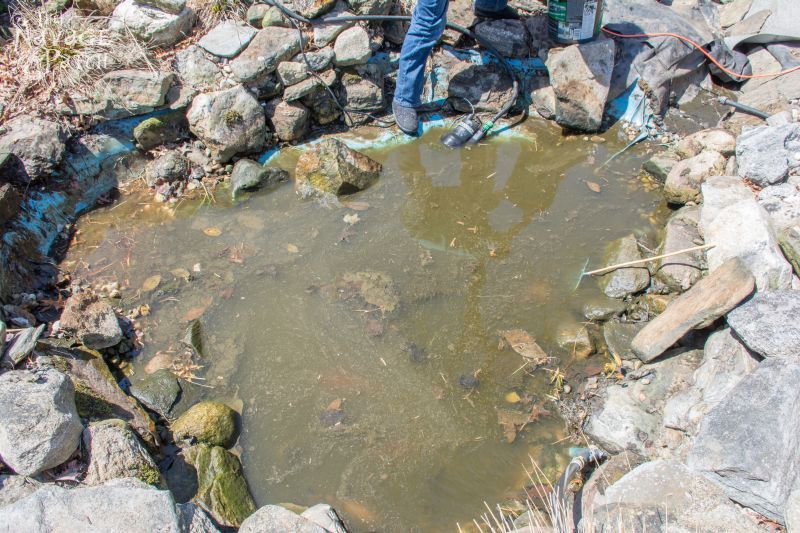
We cleaned and filled, then drained it again.

The Pond Project | DIY pond and backyard makeover | DIY garden edging | How to lay edge stones | How to edge garden beds | Tips on landscaping | DIY garden decor | DIY koi pond lining | How to maintain a koi pond | Spring planting and transplanting | Pond and backyard reveal | Before & After | TheNavagePatch.com

Gratuitous pet picture.

The Pond Project | DIY pond and backyard makeover | DIY garden edging | How to lay edge stones | How to edge garden beds | Tips on landscaping | DIY garden decor | DIY koi pond lining | How to maintain a koi pond | Spring planting and transplanting | Pond and backyard reveal | Before & After | TheNavagePatch.com

Handan, still cleaning up the muck, while I stood around with my finger in my nose. I don’t know how or why she puts up with me, but I’m so thankful she does!

The Pond Project | DIY pond and backyard makeover | DIY garden edging | How to lay edge stones | How to edge garden beds | Tips on landscaping | DIY garden decor | DIY koi pond lining | How to maintain a koi pond | Spring planting and transplanting | Pond and backyard reveal | Before & After | TheNavagePatch.com

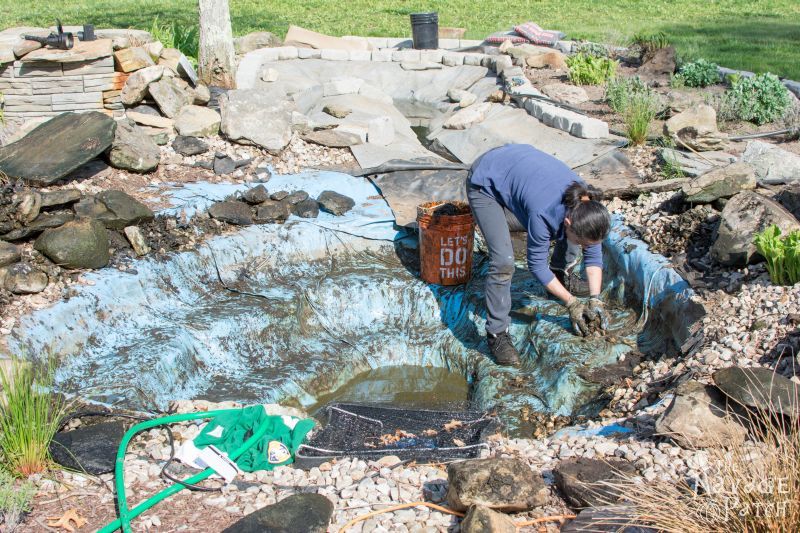
Always with a smile.

The Pond Project | DIY pond and backyard makeover | DIY garden edging | How to lay edge stones | How to edge garden beds | Tips on landscaping | DIY garden decor | DIY koi pond lining | How to maintain a koi pond | Spring planting and transplanting | Pond and backyard reveal | Before & After | TheNavagePatch.com

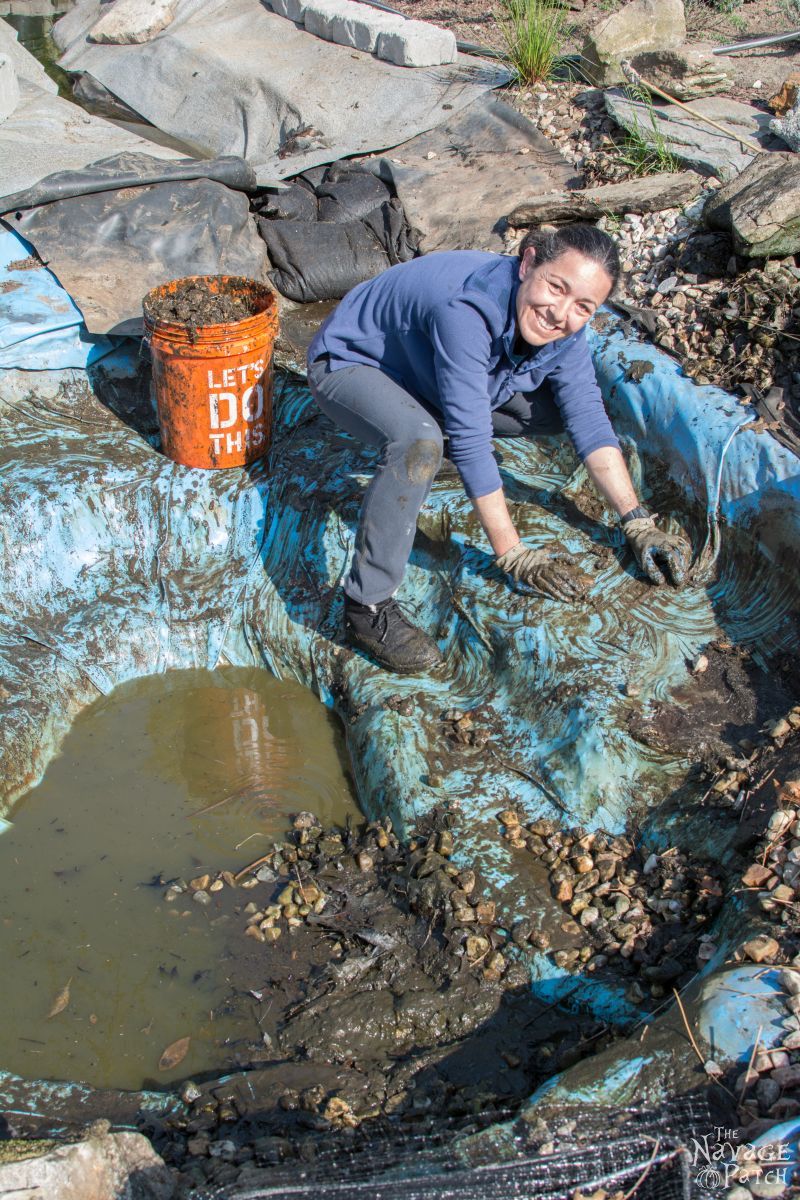
Seriously, it’s like she loves being covered in smelly mud!

The Pond Project | DIY pond and backyard makeover | DIY garden edging | How to lay edge stones | How to edge garden beds | Tips on landscaping | DIY garden decor | DIY koi pond lining | How to maintain a koi pond | Spring planting and transplanting | Pond and backyard reveal | Before & After | TheNavagePatch.com

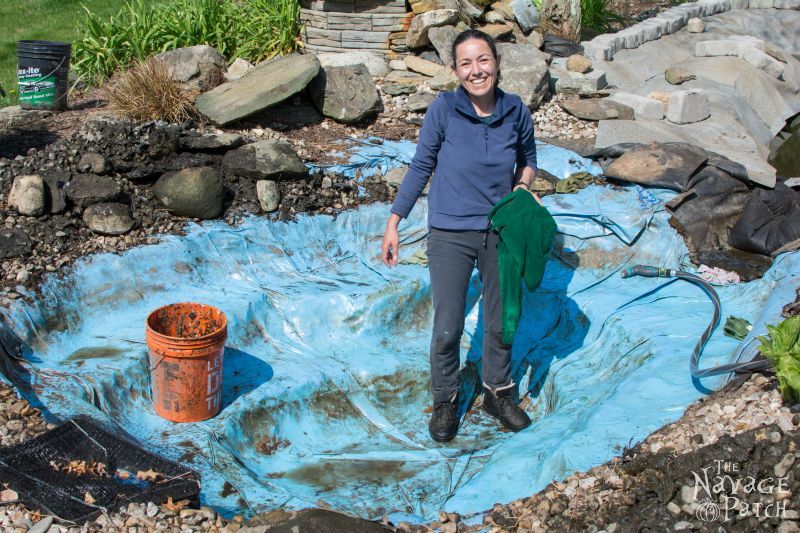
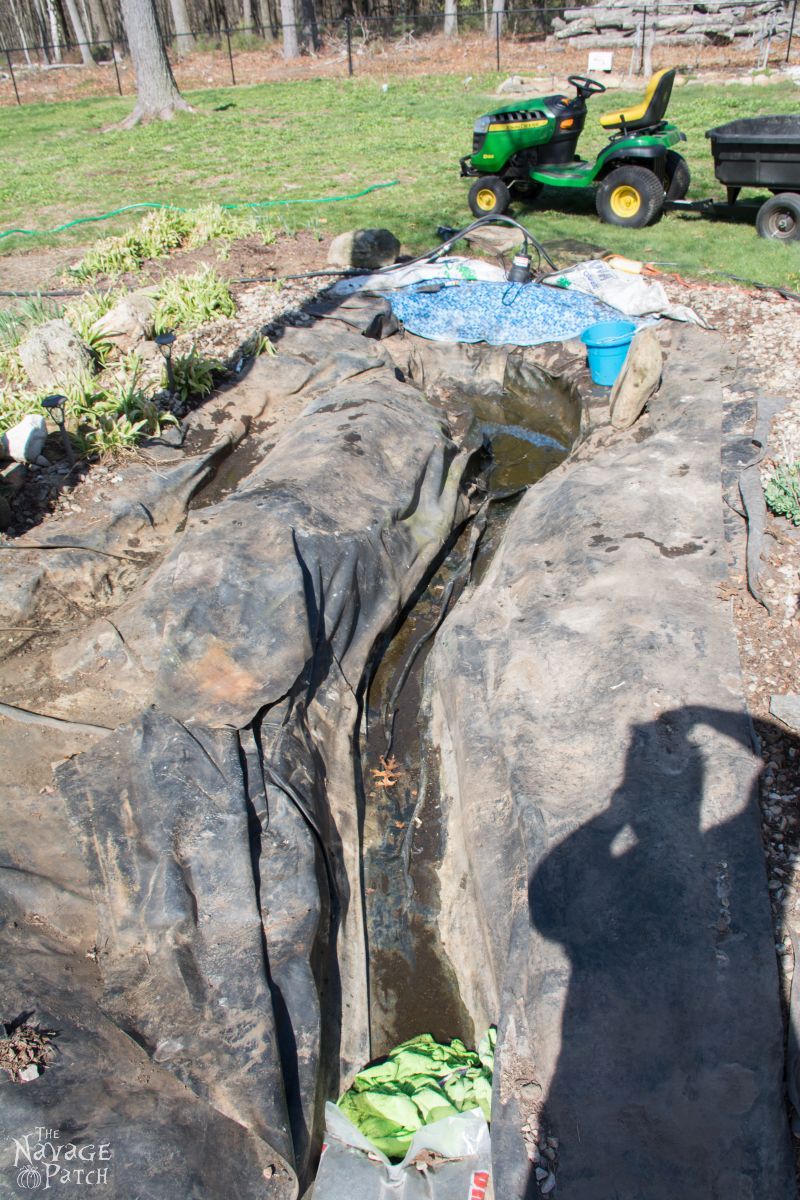
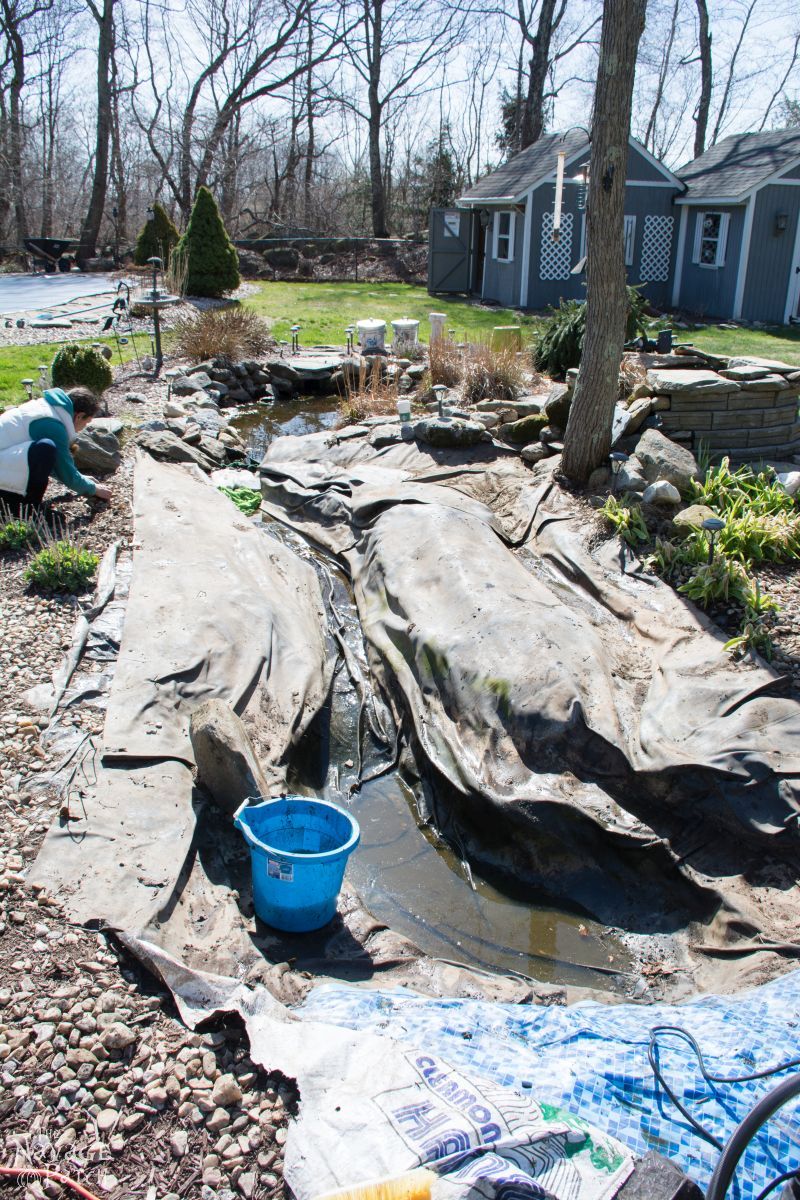
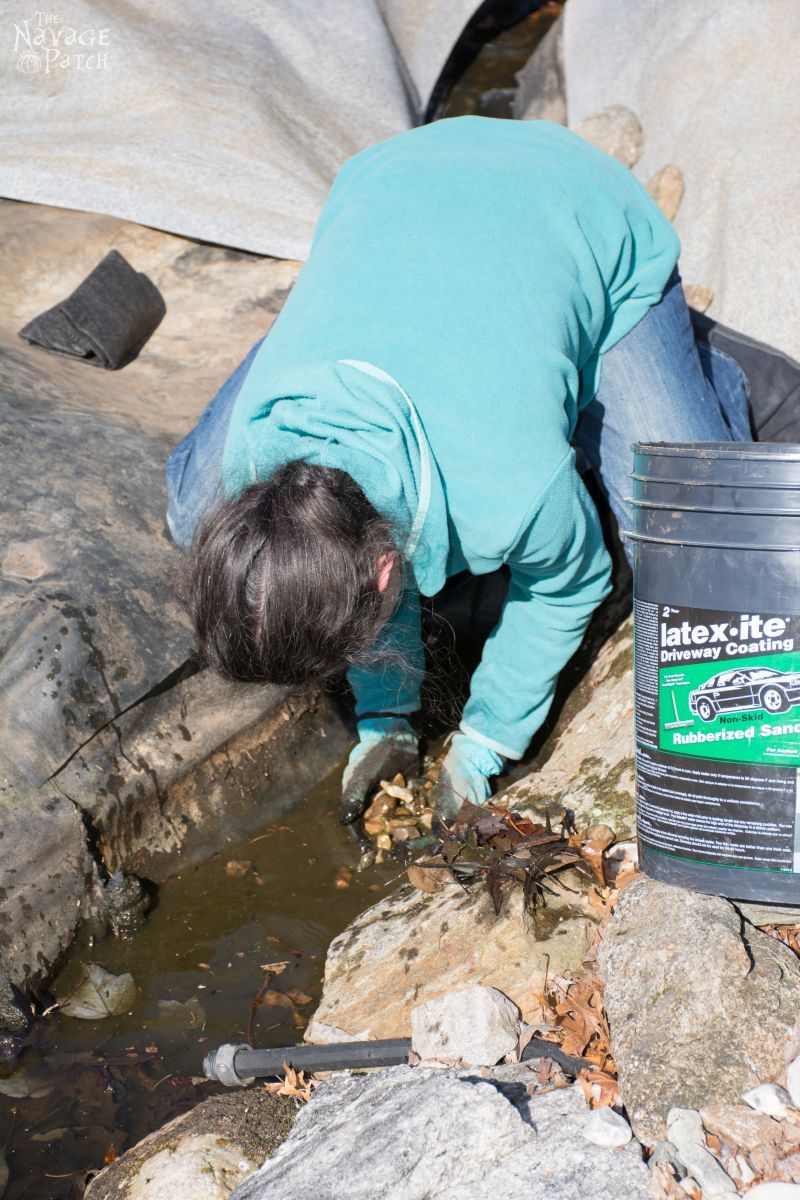
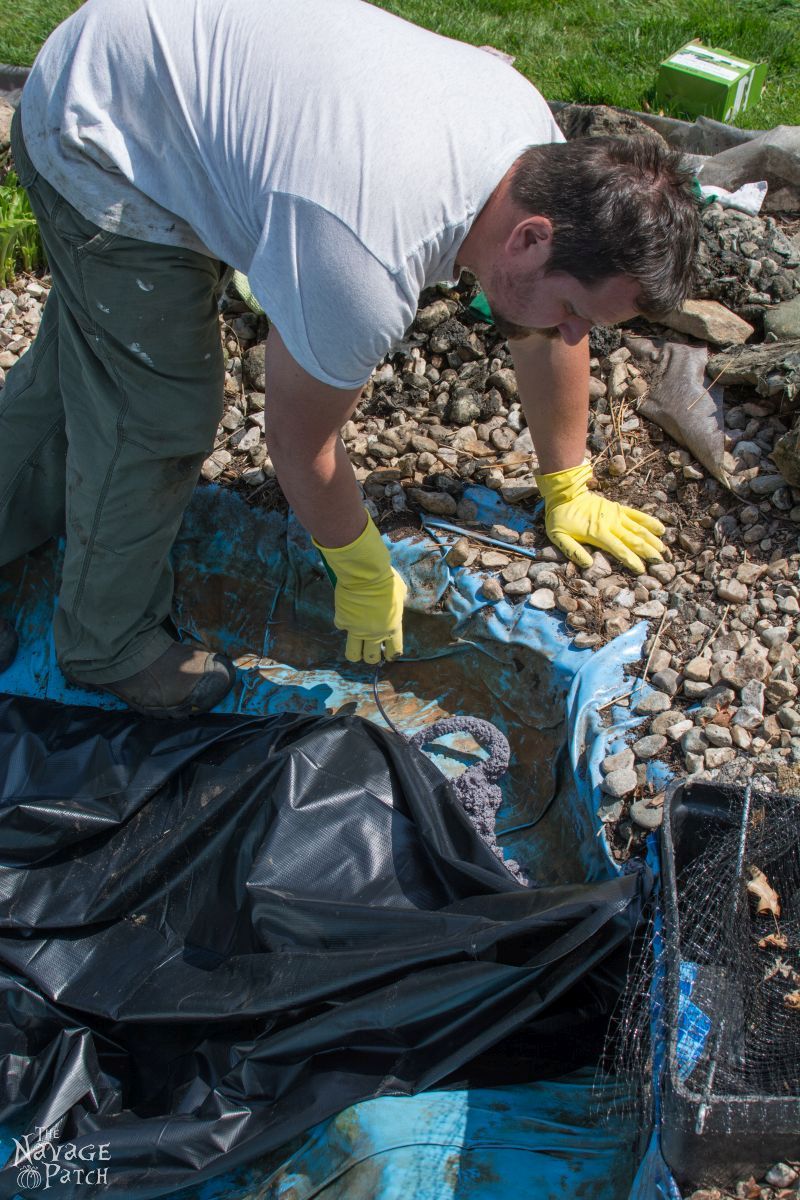
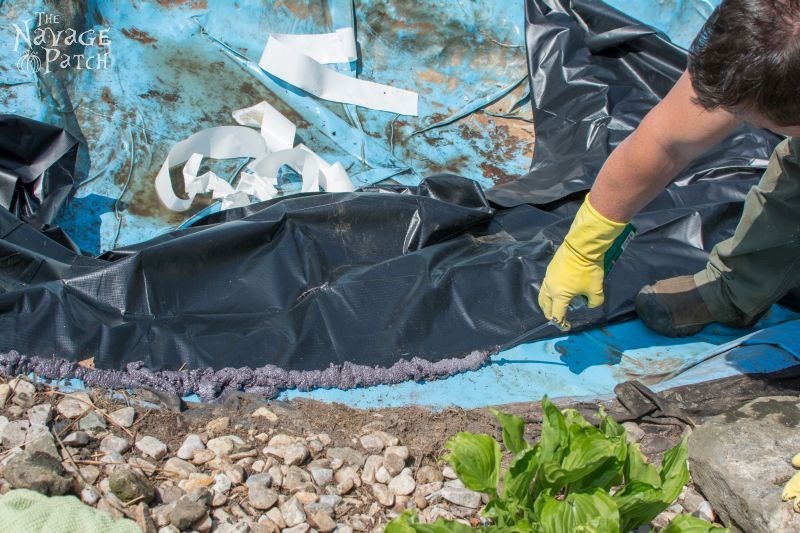
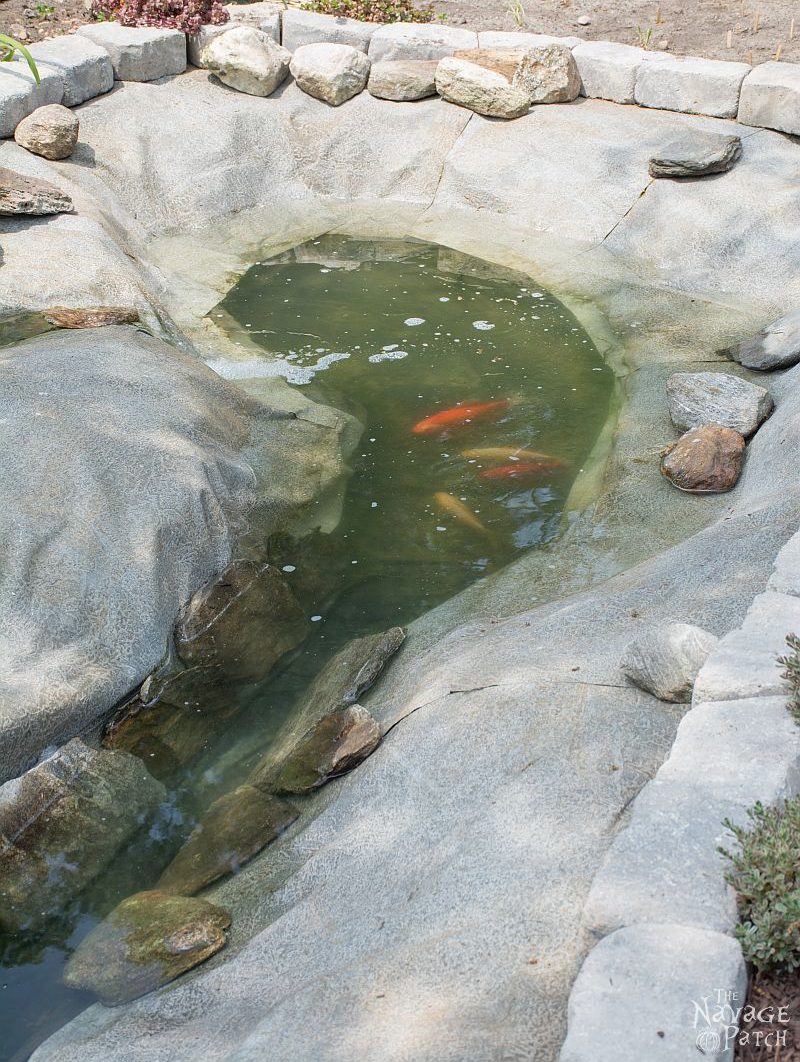
Once the pond was clean (and look how big it is!!), we attached some strips of pond liner around the edges. We only adhered them at the bottom, this time using a new product we found. It is so much easier to work with than the foam, because it adheres instantly. We still used foam though, just to double up on the adhesion.

The Pond Project | DIY pond and backyard makeover | DIY garden edging | How to lay edge stones | How to edge garden beds | Tips on landscaping | DIY garden decor | DIY koi pond lining | How to maintain a koi pond | Spring planting and transplanting | Pond and backyard reveal | Before & After | TheNavagePatch.com

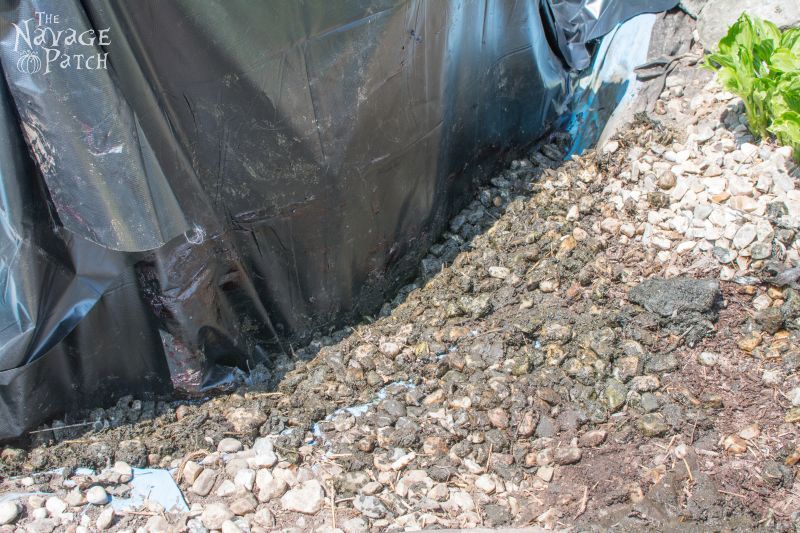
We then folded these strips of liner back over the edge of the pond. Once the strips were secured at their bottoms with the tops flipped over the edge, we began to backfill them with small stones. This was to raise the sides of the pond a bit to help prevent small stones and dirt from falling in in the future.

The Pond Project | DIY pond and backyard makeover | DIY garden edging | How to lay edge stones | How to edge garden beds | Tips on landscaping | DIY garden decor | DIY koi pond lining | How to maintain a koi pond | Spring planting and transplanting | Pond and backyard reveal | Before & After | TheNavagePatch.com
Spraying landscape foam next to the tape.

The Pond Project | DIY pond and backyard makeover | DIY garden edging | How to lay edge stones | How to edge garden beds | Tips on landscaping | DIY garden decor | DIY koi pond lining | How to maintain a koi pond | Spring planting and transplanting | Pond and backyard reveal | Before & After | TheNavagePatch.com The Pond Project | DIY pond and backyard makeover | DIY garden edging | How to lay edge stones | How to edge garden beds | Tips on landscaping | DIY garden decor | DIY koi pond lining | How to maintain a koi pond | Spring planting and transplanting | Pond and backyard reveal | Before & After | TheNavagePatch.com

The Pond Project | DIY pond and backyard makeover | DIY garden edging | How to lay edge stones | How to edge garden beds | Tips on landscaping | DIY garden decor | DIY koi pond lining | How to maintain a koi pond | Spring planting and transplanting | Pond and backyard reveal | Before & After | TheNavagePatch.com
Folding it back up and over. Look at that smile!The Pond Project | DIY pond and backyard makeover | DIY garden edging | How to lay edge stones | How to edge garden beds | Tips on landscaping | DIY garden decor | DIY koi pond lining | How to maintain a koi pond | Spring planting and transplanting | Pond and backyard reveal | Before & After | TheNavagePatch.com

The Pond Project | DIY pond and backyard makeover | DIY garden edging | How to lay edge stones | How to edge garden beds | Tips on landscaping | DIY garden decor | DIY koi pond lining | How to maintain a koi pond | Spring planting and transplanting | Pond and backyard reveal | Before & After | TheNavagePatch.com

The Pond Project | DIY pond and backyard makeover | DIY garden edging | How to lay edge stones | How to edge garden beds | Tips on landscaping | DIY garden decor | DIY koi pond lining | How to maintain a koi pond | Spring planting and transplanting | Pond and backyard reveal | Before & After | TheNavagePatch.com
Back filled with small stones and dirt.

It was exactly here, around 2:00 on a Sunday, May 12, that we decided it might be a good idea just to buy a whole new waterproof pond liner and lay it over everything before trying to apply the Rock-on-a-Roll. I hopped in the car and headed to Lowes to pick up a liner. An hour later, we had it sprawled on the lawn.

The Pond Project | DIY pond and backyard makeover | DIY garden edging | How to lay edge stones | How to edge garden beds | Tips on landscaping | DIY garden decor | DIY koi pond lining | How to maintain a koi pond | Spring planting and transplanting | Pond and backyard reveal | Before & After | TheNavagePatch.com

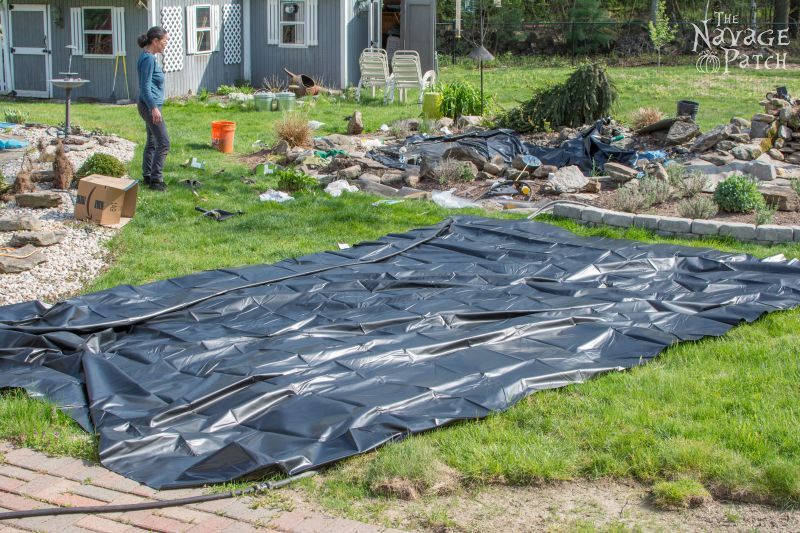
And then in the pond.

The Pond Project | DIY pond and backyard makeover | DIY garden edging | How to lay edge stones | How to edge garden beds | Tips on landscaping | DIY garden decor | DIY koi pond lining | How to maintain a koi pond | Spring planting and transplanting | Pond and backyard reveal | Before & After | TheNavagePatch.com

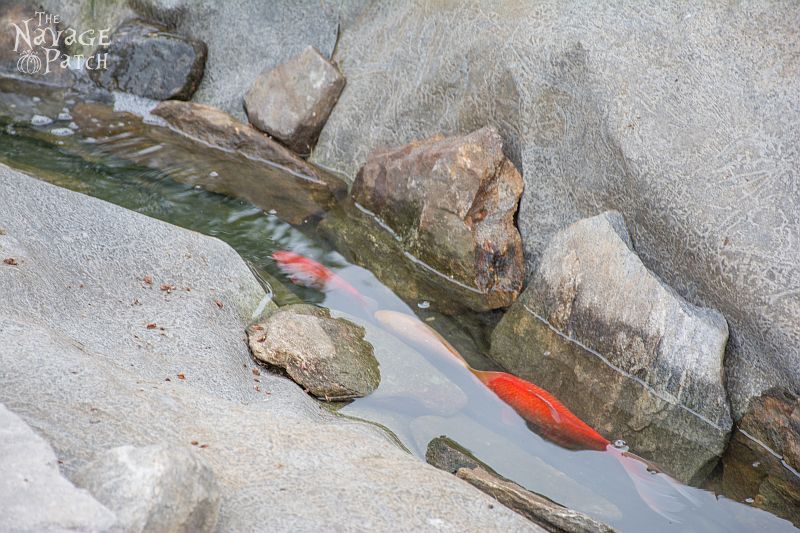
We set it in place with some water and added some big rocks that the fish could swim under for cover.

The Pond Project | DIY pond and backyard makeover | DIY garden edging | How to lay edge stones | How to edge garden beds | Tips on landscaping | DIY garden decor | DIY koi pond lining | How to maintain a koi pond | Spring planting and transplanting | Pond and backyard reveal | Before & After | TheNavagePatch.com

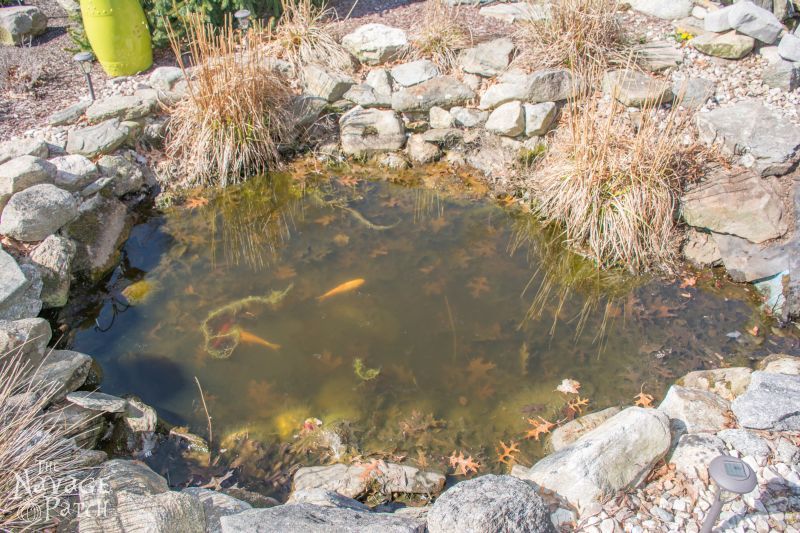
We moved the fish back and left it like this until the next weekend, then we finished putting on the Rock-on-a-Roll. I took no pictures, as it was a lot of work, and we were focused on getting it done. After it was complete, Handan put a few decorative rocks back into the pond.

The Pond Project | DIY pond and backyard makeover | DIY garden edging | How to lay edge stones | How to edge garden beds | Tips on landscaping | DIY garden decor | DIY koi pond lining | How to maintain a koi pond | Spring planting and transplanting | Pond and backyard reveal | Before & After | TheNavagePatch.com

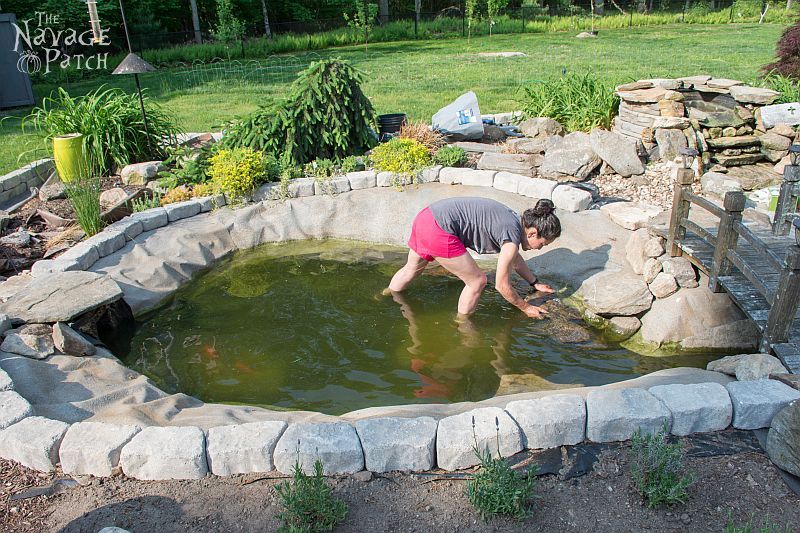
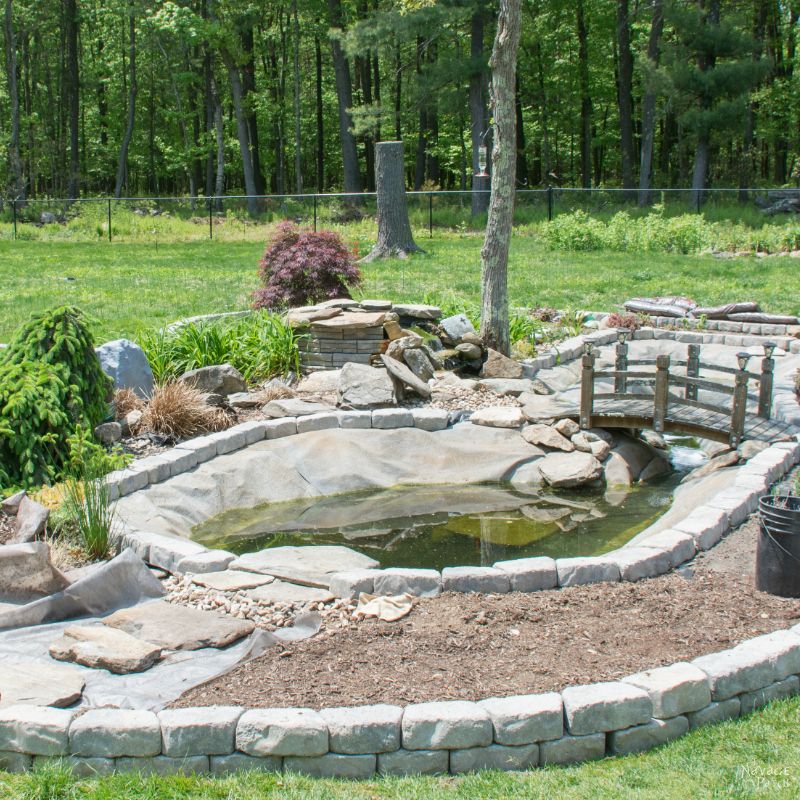
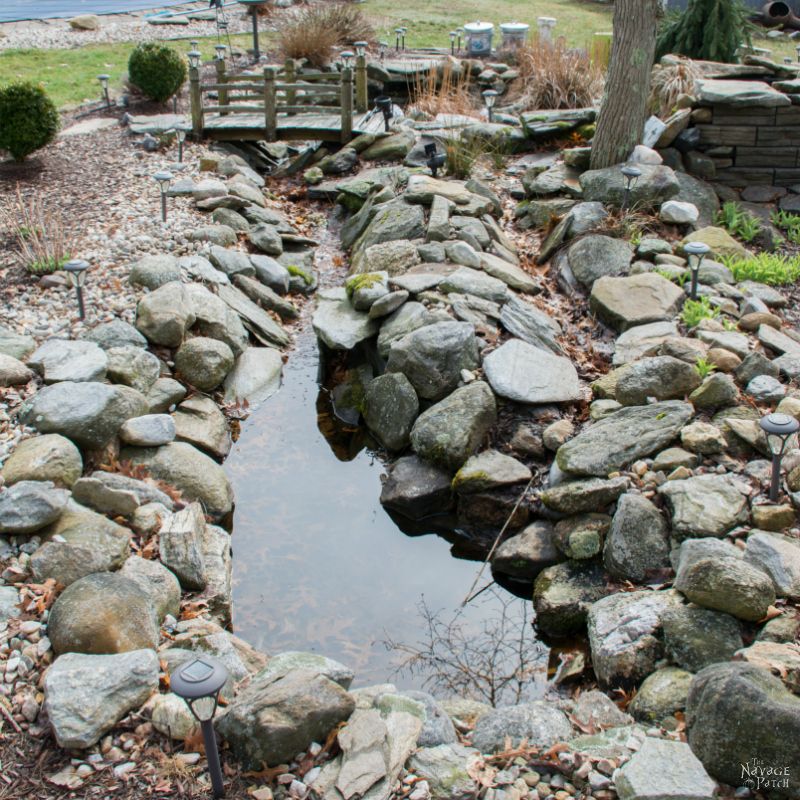
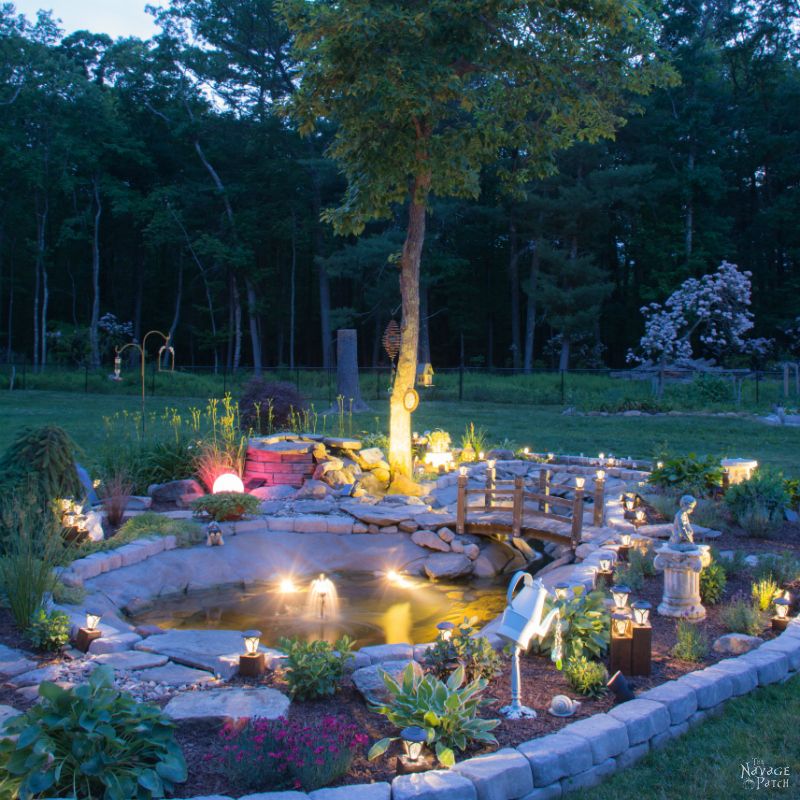
And that brings us to the end of the pond itself. There are still some more rocks to place, and a few other details, but they will be shown at the end of the project. In the next post, we’ll dive into the landscaping. But first, look at how happy the fish are. They can finally swim between the big pond and the little pond!

The Pond Project | DIY pond and backyard makeover | DIY garden edging | How to lay edge stones | How to edge garden beds | Tips on landscaping | DIY garden decor | DIY koi pond lining | How to maintain a koi pond | Spring planting and transplanting | Pond and backyard reveal | Before & After | TheNavagePatch.com The Pond Project | DIY pond and backyard makeover | DIY garden edging | How to lay edge stones | How to edge garden beds | Tips on landscaping | DIY garden decor | DIY koi pond lining | How to maintain a koi pond | Spring planting and transplanting | Pond and backyard reveal | Before & After | TheNavagePatch.com

CONTINUE ON TO>>

The Pond Project | DIY pond and backyard makeover | DIY garden edging | How to lay edge stones | How to edge garden beds | Tips on landscaping | DIY garden decor | DIY koi pond lining | How to maintain a koi pond | Spring planting and transplanting | Pond and backyard reveal | Before & After | TheNavagePatch.com
The Pond Project – Part 3: The Reveal

TNP Related Posts


Leave a Reply

Your email address will not be published. Required fields are marked *

15 Comments

  1. Ok. First, how the heck did I wind up here? Let’s see. First, I found a white horse on Thoughts from Alice. I proceeded to read about said white horse. I then saw something about Afghanistan. What is a woman(?) in Afghanistan doing painting a hobby horse? So what did I do? I clicked About Us. Now I have been through your courtship, wedding and been around the world with you. The horse turned out great, the moss balls are fantastic and the pond is looking really good and the fish are happy. I wish I could say the same for Lola and Jerkfish (I think are the names). Anyway, enjoyed reading About Us. I Can’t wait to read more.

  2. That’s pretty much how I met them Mary! I got hooked as soon as I saw what a cute couple they are and I love how they work on projects…something a little similar as my hubs and I. Well, usually I am the one with the ideas that he carries out..hehe..but I’m trying to get better. :).
    Love how the pond is turning out! That was a lot of work!!

    1. Thanks, Andi! It was a lot of work, and I swear Handan did most of it. She’s still finishing up the landscaping…we hope to finish that this weekend, and I’ll have the final post out next week.

    2. Thank you so much, Andi! Yes it was a lot of work but I am so happy it is getting there. Keeping my fingers crossed for some good weather so that I can finish the landscaping. đŸ˜€

  3. You both continue to amaze me. Is there anything you won’t tackle. Love how you work together on your projects. Lamar says “hi”. It’s already 110 degrees here. No outside work here.

  4. What kind of filter are you using? Do you know the gallon of your pond? I too have a pond that I need to redo. I will try to post pictures later if this will allow me to.

    1. Hi Teresa, okay I’m not sure exactly how many gallons our pond is, and I’m not great at estimating volumes, so I’m going to say somewhere between 250 and 750 gallons. I bought this filter this year:

      http://amzn.to/294vX6v
      I use it in conjunction with this algae control:

      http://amzn.to/29kft8p
      and they have made all the difference in the world! The water is crystal clear!

      Please do post pics. If you can’t post them in the comments section, please send them to me at greg@thenavagepatch.com

      Good luck!

  5. You guys look like kindered souls. Love your stuff. Too bad you’re not in Iowa we could destroy diy barriers together lol.

    I’ve found the ability to destroy a planet insignifigant to the power of the diy force, lol. Really its 90% attitude that it’s possible.

    1. Lol, Clint, we literally just finished watching Rogue One, so your comment is the most perfectly timed ever! And yes, you are correct!

  6. I have a dog that loves to get into the pond. He put a hole in the last liner I had and now i have to start all over. The dog must be ADD on crack (and I haven’t a clue where he gets his stash) So! My question is….does the material you are using stand up to a dog splashing and jumping into the pond?