DIY Dollar Tree Lantern
This DIY Dollar Tree Lantern will fool anyone into thinking it came from a high-end decor shop! It’s amazing what you can do with Dollar Tree supplies!

Wow, this project started down here for me [waves hand around his knees], but it ended up here [jiggles hand above his head]!
Handan has been wanting to do something with the stretched canvas frames from Dollar Tree. And her original idea is still just that – an idea – for the time being.
Because while she was explaining what she wanted me to do, I started fidgeting with the frames and leaned them together just so…
“Hey babes, does this look good?” I said, pointing to the loosely-assembled frames.
She stopped and considered the jumbled wood.
I could see the gears turning, hear the tumblers falling into place.
“My babes!” she said. “We can do something with this! Good job, my babes!”
I puffed out my chest and strutted around the kitchen, stopping now and then to ask, “Who came up with an idea??” Whereupon I’d thrust my thumbs toward my face and shout, “THIS GUY!”
And thus our DIY Dollar Tree Lantern was born.

But it wasn’t all smiles and unicorns and this guy, madam!
There was a time near the end where I thought it was just a big ol’ glop of crap, and I was ready to toss the whole damn thing in the bin.
Then Handan slid in with the save, as she usually does.
And now we have a project worth sharing and showing off in our home.
And it can be made entirely from Dollar Tree materials.
DIY Dollar Tree Lantern

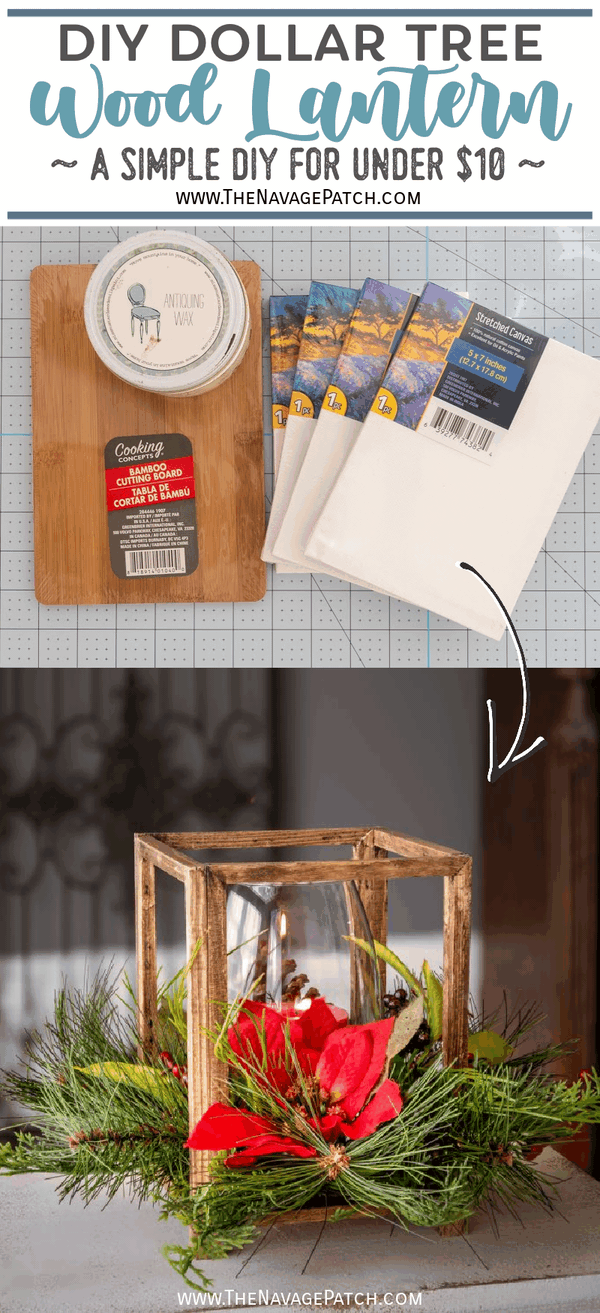
SUPPLIES LIST
- (4) 6 x 8 Dollar Tree stretched canvas frames
- Dollar Tree bamboo cutting board or Dollar Tree popsicle sticks (no saw needed with popsicle sticks)
- Dollar Tree small wooden cubes
- Dollar Tree hurricane vase
- Dollar Tree scented candle
- Dollar Tree white, green or red sand
- Dollar Tree candle ring or a candle ring of your choice
- Dollar Tree flower or Christmas picks (optional)
- Staple remover or screwdriver
- Antiquing wax or stain or diluted Dollar Tree brown paint
- Super glue
- Saw (only needed for the bamboo cutting board)
How to make a Dollar Tree Lantern
Here are my 4 stretched canvas frames. We used 6 x 8, but you could go bigger or smaller, as DT carries 8 x 10 and 5 x 7. I still can’t believe that you can get these things for a dollar! If I were going to learn how to paint, I’d be spending my time in DT rather than Michaels!

We’ve bought these frames a few times from a few different locations, and we’ve noticed that there are two variations – both from the same brand. One is as shown below, and this is what we used for out lantern.

The other looks like this. I can’t figure out why some have the slit and some don’t. You can still make a perfectly decent-looking lantern with the split, so I wouldn’t let it deter you if that’s all you find.

The first step is to remove the staples. I used a special staple remover meant for removing carpet staples, but anything will do, including a screwdriver.

Once those stapes are gone, the canvas peels right off.

To get a nice brown color, I used antiquing wax, as it was quicker and easier than stain, and it allowed me to carry on with the project quicker. You could also use watered-down brown paint. Now, I waxed these frames first and then I glued them together later. I first tried hot glue, but because of the wax, bot glue wouldn’t hold, so I ended up using super glue. If you’d like to used hot glue on this project, then I would recommend building the lantern first, and then waxing/staining/painting it after its built.

Gloves are a good idea with wax – it can be a pain to clean off your hands and out from under your fingernails. Not that I care about dirty nails, mind you, but you may have different priorities.


I let the wax sit until it hardened.

After a failed attempt with hot glue, I turned to something a little stronger. You’re going to want a gel super glue or one that says “extra thick.”

I put a thin line down the middle of one face. I didn’t want to be wiping up too much excess glue, so I tried to use the least amount possible.

I started with manly hand-clamps…or are they handy man-clamps…?

…but then said “nuts to that” and broke out my dainty DeWalt mini clamps. My babes loves these little things [I do! They’re the cutest little wood shop tools ever! – Handan]. We probably have 20 of them strewn about the craft room and wood shop.

Okay, now here’s how we proceeded with the build. This is a highly-detailed and complex top-view schematic that I had some of my NASA buddies create on their intergalactic supercomputer.

Another thin bead of superglue for the next face.

Okay, I know what you’re thinking: “Why is that one plain? I saw them all waxed in an earlier photo!”

Indeed, madam! But while I was doing my pre-build mockup, Handan noticed that one of the frames was shorter than the others by about the width of three hairs.
I tried to tell her that it was all in her head.
I tried to tell her that no one would notice. (It was pretty obvious) [It was SO obvious! – Handan]
But she was having none of my baloney, so she made me open another one, de-staple it an use it instead.
So here I am, gluing the final frame into its place.

Soon, I would wax that eyesore, but first, I placed the bamboo cutting board underneath and traced where I would be cutting. Okay, look – cutting that bamboo board is the only part of this project that requires anything even remotely complex. But in case you don’t have a saw to cut the bamboo, you can also make a plank base using Dollar Tree popsicle sticks trimmed with scissors or scored with a razor and then snapped to size.

If the bamboo doesn’t look square, well, that’s because it isn’t. Remember, we’re dealing with dollar frames here. Perspective, madam. Keep everything in perspective.

Hmmmm, Handan must have taken this photo, LOLOLOOL! I put a bead of glue on all 4 edges of the bamboo.

I tapped the bamboo in place before the glue set.

I don’t have a picture, but after I glued the base, I was looking at my creation and thinking that it was looking a little…plain.
Fortunately, my babes came up with the idea of using Dollar Tree cubes for feet.


They made a big difference! Once they were on, I waxed them and the base, so everything was a uniform color.

So now I had my lantern.
(big whoop)
Yep, I had my Dollar Tree lantern.
(yawn)
I don’t know. I just stood there looking at it, and even with the new feet (which helped tremendously), I couldn’t help but feel entirely and utterly underwhelmed.
This was my first creative idea in god-knows-how-long, and here it sat before me on the counter like a wart-covered toad.
I wanted to love it…but I didn’t.
My babes saw my face and asked what was wrong.
“I don’t like it, my babes,” I said. “It’s…it’s…I don’t know. It’s boring.”
Without a word, she walked over to our Dollar Tree craft supplies (I could spend hours describing this ever-expanding corner of our craft room) and returned with an armload of floral stuff.

This candle ring looked promising.

And would you look at that!

It’s like it was made for this hurricane vase!


Wow! Not bad! Not bad!

Hey, look! A bird! Let’s stick him on there, too!


And these logs!

Holy crap, things were looking up!

But then Handan went a little crazy and broke out another candle ring she bought at Hobby Lobby back in October. Now, full disclosure here, this candle ring was not a dollar – its original price was $12, but we bought it during floral sale (50% off all holiday florals), so it was $6. But here’s the thing – if you were to make it with Dollar Tree florals, you’d need a candle ring and 4 additional picks to make your candle ring look full on all 4 sides. So for an extra dollar, it made sense to use the bigger candle ring from Hobby Lobby.
And that’s an important lesson as we try to get the most bang for our bucks when we craft. The Dollar Store isn’t always the cheapest option when you factor in sales at the traditional craft stores.

I manhandled the candle ring into place while Handan shrieked and told me to be careful.

Oooooh….ahhhhhh….

At Handan’s insistence, I pressed and pulled and fluffed and basically tried to make the thing look as good as I could.

The moment of truth…

Now, as amazing as those hurricane vases are for a dollar, their one Achilles heel is that the glass bottom (where the candle would sit) is warped, so the candle can’t stand straight. My guess is these are factory rejects that end up in Dollar Tree.
But hey, it’s okay! It’s nothing a little Dollar Tree sand can’t solve!


Now that I had a level base, I plopped my Dollar Tree scented candle into the hurricane vase.


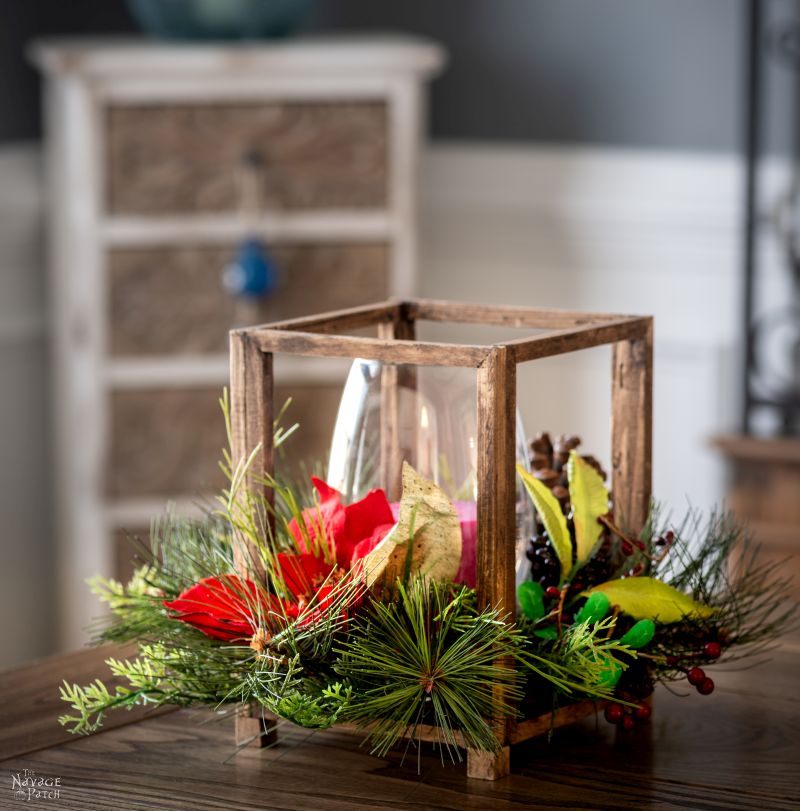
And madam, that is how you make a beautiful rustic lantern from Dollar Tree stretched canvas frames!

When I looked at my Dollar Tree lantern after adding the greens, I knew we had a winner on our hands.


Okay, I know what you’re thinking – “Couldn’t I just make it out of dowels? I’m sure it would look nicer, and it wouldn’t have all those staple holes in the back!”

Well, yes. Yes, you could. But it’s a lot easier and quicker to make it from DT stretched canvas, especially for those without tools. And even though it has staple holes, and it’s a wee bit unsquare, it has loads of rustic charm. And your friends will never believe you when you tell them the truth about its humble origins!

It looks amazing.
We love it when you share our posts on Facebook and Pinterest!


Good thinking batman and beautifully done as always. Love how rustic the lanterns look with their little cubed feet 😉 BTW, those slits in the wood are an artist’s best friend. When you buy a canvas with slits there will normally be a small packet of wooden wedges stapled onto the back of the canvas. When your canvas starts to sag (cheaper ones often do) you can stick those wedges into the slits, and voila your canvas will tighten up nicely.
Aahhhhhhhh, and here I thought the Dollar Store was making them cheaper. Turns out, they’ve actually improved them! Thanks for the lesson, Michelle! 🙂
Very beautiful and what a great price! Thank you for sharing. I love your website. I just found it this week.
Welcome, Valerie, and thank you! 🙂
These are great! I hope I can find the supplies at my Dollar Tree. I am constantly impressed with your creativity – and you never run out of these awesome ideas!
Thank you, Patty! The only seasonal part of this is the candle ring (I think) – all other components are year-round, and can be found in the craft area.
A great Dollar tree creation. I love rustic decor. Pinned
Thank you so much, Cheryl! 🙂
Very cute, but it DID cost $15.00 not counting the stain and the glue! Which would be great if you already had all of the supplies, but, $15.00 would probably buy an already made lantern at Hobby Lobby, Michaels, JoAnns. or WalMart. But it IS original, so you get points for that. Very cute and very creative!.
Hi Karen, thank you so much! Now to address the cost part of your comment: $4 for the canvases, $1 for the bottom wood, $1 for the cube feet and $1 for the hurricane vase. Glue and paint from the dollar store will work perfectly fine, so add $2 more and for a total of $9 you’ll have a wood lantern.
If you’re counting the floral within the $15 you mentioned, then you’re comparing apples to oranges as there will be no florals included in the lanterns you’ll buy from Hobby Lobby, Michaels and Joanns or Walmart. But I do agree with the point of buying a small lantern for $15 from any of those places, because you surely can get a lantern for an extra $6 which may not even need the floral to look good. So at that point it is the question of whether you’re a DIYer/crafter because you have to, or because you’d like to.
I’m a Turk and in Turkey majority of people do not craft or DIY in their spare time, because a) they live in apartment buildings so they don’t have the space for it anyway, and b) they’re able to get better quality things and service for much cheaper than they can do themselves. And therefore, I very much agree with you when it comes to “why waste your time and effort on it, when you can buy it” and that’s why Greg and I don’t post about everything we do here. But I also do keep in mind that crafting and DIYing is a part of the culture here in America, so for those who see DIY and crafts as a hobby, this lantern is worth making and is a useful way of spending your crafting time 🙂
Greg,
Tell Handan she’s one lucky woman! My husband will help e cut wood pieces for my projects, but he isn’t going to put them together! I love your tutorials and the conversations you have with yourself, along with Handan’s help and great ideas (yes, give handan a lot of credit!) I might just go out and get 4 DT canvases – if there are any left in the store!!! Keep these great ideas coming! Merry Christmas to you both.
Thank you so much, Barbara! Oh, I tell Handan how lucky she is each and every day, and she tells me the same! Good luck with yours and Merry Christmas to you and your family! 🙂
I love the way it turned out. The brown wax was the perfect color for the rustic look!
Thanks, Mom!
Hi Greg,
You did an amazing job, with Handan’s encouragement. You are the best team! I am heading to the dollar tree right now. Maybe I can whip up something. Thank you.
Marian
Thank you so much, Marian! Good luck! 🙂
Is there any way to make your site load faster? Less pop ups? Make sure each picture is really important?
I’ve been finding myself “giving up” on viewing since it takes so long for the content (esp pictures) to load. I really like your site, hoping there is a way to improve…
Not an overall problem with my device. Just notice some sites are much better at loading, others, not so much!
Great idea!! I would fill in the staple holes and slits with a bit of wood filler, my OCD.?
Thanks, Robyn! LOL, if I had to do that, I’d tell Handan she could find another sucker to do it for her! Remember: staple holes = rustic = chic. 😀
Great project.I can see it in black for Halloween, metallics for a less rustic look, and even with florals and birds in it for spring–very versatile! I first learned to add “feet” to a basket kept on my bathroom counter so it didn’t mold and discolor; they were only round beads but worked well. Gotta love Dollar Tree!
Thanks, Kathy! You could do this lantern in so many ways! We just happened to hit upon the idea during Christmas season, so that’s the treatment it got. 🙂
I love this DIY very creative beautiful and festive thanks for sharing and happy holidays
Thank you, Ivory – Happy Holidays to you and your family! 🙂
For quicky brown stain, I use brown shoe polish with the dauber. Dries fast and no need for paint brush clean up ?
That’s a great idea, Teri! I think we have an old shoe-shine kit we found at a tag sale around here somewhere!
You guys are so funny. I love reading your instructions even if I don’t make the project. I think I’ll have to make myself a DT list today.
Thank you, Denise! Good luck! 🙂
I’d love you to try this using picture frames (so I don’t have to do it to see if it works, see what I did there??) You can get those cheap ones with the glass that look very much like these. I usually see them in black so they would be a nice base for a rustic sanded finish after painted white or any other color. Keep the glass, cover the back of the wooden part with pretty paper, then you can just add a bigger, fatter candle instead of the hurricane. Set it on a round base that you can decorate with picks/greenery. If you want to try other sizes of canvases, you can buy packs of 10 at Michaels. I usually see them for less than $1 each when you buy in bulk. Just check the framework first to make sure it’s the right shape.
That’s a great idea, Charlotte! Send me pics if you do it at greg@thenvaagepatch.com
These are awesome, I think I’ll take a page from Kathy A and make a few for all seasons/holidays by changing out the different types of greenery and candle. Thanks guys!!
Thank you so much, Kathy! Yep, they’re totally versatile! 🙂