DIY Light-up Paper Snowflakes
These DIY light-up paper snowflakes look amazing and elegant with fairy lights or without, and they’re incredibly easy to make!
Back in November of 2019, I made a bunch of light-up paper snowflake stars for my babes. I was still new to crafting, so it was something of a challenge for me. But the snowflakes turned out great, and they made it all the way to Florida before finally giving up the snowy ghost.

Well, this year, my babes again wanted light-up snowflake stars but without some of the fuss of my last versions.
What fuss, you ask?
Well, to start with, the bags I used 3 years ago are about as rare as an unopinionated teenager, and are generally only sold in bulk to nut vendors and their ilk.
Besides the unicorn nut bags, my method used fancy snowflake hole punches – 3 of them, to be exact. Now who needs that extra expense?
And to top it all off, my method of installing the fairy lights was clunky, at best and infuriating at worst.
As with all things, it was time to simplify.
I didn’t need albino nut bags from the foothills of the Himalayas – I’d make do with brown and white sandwich bags that can be found in any American grocery store.
And let’s leave the hole punches to kindergartners and college kids. Scissors will get the job done quicker.
Finally, the lights. We found a much easier way to light these snowflake stars. Since we made our first 3 years ago, paper snowflakes have exploded all over social media, but ours are still the original light-up ones!
So let’s take a new look at an old classic. I’ve kept the original post at the end, so you can read through and see how to make those as well, but I’ve removed the original light installation. This new method is the one you’ll want to use regardless of which style paper snowflake you make!
Light-Up Paper Snowflake SUPPLIES LIST
Affiliate links are provided below. Full disclosure here.
We love to see our craft projects out in the wild! If you try this seasonal craft project, take a picture and post it on Instagram, be sure to tag us – thenavagepatch
DIY Light-UP Paper Snowflake Stars VIDEO Tutorial
On Tiktok
More DIY Christmas Decor Ideas
- DIY Dollar Tree Duster Trees
- DIY Dollar Store Mop Wreath
- DIY Faux Fur Trees
- DIY Faux Antique Brass Bells
- Free Vintage Christmas Magazine Cover Printables
- DIY Shag Tree Pillow
- Easy DIY Christmas Candles
- DIY Winter Loop Yarn Wreath
- DIY Christmas Decor: Faux Tree Repurposed 3 Ways
- DIY Wood House Candle Holders
- Christmas Patent Wall Art And 18 Free Printables
- DIY Epoxy Wood Shim Trees
- DIY Dollar Tree Snow-White Nutcrackers
- Free Watercolor Christmas Printables (20+ BEAUTIFUL Holiday Prints)
DIY Light-Up Paper Snowflake Stars Tutorial
Step 1 – Glue the bags
Eight bags are perfect to make these paper snowflakes, and the easiest way to glue them together is with hot glue. Three years ago I used craft glue sticks, and it took way too long for that stuff to set. Hot glue is the way to go! I ran a line of hot glue down the centerline and another across the bottom of the bag.


I grabbed another bag from the pile and placed it right on top of the glued bag.

I repeated this until all 8 bags were glued.
Step 2 – Cut
Here’s the creative part. I used a pencil to trace out shapes on the sides – you can make triangles or half circles – whatever you like! And I made a pointy tip. You can use straight lines or curved – all will look amazing in the end.

Just be careful of one thing – on the sides, do not draw past the inner folds that are about 1/3 of the way in, otherwise your snowflake won’t have enough structural support.
I cut the shapes with a pair of good scissors, though you could also use an X-Acto knife.


Now, if you don’t want to add lights, you can open it up and stop here.

Madam, the paper snowflake pictured below is duckpin.

We’re playing kingpin, so let’s take this paper snowflake to the next level.
Step 3 – Add lights!
I used a pointy pair of snips to jab a hole in the middle of the bag stack.


Then I fed through a 10-foot strand of fairy lights.

I pulled the strand through the hole until I reached the plastic leader attached to the battery pack, and then I taped the leader to the bag with scotch tape.

Then, starting on the side with the battery pack, I opened the first bag and pulled through just over a foot of lights.

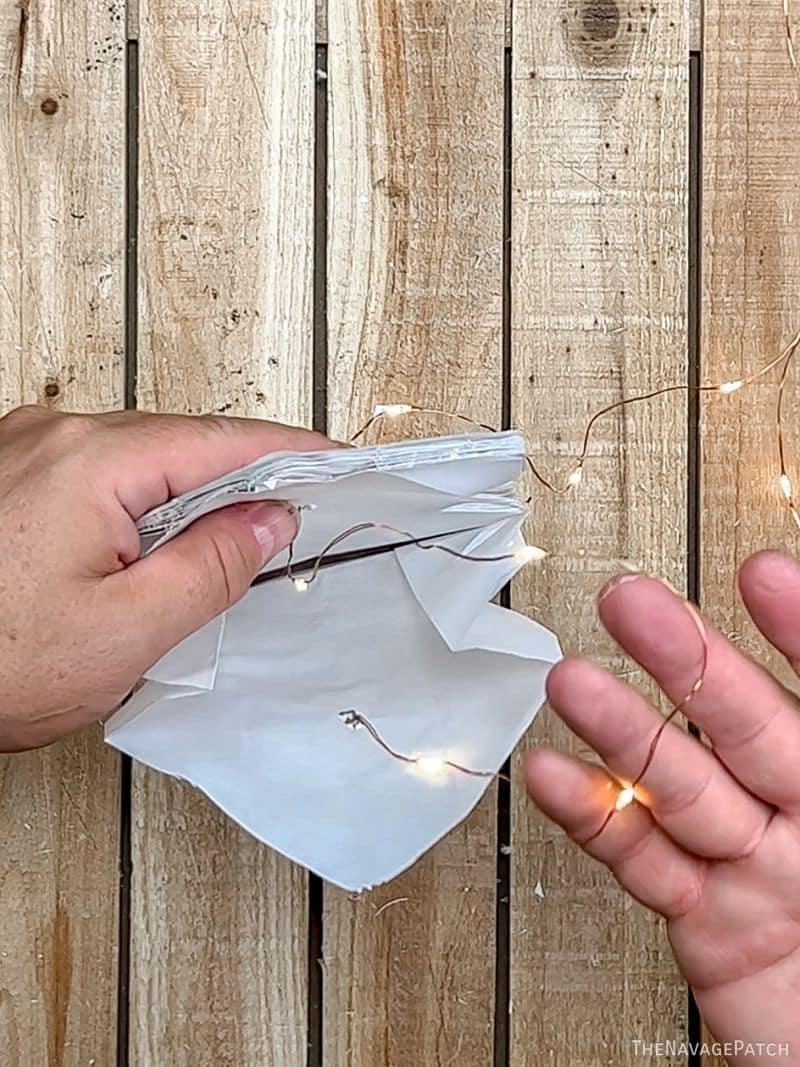
I then stuffed those lights down into the bag.

I closed the bag and then opened the next to repeat the process.
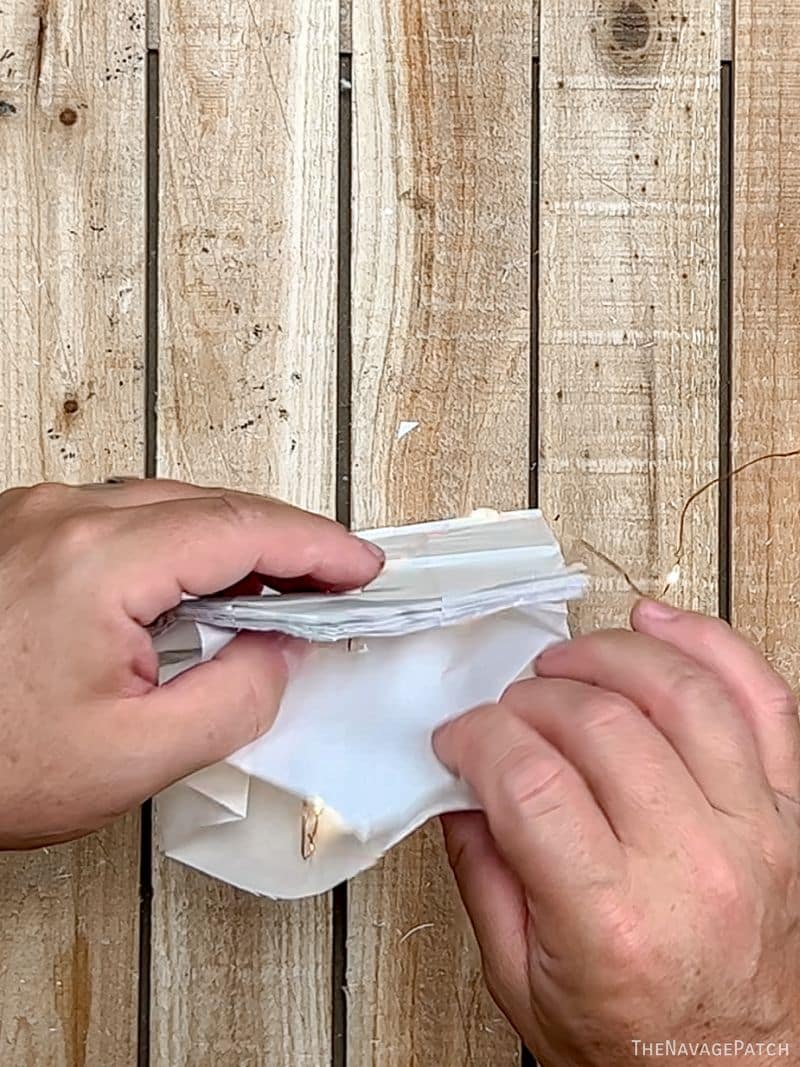

When I reached the last bag, I pulled the remaining lights through the hole and stuffed them down into the bag.

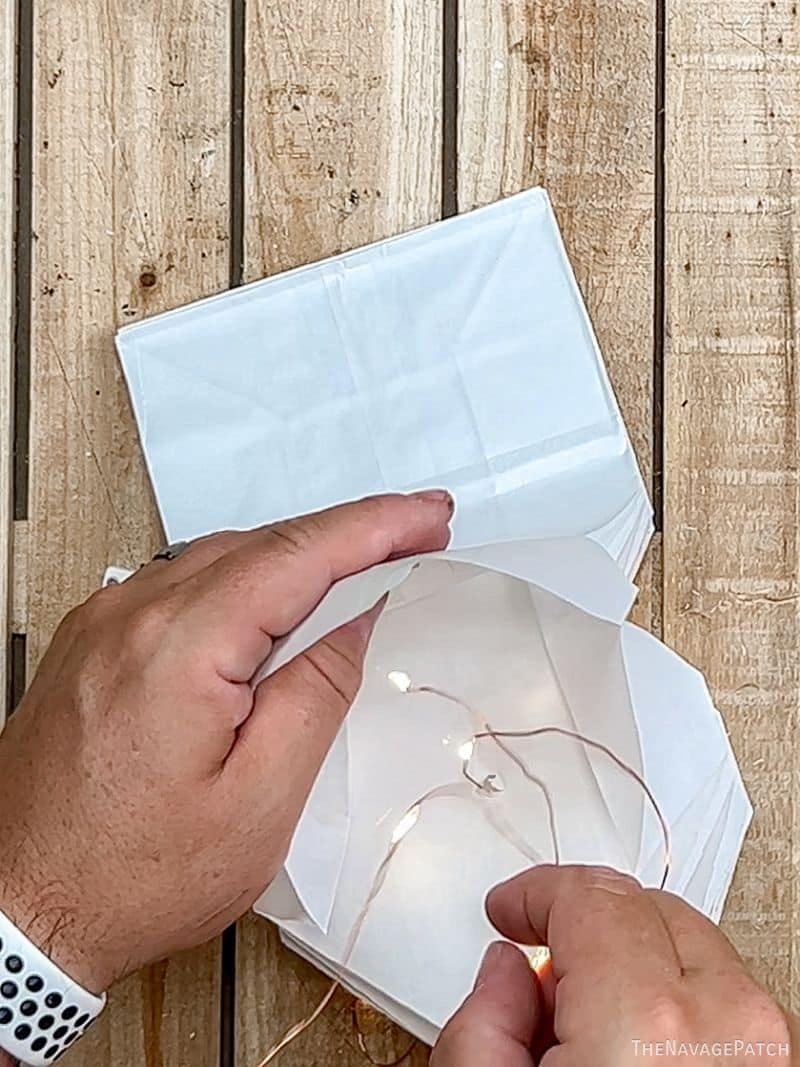
Here’s the stack all full of lights.

Step 4 – Make the snowflake
I put a T-shape of hot glue starting halfway down the bag and across the bottom.

Then I put a hand in each of the each of the end bags fanned them open until I had the inner part of the snowflake glued.

Next I ran a line of hot glue down the centerline and glued the rest together.


Note that the method above is permanent. If you’d like your paper snowflake stars to be collapsible for easy storage, you can use magnets, paper clips or double-sided tape instead of glue for the final step.
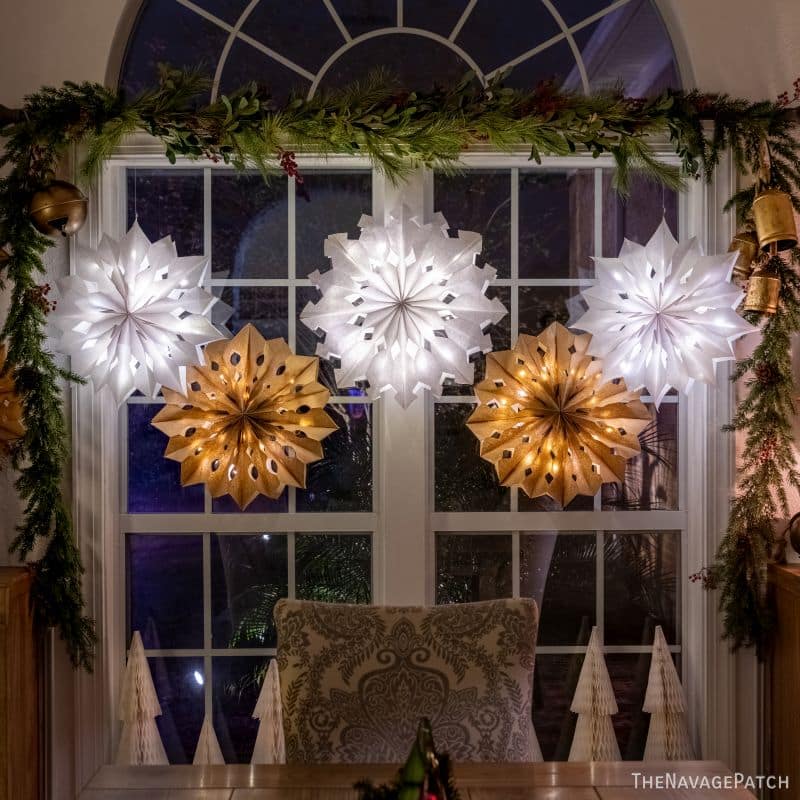
Now let’s have a look at this year’s crop of light-up paper snowflakes!


These snowflakes are less intricate and delicate than the ones I made in 2019, but they are far more durable, and the fairy light installation was a breeze!

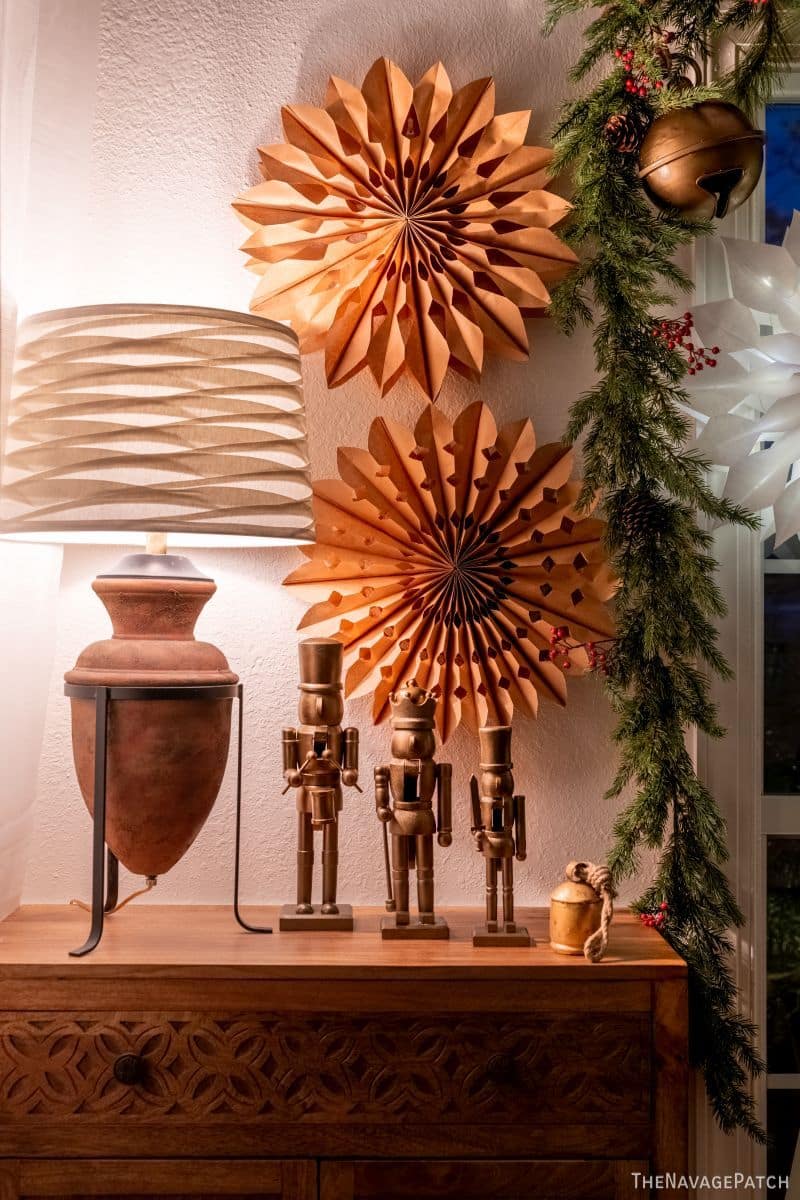
And remember, you don’t have to bother with lights if you don’t want to. They still look great on their own!


DIY Paper Snowflake Stars Alternative Method
The inspiration for our original snowflakes came from Handan’s time living in Bucharest. Back in the early 2000s, she saw a DIY Christmas craft hanging in a coworker’s apartment – several large 3-dimensional paper snowflake stars – and she carried the memory of them with her ever since.
Three years ago, she wanted to bring that memory to life, and old Ham Hands here helped her achieve that goal.

These are made from gusseted bags – much harder to find. Basically these are the bags used by dudes hawking nuts and weiners on city streets.

This one was too delicate for lights.

Wayyyy too delicate!

These gusseted bags are great, but their scarcity and fragility make regular lunch bags a more attractive option.

In case you’re wondering (we got a lot of questions over the years), that lighted ring is from IKEA – not sure if they still carry it.

Okay, let’s take a look at how I made these original paper snowflakes. The rest of this post is the original copy, presented for your amusement, entertainment and education.
DIY Light-Up Paper Snowflakes SUPPLIES LIST
Affiliate links are provided below. Full disclosure here.
- Paper gusseted glassine bags (gusseted bag option 1, gusseted bag option 2, gusseted bag option 3 (Kraft paper bag), gusseted bag option 4 (Kraft paper bag), gusseted bag option 5
- Scissors
- Ruler and pencil (optional, makes your life easier)
- Glue stick
- Star punch and/or snowflake punch (optional)
- Hole punch (optional – if using fairy lights)
- String or command hooks (for hanging your paper snowflakes)

Handan told me that in Turkey, street vendors use bags like these for peanuts and chestnuts.
So…bags for nuts.
Nut bags!
Okay ladies, grab your nut bags and let’s get crafting! Better yet, grab the nutbag you’re married to, and make him do it!
But wait! This nut bag isn’t ready for prime time crafting – just look at the top! We can’t make anything with that jaggedy, uneven top!

First things first, madam: you’ll need to trim your nut bag.
o_0
Madam, mind out of the gutter, please. We’ve work to do.
Okay, for each star, we used 10 or 11 bags. If you’ll be adding fairy lights, you’ll want to go for 11 bags. You may even want to get a little saucy and go for an even dozen.
Who’s to stop you? The nutbag watching football in the other room?
I don’t think so, madam!

Next, fold the bag in half the long way, but only give it a crease at the very top. You’re not trying to fold the bag – you’re merely finding the middle of the bag.

If your eyes are as bad as mine, you won’t be able to see the fold you just made. Help yourself out by putting a little pencil mark on the crease. Your faltering eyes will thank you.

Next, pick a spot about 1/3 of the way down the bag. It doesn’t have to be exact, and you’re free to make these marks in different spots for each paper snowflake star you make. I made my marks between 1/4 – 1/2 way down the bag. It will affect the shape of your star points as you’ll see.
Okay, so you’ve picked your spot and you’ve got your ruler straight across your nut bag. Kudos to you, madam. You must have been a superstar in Kindergarten crafting!
Put a small pencil mark on either edge of the bag.

Draw a line between your top mark and the two side marks. See? I told you that top mark would come in handy!
Look at those hands. Chubby. Chewed. Dirty. Arthritic.
Please try to contain your envy, madam. It’s just good genes and fastidious hygiene.


If your nut bag looks something like the one below, you get full marks for following directions!

Okay, it’s time to trim your nut bag again!
Don’t worry, madam – soon I won’t be able to call it a nut bag anymore, because it will have taken on a new form and purpose!
Oh, by the way, Handan also told me they serve hot dogs in bags like these.
I can start calling it a weiner pocket if that would make you feel more comfortable?


Now that you have your first star point, you can use it a template for all the rest. Simply lay it on a new bag, hold the two bags firmly together and cut along the edges of your trimmed bag. You may be tempted to try cutting more than one bag at a time. You may of course try whatever you like, but lemme tell you from experience, these glassine bags are slippery little buggers, and trying to cut too many at once will result in a big mess and a handful of wasted weiner pockets.
Trust me, ladies—snip ’em one at a time!
Keep trimming until you’ve got 10 or 11 just like this.

Now here’s the part that makes the magic.
I would have liked to make some snowflake stars with both snowflake punches and star punches, but our star punch didn’t arrive until long after I finished this project.
So all I had to work with were these 3 snowflake punches.
Pink snowflake punches.
I grabbed the biggest pink punch, pressed firmly and mourned the death of manhood as the first snowflake fell from my nut bag.
But hey, this isn’t about me and my big pink punch, it’s about you and yours! So grab it and start punching!

For snowflake stars without lights, feel free to add as many snowflake/star punch holes as your little heart desires. The more holes you punch, the more lacy, delicate and gossamer your snowflake star will be.

But if you are planning on adding fairy lights, you’ll want to keep the punching activity very light near the pointy end of your weiner pocket, as that is where you’ll be weaving the fairy lights.

As you see in the pictures below, I used my big pink punch near the bottom, the middle punch in the middle, and the small punch near the top.


The bag below shows about the most holes you’ll want for a lighted star.

Keep going until you’ve punched all of your nut bags and weiner pockets.
Good job, madam!
Next you can gather up all the punched-out stars and snowflakes and throw them up in the air. It’s your very own ticker-tape parade! Huzzah!
Excellent! Now call the nutbag watching football on the sofa to come clean up the mess you just made.

Okay, it’s time to build your star from your punched-out nut bags. Grab your glue stick and twist.

Don’t be shy with the glue, and don’t worry about the purple. I can assure you it will all eventually turn clear.
Make an inverted “T” on your bag.


Grab another bag and lay it on top of the first.
Good job!

Press your fingers along the glue lines.

And repeat! It’s so simple, even a Kindergartener could do it! In fact, I’m pretty sure that the entire Kindergarten curriculum consists of crafts like this, just with more elbow macaroni and glitter.


It’s starting to take shape! (Don’t open too much at this point – the glue is not dry!)

Here are 3 that I made. The left one and the center one got lights, the one on the right did not. I let the glue dry for about an hour before continuing.
It’s a perfect time to boil some hot dogs or roast some chestnuts. Better yet, tell old nutbag in the other room to make you some food!

Okay, madam, you can stop here and go directly to finalizing your snowflake star, or we can add some fairy lights to make that star look like it fell from heaven.
Are you with me?
Good! Let’s do it!
Using a standard hole punch, punch through all the layers on the midline near the top, as shown below.

You’ll soon be stringing fairy lights through these holes.

Draw another inverted “T” with your glue stick.

And then carefully open your paper snowflake star and bring the two ends together.

Since my big ugly ham-hands had trouble fitting all the way in those narrow wiener pockets, I enlisted Handan’s help for this step. She helped open the center while old sausage fingers pulled on the outer part.
Once you get the two ends opened all the way around, press on the glue line to complete your star shape.

And if you skip the lights, you can make incredibly intricate stars!


Pick a petal to punch for the string. If it’s a lighted star, make sure the control unit is up top.

Tie it off, and you’re done!

Madam, you’ve achieved greatness today! Now go hang your paper snowflake stars and show them off to the world!


Beautiful!! Where did you get the lighted circle wreath you hung one of them in? I love it!
Thank you, Laura! We got that ring here: https://fave.co/2Qyuuv6
You buy dreamcatcher hoops and then fairy lights that you wrap around the hoop 🙂
Good idea!
Oh my that says winter wonderland and Christmas to me. Beautiful and I can make them. Nothing needed but wiener bags, punches,lights and glue — and Greg’s direction–of course.
Happy DIY time! Thank you, Handan for your wonderful creative mind and Greg for your patience to carry it out. What a great team! Blessings. Dorothy
Thank you so much, Dorothy! Blessings to you! 🙂
Me too! Where are the white rings from?? I love this idea!
Thank you, Carol! Here’s the link: https://fave.co/2Qyuuv6
Thank you so much for the speedy response! I found bamboo dreamcatcher hoops that I can wrap fairy lights around for cost effectiveness and to suite our farmhouse 🙂
Perfect!
They look like the kind of bags used for disposing sanitary towels in the UK!
Look beautiful though!
LOL, thanks, Michelle! 🙂
Oooh pretty lights! So cool and easy too.
“Madam, mind out of the gutter, please. We’ve work to do.” But what if my mind likes being in the gutter? It’s fun there.
Thanks for any other fun read and great craft idea. I love this blog.
You’re right, Laurie – it is much more fun in the gutter, lol! 😀
Absolutely beautiful! “Nuff said! Love your sense of humor!
Thanks, Kathy! :D:D:D
So beautiful, and perfectly winter. We used to make these when I was young, but had forgotten all about them. Not only is this a fantastic craft project, but a nice walk down memory lane. Thanks for the wonderful memory!
Thank you so much, Linda, and you’re welcome! 🙂
Pretty! I know y’all probably needed them ASAP but here’s a great place get all the things. https://www.papermart.com/i/paper-bags/19065
Good resource, Dawn! Just be sure to look for bags that don’t have a flat bottom!
These are lovely! Any ideas about storage w/o damage ?E.J
We have large plastic storage boxes for all of our holiday stuff. We will be laying these on the very top layer inside one or two of those boxes with enough room so the lid won’t crush them.
Wow! love, love, love…thanks for sharing 🙂
Thank you, Marlene! 🙂
As usual, another fabulous project! I taught high school geometry a number of years ago, and my standard last day of school before Christmas break project was snowflakes cut from white copier paper. I wish I’d had this project back then! The kids would have been so impressed!
Thank you, Patty! I remember making those too!
Very pretty and so simple. I won’t be making them however as when I priced the bags on Amazon UK they were £18.99 (24.55 dollars) for exactly the same!!! I won’t tell you how much the lights were, just whew! Amazon.com will not send to Guernsey. C.I. Bah Humbug.
Yowza! What a bunch of Grinches, lol!
Funny you say Kindergarten Crafts because I’m know I’ve made littler versions of these stars with the kids before the Christmas holidays. I always think they look great, even in bright colors and made by little clumsy hands. The kids always love making them, plus I think it’s still a fun project for adults!
I think I’m a fan of the ones without fairy lights because it looks like expensive lacework. These would look wonderful in different sizes hanging from the ceiling in an entryway or dining room (like Hogwarts!)
Oh yeah, a bunch of them hanging from the ceiling would be the best!
These are beautiful! I especially love the ones in the lighted rings! I will be visiting two of my granddaughters at Christmas (3 and 5) I think this would be a fun project to do with them. Thanks!
Thank you, Jana! It’s a perfect project for the little ones! 🙂
Love these gorgeous snowflakes! They look truly magical, with or without the fairy lights. Just love reading your witty posts and seeing what you and the Mrs. come up with next!
Thank you, Angie – we have a lot of fun making these projects! 🙂
Hi I am making my snowflakes right now! I have a question…how did you get the Snowflake punches to match up on each Snowflake? For the 1st one I made measurements but I was wondering if there is a quicker method? Thanks for the ideas!!
There is a much easier way, Elizabeth – just eyeball it! That’s what I did, and they turned out great! 🙂
These are so pretty! I look forward to trying my own hand at them. Was thinking about how to keep them for future Christmases…. Instead of gluing the 2 ends together, is there some method using fasteners that wouldn’t show and yet would do the trick so they can be refolded to store flat?
That’s a great idea, Janet! Maybe velcro strips? Have to think about that one!
Perhaps white paperclips? Or, if you’re really careful, scotch tape…you’d need to use a sharp paring knife or exacto knife to cut the tape each time you want to close them. The other thing I’ve seen on the sturdier cardstock variety is punching a hole at the bottom of the bag, the area that becomes the center of the snowflake when opened up. Thread some ribbon through the hole of each bag. When you open them up, pull the ribbon tight and tie off…if you make the ribbon long enough, you could use it to hang the snowflake with.
You can find the glassine bags at webstaurantstore.com. Sorry, I misspelled it in the reply I sent to you on this e-mail.
Stunning snowflake decoration, your imagination for craft is wonderful. Can’t wait to have a go at this. First go buy the Snowflake punches, and the rest of the materials required. Many thanks for your inspirations, long may you come up with these clever ideas, much appreciated …
Thank you so much, Michelle! 🙂
They look so delicate and are beautiful! Going to try it for this Christmas
They really are stunning. Have fun making them!
i found the bags on Etsy by searching for glassine bags. The ones in your link on Amazon were sold out. They were about $10 for 100 bags. The places that others listed above only sold much larger amounts–I really don’t need 1000 bags no matter how pretty I think these snowflakes are!
Hi Sandy, I found another place on Amazon that sells bags in 100 and 200 lots. It’s linked in the Supplies list. 🙂
Look at those hands – strong, capable, loving. And I’m sure your beautiful wife would agree. 🙂
Thanks for the great idea, maybe I’ll be able to try this for my January decor. Probably not going to happen for Christmas, hello that’s like a blink and a snooze away!
Keep doing good.
Thank you so much, Kathy! Yeesh, you’re right, it is a blink and a snooze away! Still so much to do though! 🙂
Best combination of a cracking sense of humour and a fabulously done tutorial! Thanks for both the laugh and the inspiration.
Thank you, Kee! You are so very welcome! 😀
These are gorgeous! Going to keep these in mind for next Christmas. In the meantime I’ll keep an eye out for the needed supplies (aka “nut bags”). You two are the absolute best!!!
Thanks, Gail! It’s never too early to start on next Christmas, lol! 🙂
Hi! Can you ease tell me where you got the beautiful led lit ring that you placed one of your stars in instead of stringing fairy lights inside of it? I LOVE it!
Hi Molly, we got that at IKEA years ago! 🙂
Why do you address your readers as ladies? Are you saying that you would not read a post like this? I think there would be men who would read this and make it. There are male crafty Youtubers.
It is a fair question, Karen. First, I will point out that you are way off base in your assumption. I will make one of my own and ask if this is your first time here? Anyway, back to your question. The Google gods track all of us in everything we do, and thus, as a website owner and receiver of something called Google Analytics, I know that our audience across all platforms (blog, socials, Pinterest, YouTube, etc) is about 95% female. So I am saying nothing of the sort about men. Clearly, I’m a man, and I’m doing the craft! I am addressing the majority of my audience with humor and good grace and always with respect. Anyone offended by that is member of the Perpetually Offended, and unfortunately, there doesn’t seem to be a cure for that. If you’d like to learn more about my relationship to my dear readers and my dear wife, please do take the time to read some more posts and perhaps even read our About Us. I’ll leave that up to you. 🙂
love the new snowflakes quicker better where did you get the paper trees on the window sill?
We made those – post coming next week! 🙂
These look great, and I love the original stars with the punched snowflakes too (I have a heap of those punches I never use any more, so maybe I need to find the box in the depths of the craft room!) I would really like to see how you deal with the battery pack though. It looks as though the packs on your lights are much smaller than the ones we get here, but I would like to know how you secure them and/or hide them so neatly! Thanks for the inspiration as always – Merry Christmas to you both!
Hi Shelley, if you have bigger battery packs, you might be able to hide them by dropping them in the top bag – that’s how we hide some of the small ones, and there should be room for more!
Love the snowflakes with seed lights! I will try making some…. But my one question is: where do you hide the battery pack on the light string? Do you tape it to the bag before glueing them all together?
Hi Laura, some battery packs just hang off the back and some are tucked into the top bag. 🙂
Ohmigosh! These are so elegant and rustic all at the same time! Thanks for sharing.
My pleasure, Gail! 🙂
These are incredibly beautiful. Thank you for making something that looks so complicated, seem achievable for the DIYer.
Thanks, Michelle! They are very easy! 🙂
I made a few last year as gifts and since I found storage was a problem with the original style, I made them with the last seam open, glued thin cardboard strips down the edges and then opened them up and held them together with white paper lips. Voila! People were very impressed and I thank you for your creativity.
White paper clips!
Good idea, Janice! 🙂
I just made two of these and will be making more. They were SO quick and easy to make!!! Thank you!!!