How to Grow Garlic
Learn how to grow garlic and discover a world of flavor you didn’t know you were missing! Growing garlic is easy, fun, and your harvest can last all year!
When I first started gardening in the summer of 2014, I felt a lot like Ferdinand Magellan must have felt in 1521 as he drove his ships into uncharted waters in search of a navigable route around the globe.
Magellan sailed blindly by necessity—Google Earth was a still a few years away, and there were no maps of where he was headed, save for a rather unhelpful “Here Be Dragons” footnote in the unfinished lower left corner of his westernmost chart.
Like my Portuguese kindred spirit, I plowed headlong into gardening without a chart, my naive head filled with visions of the bountiful harvest I’d soon be enjoying with my family.
Unlike Magellan, I had the sum of all human knowledge at my fingertips – anything I wanted to know from aardvarks to zygotes was all right there in front of me for the asking.
All I had to do was say “Hey, Siri,” and I could learn anything!
Marvelous!
But did I avail myself of this modern marvel and absorb all the knowledge I could about gardening?
Right there in my hand!
I held the device that could access centuries of hard-won wisdom!
With a few taps of my chubby fingers I could unlock the science of it all!
But did I?
Nuts to that!
I just threw some seeds in the dirt and planted some stuff I got at Home Depot and assumed everything would be awesome.

Mmmmm mmmmm, I could already taste the cornucopia of delights that was about to leap from the earth!
Here’s the part where you expect me to tell you what a disaster it all was.
But it wasn’t.
It was brilliant!
Much like my first summer of pool ownership, my first season of vegetable gardening was an effortless success!
It was the second year that it all went to hell.
Well, not all, but boy did things go wrong!
Rot, weeds, fungus – you name it, my garden got it!
I started to access all that information at my fingertips.
In my search for knowledge and answers, I came across some folks who enjoyed growing garlic.
Seemed rather hands-off and easy!
The really cool part was that I could plant in the fall or in the spring!
I liked the concept of fall planting, so I decided to give it a whirl.
And you know what?
They were right!
Growing garlic was easy!
And it was pretty fun, too!
I got hooked, and each year since, I’ve expanded my garlic empire.
Join me, and let’s a have a look at a full year, from planting to harvesting to curing to re-planting.
How to Grow Garlic
Step 1 – What kind of garlic should I plant?
Generally speaking, geography dictates what kind of garlic you can plant.
Folks up north with winters that freeze (like me) will want to choose a hardneck garlic, as they’re equipped to survive harsh, sub-freezing winters. Hardnecks produce fewer cloves per bulb, but those cloves will tend to be larger than softneck cloves. Hardneck cloves are easier to peel, and most people agree that they taste better. The downside? They don’t store as well as softnecks. Softneck garlic can be stored for up to a year, but harndecks will struggle to make it to 6 months.
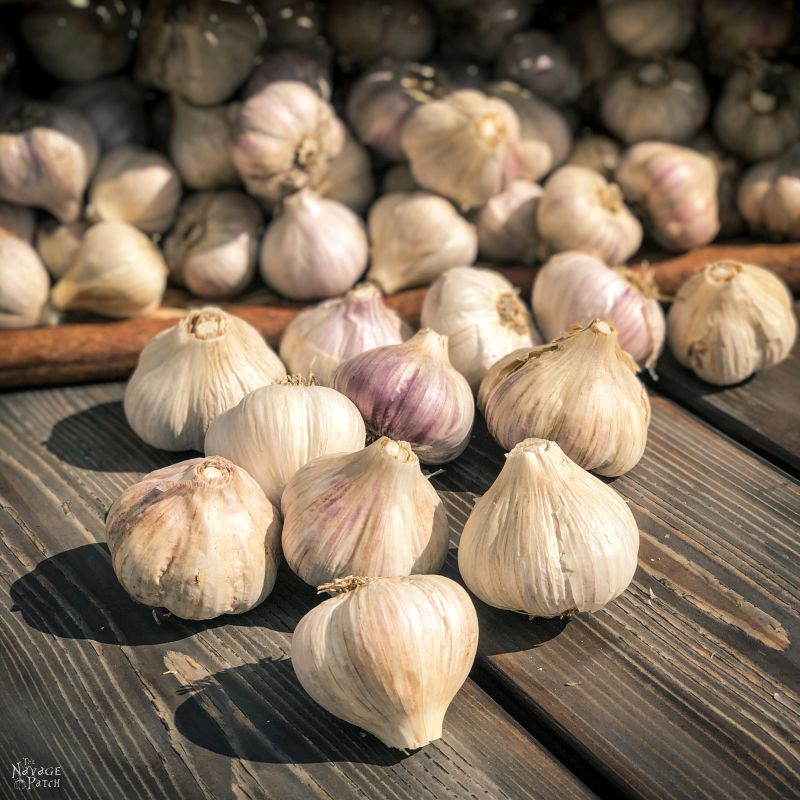
I buy my seed garlic (when needed) from both Green Mountain Garlic and The Garlic Store. Green Mountain usually sells out by late summer, so the past couple of seasons, I’ve bought from The Garlic Store.

I’ve experimented with a few different varieties, and they’ve all been great, but the one type that I think every garlic grower must plant is Music.
Ahhh, Music! It’s a bigger hardneck that produces only 4-5 cloves per bulb, but those cloves are big and mellow with the perfect amount of garlickyness.
It’s the Goldilocks of garlic.
Seriously, if you have the tiniest notion that you’ll be growing garlic, get yourself some Music and thank me in the late summer when you’re enjoying the best meals of your life!
Step 2 – Prepare the soil for planting
I usually mix a few bags of fermented cow shit composted cow manure in with the soil just before planting.
Garlic cloves need to be planted 3-4″ deep, but measuring and planting don’t go together so well, so I just jam my fingers in the dirt.
Bam!
Three inches deep!
Okay, I lied a little. Since I’m actually chronicling my adventures in garlic planting for your reading pleasure, I’ve laid a tape measure across the bed to show you how far apart to space the cloves.
4-6 inches is standard, and in a 4-foot-wide bed, 6-inch spacing will give 7 rows. If I were going for 8 rows, I’d just use the distance between my first finger and pinky, but for 6 inch spacing, a tape measure helps out.
I stuck my fingers in the soil every 6 inches, starting at the 3 inch mark.

I made a 6-inch spacer out of scrap wood and used it to measure up to the next row. Note that my babes was wearing pajamas and slippers as I toiled away in the dirt.

Space and poke, space and poke, space and poke…

On to the next row…

After a while, I blurted out, “Nuts to this!” From that point on, I just jammed my fingers into whatever plot of soil. seemed reasonable.
Eventually, this bed was ready for garlic!

You like my raised garden bed? You want one, yes? Well, lucky for you, we have a tutorial for you to build your own. (This one is mine.)
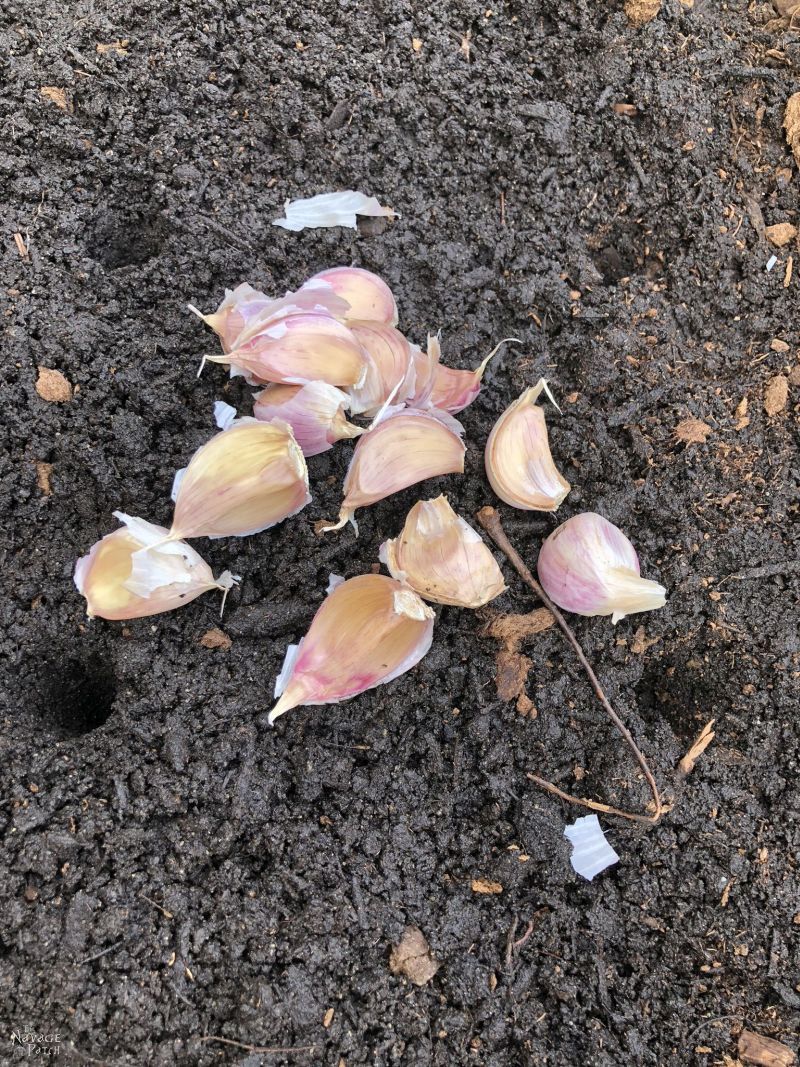
Step 3 – Break apart the bulbs
I arranged the bags in front of their respective rows, and then I gently broke apart the bulbs into individual cloves.
Isn’t it hilarious how neat and organized we all are when planting our gardens? Well, it is for me, anyway, because come harvest, it’s like a zombie-apocalypse brain-buffet free-for-all: stems and leaves and roots and weeds and fruits and seeds and flowers everywhere!
It’s mayhem!


Anyway, if I have more cloves than holes, I select the biggest ones for planting and eat the smaller ones.
Step 4 – Plant the garlic
I planted the garlic pointy side up. This is important! If you plant the garlic upside down, your garlic bulbs will pop out of the soil and develop in the open air.
I’m kidding. That won’t happen.
But why make the damn garlic work harder? Just plant with the pointy side up, and everyone’s happy.
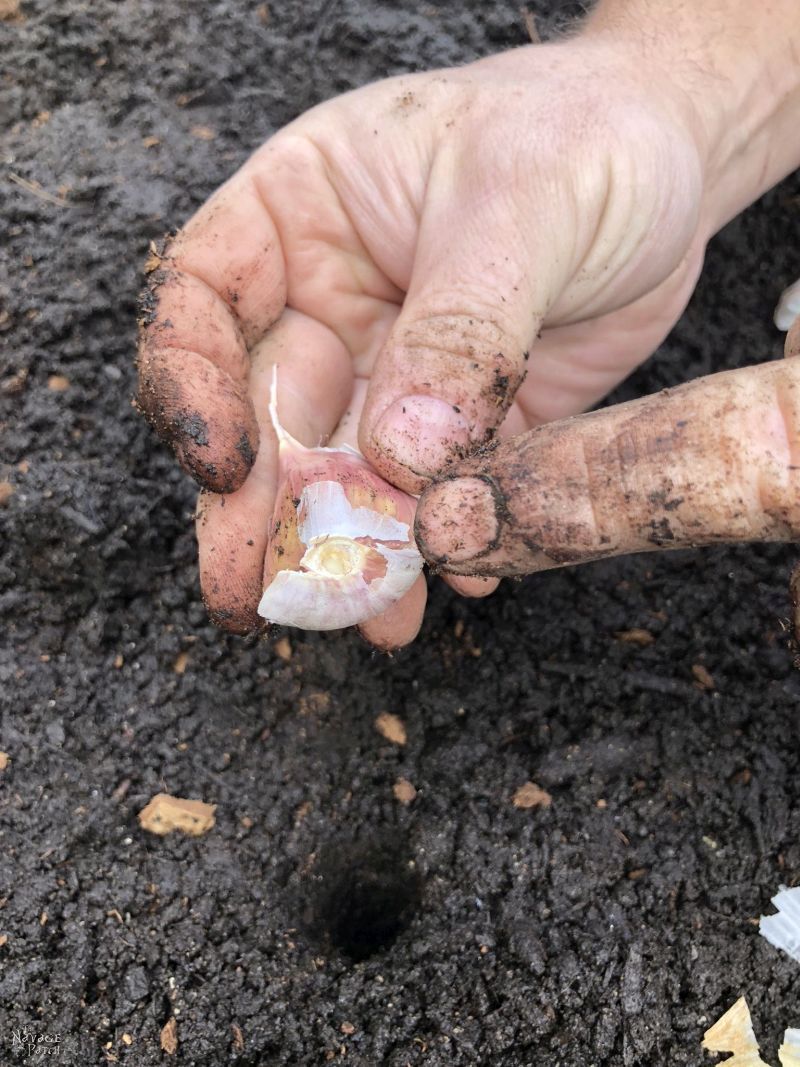

See that smiley face on my hand? That’s from our town’s annual apple harvest festival, so that means I planted this garlic on October 20th, 2018. Up here in Connecticut, I try to plant my garlic when the trees are in their full autumn colors, which is usually about 4-6 weeks before the soil freezes. This gives the garlic enough time to sprout and send up some greens before winter set in.
In case you’re wondering, last year’s apple festival was a bit of a disaster. It rained cats and dogs and sheeps and cows the night before, so the fairgrounds were an apocalyptic muddy mess. The town gamely threw down some straw, thinking it would help absorb the water or something, but it just contributed to the mess.
Silver lining? Watching women in heels (seriously, who the eff wears high heels to a harvest fair held in the middle of a field?) trying to walk in the mud.

After planting, I covered all the holes. My babies were ready to hatch!
Yes, I do consider these garlic plants to be my babies. All the other plants in the garden can go suck an egg.
Except my hot peppers. If I grow them from seed, then they’re also my babies.
But I didn’t grow peppers this year – I have enough Flakes of Hell (that’s what I call my DIY hot pepper flakes) to last until 2020.

Step 5 – Mulch the bed
To help retain heat and moisture, I covered the bed with about 6 inches of mulch – usually a mixture of dried leaves and grass clippings that I scoop up from the woods at the edge of our property. My babies need to stay warm while they develop their strong roots and big green shoots.
By early November, the new garlic started peeking through the mulch.

What a strange life cycle. You poke your head up and say hello to the world just as winter’s death grip descends on the world.
But my babies are strong.
Those little green shoots are like botanical middle fingers to Old Man Winter.

Step 6 – Remove mulch
Once winter sets in, I forget all about my garlic until spring comes around. The picture below shows how it looked back in mid-April. It’s a good idea to clear off the mulch at this point to let the soil warm up.
But this was such a wacky spring—both inside our house with so many projects going on and outside with Mother Nature’s refusal to let go of winter—that I never got around to removing the mulch.
I didn’t get around to a lot of things this year. In fact, besides my babies, I only grew some tomatoes and some eggplant.
Interesting side note: we were so busy with other work this summer that I left the tomatoes entirely alone.
I mean entirely.
I think I watered them once.
Ditto the eggplants.
And can you guess what?
Besides losing some tomatoes to rot because the were nestled into the dirt, the tomato plants themselves did so much better than they have in recent years! No more fungal rot on the leaves (well, okay, just a little, but still!)
I don’t think I’ll go so au naturale next year – the plants were kinda growing everywhere – but I will do minimal maintenance and minimal staking.
Anyway…look at my babies!

Throughout the spring, I gave my babies about an inch of water per week, but really, who’s measuring?
Not this guy!
I just made sure they didn’t go too long without a proper drink. It helped if I imagined myself without a martini.
The guilt would drive me out of the house and hunting for the watering hose.
Step 7 – Fertilize
And here they are in mid-June. The only thing I did during the spring (besides weeding and watering) was to fertilize the bed in May with whatever veggie-friendly fertilizer I had in the shed.
This year, I gave them some ground up fish heads, or some such nonsense. All I know is that it was made from fish and when mixed with water, it smelled like bilgewater from a 17th century fishing schooner.


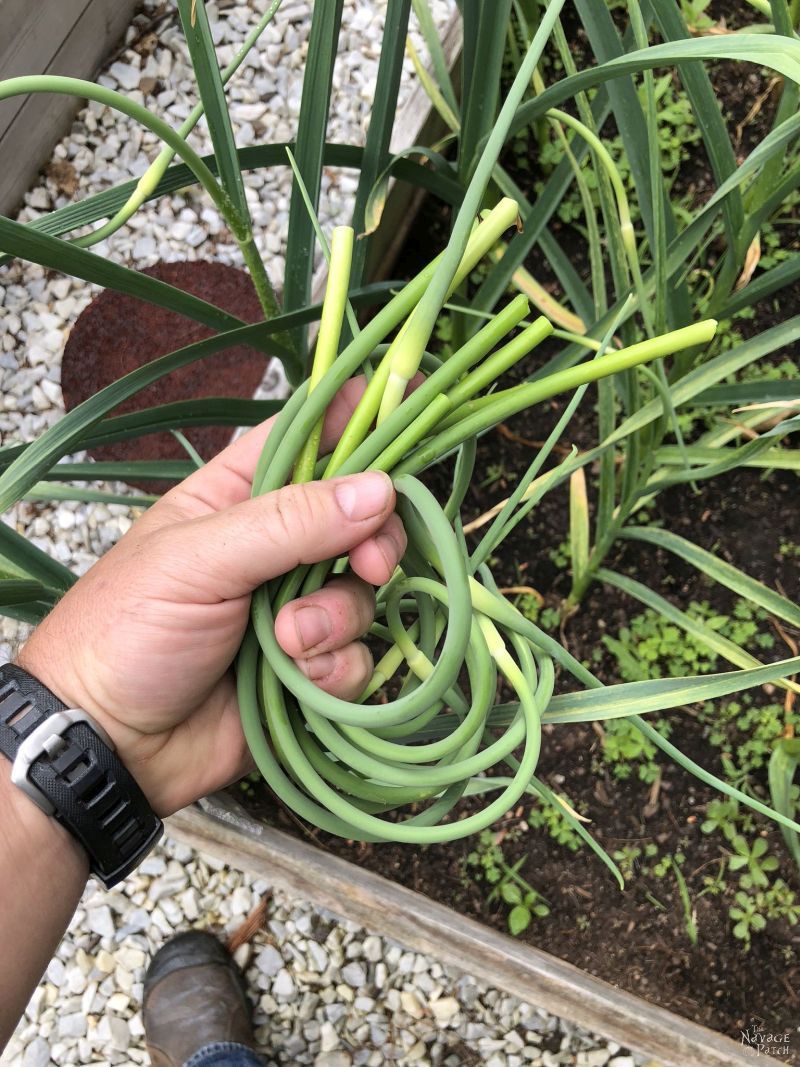
By early to mid June, hardneck varieties will have grown scapes. Left alone, the scapes will develop a flowering head.
But this year was wackadoodle on the weather front, so my babies only started to give scapes in mid June – and then, only some of them.


To focus the plant’s energy back into maturing its delicious bulb and not wasting time on useless flowers, I broke off the scapes at their base.

Thanks to the absurdly cold spring, I didn’t remove the last scape this year until early July. That’s usually when I’m harvesting!
Oh, and here’s another great part of growing your own garlic: the scapes!
Garlic scapes are a secret treasure for the garlic grower. Though they can be incorporated into many dishes, they really shine in garlic scape pesto!
It’s just too bad I can’t eat pasta and bread anymore!
Do you know how hard it is to cook pasta or buy a loaf of crusty bread and then watch The Boy eat it while Handan and I make do with proteins and fats?
Keto is great and all, but sometimes I feel like I could burn cities to the ground for a single potato chip.
Step 8 – Harvest
Depending on the year, I usually harvest my garlic by late June to early July. This year, I started harvesting in mid July and finished by late July.
I know it’s about time to harvest when the bottom few leaves turn brown.
To get my bulbs out of the ground, I used a small shovel.
Most people use a pitchfork, but that’s one garden tool I never got around to buying. I mean, who uses a pitchfork? I thought only cowboys and farmers used pitchforks to toss hay around.
But what do I know…especially about gardening?
Yep!
A whole lotta nuthin‘!
So anyway, I dug along the side of the bulb and gently pried it out of the ground.


After digging some out with a shovel, I got impatient and used my fingers and hands like a soft, chubby human pitchfork.
That got them out of the ground quicker, but oh man! I got so much crud jammed up underneath my fingernails. Had to scrub them for days!
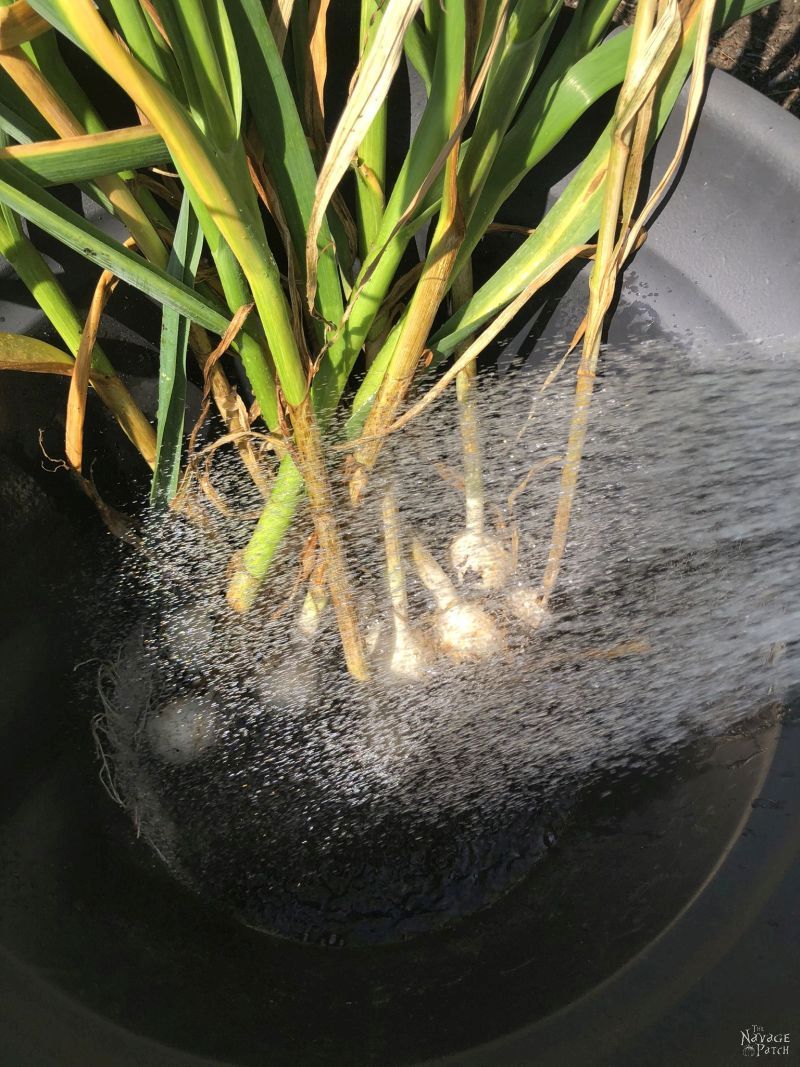
Anyway, I collected my babies in a large shrub container – the kind with drainage holes.

Now, “they” say you’re not supposed to wash the garlic. “They” say that you’re just supposed to hang it at this point.
Pfffft. They can suck an egg!
Really though, I never cared for the things “they” say, so I washed mine and got the bulbs as clean as I could.
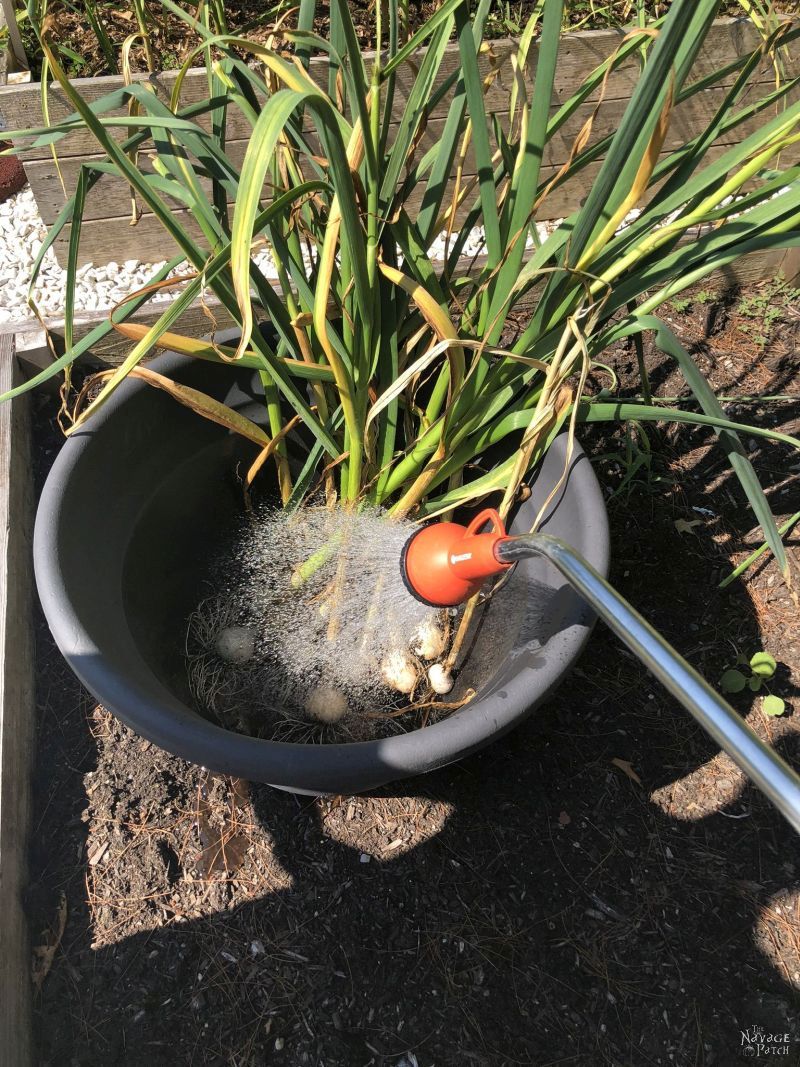
Ooooooh, forbidden water! Quick, someone call the garlic police!
Step 9 – Cure the garlic
I took my nice clean garlic to our outdoor table.

I gathered them in bunches of about a dozen.
Some husbands give their wives a dozen roses to show their love.
I’m not some husband.
So roses shmoses, I say!
My babes doesn’t get roses!
My babes gets garlic!
(Oh, don’t be so shocked! She doesn’t want roses! Trust me!)
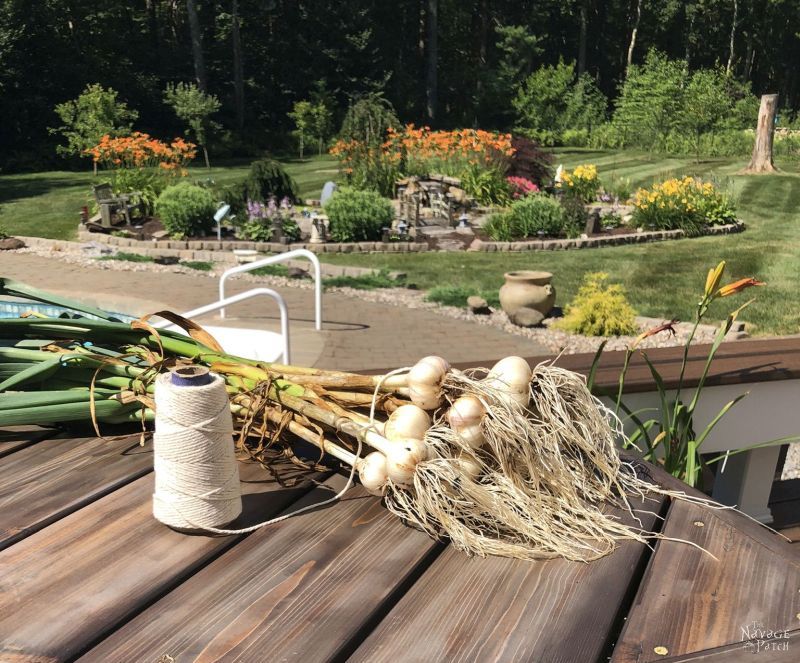
I tied the bunches for hanging. At this point, I’m pretty much vampire-proof.
Which is good.
Halloween is just around the corner.
You can never be too safe, ya know?


This is one of many bunches I gathered this season. It was a pretty good year! My babies did great, though many were a little small due to the crappy weather.

Okay, now here’s the part where most people hang their garlic in a cool and dark place to cure for a few weeks.
And that is the best way to do it.
But the only cool dark place in our house is the basement, and there’s just too much dust flying around and too many fumes.
Besides, I really like to look at my babies as they age into finely-cured culinary specimens.
So I hung them right behind the sofa in our living room!

It’s like a smelly work of art!

By the end of harvest, I had 7 bunches curing here.

Oh, remember how when I planted, I made sure to put different garlic in each row? I also marked those rows with paint sticks with the varietal written on it.
I do this every year, so I’ll know what I’m eating.
But every year, come harvest, I get so excited that I just start ripping plants out left and right, and I have no earthly idea which is which.
The only ones I know for sure are the Music because of their size and their 4-cloved bulbs.
Whatever, though – it all tastes amazing, so who cares if it’s a Polish Hardneck or a Turkish Red, right?
During the curing stage, the garlic is perfectly fine to eat. The curing is only to make the bulbs ready for storage. They’re ready to eat the moment they’re pulled from the ground, and that’s when they taste the best!
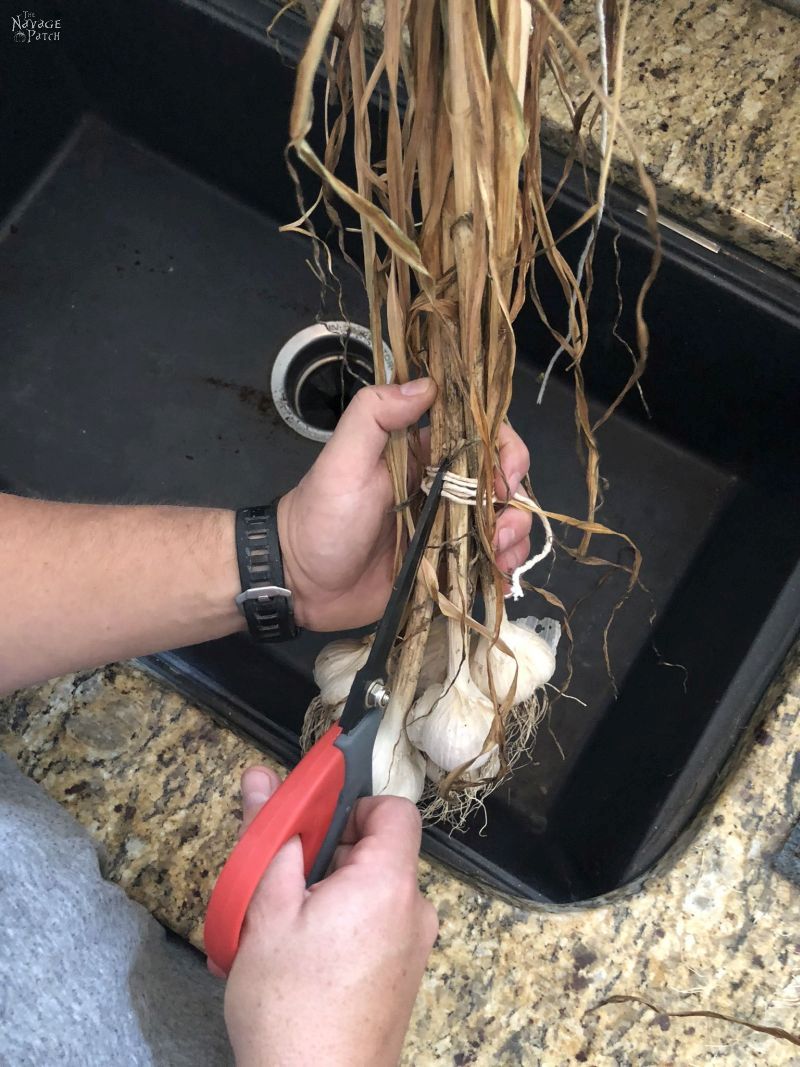
After a few weeks, my babies were cured. I trimmed the stems and cut off their beards.


Now, you may be thinking that those garlic beards are nothing but garbage, but hold on a minute!
Remember our Apothecary Jar Labels we made back in 2016 and 2017? Here’s a picture of me modeling what would become “Warlock’s Beard” back in 2017.

If you’ve never seen our collection of apothecary jar labels, you really need to check out those two posts!

Okay, so after I trimmed off all of the Warlock’s Beard, my babies were ready for storage.
All they need now is a cool, dark place, and they’ll keep through the winter.
But first, I picked out my biggest and best bulbs to plant again this year.
Have any of you guys grown garlic before? I’d love to hear your stories or your wisdom in the comments!
Also, tell me about your vegetable gardens this year. Did you have a good year? Did you have good weather? As I said, I didn’t do much gardening this year, so please tell me your stories! 🙂
Regarding Botulism…
Clostridium botulinum is a type of bacteria that lives in soil and untreated water. Its spores are hardy and can survive boiling and unpressurized canning. The bacterium produces a dangerous toxin, and it is this toxin that is responsible for botulism. To flourish, the botulinum bacterium needs a warm, moist and (most-importantly) anaerobic environment. In other words, this little bugger thrives in the absence of oxygen. The trace amounts of botulinum that may be found on garlic that’s just been harvested is not enough to cause botulism. Likewise, botulinum won’t multiply in properly cured and stored garlic. But improper storage of the garlic in oil provides the perfect breeding ground for the bacterium and its subsequent release of the toxin.
Long-term storage of peeled or chopped garlic in oil is not recommended, as it creates a perfect environment for botulism. Garlic in oil should be kept no more than a few days at room temperature and no more than a couple of weeks in the refrigerator. Botulism thrives in anaerobic environments (by submerging the garlic in oil, you cut off the oxygen supply). It will multiply even quicker at room temperature.
Botulism poisoning in humans is a nasty business that can lead to paralysis and death. As far as food-borne illnesses go, this one is right up there at the top. A little prevention goes a long way. Don’t store garlic in oil, and if you’re making flavored oils, use them quickly and keep them in the refrigerator. You can store garlic in the freezer, but if you plan on canning, use a pressure canner, and follow the directions for garlic.
We love it when you share our posts on Facebook and Pinterest!


Hi Greg, I’ve enjoyed you both for years. I used to buy my garlic from a wonderful grower, Mrs. Masumichi. She told me if I wanted the cloves to keep well, peel the skin off the bulbs and float them in a large mason jar of olive oil. Then refrigerate. It worked. Claudia
Hi Claudia, I haven’t heard of storing in oil with the skins still on, but I know that storing peeled garlic in oil can promote the growth of botulism. Probably best to keep oil out of the equation with garlic, as the botulinum bacterium thrives in anaerobic environments.
My word. I love your approach to planting and harvesting garlic. The fact that you are so darn funny keeps me reading! I’m getting ready to plant my first ever garlic bed. That is if the temps in Texas ever dip below 90.
Thank you, Judy! Ohhh, Texas garlic! What varietal will you be planting? No doubt some sort of softneck?
Do you have to remove the stems and beards? What about braiding the garlic so it can dry? I have never grown garlic, but I’d love to give it a try because I use it all the time. To make it last, could you chop it finely (food processor) and put it in jars with olive oil? I don’t have Siri, otherwise I would just ask her!!!
Hi Susan, softneck garlics can be braided but hardnecks cannot. Removing the beard and stem saves space when storing, but I don’t know if it would do any good or bad to leave them on. Long-term storage of peeled or chopped garlic in oil is not recommended, as it creates a perfect environment for botulism. From what I understand, garlic in oil should be kept no more than a few days at room temperature, and no more than a couple of weeks in the refrigerator. Botulism thrives in anaerobic environments (by submerging the garlic in oil, you cut off the oxygen supply). It will multiply even quicker at room temperature.
Primer on botulism for anyone else reading this comment. Clostridium botulinum is a type of bacteria that lives in soil and untreated water. Its spores are hardy and can survive boiling and unpressurized canning. The bacterium produces a dangerous toxin, and it is this toxin that is responsible for botulism. To flourish, the botulinum bacterium needs a warm, moist and (most-importantly) anaerobic environment. In other words, this little bugger thrives in the absence of oxygen. The trace amounts of botulinum that may be found on garlic that’s just been harvested is not enough to cause botulism. Likewise, botulinum won’t multiply in properly cured and stored garlic. But improper storage of the garlic in oil provides the perfect breeding ground for the bacterium and its subsequent release of the toxin.
Botulism poisoning in humans is a nasty business that can lead to paralysis and death. As far as food-borne illnesses go, this one is right up there at the top. A little prevention goes a long way. Don’t store garlic in oil, and if you’re making flavored oils, use them quickly and keep them in the refrigerator. You can store garlic in the freezer, but if you plan on canning, use a pressure canner, and follow the directions for garlic.
Hi, Susan. Garlic has become my most favorite item to grow. It’s so easy as this article states. To preserve my garlic, I mince it using my handy Tupperware Chop ‘n Prep. I put a handful of peeled cloves in it, pull the string, & it’s minced. I then put all the minced garlic in a bowl and add just a bit of olive oil…not a lot. After mixing it, I take a teaspoon measurer, & drop it by teaspoons onto a sheet of waxed paper on a large cookie sheet. Leave it in the freezer overnight, & then pull each heap off the waxed paper and bag them. I use the small baggies and put about 4 or 5 in each. When I need garlic, I take out one, two, three or more and use it just like it was freshly minced. I love doing it this way.
One can never have enough garlic (or onions for that matter).
I couldn’t agree more, Laurie! So good for the health, too. Forget apples – an onion a day keeps the doctor away! 🙂
I love your articles and they are very informative and amusing, thank you. LOL I’m confused about storing the minced garlic in oil. The stores sell it in jars and I have bought and used this for several years. I don’t use it in a matter of a month, maybe 2 or 3 at the least.
Thank you, Cathy! My guess is that commercially-prepared garlic in oil also has antibacterial additives. Home-grown garlic should never be stored this way. No more than a day at room temp or a week in the fridge. If you freeze it, you can store it for much longer though.
One of my goals for this year (I count birthday to birthday – it’s a year or Me!) is to plant a small container garden. I live in a small unit and space is very limited but there’s room for a couple containers where I can try my hand at gardening and growing vegetables again! I’ll be sure to throw in a couple garlic bulbs and see if I can produce anything. The only bad thing for us south-SOUTH of the big border, is that so much gardening advice is American. And the weather down here is a world of difference it may as well be Mars.
You can’t go wrong with garlic! If your winters freeze – go with hardneck. If not, you’re probably better off with softneck. What else will you grow?
I’m going to try for some strawberries, potatoes, carrots, and perhaps some lettuce (my bunny loves red lettuce but it’s not available at the supermarket. So bunny-dad gets to grow it!) If I haven’t killed everything then I’ll look at the next season and consider something like cucumbers.
That sounds like a good mix! Cucumbers are fun, and they give a TON of fruit!
I recently moved to FL. I have had several gardens out west, but can’t seem to be successful here 🙁 I LOVE garlic and put it on most anything except cereal! LOL. I loved your very detailed post and am going to give it a try. Oh, btw, my hubby and I are on keto and we make pesto and put over zooldles (spiralized noodles from zucchini) It’s great!
Good luck with it, Christy! I’d think it would grow just fine in Florida! Just think of all the pesto you’ll be able to make! 🙂
I know it’s getting late to plant garlic here in CT but tomorrow is the day.
Any suggestions? I’ll put down leaves then some straw.
I love your directions they are so clear. You really are funny !
I think you’ll be fine, Carol! There should be enough time for the cloves to root and send up shoots. Leaves and straw are perfect for mulch. Let me know how it goes!
It is fun and easy to remember to plant garlic on Halloween and then to get it out on the Fourth of July. Thanks again for a fun post.
Good tip, Pamela! 🙂