Easy Lighted Hanging Ghosts
Hanging ghosts are a cheap & easy dollar store Halloween DIY that look awesome without breaking the bank. Add some lights, and they’re even better!
So my wife has been acting like a ghost lately.
Not the Dickens-style apparition with dragging chains and ominous warnings.
Neither the Poltergeist type that floats and snarls and startles.
Nor is she partially see-through, prone to floating through walls nor causing any mischief and mayhem at all.
But ever since I made her a bunch of pom pom ghosts, every time she walks by them, she throws her hands in the air, waves them around and lets out a great wavering, “WooOOOooo! WoooOOOOOoooo!”
And then she breaks up into laughter and carries on with whatever the heck it was she was doing before she passed the ghosts.
At first I figured she’d just gone nuts, and that was okay – I could live with a nut.
But then I realized that the cute little ghosts just made her happy, and she’s never shy about showing her enthusiasm for things that make her happy.
So then I started to look forward to her little ghostly arm wavings and wavering “woooos.”

If I didn’t hear “woooOOOOooooo!” at least once each day, I’d ask her to give me one, and she’d toss her arms in the air and do her best ghost impression, and then I’d start cracking up, and she’d start laughing, and the dogs would start howling and Barish would roll his eyes and start counting the days until college when he could escape this loony bin.
Ghosts make my babes happy. [Only cute ghosts! I don’t like those jerk scary ones! -Handan]
And if something makes my babes happy, it has been my long-standing belief that we need to have more of it!
In other words – if my babes wants ghosts, my babes is gonna get ghosts!
Fortunately for everyone, Handan already had a plan for more ghosts – lighted hanging ghosts for our front yard, to be precise – and she’d been collecting the materials from the dollar store since summer!
I must admit, though, when she told me the plan, I didn’t think they would turn out nearly as good as they did!
She tells me a lot of ideas, and usually I’m all in from the start, but this one made me raise my brow and give her a little side eye.
Dollar store hanging ghosts made from paper lanterns and table covers?
The idea didn’t sound very promising.
Actually, it sounded kinda lame.
It also sounded like the whole thing would disintegrate in the first rain.

But I kept my suspicions to myself. It wasn’t the first time I’d doubted my wife’s sanity, only to learn that she was right all along.
There was that time I thought she was a certified crackpot for suggesting that I document and write about a shed cleanout and reorganization.
(You guys loved it.)
Then there was that time way back in 2015 that I thought she’d gone bananas for insisting I photograph and write about how to make a cutting board.
(Our 11th best post of all time.)
And even for Halloween, there was that time I nearly called the paddy wagon when she insisted that I make a hanging cage Halloween prop out of some dollar store laundry baskets!
(Not only is it our 10th best post of all time, but it was one of my top 5 most enjoyable posts to write, and it is one of my favorite posts to revisit and re-read.)
So, yeah, I have a long history of thinking my wife is nuttier than a half-baked fruitcake, when in fact she’s a creative genius who is so far ahead of me that I may as well be a thumb-sucking toddler in a playpen.
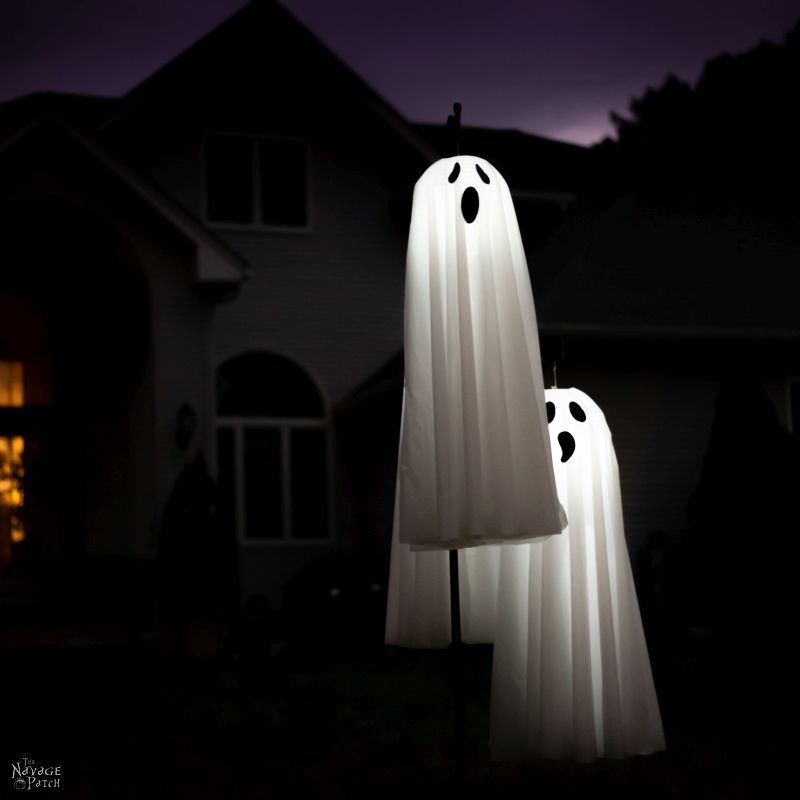
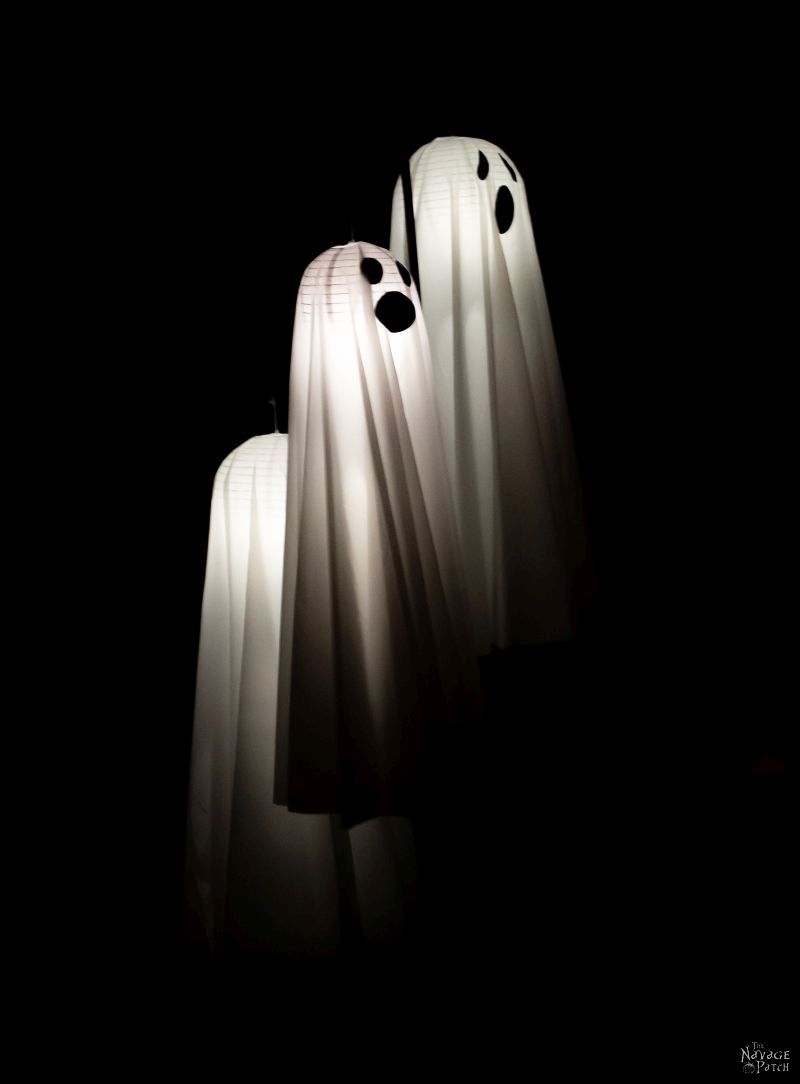
And I’ll tell you, these hanging ghosts are awesome, and dammit, as much as I hate to say it, they’re “cute!“
GAH!
And they’re cheap—only a few bucks per ghost!

But the best part of all is that every time we leave the house or return home, and every time Handan walks by the front door, she throws her arms up high, waves them around and goes, “WoooooooooooOOOOOOOOOOOooooooooo!”
And wherever I am…I laugh.
Then she laughs.
And the dogs howl and The Boy smiles and shakes his head and wonders how in the world he wound up in a family like ours.
Lighted Hanging Ghost SUPPLIES LIST
Affiliate links are provided below. Full disclosure here.
- Paper lanterns (8 or 10 inch) or Dollar Tree plastic bell cloche (pictured below)
- Dollar Tree round plastic table covers (also on Amazon)
- LED remote controlled tea light candles
- Packing tape (Dollar Tree has the Jot brand)
- Scissors
- String or twine
- Black adhesive vinyl (Dollar Tree carries adhesive vinyl, but you could also use a black garbage bag or color in the eyes and mouth with a Sharpie)
- Double-sided tape (if using a black garbage bag for eyes and mouth)
- Garden shepherd’s hooks or a tree with branches you can reach (or you can hang them indoors)


More Easy DIY Halloween Decor Ideas


- Hanging Cage Halloween Prop
- Halloween Fire Wreath
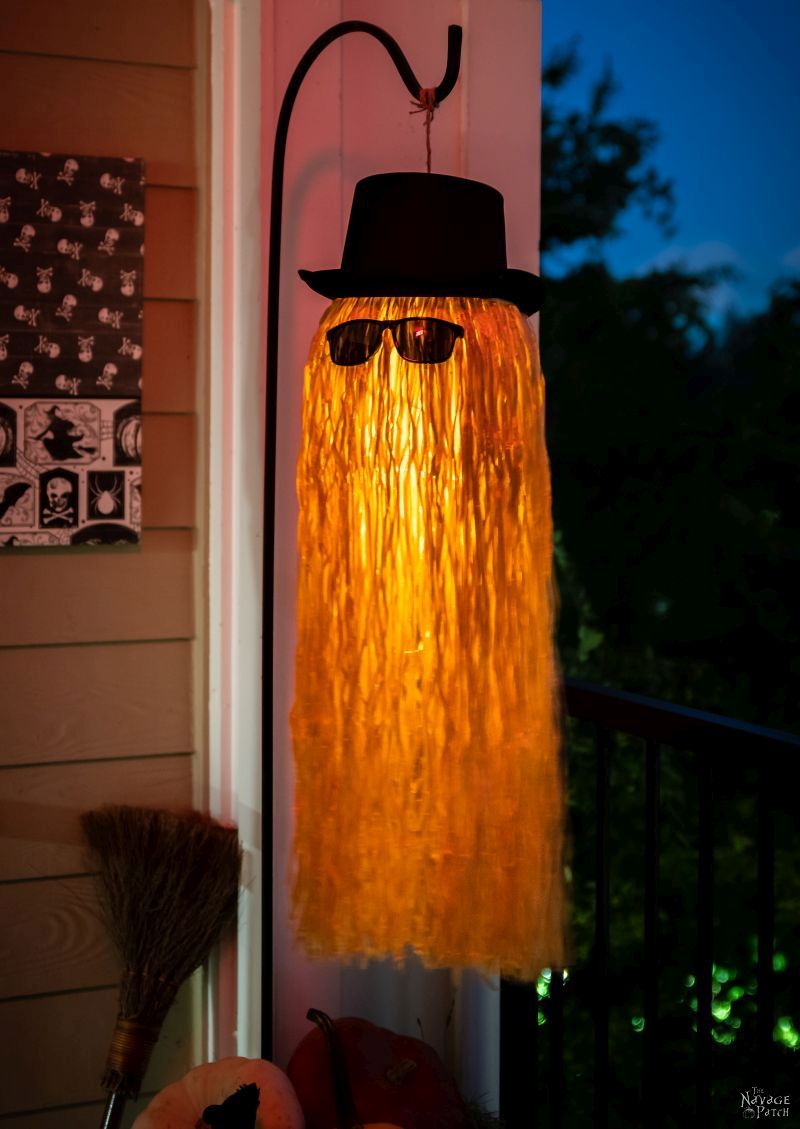
- DIY Cousin Itt Pathway Light
- Free Vintage Movie Monster Printables
- DIY Dollar Tree Halloween Lights
- Gallery Of The Faceless – Easy Halloween Wall Decor
- DIY Lighted Witch Hat (Grandin Road Inspired)
- Free Vintage Witch Printables
- DIY Witch Legs (Grandin Road Inspired)
- Floating Potion Bottle
- Apothecary Jars And Free Printable Labels
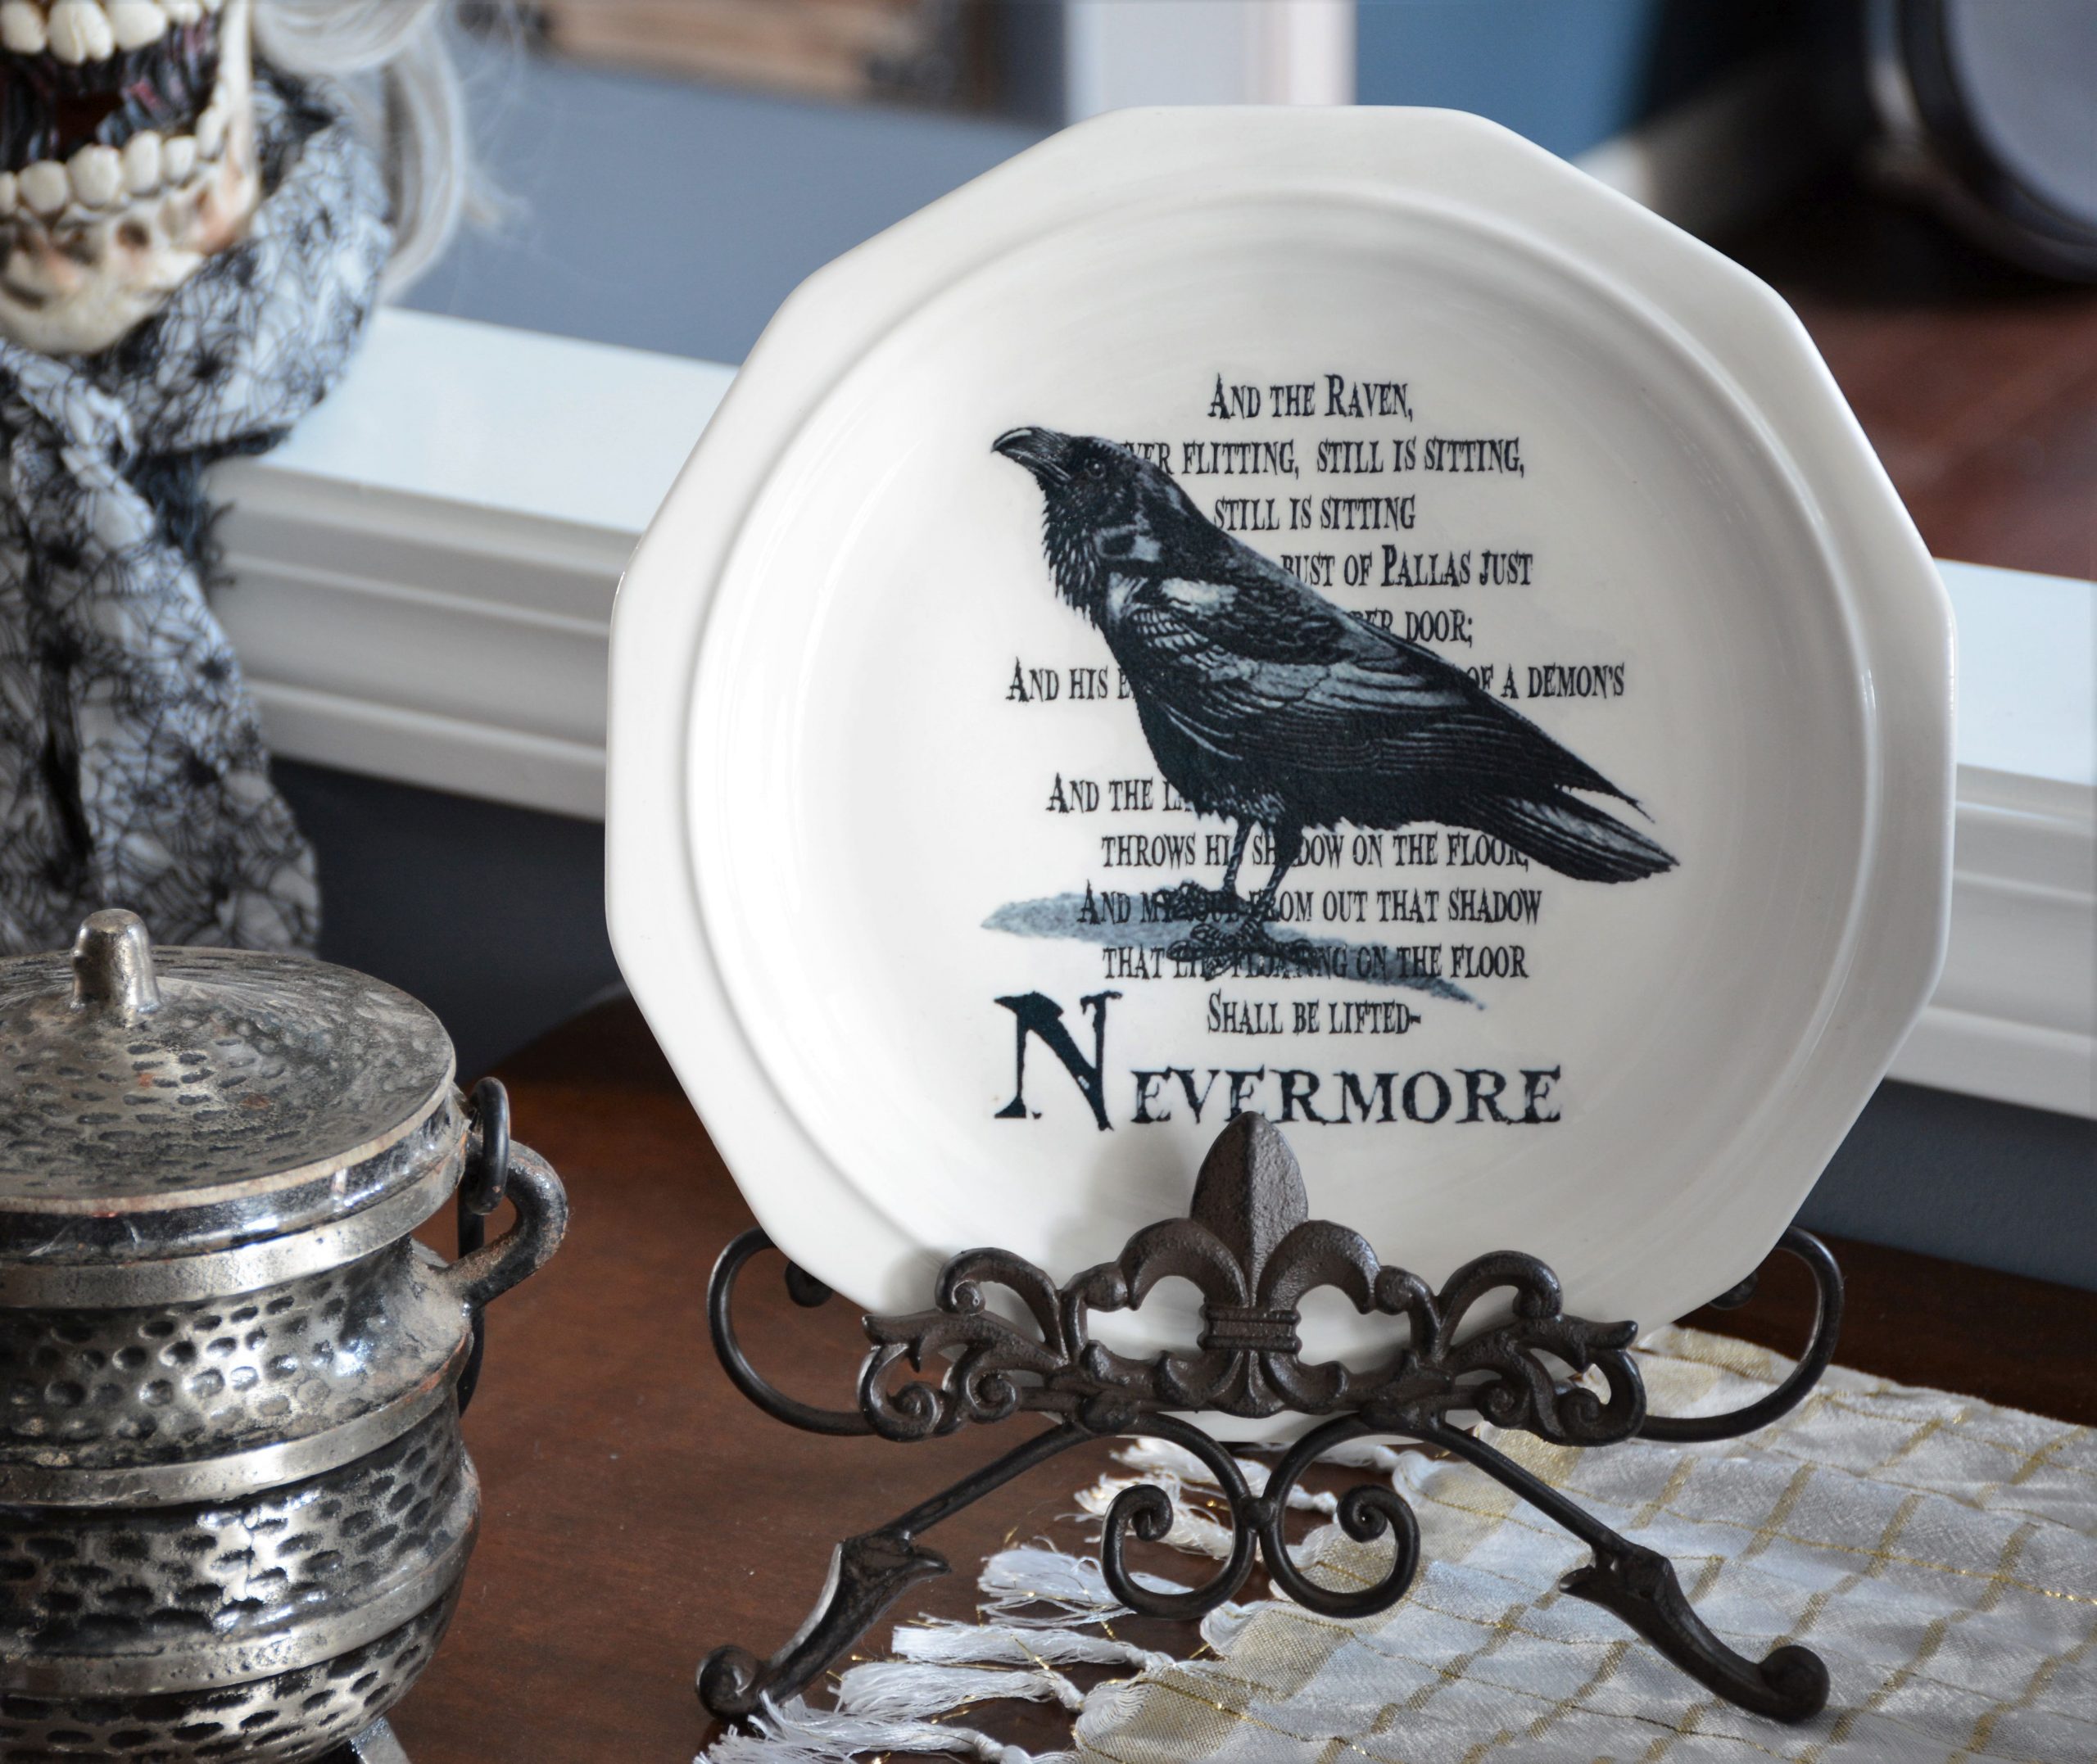
- Dishes Of Darkness: Pottery Barn Inspired Halloween Plates
Easy Lighted Hanging Ghosts VIDEO TUTORIAL
You may want to watch our short video below for an overview of our easy lighted hanging ghosts before you read the detailed step-by-step tutorial.
Easy Lighted Hanging Ghosts TUTORIAL
Okay, are you ready? Look I wasn’t joking when I said these were easy, so don’t blink, or you might miss the tutorial!
Believe it or not, Handan had to show me how to do this first step of assembling the lanterns.
What? Don’t judge! I’ve never built a damn paper lantern before, okay? It’s not exactly intuitive for dumbos like me!
So anyway, the wire thingy goes into the paper thingy and…oh what’s the point? I’m sure you’ve built a paper lantern before! You don’t need me telling you how to do it!

…And then those round wire things go over the….ah, forget it! Just build it, already!

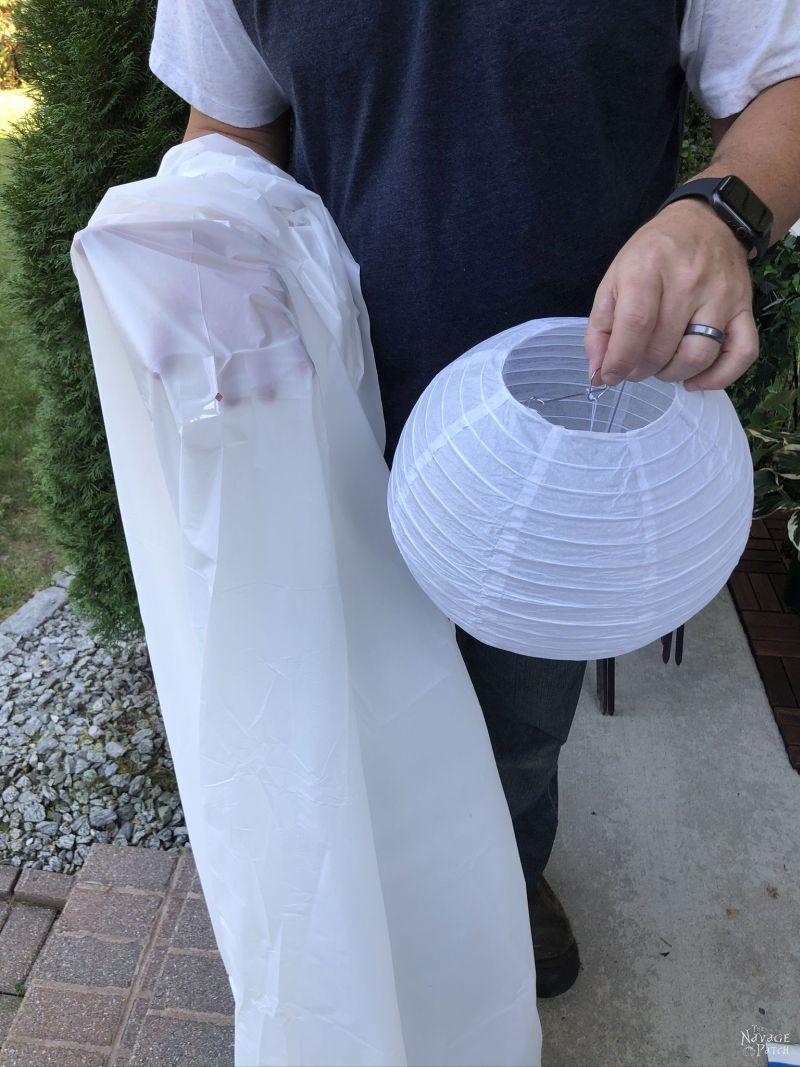
If you can’t find paper lanterns dollar store also carried bell cloches. That might be easier since all you need to do is cut the rim of cloches.
Okay, now that that’s out of the way….
If you’d like to light your ghost, now’s the time to put in the lantern light. First let me model it for you.
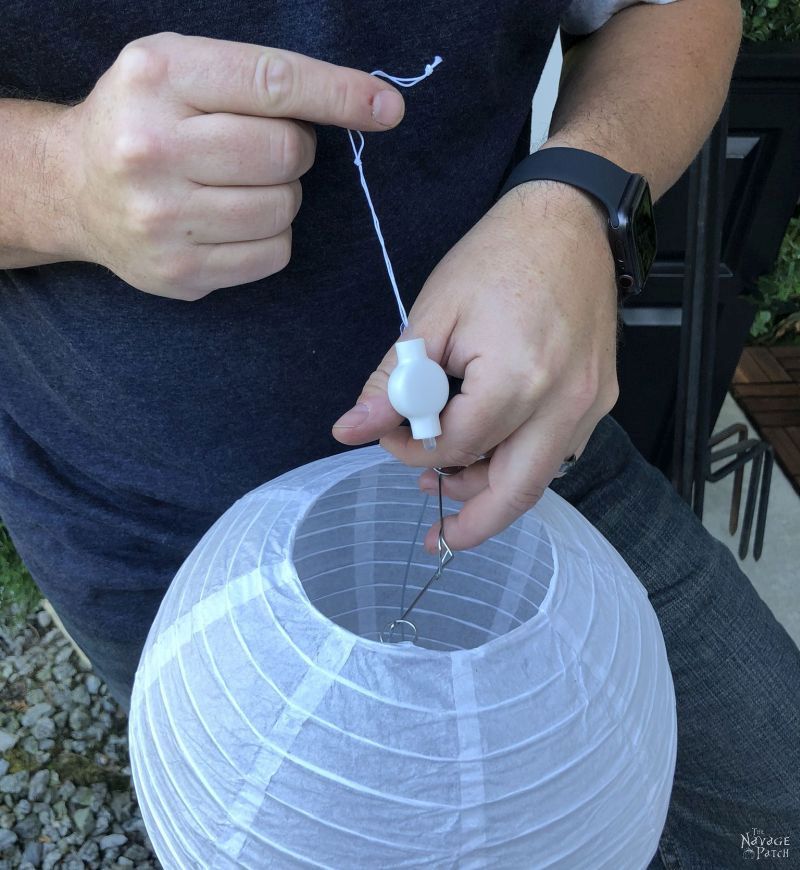
I know, I know, I missed my true calling. I should have been a hand model.
Look, full disclosure here – the lantern lights pictured above don’t last long. I mean, if you leave it on overnight and all the next day, you may—may—get one more night out of the thing. If you’d like to enjoy them throughout October you can use these battery operated remote controlled tea light candles which will last longer and they are only about 2 dollars each.
They work so much better than those cruddy old ones back in the stone ages when we first did this post! Just check out the Instagram Reel below to see them in action! They are amazing!
But, hey, these guys look great in the daytime, too, so it’s not all bad if you don’t want to light them!
Okay, now that we’ve all agreed that you will be adding lantern lights, you’ll hang it from the middle of the wire support.

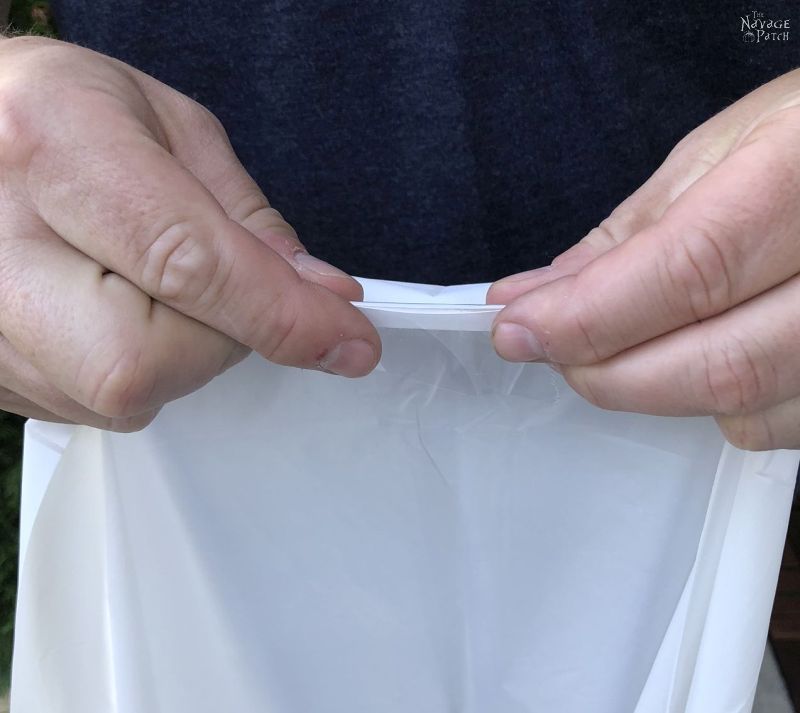
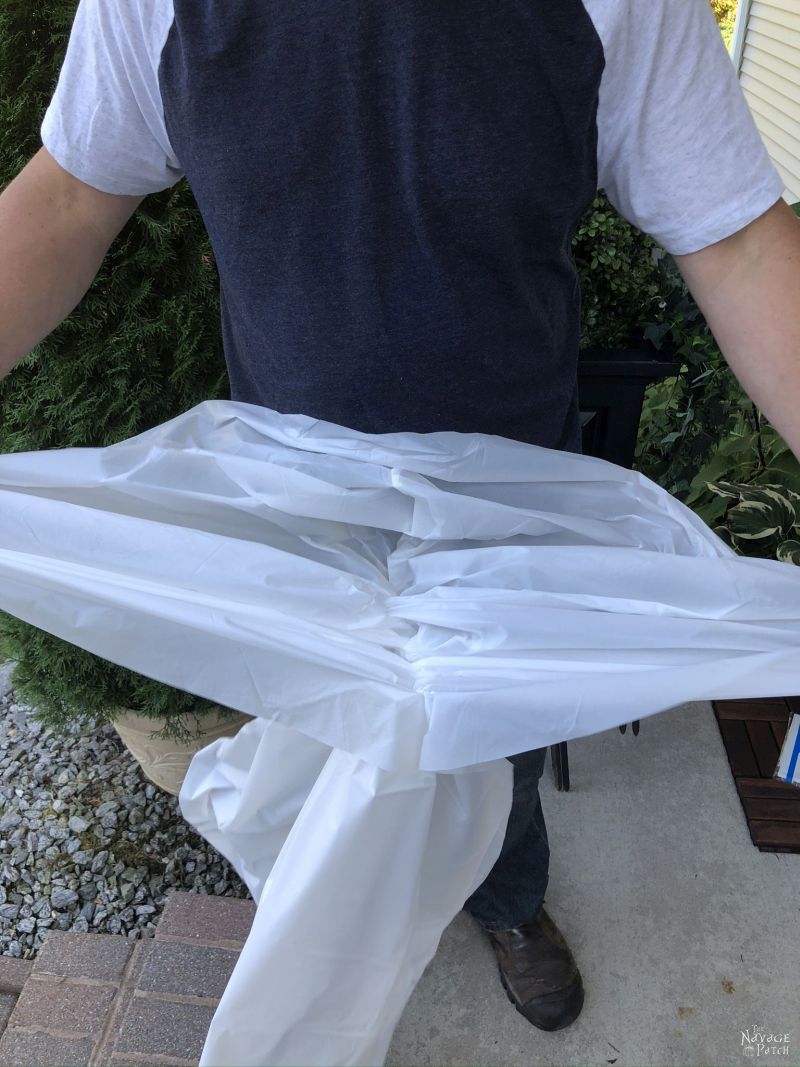
Next, open the table cover package. This is complicated. Lemme show you how to do it.

There’s a more advanced method involving teeth that I won’t get into today.
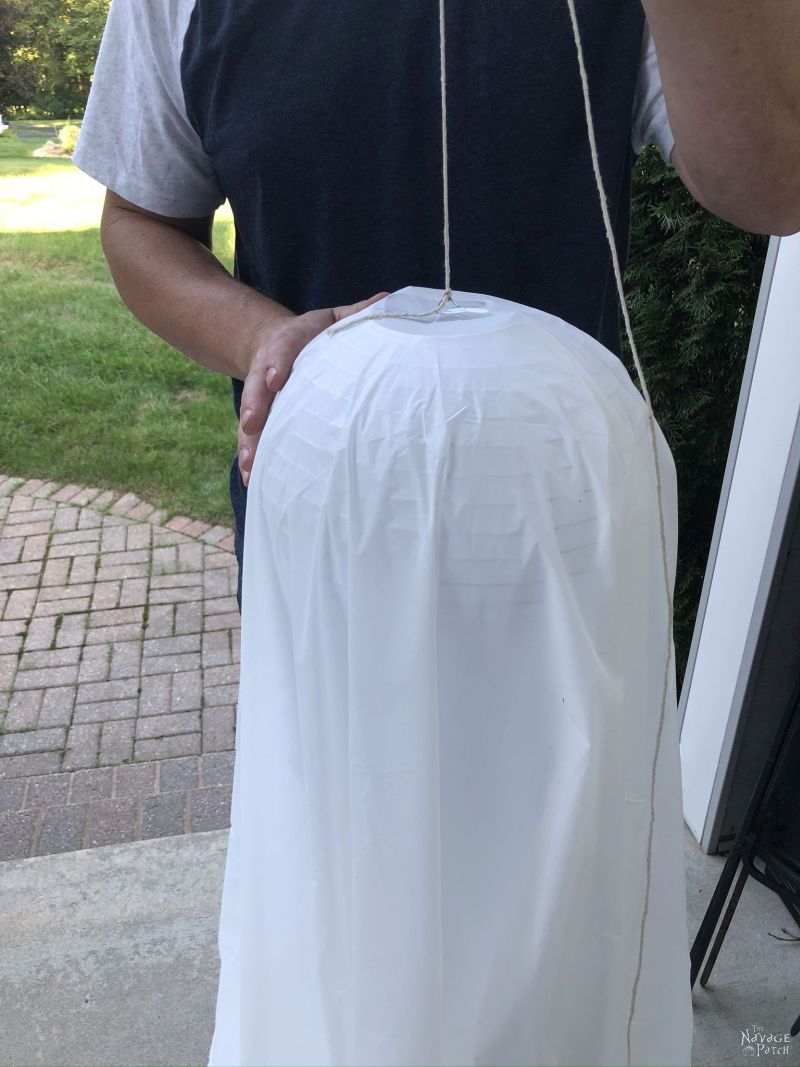
Unfold the table cover until you find the middle. Doesn’t my body language just scream enthusiasm in this picture? I was doing my best teenager impression.

I’m holding it along the midline. The center of the table cover is halfway between my hands. I’m clearly so excited in this picture. I was barely able to contain myself!

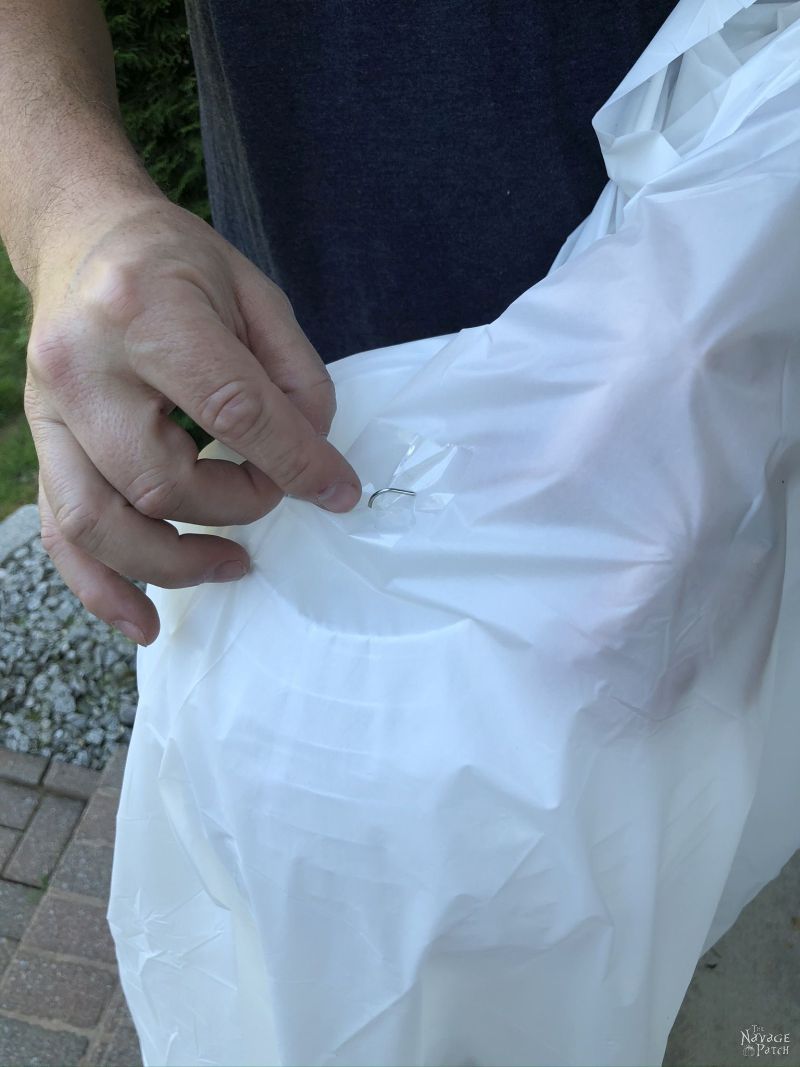
Get yourself a couple of inches of packing tape and fold it around the center point. This is going to make your hanging ghost stronger, so the wind won’t tear him apart.

Fold the taped part over and cut off just a tiny bit of the corner.

Now fully open the table cover and find the center.
Hey, look! There it is!

Hook the top of the lantern through the hole you made in the table cover. Stay with me, now! We’re almost there!
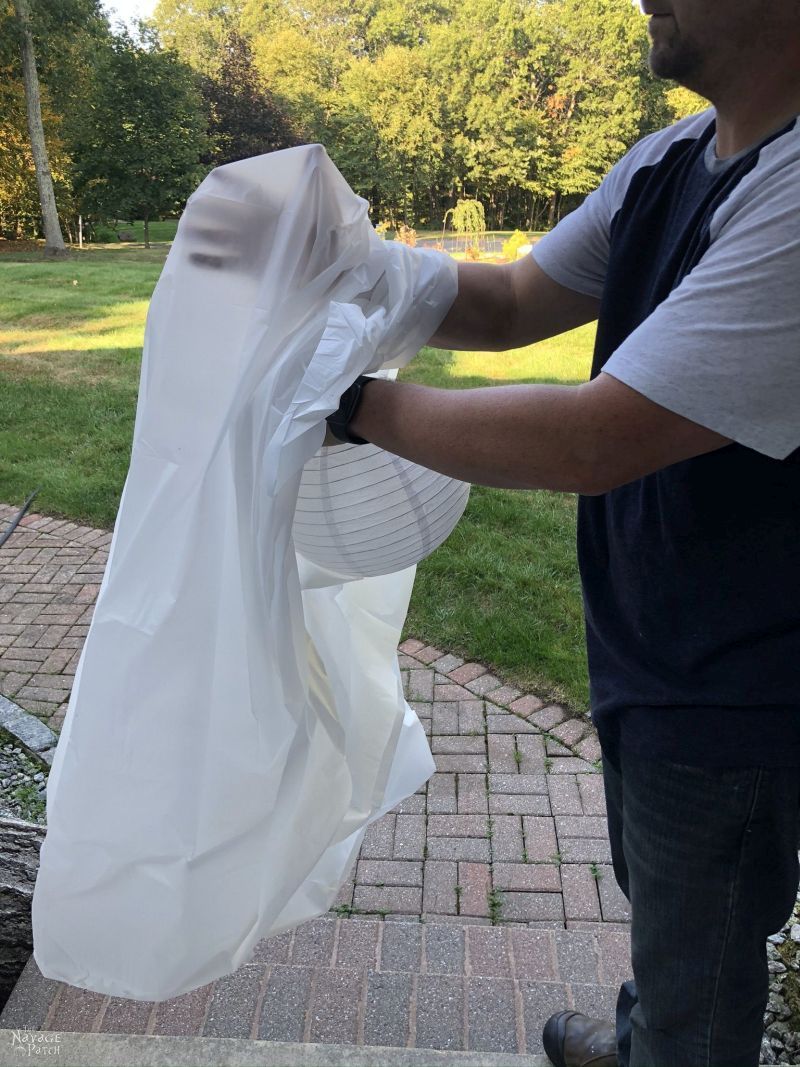
Congratulations! You’ve built your hanging ghost body!

Next, tie a piece of string to hang your ghost.

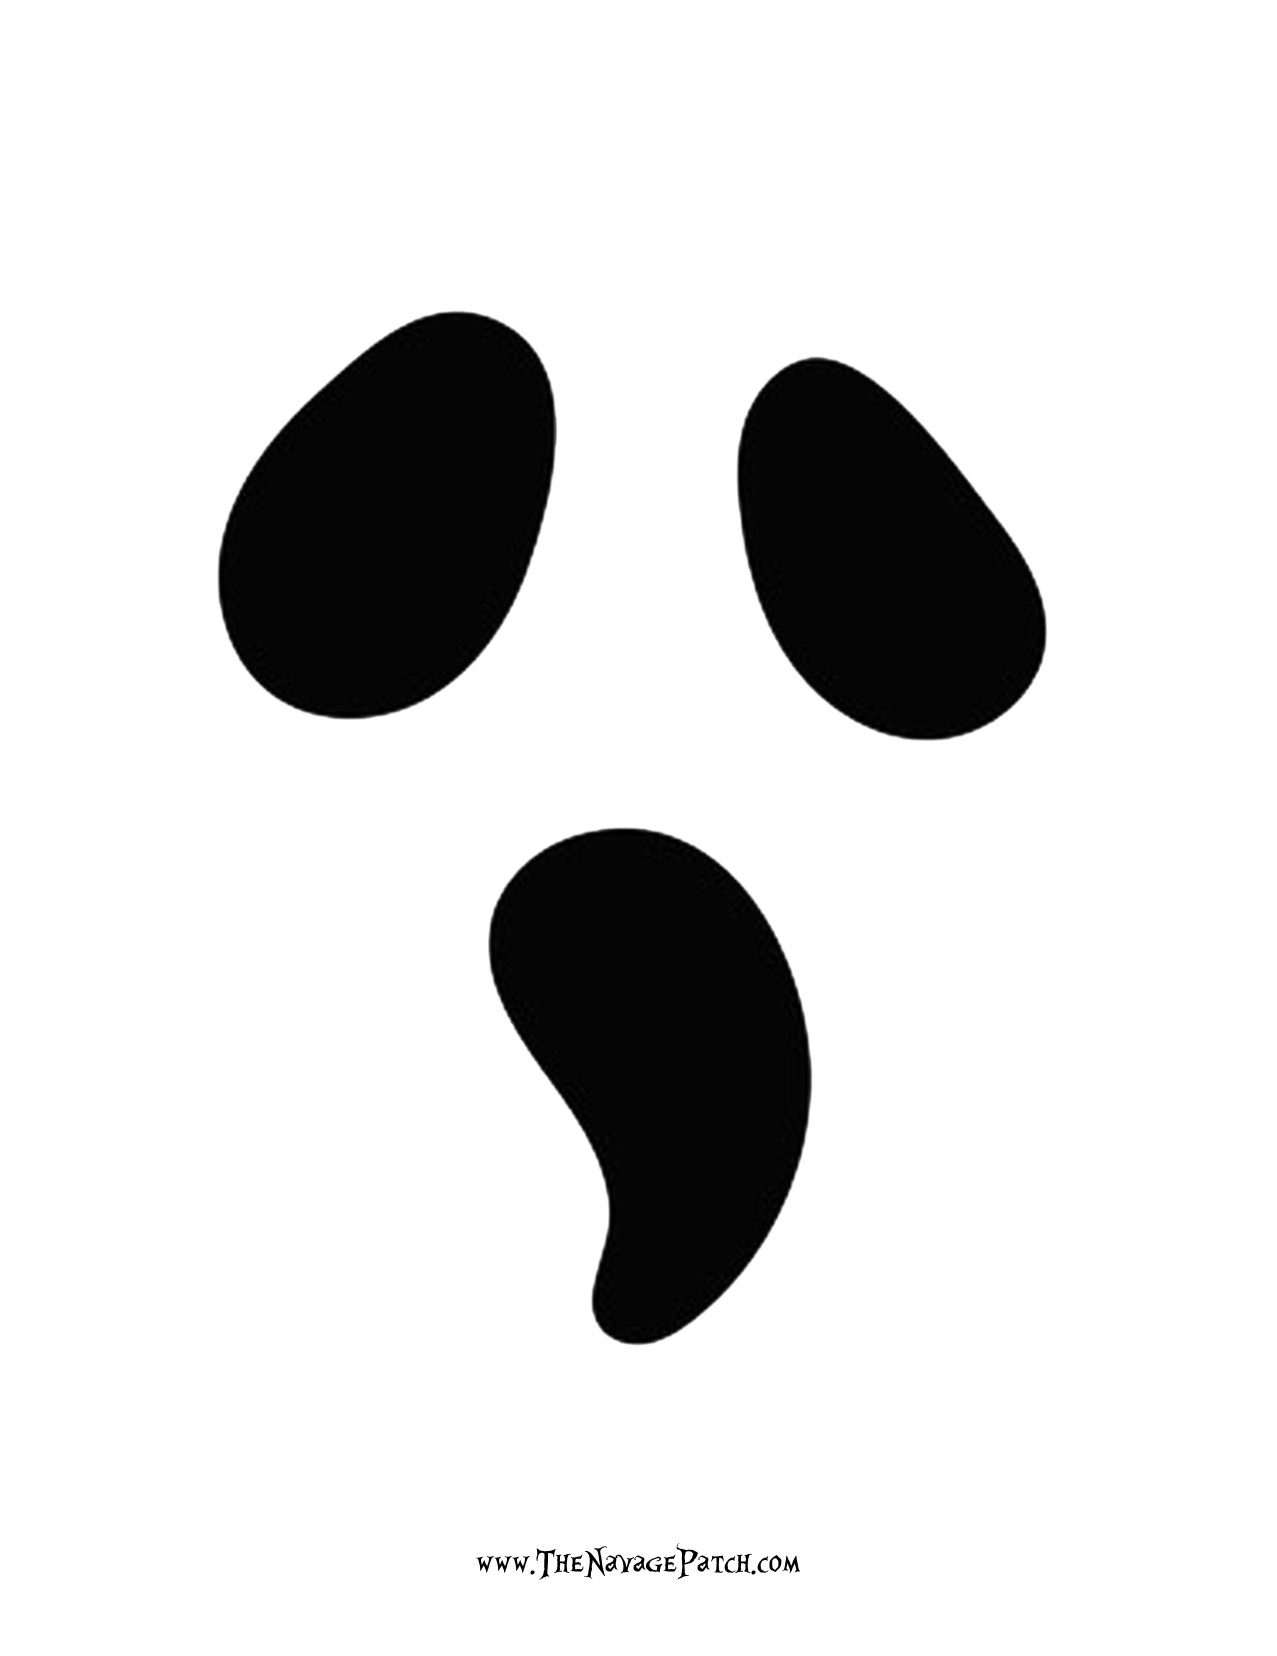
The last step is to stick on the adhesive vinyl eyes and mouth. Choose any or all of the designs at the end of this post. You can cut them out with a Cricut if you have one, or trace them and cut out with scissors. If you’d rather not buy a roll of adhesive vinyl just for this project, you can also cut the eyes and mouth from a black garbage bag and stick them on with double-sided tape. Alternatively, you could draw them right onto the hanging ghost with a Sharpie. There are solutions for every budget!
Update October 2021: Dollar Tree now carries adhesive vinyl! 12″ x 48″ for a dollar!

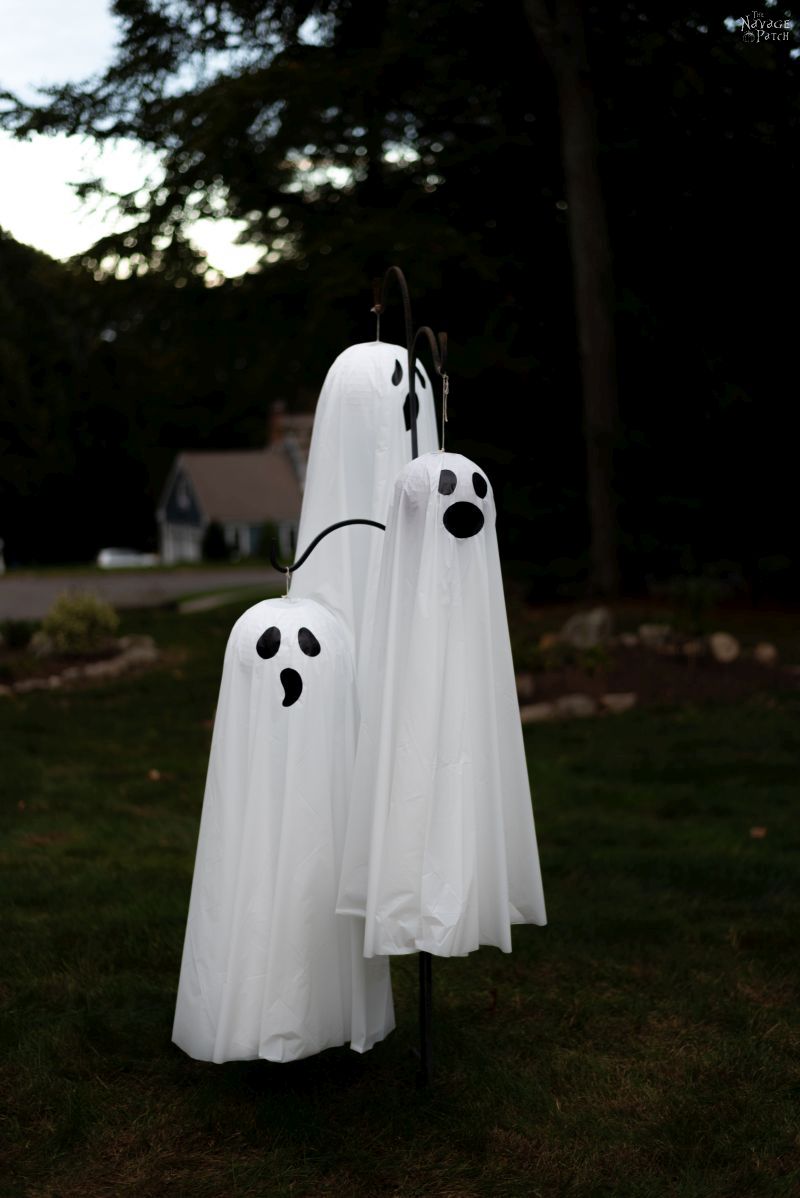
And that’s it! Your hanging ghosts are ready for action!

I told you that these came out much better than I ever would have guessed. Just have a look at these pics!


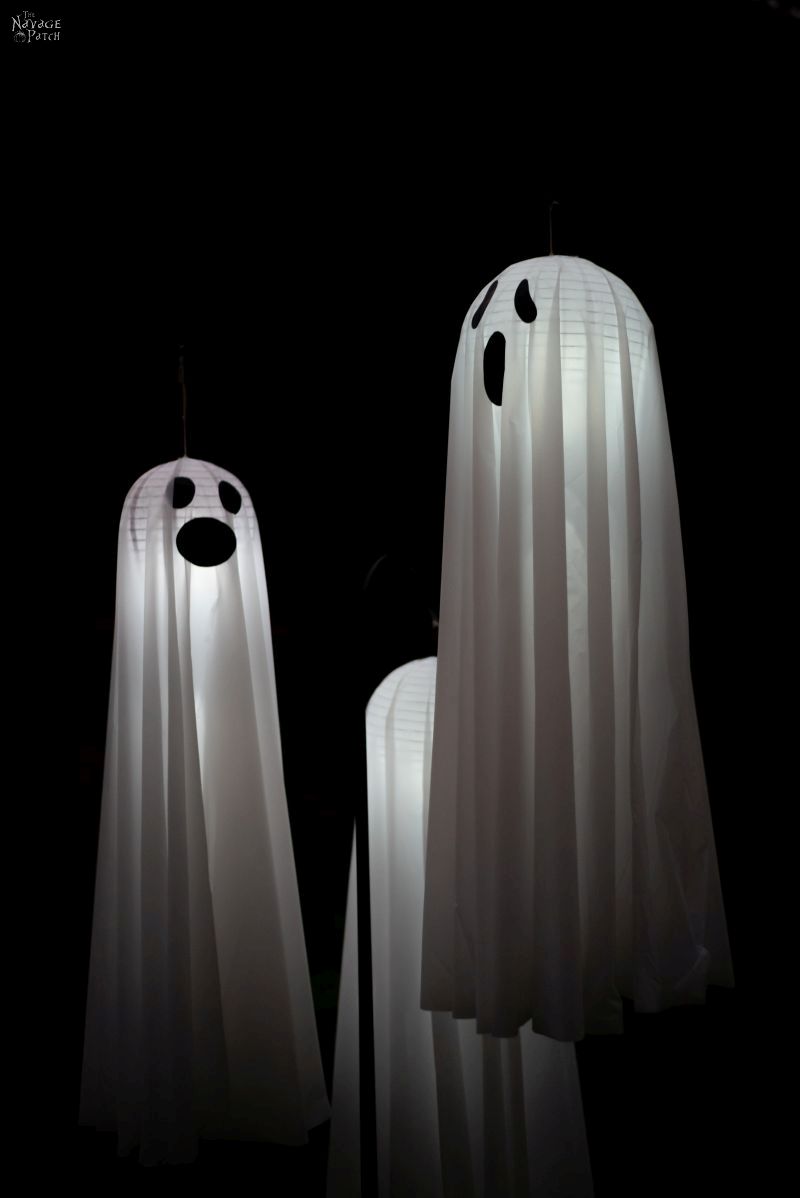
They’re pretty damn cute, I have to admit.


And yes, these little guys can handle almost anything Mother Nature throws at them. They’ve already survived two rainstorms and non-stop windy days with absolutely no issues.


Can you hear it?


Can you hear my babes?
WoooooooooOOOOOOOOOOOOooooooooOOOOOOOOOooooo!


*******
As promised, here are the ghost faces. Just right click on each image and select “Save Image As” to save the ghost faces full size. Or CLICK HERE to download the PDF versions of them!


Share it on Pinterest & Facebook!


Another great and easy idea. Love the photos, Greg. You’re the headless crafter. And those of the ghosts blowing sideways makes them look like the ghosts of windsocks past.
Whoooooo whooooooo
LOL! Trust me, it’s better if my enormous head isn’t clogging up everyone’s computer screen! You should have seen me trying to take pictures on that windy day – I was running in circles around the ghosts trying to catch their faces as they twisted in the wind! 😀
Another idea for the eyes and mouth . . . cut them out of black duct tape.
Great idea, Ruth!
Another easy DIY project that I can do. Thank you. Granddaughter is looking forward to creating a bit of spookiness on our front porch. Just wondering about the lights you used in your ghosts. I would want to use lights that could be controlled with a remote. Any suggestions? The ones you have a link to only last 72 hours.
Thank you, Jennifer! Have a look here for some remote controlled lights: https://amzn.to/2ImOqMp
These are pretty darn cute alright. I think I can do this one. You two are my favorite crafters and favorite blogger. Nothing wrong with laughing while you are working …. or reading your blog.
Thank you so much, Jan! I’m always so happy to hear that I make people laugh! 🙂
Love these! We decorate our office and these ghosts would be a lot of fun hanging around in here. I got my waterslide paper yesterday! Off to the Dollar Store to hopefully find some candles. 🙂 I told our UPS guy yesterday about your site. He loves to make things, too. He said he was going to check it out last night. Hope he did! 🙂
Jana
Awesome! Thank you, Jana!! 😀
What a great idea! Thanks for sharing!
Thanks, Andi! You’re welcome! 🙂
Love, love LOVE the idea! Reading your blog always makes me smile 🙂 Thank for sharing!
Thank you, Karen! 🙂
Thanks Greg and Handan for all the amazing projects you post. I love the humor, you guys are hilarious and inspirational!
Thank you so much, Janine! We’re always so happy to hear that we inspire others, and of course, if I can make you laugh, then all the better! 🙂
Love these! What diameter are the lanterns you used? There are several sizes available on Amazon but yours look just right with the length of the tablecloths. Thanks.
Hi Pamela, thank you! The two big ones are 10″ and the little one is 8″
Greg I just love reading your blogs. You always have a positive, upbeat attitude. I think it would be great fun to be a fly on the wall to spend time with your creative genius. Even in the event of a mistake(?) somehow you make it seem part of the process. Thank you so much for providing laughter and sunshine along with practical information. It’s always such a joy.
Aww, thank you so much, Ronna! I’ll tell you something – with me, mistakes ARE part of the process, because I don’t think I’ve ever completed a project without one! 😀
Oh My! This is adorable and cheap, I love it! Running to the dollar store now. And I may just use the dollar store battery tea lights and see if they will work! Thanks!
Oh, yeah! That’s a good idea about the dollar store lights, Breanna! Let us know how they work!
Love these!!! What about using glow-in-the-dark paint on the ghosts?? If they make glow-in-the-dark thread for quilting, someone has to make glow-in-the-dark paint!! You could put a fabric medium in the paint and then your ghosts would not get stiff. Using the battery-operated fairy lights would be a great idea as well. Definitely sharing this idea on Facebook!!
Oh yeah, they certainly make glow in the dark paint, and that’s a great idea you have! 🙂
A great fun idea, I love it.
Thank you, Claire! 🙂
These are absolutely adorable. Or adooooooooorable~
Wooooooooooo! LOL!
Ghosts are awesome! Also love the Halloween plates !
Thank you so much, Janis!
Love this , Thank you for sharing
Thank you, Myra!
Just found this post looking up Halloween ideas on Pinterest. Was reading while chatting with my son and was laughing so much that he had me read it to him out loud. His first comment was that he wants this kind of fun comeraderie in a relationship! LOL
I will definitely be wrangling my hubby into helping me do this. LOVE how they came out. And I’ll be reading your blog further. Thanks for the ideas and the laughter.
So awesome to hear! Thank you so much, Shannon and welcome to The Navage Patch! We’re happy you found us – yeesh, what took you so long??? 😀
Thank you for this idea! 6 ghosts are glowing in my garden graveyard tonight. I can’t seem to post a photo here, but they’re on my Twitter: @AliceLoweecey
I didn’t light them from within. Rather I chose to drape orange mini-lights around them. They look a bit like ghosts from hell. Since I write horror, it’s entirely appropriate!
Hi Alice, you’re welcome! I just checked your Twitter, and those ghosts look fantastic with the orange lights. Great job!
I LOVE these! Any unique Halloween decorations, and Im in. Im pretty sure that you have way better dollar stores than we do, though. You seem to find things that I’ve never seen at ours. Keep up the great work!
Thank you, Serene! It’s weird how variable DTs can be from state to state!
Greg would you be interested in selling one?
Hi Gina, unfortunately I don’t have the time to make and sell our creations, but they really are so easy to make!
Love these, what size lantern did you use please?
Thanks, Jany. We use 8, 10 and 12 inch lanterns for our ghost. Having different sizes gives a much better look than if they’re all the same!
These turned out great. Thank you!
Glad to hear it, Jessie!
Awesome post
Thanks!
They are really cute!
Whoooooo
Thank you, Debbie!
The Nekopoi apk folder provides easy app access, and **Easy Lighted Hanging Ghosts** are simple DIY decorations for Halloween.
for more visit this site https://nekopoiapks.com/
I absolutely love the idea of these lighted hanging ghosts! They add such a whimsical touch to Halloween decorations. The step-by-step instructions are so easy to follow, and I can’t wait to try making them myself. Thanks for sharing this spooky yet simple craft!
Thank you!
How would you put the lights if you used the bell cloche?
This thread is about lighting setup not Sunday quotes which focus on relaxing inspirational messages for a peaceful Sunday.
I absolutely love this idea! The lighted hanging ghosts add such a whimsical touch to Halloween decorations. The step-by-step instructions make it so easy to follow. Can’t wait to try this with my family! Thank you for sharing! 🎃👻