Metal Filing Cabinet Makeover
This metal filing cabinet makeover proves you don’t need to spend a ton of time and money to get great-looking results. Just keep it simple, stupid!
My favorite types of assignments projects from Handan are the ones with gradually lowered expectations.
She may come at me wanting the Taj Mahal, and because she’s my babes and I love her so much, I login to my computer, open Sketchup and start trying to design her a Taj Mahal of her very own out of 2x4s and Kreg screws.
But every so often, she scales things back a bit.
Sure, she wanted the Taj Mahal, but you know what? She’d be just as happy with, oh, say, The Eiffel Tower, which we all know is far easier to cobble together out of 2x4s and Kreg screws than the Taj Mahal!
And then as I’m calculating the angles for the Eiffel, she may say, you know what, my babes? We really don’t need the Eiffel Tower. Why don’t you just build a small cabin in the woods?
And inside, I’m celebrating, because we all know that a cabin in the woods is a hell of a lot easier to build with 2x4s and Kreg screws than the Eiffel Tower!
As we chug along with Barish’s bedroom makeover, the projects are getting smaller as we approach completion of the first room.
There’s a sense of “Just Get the Damn Thing Done, Already!” in the air.
Okay, so we were looking for a solution to a storage space problem recently.
As in, The Boy needed more of it to hold all the crapola he needs for school.
Handan came at me with the Taj Mahal.
She started explaining some marvel of engineering and woodworking she wanted me to build for the small space she had allotted for the aforementioned storage space problem.
My eyes started to glaze, and that tripped the switch on my WiFi (Wife Filter). I had almost tuned out this ridiculous thing she wanted, but then I remembered that she was my babes and I love her so much, so I turned off my WiFi and listened in.
A day or so later (I had made exactly zero progress on the Taj Mahal), my babes came at me with the Eiffel Tower.
“Hey babes?” she said.
“Mmmm.”
“Instead of the [Taj Mahal], let’s instead give a makeover to the metal filing cabinet in the basement.”
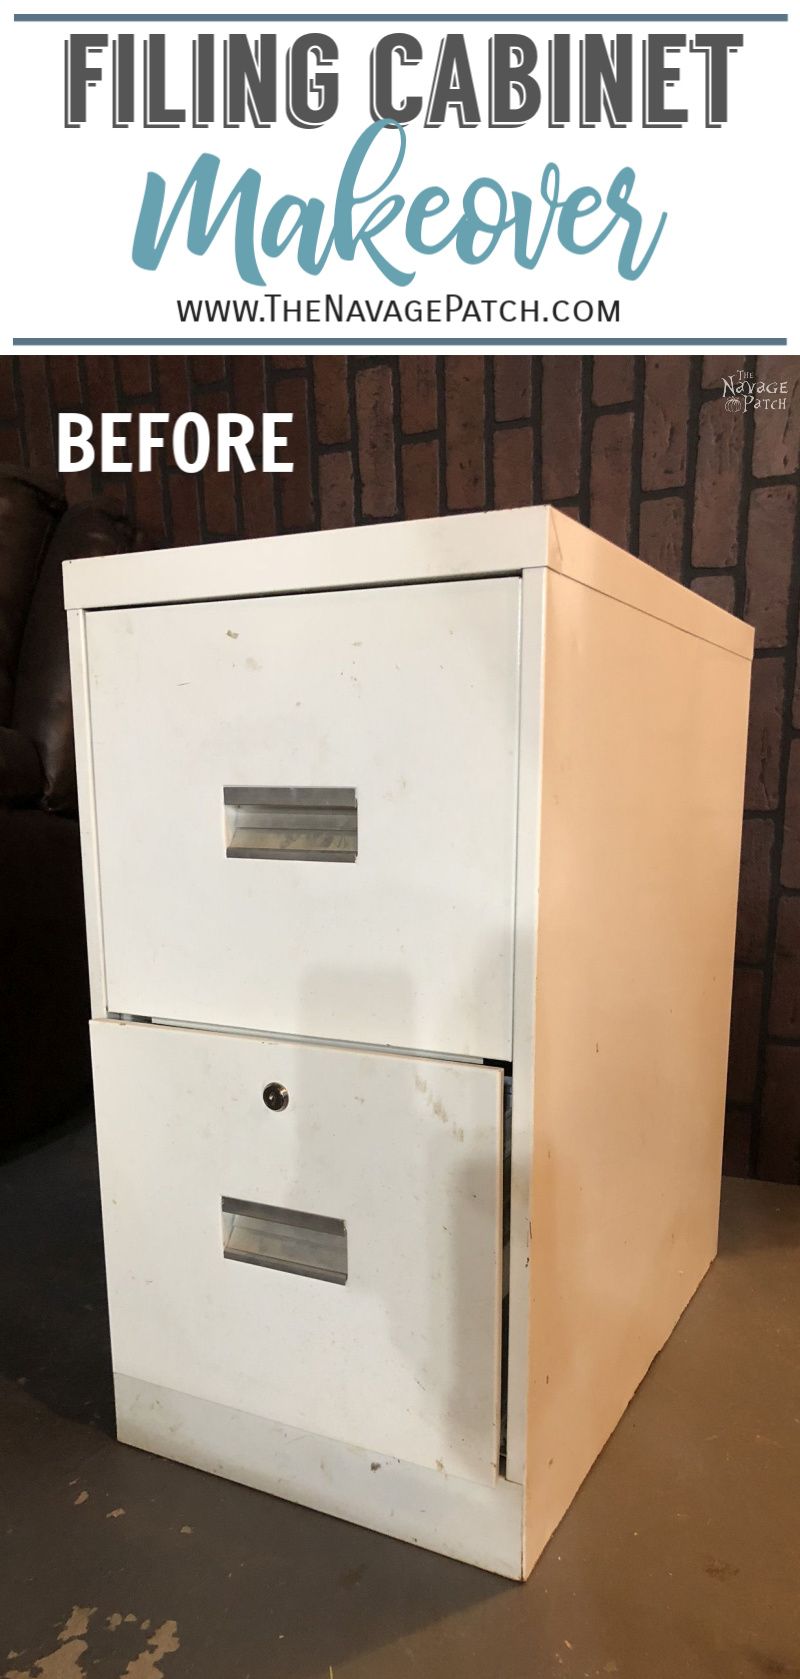
She was speaking of this forlorn office reject that had been sitting in a dusty corner.

It was opened once a year to unceremoniously dump in the previous year’s tax files with a loud “Good riddance!”
She then proceeded to explain the various paints that would be applied to the different surfaces and components of the Tax Dump. Furthermore, she indicated with flailing arms and pointing fingers that “this, those, and maybe that one over there” would be used on the top and perhaps the size. She was directing her spasms to my lumber supply.
“Okay, my babes!” I said.
The Eiffel Tower is always easier than the Taj Mahal.
Another couple of days passed, but I hadn’t yet started in on the Eiffel Tower.
I was thinkin’ ’bout it, though!
Alright, okay, you’re right. I’d swept it clean out of my ear during my daily mental cleansing (aka The Dry Martini Mental Mop-up).
The next weekend, Handan and I were in the basement working on some other component of The Boy’s room makeover, and Handan got the itch to start the Eiffel Tower.
I dragged the cabinet over so she could clean it up a bit.
It really was dinged up.
I think it belonged to an office of gorillas.
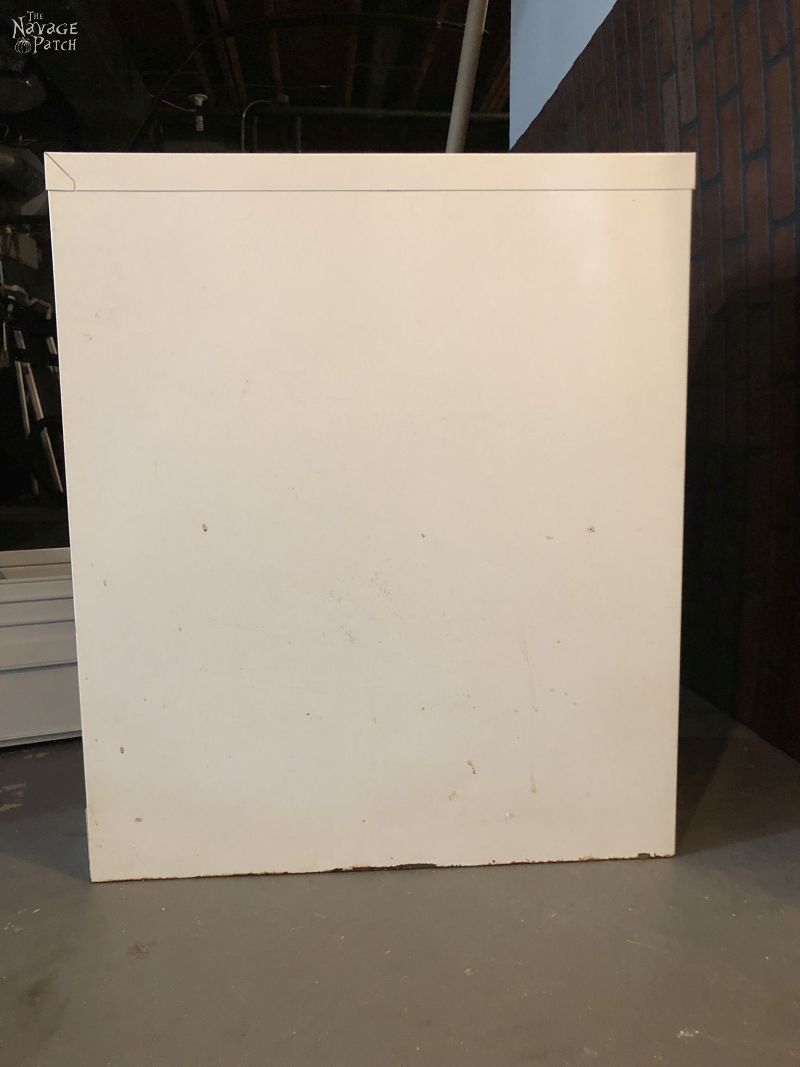
They probably held gorilla wrestling matches on it.
The bottom was rusted out. This likely meant that the gorillas’ office was outside.
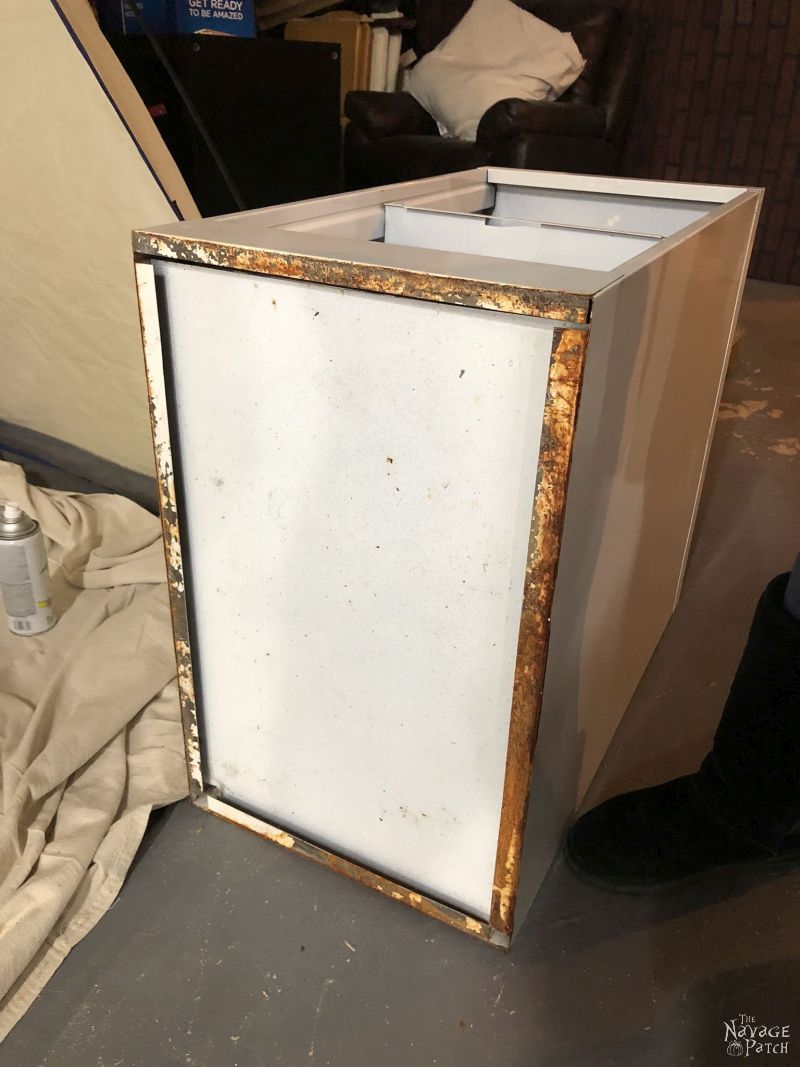
Handan got to work cleaning it with some Formula 409 before turning it over to me to begin construction on the Eiffel Tower.

And then a wonderful thing happened!
My wife looked up at me and said, “You know what, my babes? Let’s just keep this Simple Stupid.”
And just like that, I no longer had to build the Eiffel Tower.
Just like that, I would be building the cabin in the woods!
And I loved it! Hah!
She explained what she wanted. It was brilliantly Simple Stupid.
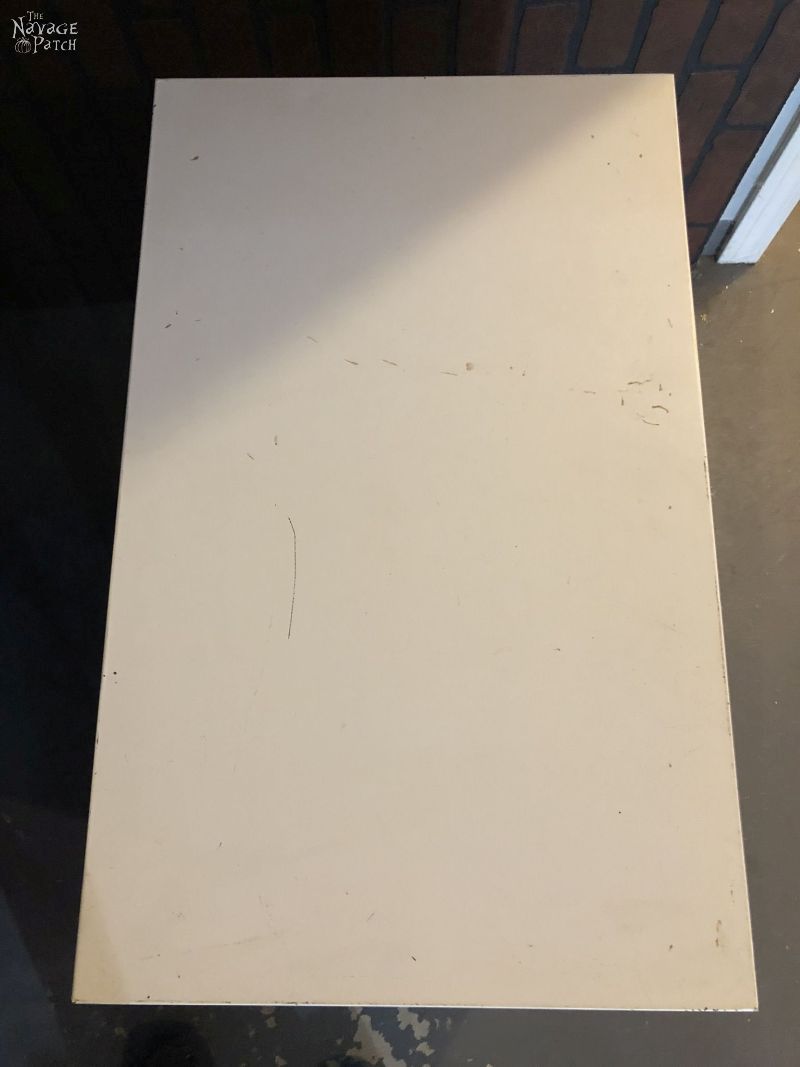
A piece of plywood on the bottom.
A piece of plywood on the top.
And some decorative strips of plywood on the sides and in the front.
It was so simple! Even the gorillas who trashed the filing cabinet could have made it!
I turned and surveyed my plywood reserves.
Bingo! I had everything I needed for the metal filing cabinet makeover!
Now let’s check out what we did.
That rusted base was hideous, but would I need to spend a moment’s energy to clean off that rust?
Hell, no!
A piece of 3/4 inch plywood would cover that eyesore!

Out of sight, out of mind! This project would be “lipstick on a pig” at its finest!
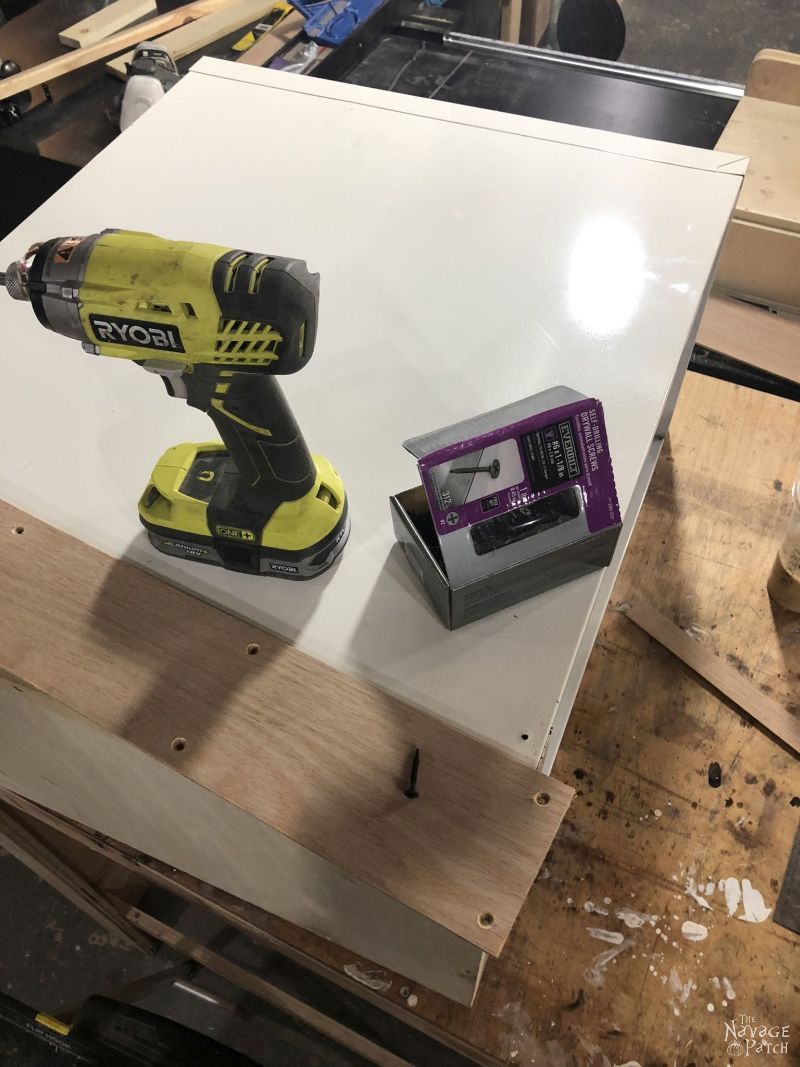
I attached that plywood base with some self-tapping drywall-to-sheet-metal screws.
With the base attached, I turned my attention to the trim pieces. I had some 1/4 inch plywood that was perfect for the job.
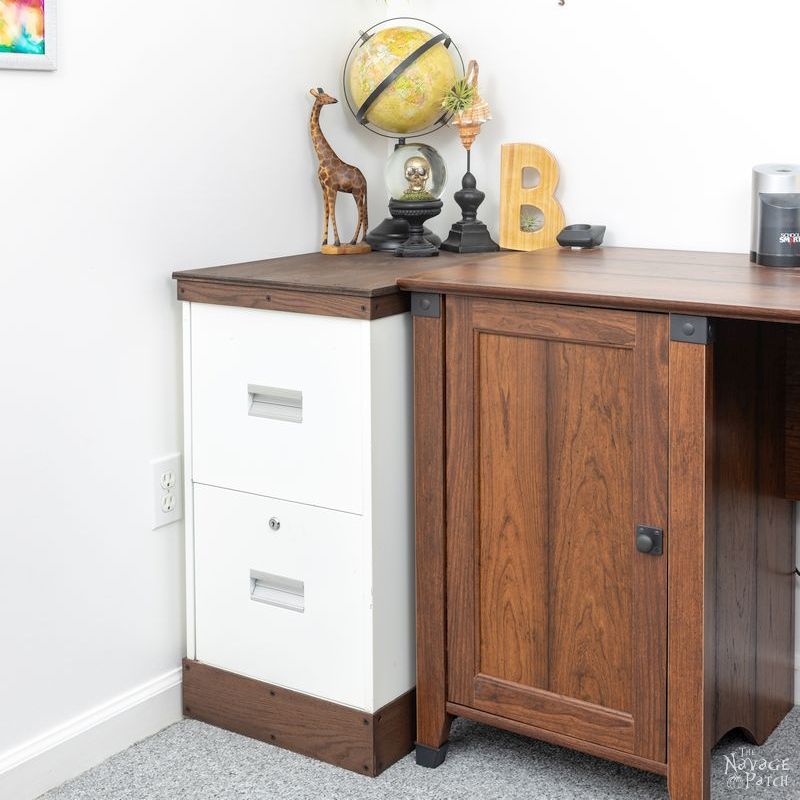
You can see in the picture below the space above the top cabinet and below the bottom cabinet. I would cover those with plywood, and then extend that coverage around the sides.

I thought that having the black screws exposed against the wood grain would look pretty cool, so I took the time to measure out where the screws would go, and then I drilled and counter-sunk the holes so the screws would sit flush.
Honestly, this was the most time-consuming part of the project!
Here is how it looked with all the 1/4 inch plywood banding screwed in place.
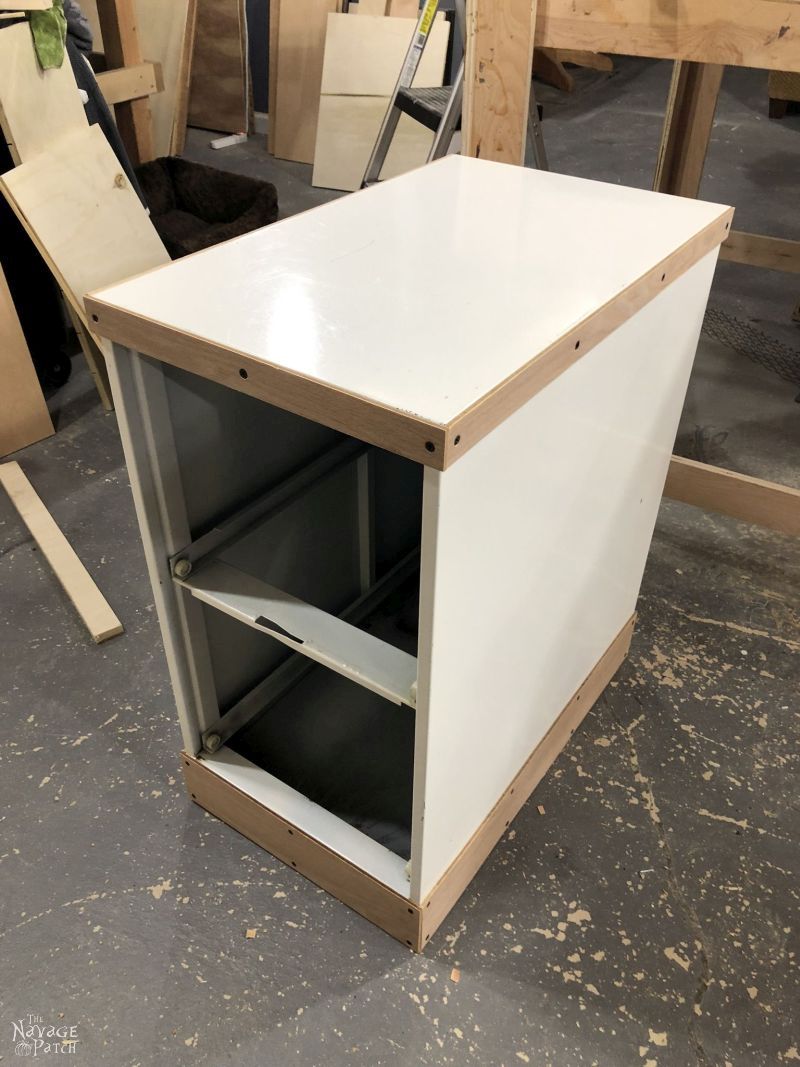
The next step was to cut a piece of 1/2 inch plywood for the top.
I installed that in the same manner as the other pieces using the self-tapping drywall screws. For some reason, I didn’t take any pictures of that step, and obviously Handan wasn’t around or I’d have about 50 pictures of my big stupid head, LOL!
Once assembled, I stained all the wooden parts with Rustoleum Kona. Nope, no pictures of that process either, but I think you guys know how to stain, right?
Of course you do!
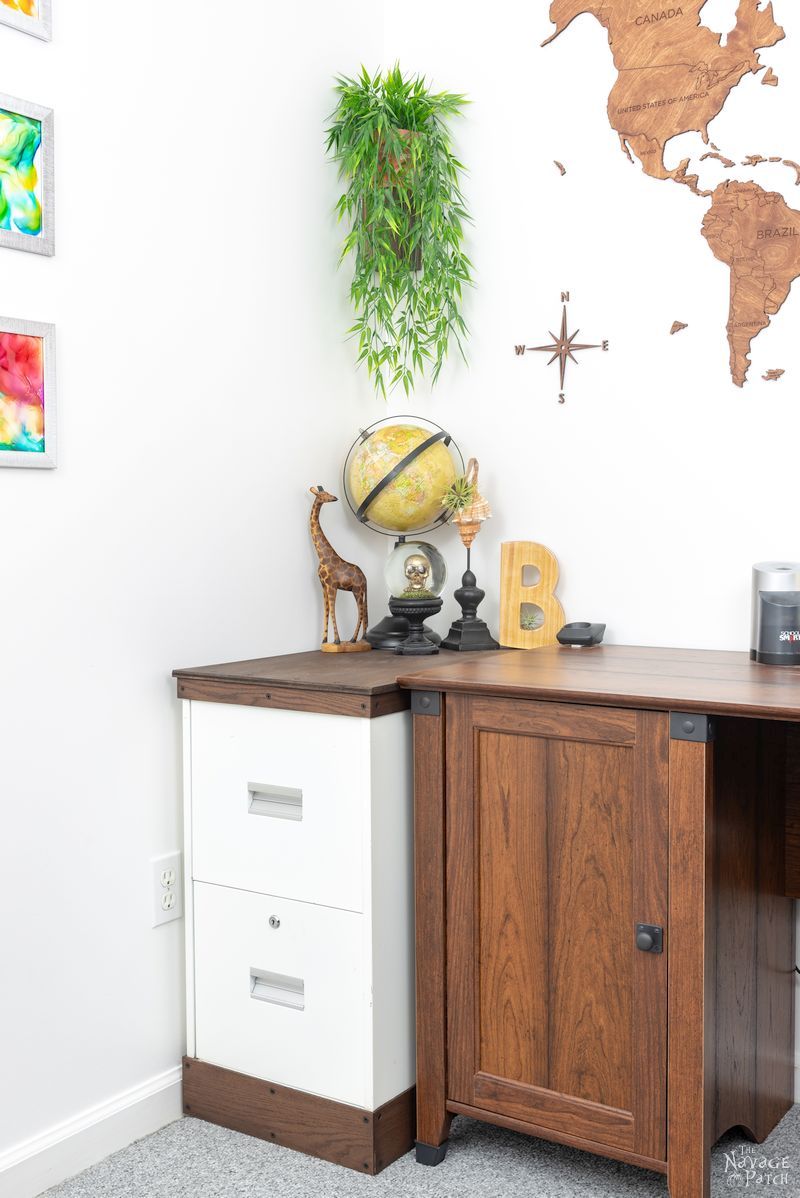
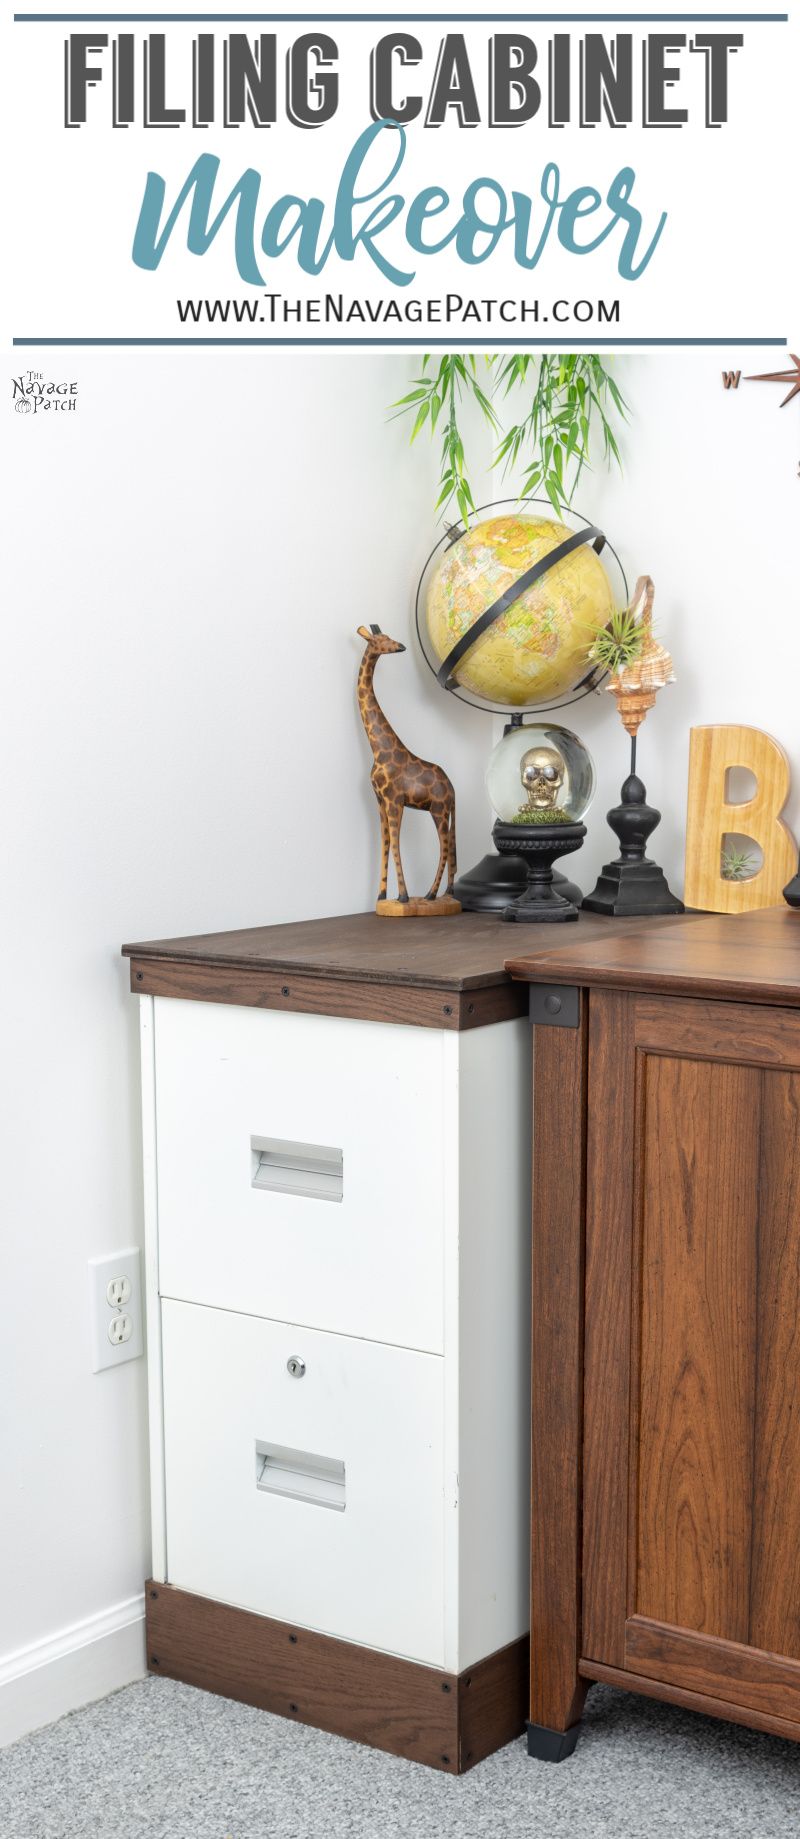
Anyway, it doesn’t matter, because the project is done! We carried it upstairs to Barish’s room the next day and inserted it into its allotted parcel of bedroom real estate.
It was a perfect fit!
And what a great makeover and upcycle! Instead of holding crusty old tax documents, it now has the honor of holding The Boy’s schoolwork and supplies!
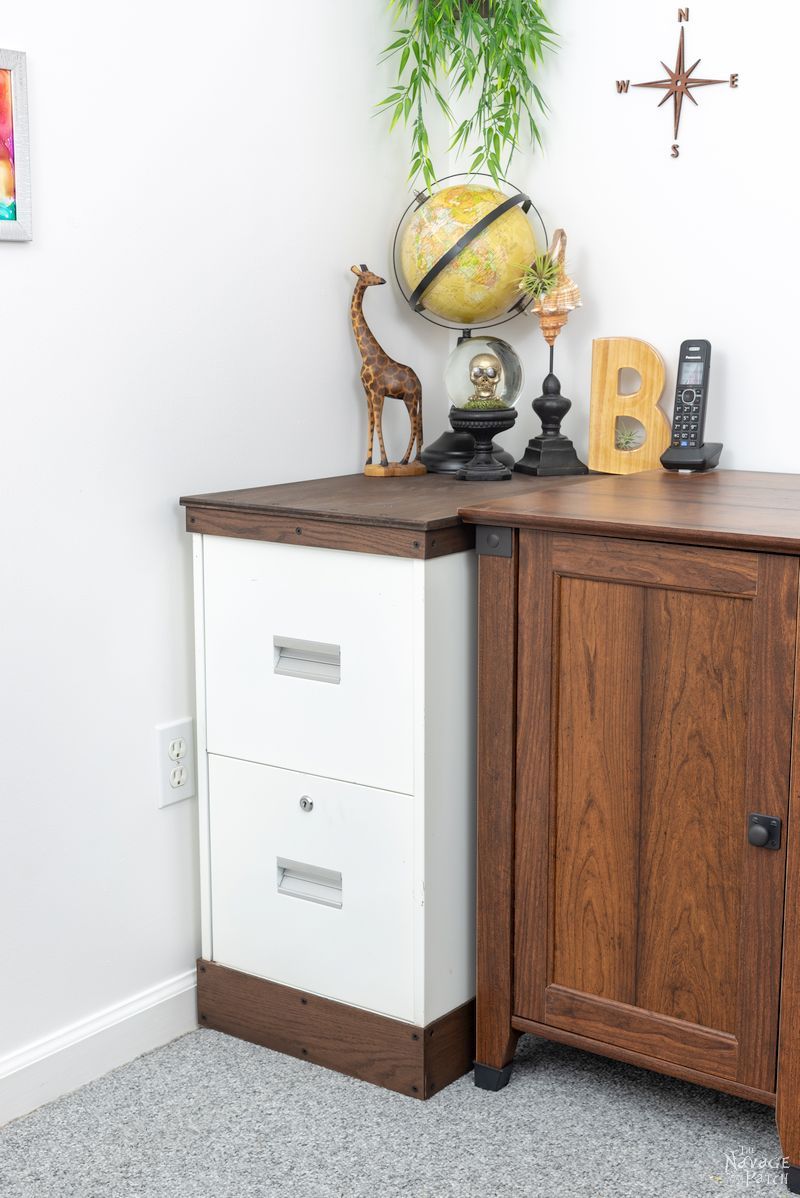
Instead of his notes and papers being scattered across the 8 corners of his bedroom (he has two rooms, you’ll recall), now he can keep them organized in his new drawer!
Huzzah!

Bwahahahaaha! Yeah, I know. I laughed, too.
He’s a teenager. I’ve lowered my expectations accordingly. But over time, I’m sure this new room will help get him more organized.
That and some high-quality nagging from his mom and dad! 😀

If you’re following along with the teen bedroom makeover, here’s how we stand:
Teen Bedroom Makeover Checklist (for The First Room)
Teen bedroom ideas and laying out the game planDIY alcohol ink switch plates- Paint the walls
Build 2 IKEA Billy bookcasesBuild a daybedHack IKEA Kallax into a TV standCreate an accent wallBuy or DIY plugin sconcesMake wooden wall artBuild a vertical chess boardBuild 2 guitar display framesBuy a new deskChange the fanBuy or DIY colorful artHack IKEA Laptop StandBuy throw pillowsAdd greenery: faux plants, air plants, DIY air plant holdersMetal filing cabinet makeover- DIY Craftsman style trim
- World map wall art
- Small closet makeover
- Barish’s first room reveal
Click here to see more teen bedroom makeover posts as we continue to cross items off our checklist!
We love it when you share our posts on Facebook and Pinterest!


Ah another brilliant Handan/Greg makeover and another entertaining blog to distract me while i wait for my painkillers to work, so i can get off my backside and do some housework ;).
Thank you, Catherine! We’ve got our fingers crossed for your pains to go away so you can start enjoying the Great Outdoors! 🙂
Y’all are soooo inventive! And so sassy to boot!? LOVE,LOVE, LOVE your blog!
Well thank you so much, Susan! 🙂
Hey…IT…works!!! We have THAT SAME scenario WITH…”old tax documents”…lord, help us all…franki
Unfortunately my tax papers aren’t old enough to burn, lol!
Very nice. I have a tall metal filing cabinet I plan to one day (after 1,956 other projects) add shaker style trim to and paint white (it’s boring, industrial office, aka institution, gray now (its hubby’s cabinet otherwise I would have kicked it to the curb for its ugliness).
I also really love that world map on the wall. Are they stick on decals or wood plaques?
Thank you, Laurie! Shaker trim would be awesome on one of these cabinets – good idea! That world map is wood, and it’s totally awesome! I’ll be writing about it in a couple of weeks, but here’s the link: https://rstyle.me/+82fQPBzdeJIu5w_fqMCeJg
Thanks so much! The basement rec/TV room where the filing cabinet is will be getting a style refresh in the somewhat near future, and I want to add something different to the largest wall (which I also plan to makeover with a faux white brick wall in place of the drywall.) Plus, this would let us mark places we have visited in the world. I was going to do this with a framed map, but I love this wood plaque design so much better.
Oh man, the joy of not having to do taxes every year almost makes up for having no job. And yet they still come round an haunt me when six years later I get a letter from the government saying there’s some kind of something whatsit and they want all my papers again. The only saving grace to taxes here is…you can do them online!
These filing cabinets are so prevalent in the wild, it’s nice to see one given a really nice (yet simple!) upgrade. I’m really amazed with how many you can achieve with just plywood and I’ve been having all these grand thoughts of finally tackling projects I have had waiting.
As always, you’re both a source of inspiration! And I am super excited for that wall art post!
You can never escape the Tax Man, that’s for sure! Well, there is one way, I suppose, but he still comes around after you’re gone, lol!
NICE!
Thank you, Paula! 🙂
Here in Australia we have a tax on things, called the GST. (Goods and Services Tax) However I call it the GraveSide Tax cos they sting you when you kark it.
What I want to know is; where did the phone go in the last few pics? My OCD brain is most perturbed that it disappeared! I’m the sort or person who, when I am at the movies say, “Hey, that guy’s watch is gone in the long shot, now it’s back in the close up shots! See that?” I have people throwing their Cokes and popcorn on my head telling me to SHUT UP ALREADY!
However, I digress, a terrific make up job on a piggy for sure! As I type my eye wander to my left and I see my two filing cabinets looking more like they lost the wrestling match and are now in traction. I must get around to making them look as marvellous as Barish’s one!
Yeah, death is taxed here, too. Unbelievable, isn’t it? Anyway, nice catch on the phone, lol! I had taken a few pics before I realized that I no longer wanted it in the photos, so I moved it! In the movies, they call it a continuity error. In this case, we can just call it a well-timed phone call! 😀
I, too, love what you did with the filing cabinet. I also loved the shot of one of your pups trying to get in on the action. 🙂 I was gonna ask what her name is but then I went in and found a post that you explain about them. 🙂 I enjoy reading your humorous accounts of Handan getting you to do stuff for her and your blog. Now if I could only get my hubby to see the humor and benefits of my great ideas. 😀 I have a board on Pinterest labeled “Honey do, please….” Thanks for writing such an enjoyable blog.
Lynn
Thank you so much, Lynn! We love doing what we do, even if I need to pushed into some of the projects! 😀
Very nice makeover! I love the wood on it. I madeover my file cabinet a while back with paint and stenciling. I wanted to add wood to the top but it’s top lifts up and slides back down the back and wasn’t sure how to do it. But maybe I’ll give it a try sometime because I really love the look.
Hi Linda! Thank you very much! I’ll bet paint and stencil looks great. If we had more time, I think that would be a great addition to ours!
You and Handan make the best DIY couple EVER Greg. That cabin ahem…… I mean filing cabinet looks beautiful with her little woody touches on her top and bottom.
Awww, thank you, Michelle! 🙂