
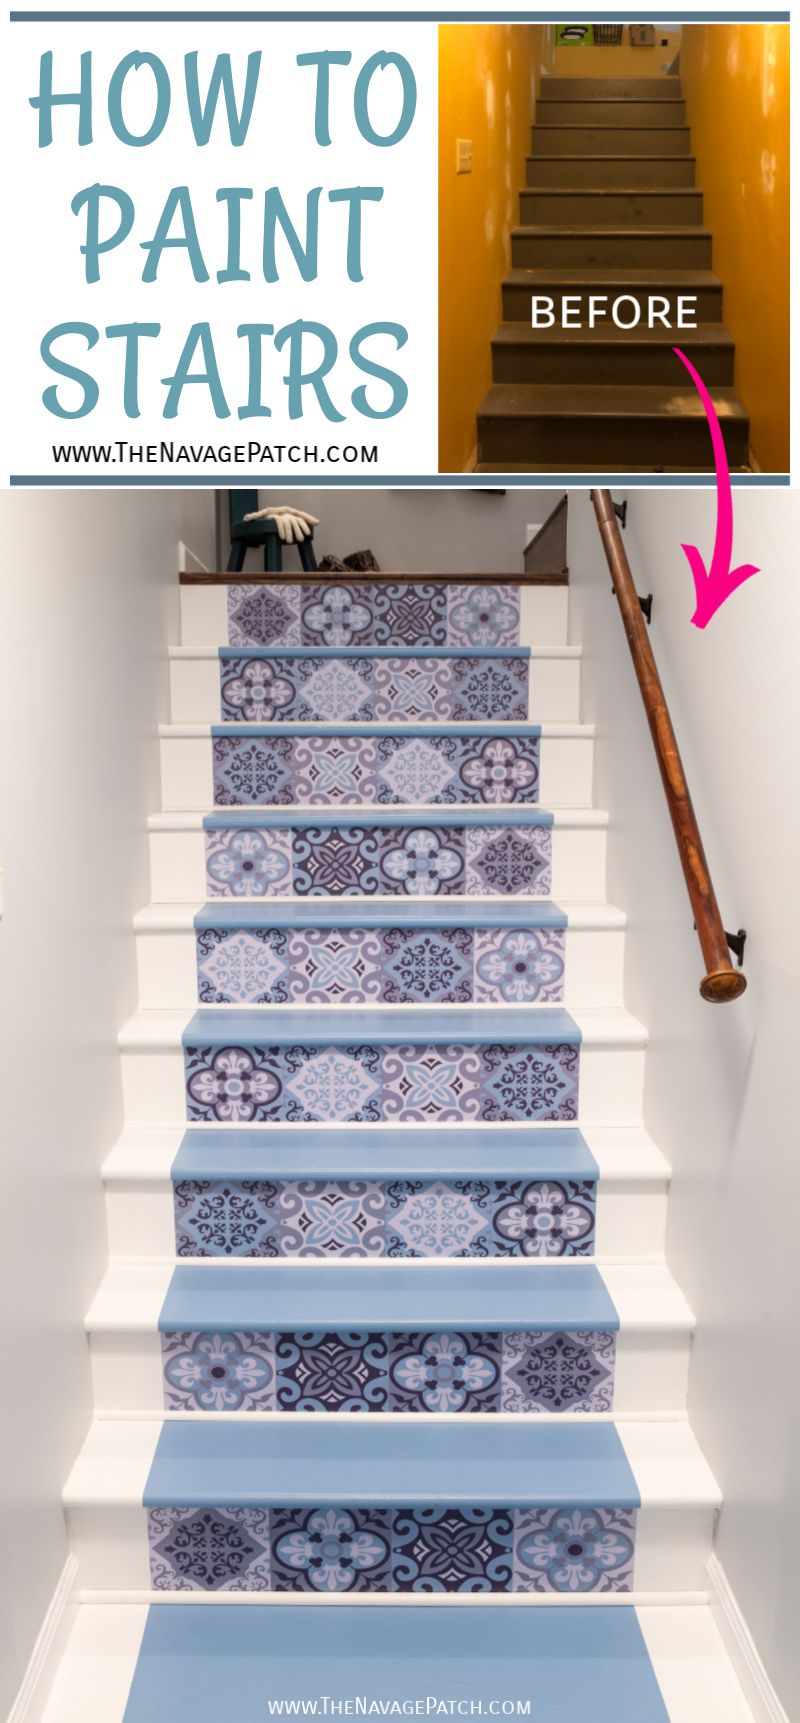
Painted Basement Stairs
We painted our basement stairs for a totally fresh and updated look that turned a dark and ugly eyesore into a light and colorful showpiece.
If it seems like I’m telling the story of this basement staircase makeover in reverse, well, that’s because I am.
Sorta.
There’s no real reason for it. It just seemed right to start with the upcycled DIY handrail.

From there, it seemed like a grand idea to follow with the upcycled coat rack.

In those posts, you all were able to catch a few glimpses of the subject of today’s post: the painted basement stairs.
But before I could paint those stairs, I had to contend with the walls and the ceiling.
Remember, this is how our wretched basement staircase looked before the makeover.

I can’t believe we lived with it for 6 years! Well, that’s on me. As I mentioned in the handrail post, I just couldn’t get motivated for this project!
Okay, so I had already removed the baseboard moulding and ripped up the old linoleum.
That was fun! 25-year-old stick-on linoleum is a hoot to remove!

All I can say is thank god it wasn’t a whole floor.
The next step was to paint the walls with the same platinum gray we used in the laundry room.
Shazam!

After painting the walls, I finally installed some new lighting. This stairwell had been lit by two bare bulbs until this point. I had actually bought a pair of LED flush-mount lights almost 2 years ago, but they’ve been sitting on that ledge behind the ladder ever since.
Go on. Ask Handan. She’ll tell you that no one (and I mean no one) is better at ignoring things-he-doesn’t-want-to-see than I am. [NO one! LOL – Handan]
I could have easily and happily walked by those boxed lights on the ledge for the rest of my days and not lost an ounce of sleep nor given them the briefest moment’s thought.
But not my babes. Oh no! Stuff like that drives her batty.
Somehow when I try to tell her “I am what I am, my babes.” Or “I’m as God made me, my babes.” It just doesn’t have the intended effect, and I end up with a tall glass of Squawking Wife.
Anyway, before installing the lights, I quickly painted the ceiling.
Didn’t want to do it.
Really, who wants to paint a ceiling?
It’s like a physical examination after the age of 40 for a man. There was a time when a routine checkup wasn’t a big deal. Tap tap, cough cough and Bob’s your uncle. In and out quick as you please.
But after 40?
Things get freaky, sister. There’s another in and out to contend with.
There’s the *snap* of a latex glove, and then unspeakable things happen.
So yeah, painting a ceiling is a little like a physical after 40.
This basement staircase ceiling though – I just couldn’t let it slide. With the walls so brilliant after their paint job, every blotch and splotch and crack and peel and all the yellowed paint on the ceiling just shouted at me and mocked me.
I had no choice.
The only good part is that the ceiling was low enough that I didn’t need more than a dinky step ladder for one spot, and the rest I could reach with a regular paint roller.
Oh, but look what I discovered when painting the last bit of ceiling before the basement!
Now, I’ve seen this light a thousand times, but apparently I’ve never really looked at it. And that makes sense, because when going up from the basement, who the hell is going to crane their neck back to look at a stupid light bulb overhead? And when coming down the stairs, the bulb is blocked by the sloped ceiling over the stairs until the very last moment.
When I was working up there, and really looking, here’s what I discovered.

Who does that?
Seriously, who?
What kind of hammer-totin’ yahoo installs that light, looks at his surroundings and goes, “Yep. That thar’s one helluva good installation! Welp! Almost three o’clock! Quittin’ time, boy howdy!”
Just add it to the List of Mysteries inside the Box of Bafflement.
This house makes no sense.
Never has.
Never will.
Anyway, the stairwell looked a thousand times better now the the Golden Ugly was hidden under 4 coats of gray.

Those stairs, though.
Yeesh, I’ve seen horror movies with more inviting stairs than these!
The plan was to paint them and then add riser decals. The base coat would be white, but to get good adhesion, I first primed them with Zinsser BIN – it’s a shellac-based primer, and it is essential for good adhesion in tricky areas.
By the way, if you’ve ever wondered how to paint IKEA furniture – I mean the sealskin-smooth smooth stuff, not the raw wood pieces – then you’ll want to read this post.
Here are the basement stairs primed and ready for the main event. A vast improvement already!

We chose Behr’s Porch & Patio Floor Paint for the stairs. It’s designed for high-traffic, high-wear areas, so it’s perfect for these basement stairs.

Of course, the downside is that it’s Behr, so it took 5 coats to fully hide the gray.
Good lord, the new lighter paint really accentuated the gaps between the stairs and the wall. Nothing a little bit boatload of caulk couldn’t fix.

Suddenly the staircase was open! With the white and gray paint and the new lights, this space was breathing for the first time!
Handan had been planning this basement stair makeover for years, and she had bought the faux tile stair stickers almost 3 years ago.
The original plan was to use them as they were intended – namely to cover the entire riser.
But, the manufacturer didn’t count on one thing.
The Navage Patch.
Just as the boob who installed the basement lights couldn’t get it centered, the gaggle of boobs who built the stairs decided it would be a fine idea to make them just a little wider than normal stairs.
Just wide enough that the stair stickers couldn’t quite cover.
I cursed every Connecticut contractor who may have been building houses in the mid 1990s just to be sure I got the boob (or boobs) responsible for our 6 years of WTF?!? and Oh, You Gotta Be Shitting Me! moments.
After some deliberation, Handan and I decided we’d trim off two faux tiles from each sticker. This would of course leave and even wider area uncovered, but at least now it would look intentional and not like the 7th grader who enters junior high with his pant cuffs above his ankles after a late-summer growth spurt.
Now, Handan’s original plan called for white stairs, but I was getting a little nervous about all that white. I suggested a color – blue perhaps. Better yet, we could color-match one of the blues in the stair stickers.
She agreed, and off to Home Depot I went to get some more floor paint.
But before painting the treads, I needed to measure and tape off the sides of the stairs. To do this, I used one of the cut pieces of stair stickers. I lined the sticker up with the middle of the tread, taped it down and then masked the outside with Frog Tape.

I didn’t bother masking off the risers, as that’s where the stair sticker would go.
Turns out, this was a mistake, as the stair sticker is not entirely opaque.
When we put the first sticker on, the blue paint showed through. I had to mask off all the blue stairs and give 5 coats of white to the risers to fix my error.

Next, Handan and I applied the stickers. Since we were both engaged in that process, neither of us thought to take a picture.
The process was simple. Peel, stick and get rid of any air bubbles with a brayer.
Once the stairs were painted and the faux tiles were adhered, I laid some 1/2 inch quarter round across each stair.
We also installed the new vinyl flooring. This was a total breeze, as the width of the landings were smaller than the length of the vinyl planks, so I only needed to cut one size for all planks.
Once I installed the stair nosing, I quickly primed and painted the baseboard and reinstalled it.
The last step was caulk, and lots of it! I used Extreme Stretch caulk – some of those gaps were big enough to be a danger to pets and small children, so I figured the stretchy stuff would hold up better.
And that was it! The basement stairs were painted, so the only thing left was to screw in our new upcycled handrail, which you read about last week.
We then installed the new upcycled coat rack and hung some jackets.
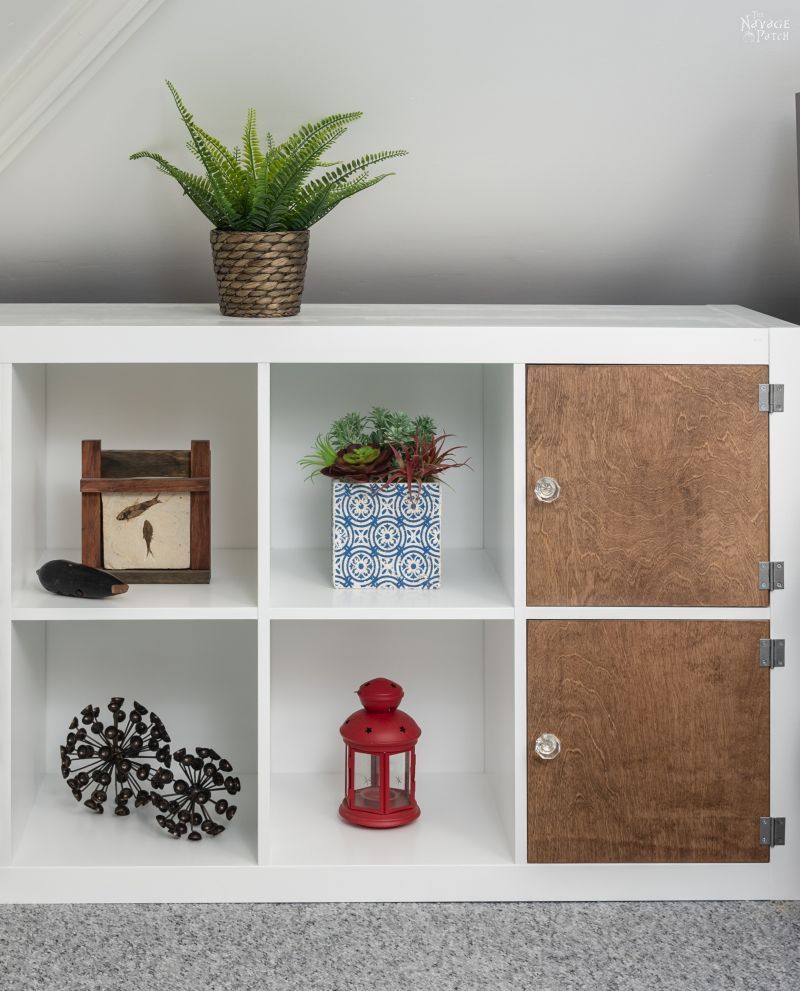
Now the only bit left on this basement stair makeover is to create a few more storage solutions on the coat rack wall, and we’ll be tackling that real soon.
Until then, enjoy some pictures of our (nearly) completed basement stair makeover!

Six years in the making, but well worth the wait (or so I keep telling Handan).


We love it when you share our posts on Facebook and Pinterest!


I hope you have better luck with the Behr floor and porch paint then we did. We didn’t put down a poly sealer and about 3 months was all it took to start seeing the wood peeking through. Because it said for heavy traffic I didn’t think I would need a top coat but think it started with the dogs tromping up and down and then I guess my husband and I added to it. Good luck
Thanks, Stayce, we’ll see how it goes with the Behr! How many coats did you put on, and did you apply thick or thin coats. Thanks!
I hired a painter to do it. He used 3 coats of charcoal gray
Hi Greg! I’m waiting very hopefully to be added to you r mailing list and to receive my password for the printables. Great job!
Hi Rebecca, according to our mailing list records, you subscribed on Feb 18 and our “Welcome” email was sent to you on the same day. But you didn’t open it, so I’m guessing it may have ended up in your junk mail. Regardless, I will send you the Welcome email from my personal email account (so expect something from Handan Navage), and in the meanwhile it will be great if you can add greg@thenavagepatch.com to your contacts list. Because about twice or three times a year we change the password for the VIP Patch and adding Greg to your contacts list will help you receiving those information emails. 🙂
Have you found the stairs slippery now that they are painted? I worry about slipping and falling with the kids going down with just socks on.
Hi Cheryl, they’re not slippery, but then again, I always wear shoes. The old stairs were painted as well, so it’s just as it was before. If kids with socks would be an issue, I recommend Rustoleum Antislip Spray. You can find it here: https://amzn.to/2tWd1Dq
I was going to ask if you put a protective coat of anything on top of your beautiful hard work!
Looks amazing. So bright and cheerful. Hard not to smile when you are walking up those steps.
Thank you, Jan! The paint we used supposedly doesn’t need a topcoat. Time will tell! 🙂
Looks wonderful Great job Greg!!! Will you please tell me how you finished off the area where the steps meet the wall? Did you just caulk it? Thank you
Thank you, Frani!I simply caulked that area with DAP Extreme Stretch caulk. There were a few places with very wide gaps, and I first put some wooden shims in the gaps, so I wouldn’t have to use as much caulk.
What a difference! Nice.
My house is full of “are you shitting me?” things too and its circa 1954 with a 1989 addition. (like who puts ugly wallpaper straight over unprimed drywall so the next owners (us) can’t remove it without taking off layers of drywall). Not one project is straightforward an easy in our house. Nope.
Gotta love that yellow. LOL The colors popular in the late 80s and 90s were different. My basement was painted salmon (that pinkish orange) with a poop brown rug and faux sponge paint (let’s just call them white splotches over the salmon paint) going up the stairwell when we bought it. We changed it to pale gray with white trim and a dark gray rug (which I want to change to wood plank vinyl flooring this summer with even light gray or white walls).
Oh god, I can picture those salmon and poop colors! What a nightmare it must be for you guys never having a straightforward project. But I bet you guys get a tom of satisfaction when you finally finish a project!
What an amazing difference! I would love to see those stairs in my house. Thank you for another great tutorial on “how to spend all my retirement free time”. Lol
You are very welcome, Linda! 🙂
I have to admit, I saw “painted basement stairs” and thought, “meh”. But, then I came back. (Because when does Greg do anything ‘Half-way’?) WOW!! AMAZING!! Those stairs are beautiful! Wonderful job, as usual! But, seriously, dude, NEVER complain to an audience of women about physical exams! LOL! We have been going through that assault and more since most of us were in our late teens or early 20’s!!! Splayed open, with ALL lights pointed to that one spot! (And why, oh why, does the foot of the table ALWAYS seem to FACE THE DOOR????) LOL! I love your work, but I love the commentary more! Thanks for always entertaining us! Happy New Year to you and Handan!
True, Terra, but I guess you could argue you guys have been conditioned since an early age. We men live most of our lives, and just when we think things are going okay, SNAP and BAM! LOLOL! Happy New Year to you! 🙂
Well. Had I seen that beautiful staircase in the last house I would have been a busy woman. But new house built in 1855 has no basement but it does have an upstairs. Seems to me this will be just as pretty there. So I am adding this to my box for when I can do it. Need two new hips first. I don’t go up the stairs.
Oh, Jody, these basement stairs are now 1000 times nicer than our upstairs stairs, lol! Here’s to two new hips and limber limbs!
I have not worked with porch and floor paint of any type but I always choose Behr paint over any other brand so I was surprised when you said it took 5 coats “because it’s Behr”. I’ve never done more than 2 coats when using Behr but with other brands I have had to put on 2 coats of primer and 3 coats of paint
With the new formulation of paint and primer in one I was even able to paint the basement with one coat of light grey (very light like your walls) over a dark ugly beige
Hi Mona, I don’t know what’s going on at Behr, but we think their quality has gone down since we’ve owned this home. We’ve always used their top-of-the-line paints, but these days, even Marquee needs several coats to cover. I don’t know – maybe we’re doing it wrong, lol! 🙂
Wow, that cellar stairwell is absolutely gorgeous now! I, too, have a house that has been a horror show at times! My favorite is the two walls switches less than 1 stud apart. On was up on 1 switch, down on the other. Fortunately, my electrician could fix it when we had work done–double switch plate, 2 up, 2 down! This house was built to be moved–and eventually was moved to across the street. We’d been away at a $125/night (in ’89 that was a lot!) hotel with mints on our pillows and USA Today at the door and came home to find the house across the street, no electricity for 3 weeks and a stepladder to get in the front “door” which was a $98 slider from Grossman’s (Lift and yank especially hard with an armload of groceries!).
Thank you, Kathy! Wait a minute – what do you mean you found your house across the street?? Please explain how that happened! Wow!
Well here comes Downer Debbie! You did a herculean job there on the entire stairwell area project Greg! Lots of good work! But…….I don’t GET the decals! Whyyyyyyyy? Looked so much sharper with just the blue stripe! ;-/
LOL, it’s okay, Constance – we can handle criticism! The good thing about those decals is that they peel right off with no mess left behind, so if we ever change our minds – bingo! 🙂
Well, the basement stairs in the 1931 farm house need to be sanded and repainted…but I’ll be using sand in my paint on the treads because I rarely wear shoes in the house…sock are de rigueur!! My steps are definitely slippery and a bit worn in the center! Does that mean I need to paint the darn wall/half wall as well??
Hi Susan, why are you going to sand them? Why not use shellac-based primer and then paint? As for your wall – well, you’ll just have to see what happens when you paint the stairs. It may work with your old wall or it may make it look…well….old! 🙂
Our unit is one of many cheaply built government places and they’re all a little…wonky. Everything was built on the cheap with bits and pieces bought at auctions en masse. *sigh* It’s a thing, that’s for sure. But still, we must be thankful for somewhere to be at all and make the best of what we’re given. The best I can do is try make it look okay with a bit of spit and polish and some crafting know-how! So all your “WTF” posts are just so relatable!
Oh jeez, once the government gets involved…yeesh. I hear ya, brother! Don’t think of it as government-built, think of it as a DIYers Dream! 🙂
Gorgeous guys. Love, love, love those decals I just wish we could do something similar at our little roundhouse down by the sea. Every single step is a different size and shape. Aaaai the joys of trying to decorate a roundhouse that was built in the 1950s 😉
Hmmmmm…everything a different size and shape? I think your builders immigrated to America after building your roundhouse so they could teach their sons how to build our house!
LOVE, LOVE,LOVE the decals!! Were did she find them? We live in a home on a lake that had carpeted stairs (yes, I know, WHO puts carpet on stars in a lake house?) Anyhow, my husband painted them an icky black. I’d like to do something different like what you did. Decals are a great idea, if I could find them! No stenciling for me! Thank you!
Thank you, Susan! Handan bought them on Amazon – they are linked in the post. They are much easier than stencils, and you can easily remove them if you’d like a different look.
Do you have the paint code for that lovely blue by any chance. I have basement stairs in need of a makeover. These look great.
Unfortunately, I don’t Carla! That leftover paint was left in CT. I’m so sorry!