DIY Pantry Shelves
DIY Pantry Shelves are an inexpensive solution to maximize the storage space in your pantry, and they look so much better than wire shelving!

This year’s Memorial Day weekend was a little different here at The Navage Patch. No, no, I’m not talking about some “New Normal” Coronacue (Bar-B-Covid?) where forlorn guests stand 6 feet apart in someone’s backyard while trying to figure out exactly how they’re going to cram a foot-long hot dog through their smelly old surgical mask.
Though we would have loved nothing more than to sit outside and soak up some of our warm Georgia sunshine, we’re in crunch time. We’re trying to get as many projects done in the new house as we can before Handan has to go back to the office and the rest of the family (The Boy and The Dogs) arrives in mid-June.
At any given moment, we’ve got at least 3 projects going at once.
Do you remember those old Dunkin’ Donuts commercials with Fred the Baker? Day in and day out, it was always “time to make the donuts” for poor Fred.
That’s what it’s starting to feel like around here, but instead of donuts it’s “time to paint the walls,” or “time to paint the ceilings,” or “time to paint the trim.”
But this past weekend…this past Memorial Day weekend…as countless socially-distanced citizens ate cheeseburgers and potato chips alone in their kitchens to celebrate the hard-won freedoms provided them by our veterans, Handan sprung a new project on me.
I shuffled downstairs on Saturday morning in my usual Fred the Baker way.
(Time to paint the windows.)
The fog of sleep hung thick in the cobwebs of my brain.
(Time to paint the ceilings.)
As I prepared coffee for my babes and for myself, my muscles geared up for another behind the brush and roller.
Walls.
Ceilings.
Windows.
Trim.
Somehow my sleep-encrusted brain stem made a connection to The Wizard of Oz, and the refrain ceilings and windows and trim, oh my! ceilings and windows and trim, oh my! got stuck on repeat in my head.
But when Handan came downstairs, she issued a proclamation. “Good morning, my babes!” She said. “You won’t be painting today.”
No painting? A reprieve from the ball and chain, er brush and roller? I felt like an inmate furloughed for good behavior. To what did I owe this good fortune?

I imagined pork-filled barbecues and coolers full of beer. There might even be sand, surf and sunshine! Hell, I’d take a bouncy castle and an ice cream cake!
Oooooh, the possibilities were limitless, and my mind flitted among them like a monarch in a field of marigolds!
But my pulled-pork pipe dream was not to be. Instead of “Grab your sunglasses my babes, we’re going to the beach!” I got, “Grab your wallet my babes, we’re going to Home Depot!”
“Hibbaduh what?” Was all could manage as the brisket of my dreams evaporated into the aether.
“We’re going to give our pantry a makeover, so we’ll be needing some boards. Also, you’ll have to paint it. All of it. Walls. Ceiling. Trim.”
(Ceilings and walls and trim, oh my!)
Then it hit me.
“Hey, wait a minute!” I said. “There’s no ‘pantry makeover’ on my project list!”
“There is now, my babes! Lo lo lololo!” She said and started dancing around the kitchen.
I sighed the sigh I’d sighed a thousand sighs before.
“Welp, at least there’s no window, right, my babes?” I have a deep-seated loathing of painting windows that stems back to a brief stint as a house painter in college. You can read all about that misadventure here.
Anyway, back to the pantry.
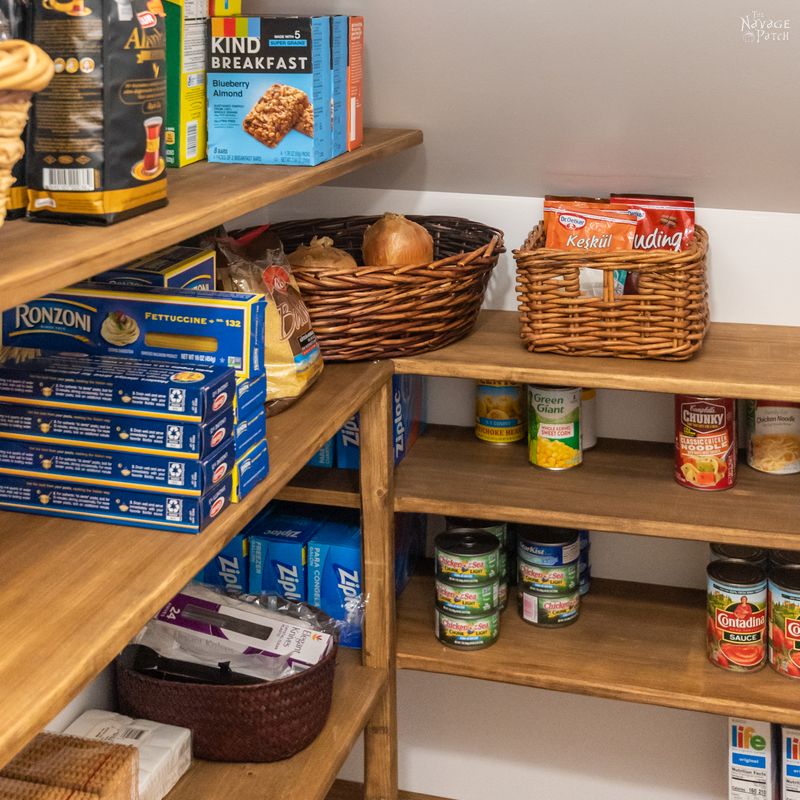
As pantries go, it’s rather spacious – at least compared to the pantry I grew up with and the pantry we had at our old house. Here’s how it looked last week. The floor had been refinished, but the rest was original.

It’s a decent-sized pantry, but the space wasn’t being utilized to it’s full potential. There was unrealized storage space here, and that kind of thing makes my babes’ eyes light up!

So her plan was (for me) to tear out those old wire shelves, paint everything and install new custom-built wooden DIY pantry shelves.
Sounded easy enough, I suppose. I agreed to her plan (like I had a choice), and we drove to Home Depot for the lumber we’d need: 1 x 12, 1 x 2 and 2 x 2.
When we returned, I commenced wire shelf removal.
Man, I hate these wire shelves. There’s no way to remove then without major wall damage.

See what I mean?

I filled the holes with spackle and waited for it to dry.

When the spackle had dried, I sanded the patches with a palm sander.
To save time, increase durability and make cleanups easier, I decided to paint everything with trim paint (Sherwin Williams Ultra White). For this house, we wanted to tone down our trim sheen from semi-gloss to satin – we think it gives a more subtle look. Since I have several gallons on hand (remember, I’m slowly making my way room-to-room painting floor-to-ceiling), I thought it would be a good idea to paint the ceiling, walls and trim of the pantry with it.
Here it is after the first coat.

After I slapped on a second coat, I called it a day, and Handan and I went out for an evening walk. What pleasant change of scenery!

The fun stuff began on Sunday – I finally got to use power tools again! My machines had been packed in a POD container since January, so it was great to put them back in action.
Granted, I’m still running a skeleton crew in the basement. I don’t have all my machines yet, I don’t have dust collection set up, and some machines (like my table saw pictured below) don’t have certain parts yet (those parts will be coming in later PODs).
Regardless, I enjoyed cutting the lumber on my incomplete table saw! No rails, no fence, no problem! A couple of speed squares worked pretty good in a pinch!


It was a little trickier cutting the wider boards with this method on my table saw. Fortunately, I had my battery-powered Ryobi One+ circular saw, so with Handan’s help measuring and marking, I was able to make those cuts as well.

Once the boards were cut, they needed to be sanded before staining.
There was just one problem.
While complying with Social Distancing Imperatives, Orders & Directives, there was just no way I could stand 6 feet away from my little Makita and still sand that board.
I pointed out my conundrum to Handan, and suggested that maybe we should take further precautions by going upstairs and drinking a martini to disinfect our insides.
She just gave me the look.
You know the one.

The mask protects my lungs from drifting sawdust.
The ear muffs protect my ears from a yapping wife. [LOLOLOL – you jerk! You’re so lucky that I love you! – Handan]

Once the boards were all cut and sanded, it was time for stain. In an attempt to save a day, I wanted to try polystain – it’s a blend of stain and polyurethane. Hey, if I could kill two birds with one stone, I’m all for it.
It’s like stain – only thicker.
The directions say to brush it on.
Well, brushing it on was taking forever, so nuts to that!

Handan had recently found and ordered for me some polyurethane applicator sponges. She reckoned if they worked for polyurethane, they should also work for polystain.
First I slopped some polystain on the board…

Then I wiped with the sponge…

The color is beautiful – it’s called Honey.

Once I finished staining the boards, we headed upstairs so the polystain could dry.
Monday – Memorial Day – was build day.
Handan’s design was simple. The shelves were made from 1 x 12 common grade pine, the wall supports were 1 x 2 pine, and the floor supports were made from 2 x 2 furring strips. We’d also add some small metal corner braces to keep things tight.
We started by installing the first wall support.

I screwed wall supports onto the back wall and a small one to the right wall and then laid the first DIY pantry shelf in its place.
At this point I’d love to tell you that it was all golden sunsets, pink unicorns and smoooooth sailing from this point on.
But, madam, please.
This is a Navage Patch project, and you what that means.
Yep.
Problems.
In this case it was a severely warped wall. Just look at the long wall support on the left in the picture below.

Of course, I’d already cut the lumber with the assumption that all was square and good in the world.
But when the hell has that ever been the case?
Those who don’t learn from their mistakes are doomed to repeat them. And I wonder why these problems seem so familiar…
Well, if there’s one thing a problem is good for, it’s getting the old noodle revved up.
Undeterred by this oh-so-familiar setback, I suggested to Handan that we try to replicate the wall’s curve on a piece of scrap wood and then cut it out with the band saw. Once we get the scrap piece fitting snugly against the curved wall, we could use it as a template on the shelf board.

And what do you know? It worked!
We put the shelf aside while we continued hanging support pieces.

Oh no! Did Handan hang the support wrong?

Nope, they just hung our house wrong.

Okay, look, what gives here with these home builders? Is it actually impossible to build a square and level structure, or do these guys just not give a fig about the work they do?
The Taj Mahal was built 400 years ago by men with no education whatsoever (the builders, not the architect), yet the monument stands to this day, just as perfect as the day it was completed.
The Great Pyramids of Giza were built 4500 years ago, and the workmanship is so precise that the average error over each of the four 756-foot-long sides of the base is only 58 millimetres!
Yet today, in the age of astronauts and Apple computers, we’re not able to build a frickin’ room that’s square, let alone an entire house!
The whole of humanity that has (until this point) passed on to the Great Beyond must be rolling in their graves and mausoleums and burial chambers.
It’s no wonder the world is such a screwed up place right now! How can anyone hope to retain any semblance of sanity when literally every building is a lazy, crooked mess?
I’ve got my eye on you, contractors and builders of the world. o_0
A n y w a y y yyyyyy….
On the far wall, we added an extra shelf. This gives us more storage apace for smaller canned goods.

Once all the support pieces were in place, we added the shelves. The small shelves on the far wall needed no additional support or bracing, but the longer pantry shelves did.
We attached the two floor support legs using small corner braces. Some of the brace screws were nearly impossible to reach by conventional means, but I was able to do so with an awesome new tool my babes just got for me.

We also added two small braces on the back underside of each long shelf to help keep things stable.

You can see in the picture below that I also installed slightly larger corner braces at the far ends of the two boards that aren’t supported by the floor support. We had to make that adjustment due to the sloped ceiling.

And that’s that! Not a bad way to spend Memorial Day Weekend, wouldn’t you agree? Beats trying to make small talk from 6 feet away while sipping Chablis through the handkerchief strapped across your face.
Our total cost for this project was just about $150, including screws, braces and polystain. A full $100 of that price was the 1 x 12 lumber.
Still, for shelves that look this good, you’d have to pay a whole lot more if you didn’t Do it Yourself!
Oh, and before I forget. All that glorious bright white light? That’s thanks to two battery-powered motion-sensor LED pucks we mounted. One is over the door on the inside, and the other is up on the wall to the right. They are really bright, and they light up the space beautifully whenever we open the door. Amazon sells them in single, double and quad packs. We’ll be getting more for other small spaces around the house!

What do you think of our DIY Pantry Shelves?


For those following along, here’s how we stand with the short-term project list (and yes, I’ve added these DIY Pantry Shelves to the list!
The Navage Patch Short Term Goals 2020 Checklist
Install radon mitigation system(I’ll write about it soon)Bring power and light to the basementInstall hardwood floors on the first floor Phase 1Pantry makeover – DIY pantry shelves- Install hardwood floors on the first floor Phase 2
- Stain the staircase posts and handrails
- Kitchen remodel (planning stage)
- Install kitchen backsplash
- Build workbenches
- Build dog feeding station
- Build floating shelves
- Paint interior walls, trim and bedroom ceilings (in progress)
- Change living room fan
- Change foyer chandelier
- Baris’s room setup & related projects
- Office setup & related projects
Change front door lantern and install a second one(I’ll show you soon)- Paint front door
- Remove big shrubs near front door
- Replace the ghost window
We love it when you share our posts on Facebook and Pinterest!


Oh to have a pantry! My kitchen has two floor to ceiling pantry cabinets on each end of the cabintry but it’s not close to being enough space.
And oh to have plumb walls. Has never happened in my world either. Nor has simple DIY projects in my house. Nope, always some hidden problem found and a challenge to solve. Comes with the territory I guess especially in older homes.
I’m glad to have found a sympathetic ear, lol! It’s so aggravating to find out only AFTER you’ve built something that the space you’ve built it for is not square. One day I’ll learn. Maybe.
it looks great. Just wonder why you decided on painting it white? Is it because it’s so small? Anyway, love your humor and thanks so much for sharing!
Thanks, Terri! That is certainly one of the reasons! The other is that having white (especially the slightly shiny satin) helps reflect light around and really light up the space when those two motion-sensing LED pucks light up!
Ah, what a timely post! Would you mind telling me the dimensions of your pantry Greg? What is the distance left between the front edge of the long shelves and the opposite wall? My pantry seems similar, I haven’t considered angled shelves so far but maybe there would be just enough space. Thank you for the funny post and detailed tutorial!
Hi Valentina, the pantry is 6 feet long by 38.5 inches wide. The distance from the shelf to the opposite wall is 27 inches – more than enough room to maneuver in. Best of luck with your project! 🙂
Thank you very much Greg! Best of luck to you and Handan with the new house!
Is that cinnamon Life?!! lol. Great pantry re-do!!
Nope, just regular Life, lol! 🙂
I sympathise with your ‘wonky’ house, Greg. Our house was built in 1925 and refurbished in the 1980s and is ‘wonky’ – door frames are at an angle (we thought we had subsidence but we have had it checked and apparently not) therefore doors don’t fit. No two door frames are the same size so you can’t get a ‘standard’ door and they all have to be hand-built and the living room ceiling is so far out that when we had wallpaper it was out by two patterns LOL. Now the walls are just plain. I was told that it is a house with character. It certainly creates a talking point. LOL
Oh wow, that would dive me bonkers, Jayne! I can’t decide whether it’s a DIYers dream home or nightmare house, lol!
Awesome make over. You guys do such amazing work.
Love the pantry! I’m jealous. 🙂
Thank you so much, Dorothy! 🙂
Wow! Isn’t it great to know you will never have to do that particular job again! Well done! In Maine, the phrase “Half a bubble out of plumb” is used frequently; it is roughly equivalent to “a couple sandwiches short of a picnic.” Do you know the difference between a rough carpenter and a finish carpenter? A finish carpenter knows how to hide his mistakes! My brother, a finish carpenter, built a casing to surround a crooked wall in my kitchen that hides the refrigerator 30 years ago. The casing is STRAIGHT! Although your carpenters were probably at fault, the walls in my NH house warped at the “kiln-dried” lumber dried, popping electrical boxes 1/4=1/2″ out into the room! WHY do we think we can win against a house????
Hmmmm…I guess that would make me a finish DIYer, lol! Tough to assign blame here. You should see the lumber that’s framing the basement. Some of the boards are warped at least half a foot from center. I can’t imagine they were installed that way 20 years ago (but I guess you never know, right?)
Whee! I have to take a nap after reading all that you have done in a weekend. I am somewhat upset that I am too old to accomplish some of these tasks that you young whipper snappers are able to accomplish. Sure enjoy your blogs, pictures, instructions and words of “wisdom”.
Sure wish I could take a nap sometimes, Janis, lol! I’m glad you’re enjoying our blog! 🙂
This pantry redo is lovely! I hate wire shelves too. Of any kind! Such a pleasure to walk in a nicely organized and built pantry. .good idea handan! To get the frustrating smaller projects out of the way are sometimes the most rewarding. My hubs ,at 72ish with extreme sciatica pain is finding it more and more difficult to do the projects. Sad. So we are happy to see you hard at work! ???
Thank you, Bernice! Handan always wanted wood pantry shelves at our old house, but in the end we stuck with the wire shelves, as they were just easier to deal with at the time, and it was such a tight space. She was so happy when she discovered the walk-in pantry when we first toured this house!
Oh I just love this! I am hoping to tackle our pantry in the next few weeks. Can you share the measurements of the vertical space between the shelves?
Thank you, Wendy! The upper shelves are 10 inches apart, and the lower ones are 14. That’s enough space to fit the tallest bottles we have. Good luck with yours!
Thank you for the wonderful birthday present. Reading your pantry adventure really brightened up my day. With the Shelter-in-Place I thought my birthday would be long and boring but you managed to start my day off with a smile – and a chuckle. My better-half also has a long list of projects – which he can never do because he does not have the “right tool”. At least I always know what to get him for his Birthday, X’mas and every other occasion or holiday. I am afraid to share your site with him or he will present me with another list of “Essentials” he needs to get things done after he sees your collection of toys. I am not complaining because what he lacks in the handy-man area, he makes up for it by spoiling me in every other way. Today is not only my 76th Birthday but also our 24th Anniversary. He is the best Birthday present I ever received.
Your pantry looks beautiful. Handan is a lucky girl.
Thank you, Sue and happy belated birthday and anniversary to you! Go on – show him the site – every man needs a new tool now and again!
I feel your pain Greg. My husband was a homebuilder for 30+years & a perfectionist to boot. Hard to find subs that will do a good job.
Today we just replaced a 7yr old garage door opener & realized the “professionals” just threw it up there any old way!
So frustrating, Dorothee! Good for your husband, though – he’s a rare find!
Nice job. I’m with you…….wire shelves suck! I love reading your posts. You are too funny. I was checking out some of the labels in your pantry……yes, I know I’m weird, Next time I get down your way I’ll stop by for a BB&J sandwich since you use Jif. LOL
Jif is the Best! For a while, we couldn’t find the smooth kind, so I had to get chunky. Handan wasn’t a big fan. Over the weekend she found her preferred creamy style, and she loaded up on it, lol!
I love Handan’s pantry idea, Greg. You did a fabulous job, from start to finish, and you did it all in your Flip-Flops!!! LOL
I love working in flip flops (as long as I’m not working with anything heacy)
Awww you didn’t get your day out treat youi thought Handan had planned, never mind think of all the goodies your beautifully refurbished pantry can hold, another grand job. I know what you mean about uneven walls etc, i don’t think the builders who constructed our housing estate back in the mid 60’s had been introduced to a spirit level or plumb line , geez talk about wonky walls and ceilings! I’m so jealous of that walk in pantry, such a usseful space.
It’s okay, Catherine. Everyday is a like a spa day when I’m working with Handan. 😀 😀 😀
It’s so great to have you both back. I have missed you both. I love the house. I know that you also have a lot of work to get, so let’s hop to it. Wish I could come down and help you. I know I could learn so much from you two. But alas, my dreams won’t come true.
If I had a pantry, I would be happier than a pig in mud.
well, let’s get to it kind sir, it won’t get done without you. lol Can’t wait to see more!!
Thank you so much, Ellen, it’s so great to be back! I’ve been hopping to it each and every day, and when I’m finished writing here, I’ll hop to it again, lol! 🙂
If I may be so bold to call you both “my dudes,” in a show of my aging sensibilities, MY DUDES! This is AWESOME! Your pantry is an almost exact match to my pantry. It also came with darn wire racks and a sad lack of lighting. In the 20 (yes, 20) years we have lived in our darn house, I have struggled to find a good way to organize our walk in pantry. Alas, I don’t have the brains or brawn of my new DIY idols.
In the darn town where I live, there is only one new home builder. And when we bought our 6 month old house, we found many many many flaws. My husband’s uncle bought a house across the street from us and said that the builders never found a 90 degree angle that they could avoid. So naturally, there have been a multitude of projects for our house that have never received attention. Covid goals have changed all that.
Congrats on the new home. May it be all that you dream after your projects are finished. Thanks to you both for teaching me how to make my pantry much more functional!
LOL, it’s okay, Handan calls me dude too from time to time! What a shame about the state of today’s homebuilders. It’s all about profit and speed. Well, it keeps us busy, doesn’t it? 🙂
Now that song is stuck in my head. ?. Just did our pantry also. Stage 1 of the kitchen remodel. We put in a counter for coffee and tea pots and the microwave so it would function as a mini kitchen when we tear out the rest. Looking forward to seeing the rest. of your DIY’s.
That’s a good idea, Cheryl – we may need to do that when we remodel ours! 🙂
You had me cracking up again! My daughter and her hubby recently remodeled their kitchen, and added a new walk-in pantry, but had someone come in and put in shelving. I’m sure it wasn’t cheap, but I don’t think the guy had any problems with “not-square” walls, but then again, now that I think about it, I’m pretty sure they were free-standing shelves (i.e., I’m pretty sure they had backs and weren’t attached directly to the walls) At any rate, yours look great! Handan is an engineer, right?
Oh yes, she’s an engineer. I’m just a slab of beef with a hammer, lol!
I love this! My pantry is also under the stairs and man it’s time for a revamp. I came across this and it hits a cord with me. This would be perfect! Now time to save up for power tools or find a friend that would be so kind to let me use them and off I go! Oh, I have a wee question…my floor in the pantry is carpet…dont ask me why the builders did that but they did would this be smart to do over carpet?!
Hi Kas, I’m so sorry for the late reply! If I were you, I’d rip out the carpet and lay down some cheap linoleum tiles or something similar. Is that an option?