JOY Wreath (Inspired By Ballard Designs)
This gorgeous JOY wreath was inspired by a Ballard Designs. Learn how to make this DIY lighted Christmas wreath for your home!

Crafting is my joy, but I only started after we moved to the States in 2013 (back to the States for my hubby, but first time for me). But to be honest, my first year crafting wasn’t very pleasant. Having moved to a new country with a different decorating culture coupled with my lack of knowledge in crafting, I was an utterly lost cause, LOL! I will never forget an article I read in one of the magazines. “What is a seasonal decoration without a wreath?” the article started and continued with pictures of beautifully arranged donut-shaped decorations hung on doors or above mantels.
Not only is English my second language, but I’d never seen anything like a wreath before in my life!
What the heck was a wreath?
How could I prepare one?
Was I even pronouncing it right? Was it pronounced like ‘breath’ but with a ‘w’? It was such a tongue-twister for me, and Greg used to make fun of me every time I mispronounced it, LOL!
With these questions in mind, I remember feeling totally panicked and searching for the definition and images of “wreath” on Google. Then after a week of hard work, I came up with this thing for Halloween 2013. It was supposed to be round, but it turned out looking like an egg!

I had no idea what I was doing, so I used only pipe insulation to prepare the form for the wreath! LOL, I really didn’t know anything back then! Some time later I would learn of a thing called a “wreath form.” 🙂
While that Halloween wreath disaster taught me how to pronounce ‘wreath’ correctly, it discouraged me a lot, and I stayed away from wreaths for a looong time.
But if there’s something I’m not good at, it bothers me until I can get good at it, so I decided to make a DIY Christmas wreath. I wasn’t sure what kind of wreath I’d make until I saw this in a Ballard Designs catalog!

Before we begin, be sure to follow us on Pinterest, Facebook and Instagram, and also click here to sign up for our email list so you’ll never miss a post!
With fingers crossed for a ‘somewhat acceptable’ wreath, I started gathering the materials for my very own JOY wreath: two old pre-lit garlands (I wanted mine to be a lighted Christmas wreath), one 22-inch wreath which I found at Put & Take, one set of mini Christmas lights![]() , and four wire hangers. Since mine wasn’t going to be a fresh wreath, I didn’t want it to be too plain. To spice it up a bit, I collected some pine cones from the woods and found a ribbon, some faux berries and a Dollar Store cardinal in my crafts room.
, and four wire hangers. Since mine wasn’t going to be a fresh wreath, I didn’t want it to be too plain. To spice it up a bit, I collected some pine cones from the woods and found a ribbon, some faux berries and a Dollar Store cardinal in my crafts room.

Note: If you are planning to do a similar project and don’t have the garlands on hand, then I recommend you to wait until next year to do it, because at this time of year, the garland prices spike. But the day after Christmas, all the shops tend to have sales up to 70%.
First I started making the forms for the letters ‘J’ and ‘Y’ using wire hangers. For this step, I had to use pliers, as the wire hangers I chose were rather on the strong side, so they were a bit harder to bend.

When I started doing the ‘Y’, I finally had enough of the strong wire hangers, so I changed them with a plastic-coated wire hangers. Even though it was slightly thinner wire, it was still strong enough to hold the shape, and it was much easier to bend.

Next, it was time to wrap these ‘J’ and ‘Y’ forms with the garland. I did not use any floral wires, because the garland itself is like wire, so I just twisted the garlands’ twigs to secure them on the forms.

While the ‘J’ was pretty easy, I have a little hint for the ‘Y’: I first opened the garland full length and found the center point. I laid the bottom point of the form at the center point of the garland. Then I bent the garland over the wire form and secured it on the form by twisting the garland twigs. After I finished the bottom part, I moved on to the branches and secured them to the form, again by twisting the twigs.

My 22-inch round faux pine wreath didn’t have lights, so I wrapped the mini Christmas lights![]() around it.
around it.

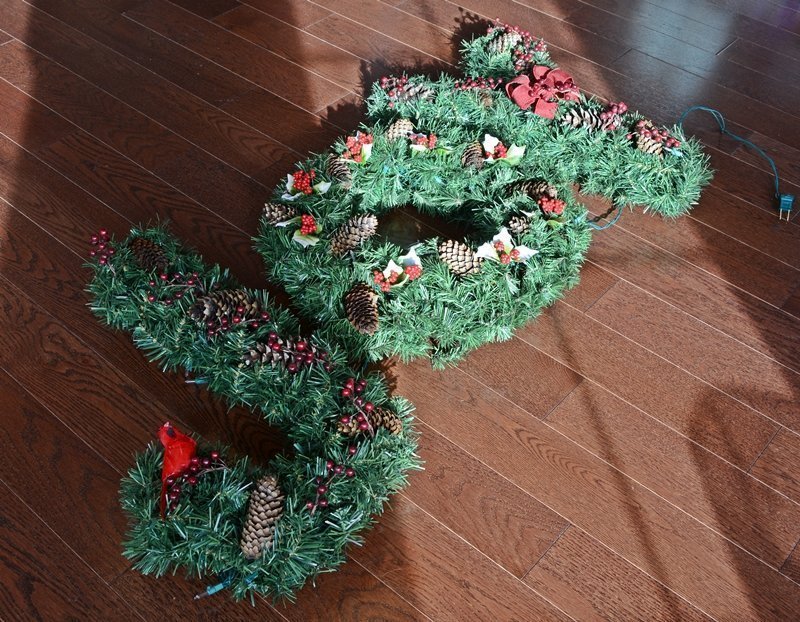
So far so good! All the letters were nicely puffed up and looking full. I had my JOY wreath formed. It was time to make this DIY Christmas wreath stand out from the crowd!

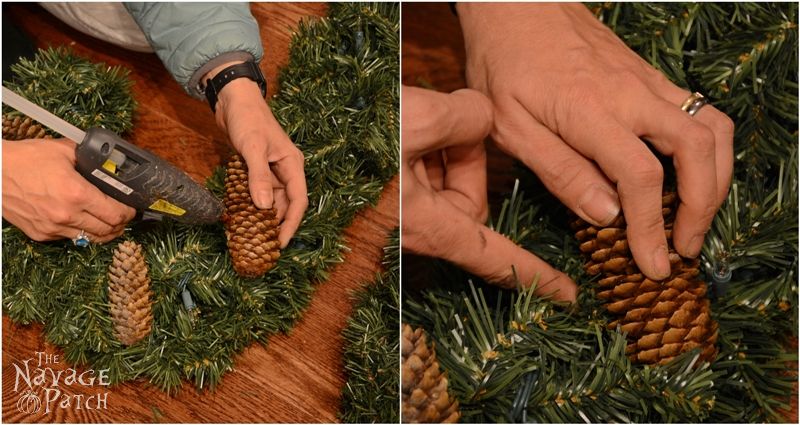
The next step was to add some pine cones and some faux berries to my lighted Christmas wreath to give the whole thing a dressed-up look. So one here and one there, I started hot-gluing the pine cones and berries sparingly to the ‘J’ and ‘Y’. Then I put some faux holly leaves with red berries for the ‘O’. Again I used hot glue, as it is much easier than using floral wire.
And here is the finished JOY wreath. Looks pretty good, right?

Since my JOY wreath was better than “somewhat acceptable,” and nobody was calling it names, I found the courage to take it a step further: I wanted to make a frame that would bring some neutral color to my DIY Christmas wreath and give it a wall-art look. For that, birch branches and chicken wire was the way to go!

But the birch branches I had were not straight, and some were thinner than others. Even if I managed to make a frame for my JOY wreath out of them, hanging it and stapling the chicken wire to it could be an issue. The easiest solution was to make a simple frame with boards thinner than the birch branches, then install the chicken wire on that frame and tie the birch branches on top of the frame.
Greg cut me the thin boards I needed for the frame. He is the best hubby in the world! As soon as I (the luckiest wife in the world) had the boards ready, I started putting the frame together.


Then one-by-one, I tied the birch branches on to the frame…

… and ta-daaaa!

Next, it was time to marry the rustic frame with the JOY wreath. I hung the letters with wire.

It looks like I nailed this DIY Christmas wreath pretty good!

My lighted Christmas wreath looks even better switched on (and after the living room makeover)

But my JOY wreath shines best at night!
I love how my JOY wreath hangs over the mantel! Want to learn how I set up our mantel in 5 minutes each year? I’ll show you how here!

Have a Merry Christmas and a Happy Holiday Season!
Handan, xo
We love it when you share our posts on Facebook and Pinterest!


I like your version much better than Ballard. It is gorgeous!
Thank you so much!
I prefer it to the original, so way to go! It looks perfect hanging over the fireplace. Cute dog too!
Thank you so much, Nettie! Pepper thanks you too!
I really like your JOY.
Thank you so much, Linda!
I love this project. How did you get the lights to work on the letters? Where did you plug into? I dont see any light wires.
Thank you so much, Linda!
The wires between the letters are aligned with the chicken wire’s horizontal lines, and the wire that goes out from “Y” is hidden at the back of the small star that is hot-glued on the frame’s bottom corner. Since we don’t have a plug around our mantel, I had to plug JOY’s lights into the garland’s lights. So only the line in between the mantle garland and the JOY’s frame is showing. But that is also not an eye sore as I wrapped that part with jute.
Way to go Handan! You did a fabulous job on it, and I say you are ahead of the game. Great job its beautiful!
Thank you so much, Linda! 🙂
Wow beautiful Handan! I’m totally inspired by the cork wreath too! Someone just gave me a huge bag of corks! JOY!
Thank you so much, Susan! That cork wreath has to be the easiest wreath I ever made. And it looks lovely anywhere you hang it. 🙂