Upcycled DIY Handrail
This upcycled DIY handrail is made a from a sturdy wooden curtain rod. It’s an easy and eye-catching update for a neglected banister!
There’s nothing I like better than an easy DIY.
Complicated projects? Yep, I’ve had my fair share. In fact, I used to have the mindset that the more complicated the project, the better.
For proof, I’ll refer you to this early post, written while The Navage Patch was still a pablum-sucking infant that couldn’t yet stand on its own legs.
(Long-time readers will be familiar with that project and know that I reference it frequently as what not to do as a blogger.)

But after a couple of years of blogging I discovered two things.
- No one (and I mean no one) is out there Googling or searching on Pinterest for “Really Complicated DIY Projects.”
- I’m too old for this shit.
And by “this shit,” I didn’t mean blogging, of course. I meant elaborate projects that consumed big chunks of my dwindling life force.
The more time I spent laboring like a rented mule in the basement on some fussy furniture makeover, the less time I had to be up here in the light writing funny stuff about my babes to each and every one of you.
It was a revelation to me.
Of course, when I revealed The Big Secret to Handan, when I told her of this Immutable Universal Truth I had single-handedly discovered, she just looked at me.
You know the look.
You women invented it.
And then you perfected it.
Anyway, she just gave me The Look.
“My babes.” She said, and suddenly I didn’t feel as wise as I had 5 seconds before. “I’ve been telling you that since we started this blog.”
Really?
I cast my mind back in time to fish among my memories of Conversations with Handan.
Nope.
Nada.
No fish in that pond.
Not surprising.
It’s hard to remember conversations when you’re knee-deep in sawdust.
And when you’re a man.
“Well, okay then. We’re in agreement.” I said. “No more complicated projects for me!”
Now, understand that when I say “complicated projects,” what I’m really saying is “needlessly complicated projects.” A little complication is bound to show up from time to time. Life is like that: carefree moments bound by complications.
But before I venture too far into the metaphysical and overcomplicate this post with my blatherings, let’s pull this runaway train back on track.1
*******
Okay, do you remember our Laundry Room Renovation?

You see the stair landing on the left? It leads to the basement.
Now, looking at that photo, you may think that the beauty you see carries all the way down to the basement.
Not so, madam, not so!
We did only as much as we needed for these beauty shots for the laundry room. That gray paint stops just past the point you can see in the picture.
Now, we fully intended to finish up the entire stairwell just after posting about the laundry room renovation.
Remember, this was the summer of 2018.
So what do you think happened?
If you guessed, “You got lazy and didn’t do a damn thing for over a year!” Well then, you’d only be partially correct, madam.
Because, in fact, I did do one or two things during that time.
But first, let’s rewind a bit to the weeks before we finished the laundry room renovation.
Here’s what that landing area looked like after we laid the new laundry room floor, but before we really had a chance to tackle the stairs. I had at least patched the holes in the walls.

Going in a bit more…
I call this color The Golden Everywhere. As you may guess from the name, it was kinda everywhere in this house when we moved in.
That lovely floor is genuine stick-on linoleum.
The stairs are a lovely shade of Gunship Gray.

Further still…

Turning the corner…

The abyss…

And looking back up…

The plan was Handan’s, and it was simple:
- Patch and paint the walls
- Paint the stairs
- Put decals on the stair risers
- Install new vinyl flooring that doesn’t look like it timewarped in from 1953
- Swap out the bare bulbs for LED domes
- Make a storage area for coats ‘n’ things
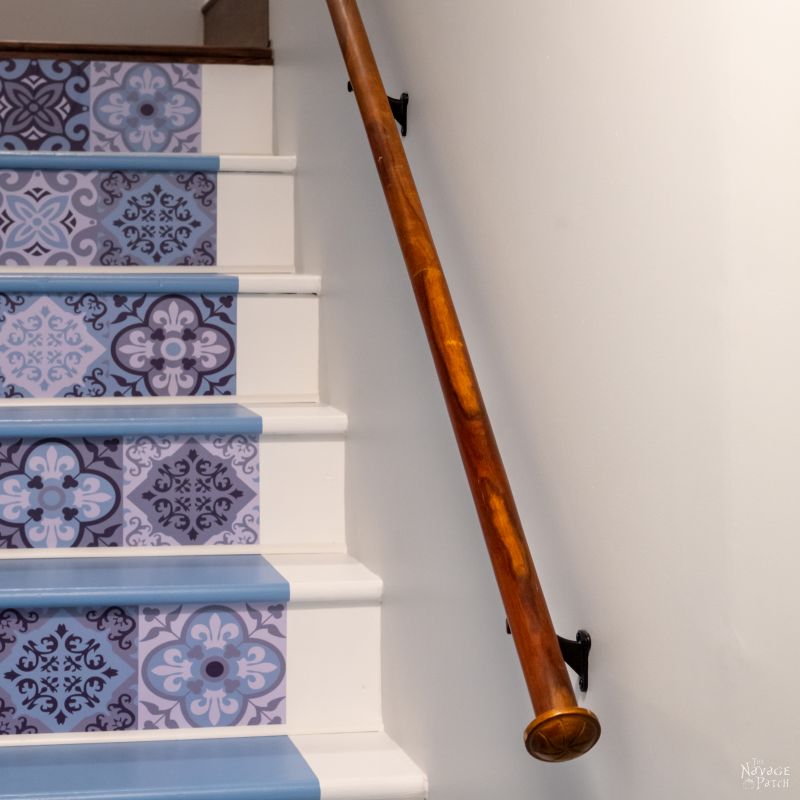
- Replace the grimey handrail with an upcycled DIY handrail
It was simple, in theory, but I was just not into it, so I let it simmer, and everything else that blipped my radar took precedence.
Handan and I painted the walls around the upper landing – like I said, just enough so the Golden Ugly wouldn’t show in the final laundry room pics.
But for the rest?
A year and a half passed.
And then my babes put her foot down.
Frankly, I’m rather shocked it went so long.
In my defense, we did have a lot of other projects, but still! A year and a half!
And during that time, I had removed the old handrails and pulled off the linoleum tiles, so there was nothing to grab onto, and the landings were a sticky mess!
Well, all that procrastinating came to an end after The Commandant ordered a full basement stair assault starting the day after Christmas.
Now, there’s not going to be an official “Reveal” for this basement stair makeover. In fact, it is done. And the last part to finish was the upcycled DIY handrail I’ll soon be sharing with you.
Instead, I’ll write about the handrail, the stairs and the storage area. You’ll get four posts, and along the way, you’ll get a full picture of this stair makeover.
As you’re well aware, one of my babes’ favorite shops is the Put & Take at our town dump.
There’s almost always a discarded treasure waiting for a new home.
At some point in the past 7 years, she picked up a couple of old curtain rods.
But not just any curtain rods!
These were gorgeous hardwood curtain rods, dense and beautifully figured!
At the time, she had no idea what they’d become, but she knew they were destined for Great Things.
Years passed before Handan divined their destiny.
They were the perfect length and perfect circumference to be handrails for the basement stairs.
Now, you could argue that getting pressed into service as a handrail for a set of basement stairs does not constitute Great Things, but remember madam!
The alternative was a lifetime buried in a smelly landfill until worms and rot took their toll.
So basement banister? Pretty big step up in the world, wouldn’t you agree?
Anyway, here’s one half of one rod (they screwed together in the middle). There were two full rods in total, but since we got them so long ago, I never took a picture.
And I forgot to take a before when I made them into handrails.
So this is all you get, but it’s good enough to get the point across: it’s a damn curtain rod!

The basement stairs have two sections of handrail – one short and one long.
I used the short piece to measure and cut a section of handrail for the upper stairs.
Fortunately, a full curtain rod was almost exactly (within an inch or two) the same length as the long handrail.
I bought identical mounting hardware in black, so I could use the existing holes in the wall that were left after removing the old handrail.
This helped immensely when installing the new DIY handrail.
But first things first.
I lined the curtain rod against the old handrail and eyeballed the placement of the mounting hardware. Then I penciled in where the screws would go.

Since this wood was so hard, I used a center punch to help with drilling the pilot holes.

I drilled small pilot holes to make attaching the mounting hardware easier.

Then I screwed the mounting bracket into the curtain rod.

Installing the handrail was so much easier with the old mounting holes still in the wall!

Hey look! A different angle! (And there’s a little peek at the new vinyl floor.)

Aaaaand that’s it!
Here is our new upcycled DIY handrail. Look, it’s a handrail on a set of cramped basement stairs, so don’t expect the Taj Mahal, okay?


Still, we think it adds a touch of class and a ton of interest. What do you think?

It’s incredibly sturdy – far more so than the pine handrail that preceded it.

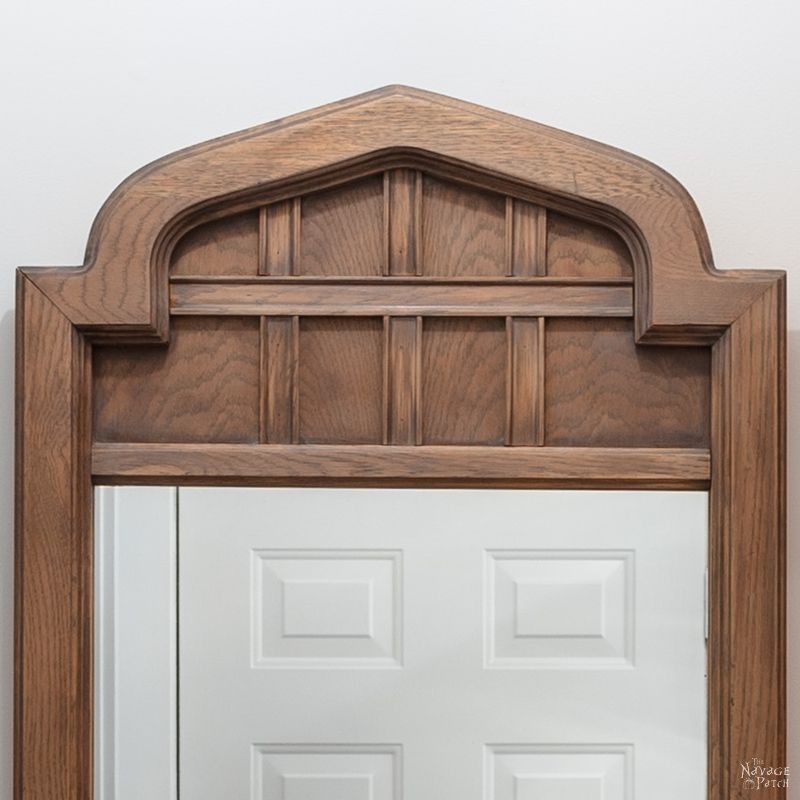
Yep, pretty easy project, eh? This one ranks up there with our arched mirror makeover for easy-but-beautiful!
And just above that mirror in the upper landing of the basement stairs hangs this pendant light – another super simple makeover.

*******
Footnotes:
1 The preceding is a prime example of what I call “blog padding.” You see, this project is really so simple I could have taken one picture of the finished handrail and told you it was a curtain rod.
The end.
Thanks for stopping in!
But what fun would that be? For either of us? Yeesh, that’s the problem with blogging sometimes. Most people just Google stuff for answers, and they don’t give a dried fig what I have to say. Well, that’s too bad for them, I guess! Every project has a story, and if you give the story a few minutes of your life, you may learn something more than anticipated.
So kudos to you, madam, if you have read this far!
Speaking of handrails – did you know that the longest stair handrail is attached to the world’s longest set of stairs (naturally). The Niesenbahn Funicular Railway (that’s a rail system designed for steep hills) in Spiez, Switzerland has 11,674 steps, rises 5476 feet (that’s over a mile) and covers a distance of 11,483 feet (over two miles). The stairs are only meant for railway employees, but once a year they hold a public race to the top.
I’ll stick to the funicular.
We love it when you share our posts on Facebook and Pinterest!


Love it! My daughter used the same thing for her basement handrail. I’m sure hers came from Goodwill ? Great minds think alike! The stairs and stairwell are beautiful!
Thank you, Susan! Yeah, that staircase was in DIRE need of some TLC!
THAT was a coup d etat finding the curtain rods!! KUDOS!! I just found iron twin headboard and they are now “bridge railings” over our ditch…that was a segue…franki
Thank you, Franki! Headboard railings – that’s genius! 🙂
Hey Greg,NICE job.Looking at it reminds me of storage..like using the steps for storage of things you do not use everyday. Making pull out drawers, to put stuff in. A beautiful job anyway ,
Thanks, Shelley! Ooooh, that’s such a great idea! I wish we could have done that on those stairs!
Nice and easy! I still love that mirror you have hanging in the landing. It’s so unique, and the wood is beautiful.
We love that one too, Laurie, and the best part is that we have another identical one still in storage! 🙂
Love this blog. You make me laugh every time I read your blogs. Great job on the stairs & handrail. Looks beautiful.
Thank you, Karen! 😀
Great post! We don’t currently even have a handrail on our basement stairs, but we DO have an extra curtain rod. I’ll have to send Hubs to dig it out and see if it’ll work for us too. I’ll tell him to thank Handan for putting the idea in my head – lol! As for the complicated posts, I’ve been blogging a few years and suffer from that too. Thanks for outlining the universal truth. Old habits die hard but I guess this is my wake-up call 🙂 If you ever start a Complicated DIY Bloggers Anonymous Group, I’ll be the first to sign up!
Well there ya go! New handrail coming right up! Oh man, yeah the complicated projects have to stop, lol!
Dear Sir,
While I don’t currently need a handrail in my abode (Palm Springs single story, and who has a basement in the desert?), I would like to think you have at last a couple of Sirs among your readership. There has to be a guy out there reading your fun blog! Lots of good ideas, and fun reading,
Madam in Palm Springs
Hi Laura, yep there are a few sirs, but you madams outnumber them tenfold! 🙂
Imagine the burn if you made it to the top of the Niesenbahn Funicular Railway staircase!! If you had to walk that every way, you would have the best legs and tush in the country!! Handan would probably really enjoy the view. Maybe she, being the awesome engineer, could figure out how many trips up and down your stairs you would need every day to equal the Niesenbahn Funicular Railway stairs and then you could do that every morning before your first coffee!! I know, you are fine with your legs and tush, but think of your babes!!!! BTW, love your handrail and staircase makeover!
Susan, I’d collapse at the 20th stair! Give me a year, and I might be able to reach the top, lol!
Thoroughly enjoy your writing! Fantastic blog – I’ll be heading over to Facebook to follow you there. Nice score on the rods, I’m sure they are much happier in their new home instead of being eaten by worms 🙂
Hi Debbie, thank you so much! Oh yeah, I think those curtain rods are quite please with the upgrade! 🙂
Oh Greg..I love simple!
Nicely done! And I am soooo glad to not see the gold any more..yikes! Love the stair treatment..is it stencil or tiles? Lovely and fun! ???
Hi Bernice! I’ll be writing about those stairs very soon – stay tuned! 🙂
As always you never disappoint now I need one of those hmmm going to take a trip to Goodwill lol
Thanks, Bunny – good luck! 🙂