Upcycled Coat Rack & Easy Aged Wood
This upcycled coat rack took only a few minutes to make with our quick and easy aged wood technique. No stain or paint required!
Do you know your coat-to-hook ratio?
Ours is about 2.7, give or take a decimal point.
That means that at any given time, each hook on our coat rack carries an average of 2.7 jackets.
For double hooks, like the ones on the Simple DIY Coat Rack we built in the summer of ’18, things can get pretty crowded!

Anyone living in the Northeast or the Midwest or Canada or Siberia or Antarctica knows that there are never enough hooks to comfortably hold all the parkas, jackets and vests needed to keep a modern family warm and stylish.
Inevitably, lesser-used garments get permanently buried against the wall, as lazy family members just grab whatever is most accessible on the rack, thus perpetuating the cycle.
And don’t get me started on the Coat Closet!
Sure, it’s conveniently located next to the front door, but who the hell uses front doors these days??
The coats in there are forgotten relics laying dormant until some far-future archaeologist unearths them and marvels at the primitive beings who donned such ridiculous and flamboyant coverings.
Now, I know many of you live in warm climates, and you’re most likely reading this with a puzzled expression on your face as you sip coffee on your veranda while the warm morning sun shines upon your face and tropical birds wheel overhead.
This post is not for you.
But please, Warm Madam – do continue reading so you can learn how your wretched and hardscrabble neighbors to the north live for half the year.
So, with our current coat rack overflowing and the “official” coat closet at the other end of the house, we needed another coat rack – especially for the really big parkas. You know – the ones that only come out when the temps plunge towards zero and the winds kick up. The ones so big and puffy, they come with their own zip code.
You’ll recall from my last post that we’ve given the basement staircase a makeover. Remember the wall where the stairs take a turn?
This wall – the one straight ahead.

Just look at how empty it is!
All that gorgeous real estate just waiting to be developed!
The perfect place for another coat rack, wouldn’t you agree?
I started thinking about building one from lumber, and I shared my thoughts with Handan.
I stopped mid-sentence.
The damn Look again.
“My babes,” She said. “We have a really long door with three panels that will be perfect for it.”
As usual, I had no earthly idea what this blathering-loon-who-called-herself-my-wife was talking about.
I spend a lot of time in the basement – even more recently, as I’ve been trying to organize our Kilimanjaro of Junk. As far as I knew, there were no “three-panel doors” down there – at least none that I’ve come across.
But still, best not to contradict my babes when it comes to old junk. The woman has a mental inventory of every item she’s bought, bartered, found or finagled since she was a pig-tailed twerp running around the mean streets of Izmir in her youth.
I made some non-committal noises as I walked down the basement stairs to try to find this fantastical door.
I checked all the usual haunts – my woodpile, Mount Kilimanjunko…I even checked our huge stash of doors. Yes, we have an entire section of the basement devoted to old doors and another to old windows.
Don’t you?? [rolls eyes]
Nothing.
Handan come down to look, but I knew where this snipe hunt was going.
There was no three-paneled door.
And that meant…
My babes’ junk memory was not perfect!

And if her junk memory was not perfect, then perhaps her freakish conversation memory wasn’t perfect either!
This was huge news! This meant that maybe I could win an argument if I could cast doubt upon her memory!
I pretended to search for her absurd “three-panel door,” but inside, my heart jumped with joy!
The iron fortress of Handan’s mind had cracks!
But then…
Ah, but then.
Then I remembered one place I hadn’t looked.
She wouldn’t have known to look there, because I had put stuff there a couple of years back during one of my rare woodshop reorganizations.
There was a workbench back in the Dark Quadrant of the basement – one of the areas I hadn’t upgraded the lighting. And under that workbench, I remember stashing some crap to get it out of my work area and out of my way.
There was an old box of flooring planks that was here when we moved in.
And cabinet doors.
I remembered the cabinet doors.
“My babes,” I said. “Under here.” I reached down and pulled out two cabinet doors. They seemed reasonably long.
“No, my babes. I remember we have one with three panels. I got it and Put and Take a long time ago.”
How this woman remembers every damn piece of junk she’s ever found is beyond me! She looked down at the small space between the floor and the bottom of the workbench. I had merely bent over and fished out the two cabinet doors. Handan dropped onto the floor and jammed her arm into the small space.
“Here it is!” She stood.
The door. The three-panel door.
Well I’ll be damned.

*******
Okay, so it’s probably not a cabinet door. Maybe a pantry door? Whatever. My babes said it was there, and she was right.
We carried it up to the basement stair landing to check the size. It was a perfect fit, and it would leave room to hang some storage baskets next to it.
But the color…
That awful orange wood color!
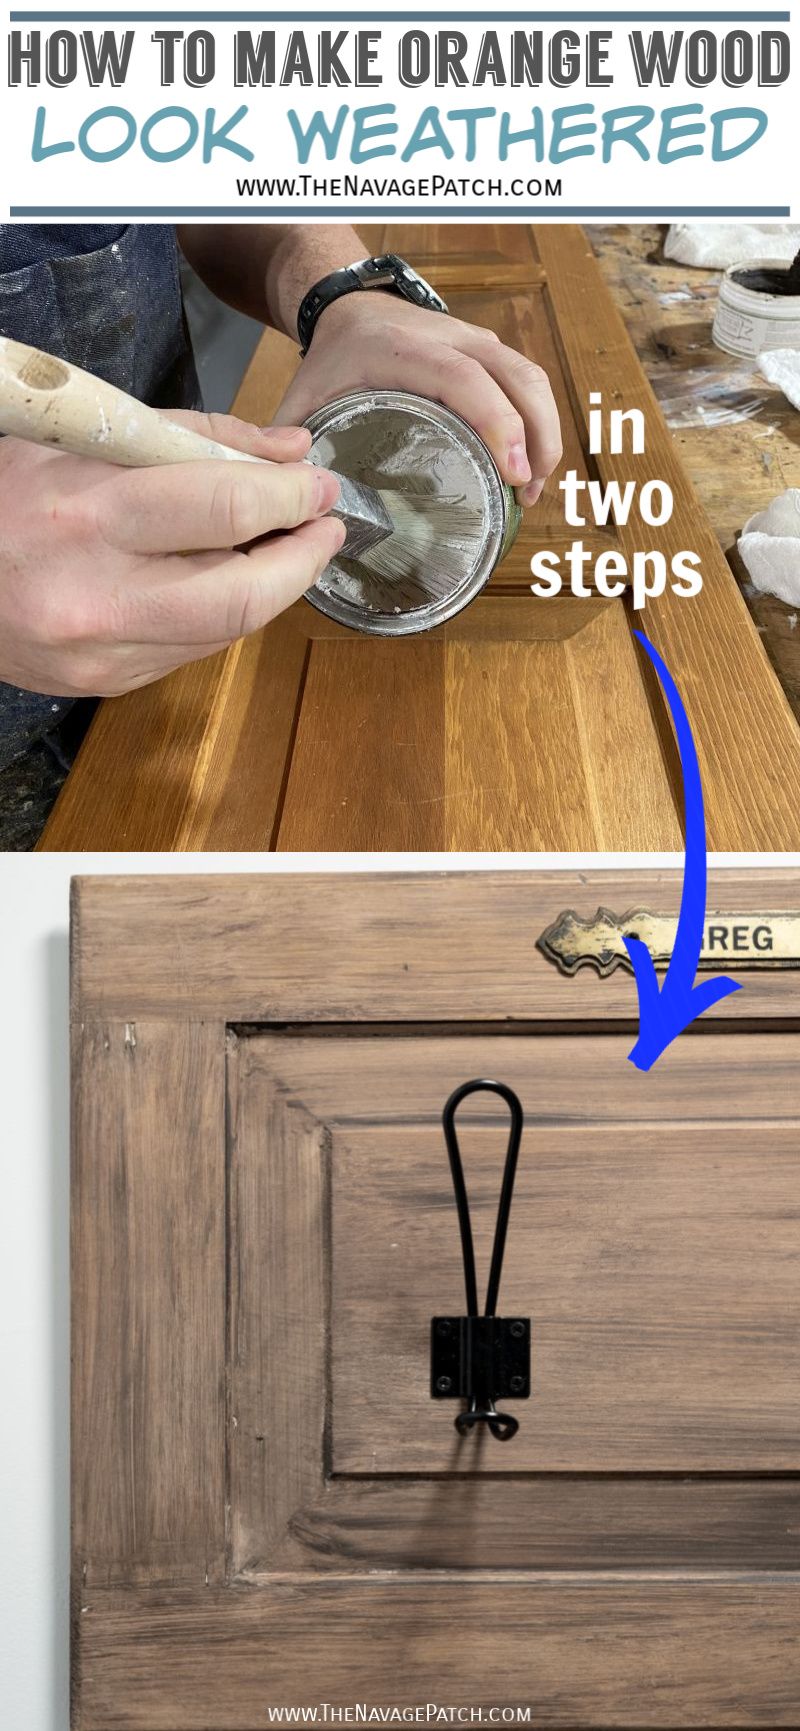
We wanted a quick way to mute that orange and even out the contrasting wood.
But we didn’t want to use stain. We wanted to try something a little different this time…
Handan went to her wax supply, fished out a couple of cans and snatched up her wax brushes.
She plopped them on the workbench in front of me and told me to start with the liming wax.
It made sense. First white, then dark. We figured it’d give us an easy aged wood look.
I took the brush and dabbed on some wax.


I worked one panel at a time so the wax wouldn’t dry and harden.

There’s no trick to this.
Wax on.
Wax off.

Next I applied some antiquing wax over the white.

One panel at a time…

After applying the antiquing wax, I rubbed it all off with some cheesecloth.
As it would turn out, I rubbed too much off on that first panel. It looked too plain for the aged look we wanted.

On to the next panel.

I figured out my technique with these next two panels: heavy on the wax, light touch with the cheesecloth.

And I didn’t fully wipe off the antiquing wax. I used the cheesecloth to streak it, leaving some areas darker than others.

After finishing the last two panels, I went back to the first and darkened it to match the others.
Handan and I love how it turned out. The orange was totally gone, as was the contrasting wood.
Next, I screwed in some coat hooks – the same ones we used for the coat rack we built for the laundry room.

Since this upcycled coat rack would be carrying some heavyweight jackets, we decided to hang it with no-nail sawtooth picture hangers.

Our new coat rack was nearly done. First I needed to pose it with the wax.

We brought it up the stairs and hung it on two screws.
Handan approves!

But we thought it needed a little something on top – especially to cover the two holes where the door pull had once been.
Fortunately, Handan had just the things stashed in the basement (of course).
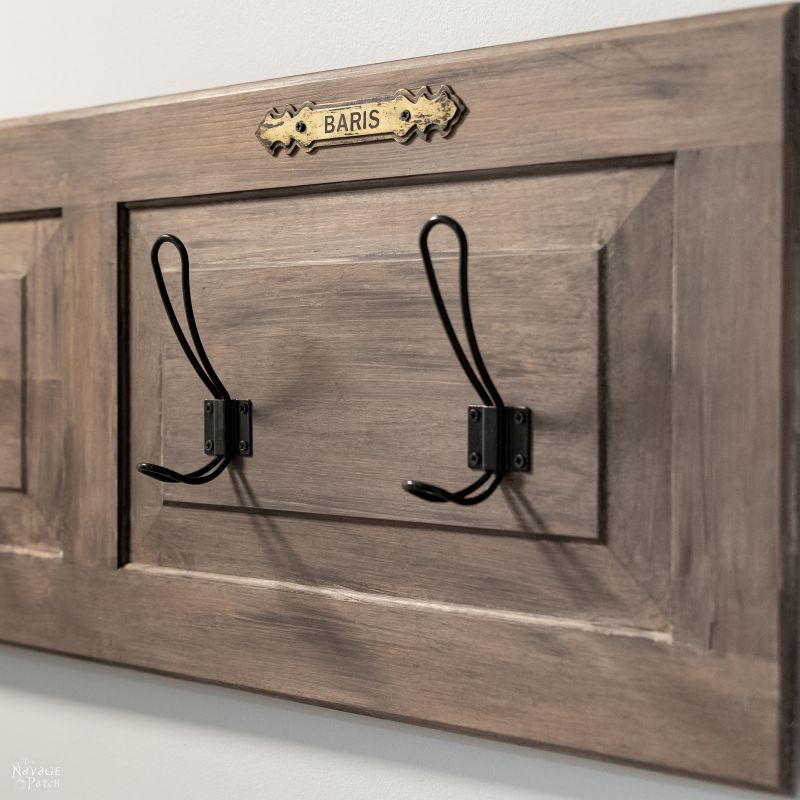
She found some brass cabinet back plates that had the same hole spacing as our upcycled coat rack. We chose three, and then we aged them with a little black Rub’n Buff.
Handan then cut out some vinyl letters with our Cricut Maker, and now our upcycled coat rack was personalized.

It’s the perfect coat rack for that space, and we love the simple transformation of the wood!

What do you think of our upcycled coat rack?

Have you ever used wax for an easy aged wood look?

What a difference from the original wood color!

I love the little bits of liming wax still poking through.


And with jackets and vests…


We love our new basement staircase – it’s now way nicer than our main staircase! Just a few more storage solutions, and it’ll be finished!
And the best part is that our coat-to-hook ratio is now back down to 1 – precisely where it should be!
We love it when you share our posts on Facebook and Pinterest!


Since you didn’t rub all the wax off won’t it come off on the coats? Or does it dry hard
Hi Nancy, it dries hard in a day.
Very cool coat rack (ours are piled 3 deep on the hooks, and we’re out of wall space!). Is it Baris or Barish?
Heheheh – I was waiting for that question, Nicole! In Turkish, it is actually Barış, but since that name contains two letters we don’t have in English, I Americanize it as Barish. My next Yap post will be all about Baris and Handan’s names and pronunciation. Prediction: 100% of you are pronouncing Baris’s name wrong, even with my Americanization! 🙂
Ha! I was thinking the same thing! Baris or Barish? The coat rack looks great!
Thanks, Laura! All will be explained in the next Yap! 🙂
I love the look. I wonder if I could do that to my bathroom vanity? Do you think it would hold up with the moisture?
The wax should keep it fairly well protected, Doris
Love it! Where did you get the hooks?
Hi Joce, they’re from Amazon. There’s a link to them in the post. 🙂
Looks really nice! I love your optimism about your coat-to-hook ratio. And I particularly enjoy the visual of the mean streets of Izmir 🙂
LOL, thanks, Hanneke! We’ll see if we can keep that ratio at 1! 🙂
Love this! My kitchen cabinets have the orange wood and I hate it. Thinking I could do this treatment instead of stripping and repainting the cabinets. Any idea how this finish would hold up to a periodic cleaning?
Hi Linda – it’s so much easier, and I think it would hold up just fine. Really it’s just a waxed piece of furniture, and waxed tables etc can be cleaned no problem.
Hi Linda. My kitchen cabinets are the same orangy ickand was wondering if you did this technique on yours. I’m thinking of giving it a try but I’m kinda intimidated. I guess it can’t get worse…….I hope. Thanks!!
Love the wood transformation. I live in the South, so no need for really heavy coats, just a jacket and maybe a scarf when temps go below 30 degrees. Always delighted to see the things that you re-purpose in such creative ways.
Thank you, Dorothy! Ah, the South sounds better and better each day! 🙂
What are the chances that those back plates would have the same spacing! I love this project, but those name plates…..!!!!!!! They’re the piece de resistance!
I know, right? Serendipitous! 🙂
Love this project! I wish I had a wall to donate to the cause. When my SO moved in, I gave him the front hall coat closet and I only have 2 coats in it. My last home had 2 coat racks and I miss them! So we HAVE to hang them up–or drape them over the shower rod or towel bar if they are wet. Not pretty!
Thanks, Kathy! Yeah, coats are like bunnies up here in the Northeast – they just keep multiplying! One coat rack just won’t cut it!
Now I’m trying to figure out where in my house I could put one of these!!! DH and I have WAY too many coats in the front coat closet…and that’s not the door anyone uses on the farm!
Exactly! Who the hell uses front doors these days, lol! 🙂
We don’t use coats in Mumbai, India… but this is so good that I want to do it!! I have two old doors :))
We never made it that far south when we lived in Gurgaon, but I can imagine how warm and beautiful it must be! Gurgaon got chilly, but not too bad. Nothing like here, lol!
Love it. I have an orange colored maple dresser and I have been dreading the sanding needed to stain or paint it. Just the thing I needed to motivate me. But, since it’s 12 degrees here in New England, I’ll have to move it in doors.
Hi Cheryl, it’s such an easy technique, and you can get really creative with the wax to make interesting patterns on the wood!
You’ve been waiting years to play Mr Miyagi, haven’t you? Wax on, wax off…
I got rid of all my coats because it was never really cold enough to wear them, and now with the climate how it is, it will never be cold enough to wear them! Through winter I barely even wear a jacket most days as I run hot and the cool temperature is perfect for me. I mostly have very lightweight hoodies or sweaters. I even gave my leather jacket to my Mom as I just couldn’t wear it anymore. Very disappointed.
I think the “coat rack” turns into the “stuff shelf” here in Oz. It stores hats, sunscreen, thongs (the footwear type), shopping bags, and the like. The things we need for leaving the house 😀
LOLOL – of course I have! Anyone who lived through the 80s has that quip in his quiver. Yep, it’d make a great stuff shelf. It sure doesn’t seem like you’ll need a coat anytime soon. Hope you’re safe and away from the fires!
Luckily I’m on the other side of the country with the…lesser…amount of fires. It’s been an absolute nightmare season.
Glad to hear it, but still. What a cataclysm.
Love this look! I didn’t see where you put on a finish coat of any kind. Does it need a clear wax or poly finish? I am always so inspired by your projects, thank you for sharing. ?
Thank you, Jackie! I didn’t bother with clear wax since it’s already waxed and polyurethane needs to be applied to raw, stained or painted wood but not waxed wood. 🙂
Hi Handan and Greg and hello from Jacksonville, FL. I love this look and i am going to definetly try it on something. Maybe i will go to Habitat and get some cabinets and make a coat rack. I do have a couple of questions. 1. why did you use cheesecloth? I thought that is mainly for removing dust. 2. What is the difference between Liming wax and white wax?
thank you for sharing this and your inspiration. I really enjoy reading your blog.
Hi Cheryl, well woops! I’m so sorry for this really late reply! Your comment came in while I was moving Handan into her temporary Atlanta apartment, and I completely missed it! We like to use cheesecloth for waxing, as it is the best lint-free cloth out there. Lint in wax is a real bugger – it’s impossible to get out. There is no difference between liming wax and white wax – feel free to use either!
Is there an alternative to the liming wax that would give the same effect? I’m having a hard time finding some, and the small can on Amazon costs double to ship. I’m not familiar with it, so not sure if there is something else that can be used instead to get the same look. I LOVE it and want to do this to my cabinets!
Hi Melissa, I’m so sorry for the very late reply! You can substitute white wax – it’s the same thing as liming wax! 🙂
Hi!! i love how easy this technique is and how beautiful it turned out!! i was looking to do redo some oak kitchen cabinets… was there any sanding involved with this at all?
Sanding shmanding, Hailey! If there were, I wouldn’t have done it, lol! It’s really the easiest technique ever. Good luck! 🙂
Hi! I love the way this project turned out, it made me order all the supplies you used but the color is turning out gray what am I doing wrong? Any advice would be appreciated. Thank you!
Hi Brittany, please send me a picture at greg@thenavagepatch.com. I suspect you’re using too much white – try a final coat of antiquing wax.
This is such a beautiful project! I made an attempt of this on my orange-y end table. I love the look, but it’s been over a week and the wax isn’t dry. It is still VERY tacky. What did I do wrong and what can I do about it? Any help appreciated, thanks!
Hi Tanya, first tell me what brand wax you used and please send a pic to greg@thenavagepatch.com so I can see how much is on there. Don’t worry! We’ll get you sorted out! 🙂
Email sent! Thanks so much, excited for your help!
Hi Handan & Greg, love this look! I have all honey oak from 1993 kitchen cabinets and would love to do this to them!! Since cabinets doors are used so much should I apply a sealing wax? Is the finished product matte or more of a semi gloss? I’m trying to update those nasty builder grade cabinets! Any tips/hints you can give would be much appreciated. Love you projects!
Christine
North Carolina
Hi Christine, thank you! You shouldn’t need a sealing wax with this method because you’d already be using two different waxes to create the aged effect. The finished product was more satin that semi-gloss. In my opinion, it was the perfect amount of sheen. My advice would be to try it on one small cabinet first to see if you like the look. Better yet, try it on a piece of plywood and hold it up to the cabinets. IF you’re satisfied, you’ll get the hang of it real quick and it’ll be a great upgrade!
I love the look! How do you think the liming/antique wax process would work on a Queen Anne style cherry dining table and chairs?? Thanks!
I think it would look great. I recently used it on an old desk for Handan, and it looks beautiful.
Was it a cherry stained desk? I’d love to see photos. I’m afraid to do it lol
By any chance do you have photos of the desk?? I’m a bit afraid to take the leap and try the process on cherry stained furniture.
Just saw this on Pinterest. Love the easy factor. Questions: was there any sanding to remove varnish or whatever from the door before sanding? How would this hold up on a coffee table that my grands use— should I apply a topcoat? Which one? Thanks for all of your ideas that you’ve shared— especially Halloween!
Since it’s wax, it should go over everything. Similarly, since it’s wax, you won’t need a topcoat over it!
I loved the way this project turned out and how simple it looked, BUT. . . . are you certain about the “ no sanding” part?
I want to refinish my 1980’s kitchen and bathroom cupboards but am reluctant to take it on. Anyone I’ve asked has said sanding will be required, and that’s A LOT. . . of sanding!!! . . . and I’m old! LOL!😅
Thanks for your input. K.
I’m sorry for this late reply! Yep, no sanding required! 🙂
Can these same two steps be done in raw wood?
Did you have to seal it with anything to protect it or when the wax is fully dry is that enough? I’m asking because this is what I wanted to do with my kitchen cabinets and I wasn’t sure if it was going to be durable enough or if I had to seal it somehow.. it looks amazing by the way and is the exact look I’m going for!
Nvm I saw prior replies lol thank you so much for the content!