Tea Cart Makeover
You’ve all seen them at tag sales or in thrift stores. Perhaps you even have one in your home. The simple wooden tea cart makes a wonderful makeover project! It doesn’t matter if it’s a new one or a vintage tea cart like mine – a tea cart makeover is a surefire way to breathe new life into an old piece!
I feel wonderful today! We finally managed to finish the second area in our Big Backyard Makeover right before the summer kicked in full-force. But the rest of the areas will have to wait until early Fall, as they involve a lot of transplanting. Besides, Connecticut summers are perfect for paint projects, so I don’t want to miss the great weather for all the makeovers I have to tackle, including this vintage tea cart! 🙂
You may remember this little tea cart from some pictures in my previous posts. We bought it two years ago at a tag sale for $20. It was in pretty good condition, with only a few scratches on the top. But it wasn’t anything special, made from just a cheap plywood and veneer, hence the bargain price.
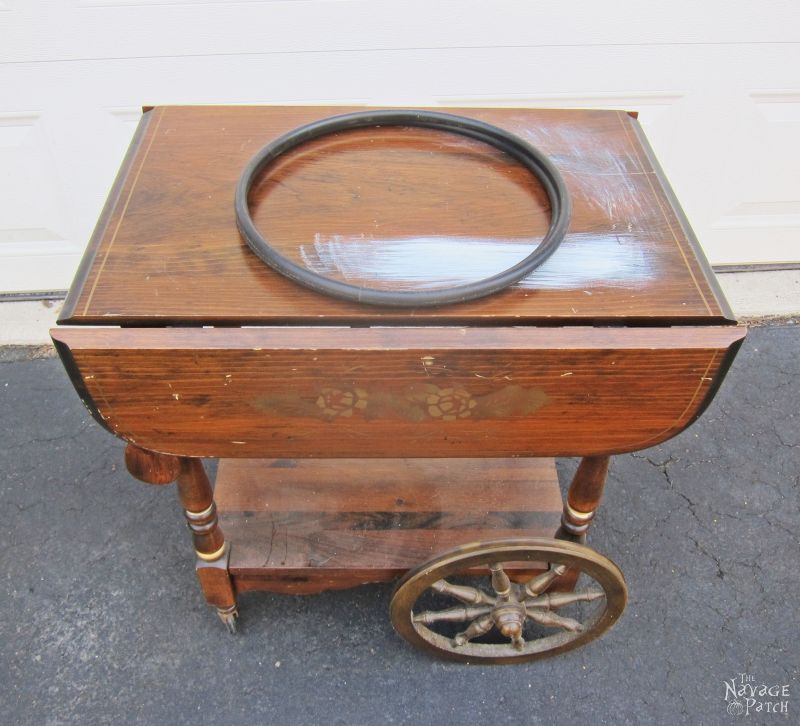
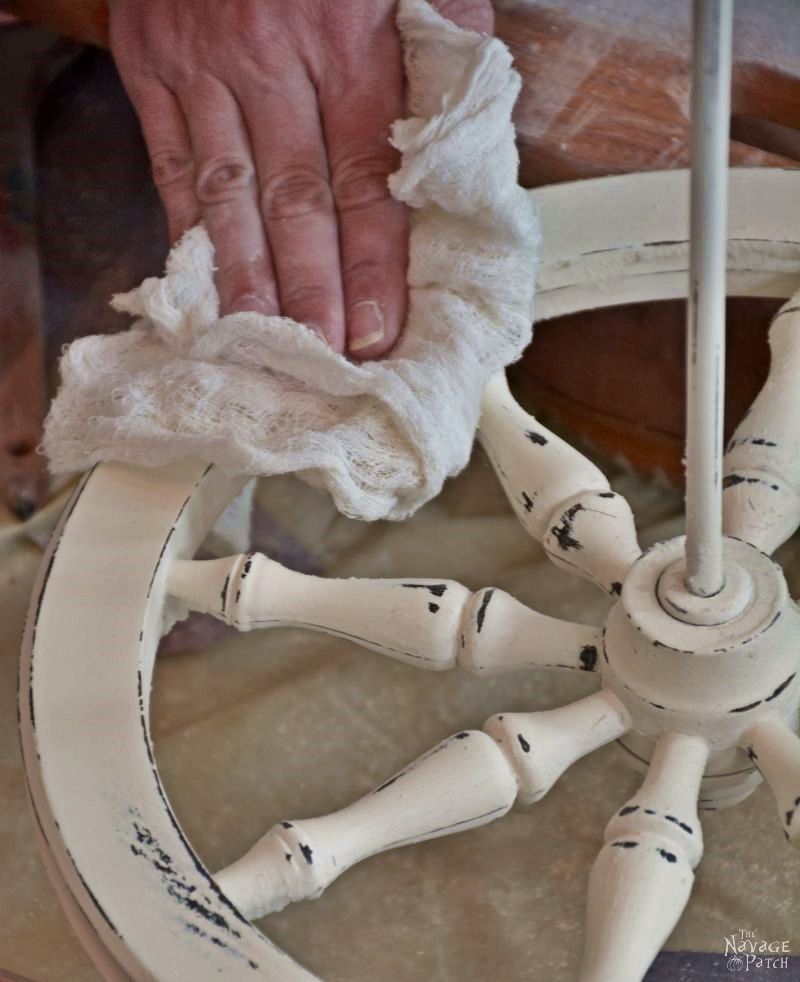
As it wasn’t made from real wood, instead of giving it to Greg as a project, I decided to paint it. To do so, first I took it all apart and cleaned each piece with a damp cheesecloth.

Next I prepared my homemade chalk paint in Old White color for my paint sprayer: Wagner Paint Sprayer. Click here to see my homemade chalk paint recipe for both brush painting and spray painting.
Then I started prepping my spray paint area and filled my Wagner with paint. I have to say this little machine was the best gift Greg ever gave me! It is such a time saver!
Prior to my Wagner, he bought me a Homeright paint sprayer. As my luck would go, the Homeright broke right after the first use. And guess what? I didn’t even get to try it, because it was Greg who used it for the first time! He told me he cleaned it perfectly and used latex paint as he was supposed to, but the sprayer just stopped spraying somehow. I mean, the machine still works when plugged in (yes we still keep it as a reminder of a bad purchase), but it doesn’t spray anything. Instead, it just drips paint. I call it The Big Dripper. LOL.

Since that experience with the Homeright, Greg stopped going anywhere near my paint-related tools. When he told me he wanted to get me another paint sprayer, I told him I was going to do the research and finally decided on my current one simply for one reason: the Wagner has 2 different front end kits (the sprayer head) that fit the model I have, and that gives me the ability to use the sprayer for different types of paint jobs. Of course, having the ability to change the front end kit also means my sprayer will never become idle like The Big Dripper did….that is even if Greg ever decides to use it! Seriously…all it will take is buying a new front end kit (sprayer head), and I have my machine back and spraying wonderfully again 😀
Anyway… enough of my yapping. Back to the makeover…After cleaning each piece I took apart, I covered the parts which I couldn’t disassemble with aluminum foil…
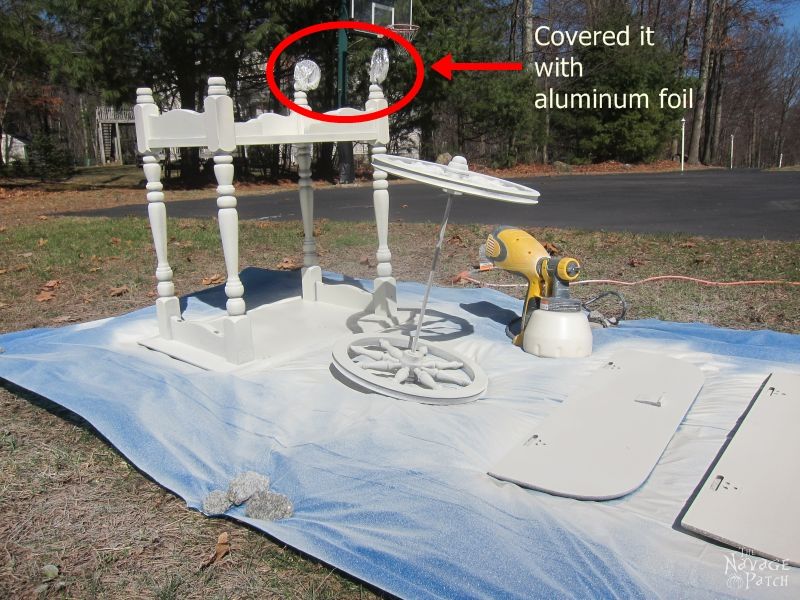
…and gave the entire thing 3 thin coats of paint. With my Wagner, it took no time at all!

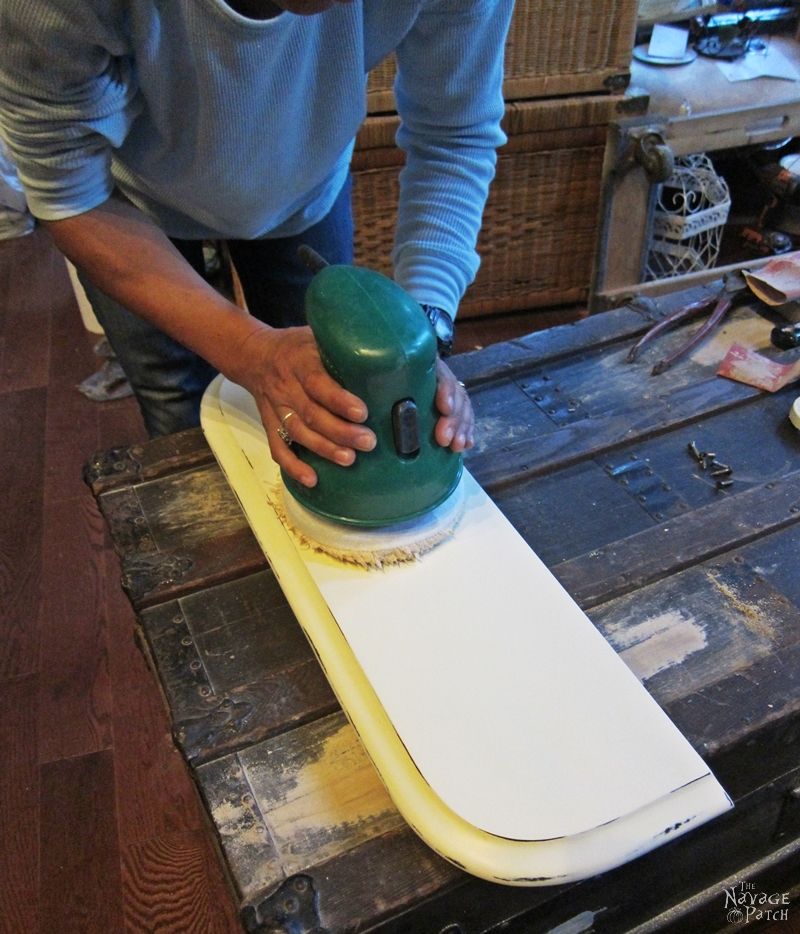
Next, I gave every piece a slight sanding with 320 grit sandpaper. That was so I would have a perfectly smooth surface all over. While I was at it, I also distressed a little.

Once the sanding was done, I vacuumed the dust off of every piece and once again wiped the all the pieces with a damp cheesecloth.
After getting every piece nice and dust free, I started waxing them with Annie Sloan’s clear wax.

When working with Annie Sloan’s wax, I always work in sections. I brush some wax on…

…then I wipe the excess with a cheesecloth and buff it a little. Since I buff everything with an electric buffer at the end of the project, I don’t spend too much time to make it shine while waxing.
After I finished waxing, I grabbed my $5 tag sale buffer and buffed all the parts.
Next, it was time to reassemble the cart.

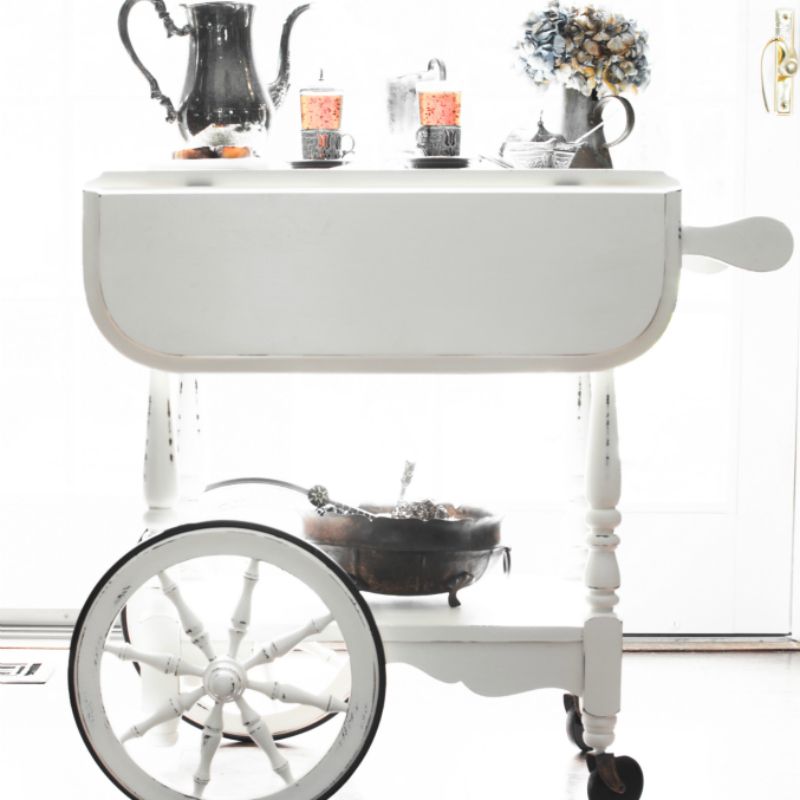
And here is our finished tea cart!
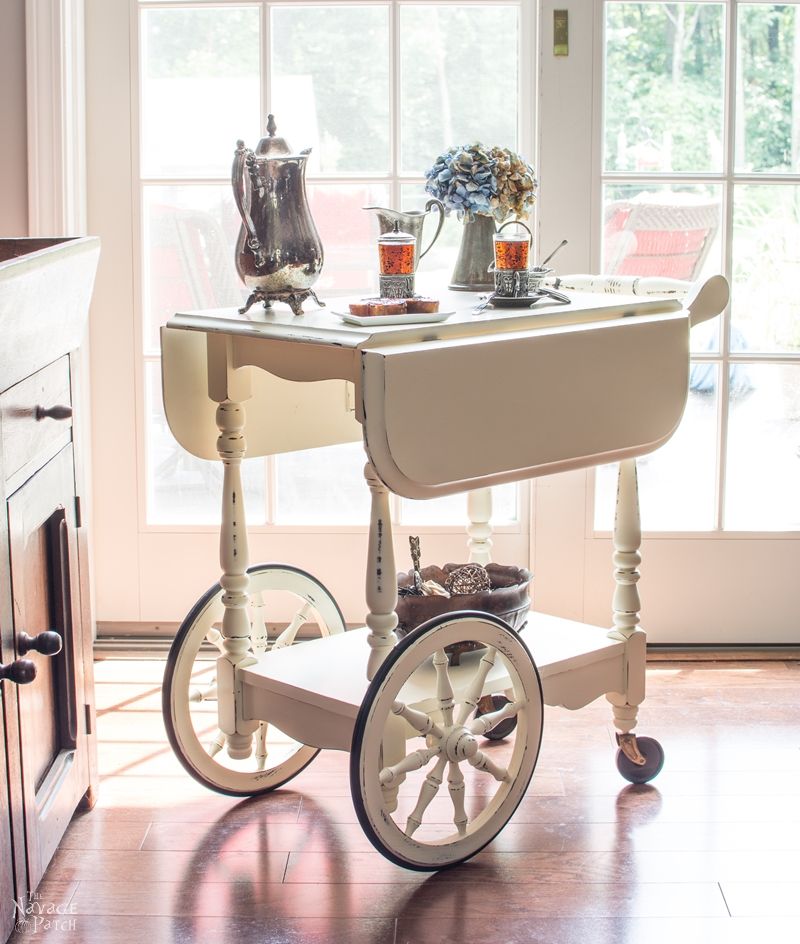
Although along the way I was contemplating whether to put stencils on it or not, in the end I decided not to. I am so glad I didn’t, because sometimes just simple one-color paint and a little bit of distressing is more than enough to give that refreshed look I love.

And here is my favorite picture of this pretty lady!
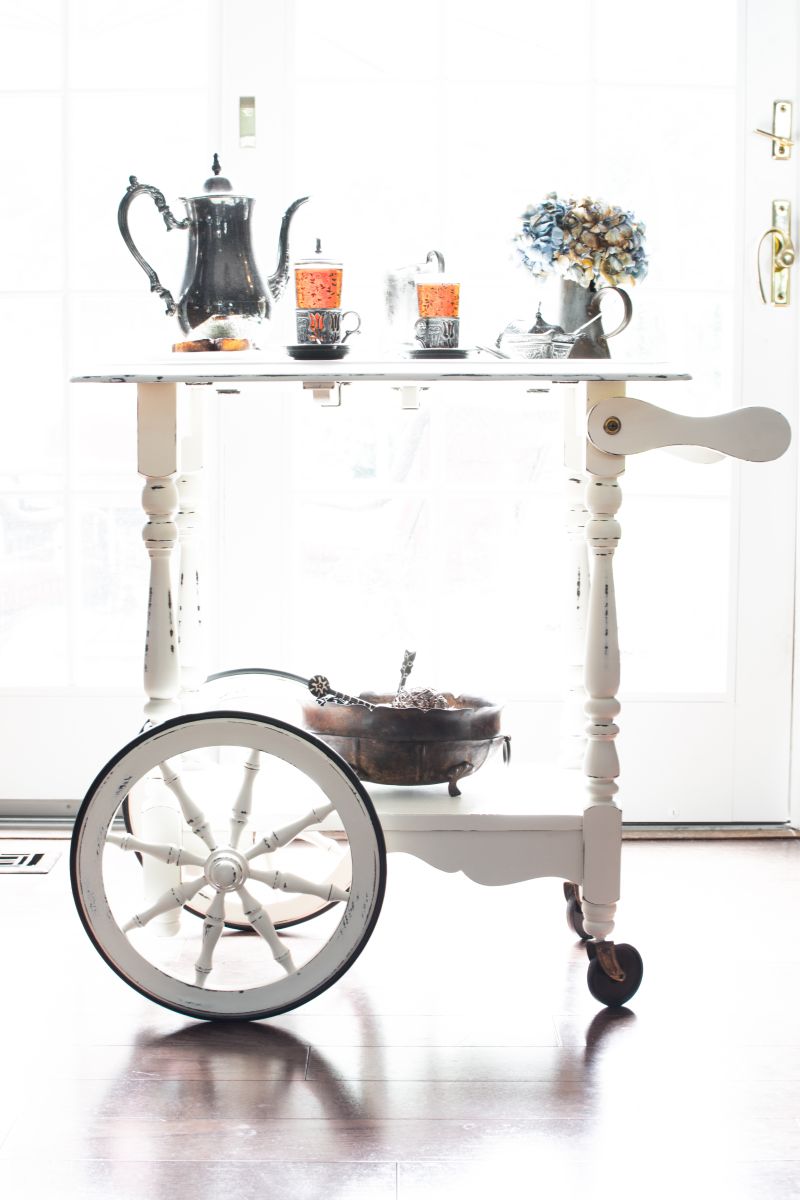
As usual some close-ups to show you the details and the finish a bit better.
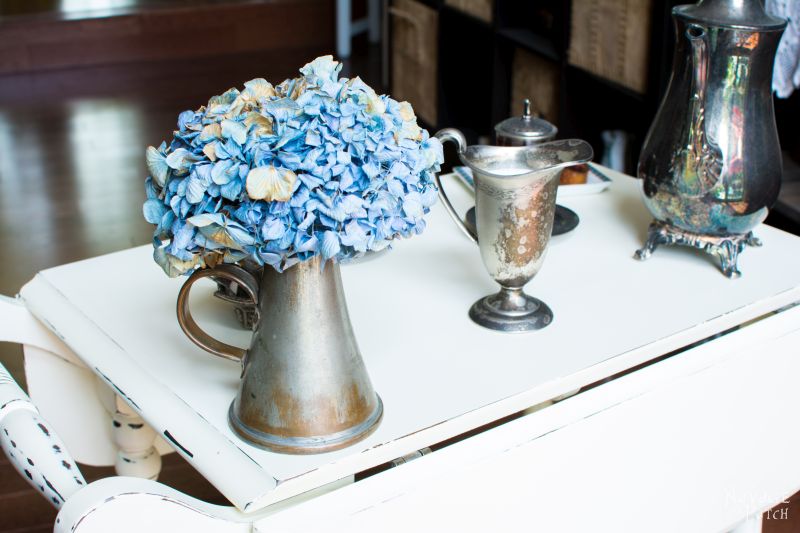


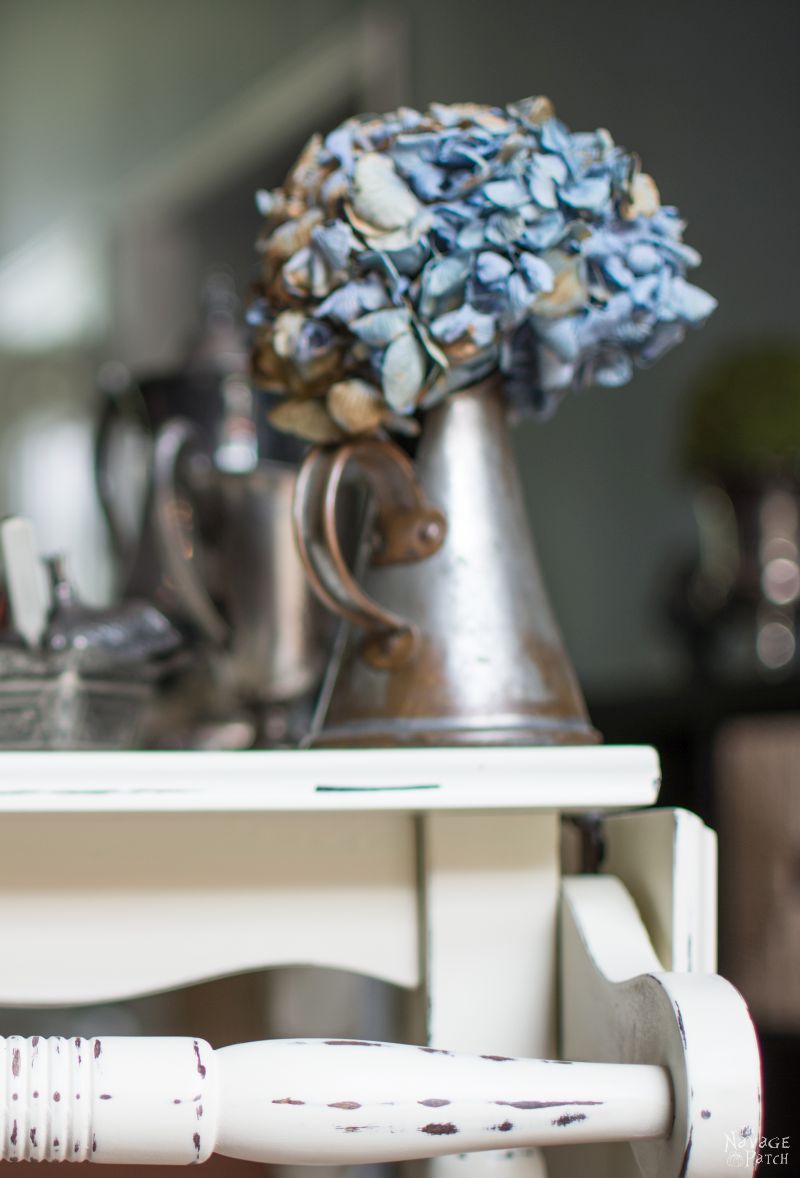
Simple yet pretty, isn’t it?


Don’t forget to save this idea to Pinterest or share it on Facebook so you can find it again later!
Handan, xo


Looks so pretty…a lot of intricate work with those wheels but so worth it!!
Thank you so much, Sandra!
By the way, I saw your latest post (about the lazy susan makeover and the frames/signs) and I wanted to ask you about your white table which you had the blue bottles on. Did you hand paint it? It is such a beautiful table!!
I in fact commented on your post (asking the same thing) but for some reason wordpress wouldn’t take my comment as it didn’t acknowledge my password. Anyway… now I went and checked it again I think it was because you changed your comments section (and made it beautiful btw) and I guess I happened to be commenting right at when you were doing your changes 😉
Hi Haden, sorry I found other people say that a pass word is needed. I did receive your comment though and I hope you got my response?. If you didnt receieve my comment I didn’t paint that table. It is from a store. I wonder why I didnt get this in my emails asking me this ? Is there something I should request to get follow up comments ?
Hi there i just bought a tea cart to restore – however some of the rubber on the large and small wheels is missing- can you help
Direct me to materials to fix them 🙂
Handan, how long do you have to wait between the paint coats? Do you clean the sprayer after each coat? I have no experience with a paint sprayer, hence the questions.
The cart looks beautiful 🙂
Thank you so much, Val!
I don’t know how any other paint sprayer would work so my answers will be for the Wagner I have. For my homemade chalk paint I wait around 30 minutes to 40 minutes between coats. When I use my homemade chalk paint I don’t clean the sprayer till the entire painting finishes. The only thing I do is wipe of the tip of the sprayer with a damp cloth so my homemade chalk paint doesn’t dry right at the tip.
Sometimes I forget the paint project I am working on and leave the sprayer with my homemade chalk paint in for hours. Once I left it for 4 hours not used! (Not kidding!) And yet it cleans off perfectly, and sprayer works just as new. One hint about cleaning: I clean the sprayer with hot water (the hottest water my hand can stand). For chalk paint hot water is the best cleaning medium, so I clean my brushes also with hot water.
I am yet to try my sprayer with latex paint, but since I prepare my chalk paint from latex paint I am assuming the results should be the same if not better (because chalk paint has calcium carbonate and talc mixed in it, so dries quicker).
I hope all this will help 🙂
Thank you for the detailed and very helpful information Handan 🙂
Anytime Val! 🙂
Your tea cart is so beautiful in its simplicity, Handan. You chose well to leave it the one color. The details and distressing are able to take center stage.
Oh thank you so much for such a lovely comment, Susan! You made it my day 🙂
Excellent job on the tea cart. I find some people go too crazy with the distressing part and end up distressing all willy nilly in areas that do not get any wear and tear and it just looks like someone did a bad job. But yours is done to perfection, like it really did get all those scruff marks through years of gentle use! As I bow down and tip my hat to you. Well done!
Kat, thank you so much indeed! I am humbled by your beautiful comment 🙂
It’s beautiful, Handan and the photos are so beautifully staged! Dang about the HomeRight sprayer, I’ve been using mine for about two years without any problems. But unlike your Wagner, it does have to be cleaned between coats or it will block the sprayer tip and you have to run a velocity test with the paint. Enjoy your tea time! Pinning to share 🙂
Thank you so much, Marie! I have to thank Greg for the photos as he is the photographer in our home.
Yeah what a luck on the Homeright… God knows what Greg did to that poor machine. LOL. And on top of that, we were late to return it back, so that was a waste of money there… But as I always say: everything happens for a reason. And I guess I was just meant to own a Wagner 😉
For Wagner, you also need to run a velocity test with the paint, and that is how I enhanced my homemade chalk paint recipe for my paint sprayer. But I only use that recipe with the detail front kit (spray head). With the iSpray front kit you can spray almost anything. It takes latex and many different paints just as is, no thinning necessary… As you can see I am just loving it! It indeed makes my life so easy 😀
handan that lovely well distressed and beautifully painted tea cart just does not fit in your home decor so please disassembly it and put it in the mail to me right away 🙂 xx
Oh Chris, you are the sweetest ever! Christmas is not far away you know 😉 xx
WOW! It went from dull and drab to DELIGHTFUL! Thanks for showing us this up-date!
Thank you so much, Anne! 🙂
I think it turned out beautiful. I love the technique, and I’m gonna use the recipe for the homemade chalk paint. I’ve never done any painting furniture, but have always wanted to. So I’m ready to give it a try. Thanks for the recipe
Thank you so much, Barbara!
Like to know where you bought the rubber ring around the big wheel of the tea cart. I own an old teacart, but the rubber ring is broken several places. Love to put a new one on he cart.
Hello Nina, the rubber ring came together with the cart when I bought it. But I did a quick online search for you, and I found a place called Restoration Supplies. Below is the link for that online shop where you can find different types of rubber rings for tea cart wheels:
http://fave.co/2allD8B
I hope it helps! 🙂
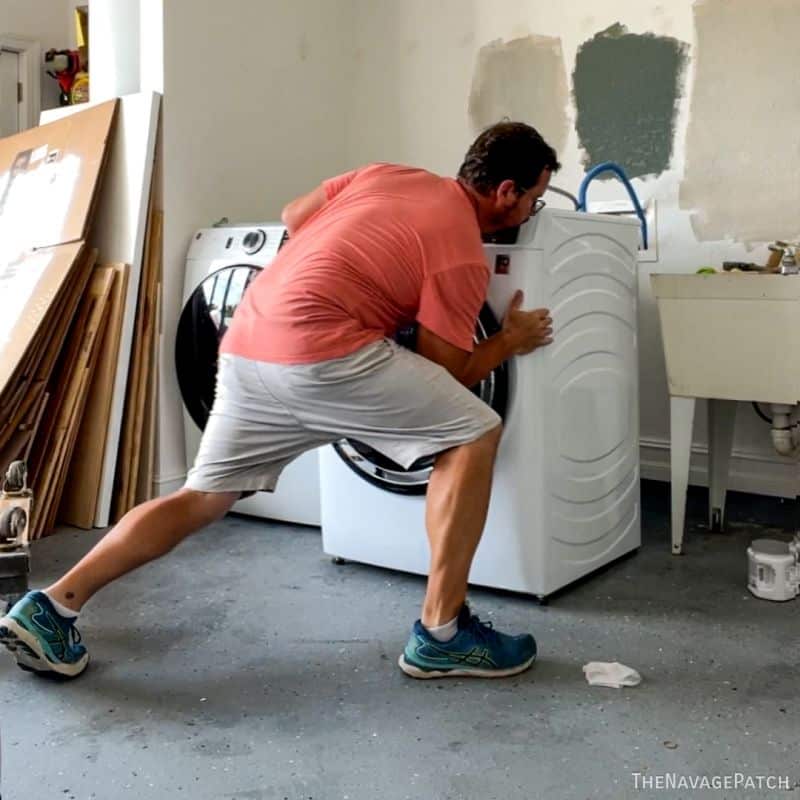
That picture of your husband holding the painter made me laugh, he looks like he is so sad, like you took away his favorite toy. That said, your tea cart turned out beautiful, I can see part of it was labor intensive but a job well done.
I have missed your wonderful projects and just had to stop by and take a look at what you have going on. Hope you will visit again soon to share on my parties.
Have a wonderful week!
Karren
Oh My Heartsie Girl
Thank you so much, Karren! Only the sanding was a bit labor intensive, but the rest was quick and easy 🙂
I was trying to finish some projects that I had in hand, hence I didn’t get the chance to attend to any of the parties for 2 weeks. But this week I will get back to our regular schedule 😉
Thanks for visiting and you too have a great week!!
The tea cart is so precious. The way you staged it really enhances the lines of the piece. Looks good.
Thank you so much, Debra! 🙂
Oh, what a fabulous job you did on this pretty little tea cart….I just love it all painted in white. I have a wicker one that needs a good spray paint…it surely isn’t as pretty as yours, tho…
Thank you very much, BJ! I love white as it really gives a refreshed look to a piece of furniture. Also I think it hides dust and dirt better than other colors. Hence I use white with majority of the pieces I paint. 🙂
Gorgeous tea cart makeover.
Thank you so much, Linda!
The new tea cart is beautiful! I have no place to keep something like that, but I want one for our house now!
Thank you so much, Leslie! 🙂
Hi Handan, hope you are both well. I appreciate that you stopped by this weeks party, nice to have your visit again. I always like to see what you guys have going on.
I am in the process of reading about your Part II experience in Afghanistan, That had to be very intense!
I hope you have a wonderful weekend, will be looking forward to your many projects 🙂
Karren.
Thank you so much, Karren! With school starting and the projects getting backlogged, I didn’t have any time to attend parties until this week. Now that we are back to our normal schedule, I’ll again be a regular at your party. Thank you once again for visiting, and you have a wonderful weekend, too! 🙂
It’s beautiful! Love your new treasure! Glad you got a new painter, too! 🙂 Thanks for sharing with me @ the What to do Weekends party!!
Theresa @ Shoestring Elegance
Thank you so much, Theresa! I thank you for hosting such a great party 🙂
Your tea cart is so sweet. The original cart was more than a bit lackluster and I’m so glad you were able to transform it. I tend not to distress my furniture, but I like what you’ve done here. I saw you link at Becca’s DIY Vintage Chic party.
Thank you so much, Ann Marie! 🙂
The poor thing was in bad shape but it’s absolutely darling now! Thanks for sharing this at Throwback Thursday this week.
Mollie
Thank you so much, Mollie! 🙂
Gorgeous Handan, love the simplicity too. Post like these from you make me want to move back to the USA (well maybe half time….) where thrift finds are everywhere and where one can have a backyard and a basement workshop! Thanks so much for sharing on craft schooling Sunday!
Oh thank you so much for your lovely comment, Sara! It is a pleasure for me to attend your party as I see wonderful projects every week 🙂
Your cart looks so pretty, Handan!! The paint seems really smooth, I guess it is because you spray painted it. I also have a Wagner spray painter but I tried it once with my own chalk paint recipe and I guess it was too thick because it scattered the paint all over and the surface was rough.
I read from one of the comments you run a velocity test, I think I have to look for that in my own too.
Hi Pili, I ran the velocity test only when I was trying to come up with my modified homemade chalkpaint recipe. Once I came up with that recipe, I didn’t need velocity tests anymore, but just kept following my the modified recipe. If you are also using Wagner you might want to give my recipe a try.
As for the surface, chalk paint (whether homemade or store bought) tends to feel rough after it dries. Therefore I always spend a good amount of time for the final sanding and the waxing, and I do that regardless how I painted the piece: whether with a paint sprayer or brush. That way I manage to get very smooth surface. Paint sprayer just saves me time during the painting process, that is all 😉
Thanks for all the info, I will try your chalk paint recipe for sure!
Hi again! Happy New Year!
I decided I am going to paint a piece of furniture that I’m too lazy to use the brush so I was wondering about the amount of paint I will need. In your recipe you measure in cups, do you remember how many you used for your tea cart? I’d prefer to have some extra than being short
Thanks a lot!!
Happy New Year, Pili! I normally fill the sprayer’s container with chalk paint made with 3 cups of paint. I start painting with that and then whatever is left over I use for the next furniture. With this tea cart I had quite a bit of leftovers. Hence I would think chalk paint made with 2 cups should be good enough for 3 nice thin coats for a furniture like this tea cart. Most likely you would still have a bit of left overs, but it is good to have that to do touch ups on any areas that might have been missed during spray painting. 🙂
Wow. I love what you did with that cart! Beautiful work! I am going to have to make some of your homemade chalk paint to use for my next project. Do you use the Buffer for all of your chalk paint projects? I have never used one, but the finish on this cart is just perfect and it’s exactly the finish I always want and never quite get. I wonder if it’s the buffer or something else I am missing?
Melissa
Thank you so much, Melissa! I use a buffer with almost all my painting projects, because it gives the perfect shine without me having to lose my arm for a day or two. But the finish being so smooth is due to final sanding. Whether I paint with a paint sprayer or brush I always do the final sanding as that makes the surface smooth and free from possible brush marks or splotches. I hope this info was helpful 🙂
Wow, this is beautiful. I have this exact tea cart, My grandmother gave it to me many years ago. I would love to have it painted the light color like yours. I really don’t use mine but I would if it looked like this one.
Thank you so much, Pamela! 🙂
Really, really lovely! Great job!
Thank you so much, Cecilia! 🙂
Lovely cart, I wish I can find something so chic. Thanks for sharing at Inspiration Galore Project Pty, see you next week.
Thank you so much, Fabiola! 🙂
Gorgeous makeover. Thank you for sharing your makeover with us at Snickerdoodle.
Thank you so much, Sharon! 🙂
I adore this project. I love tea so this would be perfect in my dining room. I’ll now be on the lookout for a tea cart. I featured this project this week on A Little Bird Told Me!
Wow! Thank you so much for the feature, Sandy! 🙂
The look on his face! Thats too cute, he looks like he’s s sorry and won’t touch your tools again. LOL Thanks for sharing this with us @ the DI & DI Link party. Have a great week you two!
LOL. Thank you so much, Christine! 🙂
Beautiful makeover Handan. There is nothing greater than the power of paint. I’ve never used a spray painter but I feel really bad for Greg. Don’t be too hard on him, he does so many other things and is a true master with the wood. I love the little tea cups you have on top of the card. They look like they came from back home. Exquisitely beautiful.
Thank you so much, Mary! Yes those are from Turkey, hence the authentic look 🙂
Love this project, Handan. Wanted to let you know that I’ll be featuring it this week at Vintage Charm 🙂
Wow! That is great news! Thank you so much, Diana!! 🙂
This is an absolutely gorgeous makeover! I love what you’ve done with this little cart. Now I need to find one to makeover for my house. Thanks for sharing your project with us at Merry Monday this week!
Thank you, S Marie! 🙂
Thank you for sharing this post on the Simply Sweet Home Linky Party. You were my choice for this week’s feature. I truly enjoyed this post and especially the finished product.
Thank you so much for your lovely comment and for the feature, Sheree! 🙂
Hi Handan! I absolutely love your tea cart. I wish I had one for myself. You did a beautiful job on this. Thank you so much for sharing it at the party. I am featuring you now at this week’s party!
Happy weekend!
Theresa.
Thank you so much, Theresa! 🙂
I love a beautiful tea cart. Makes me think of my grandmas house, and I LOVED going to grandmas house. The white paint gives it a classic look! I think they are so functional and in style 🙂
Thank you so much, Crystal! 🙂
Wow!! Beautiful!! Thanks so much for sharing at the Pleasures of the NW’s DIY party last week. Sorry it took so long to come by – it was a crazy week!!
Thank you so much, Helen! 🙂
What a beautiful transformation! Thank you so much for sharing this at last week’s {nifty thrifty sunday}. You’ve been featured at today’s party! – http://www.niftythriftythings.com/nifty-thrifty-sunday-247/
XO! Vanessa
Oh that is wonderful! Thanks so much, Vanessa! 🙂
Wow I love your teacart!!
Thanks for linking up with Welcome Home Wednesdays! Live every Wednesday at 7AM CT.
liz @ j for joiner
Thanks so much, Liz! 🙂
Handan,
The tea cart looks fantastic! What a lovely makeover. I have lots of tea parties and wish I had room for this versatile piece. You have brought it back to life and it looks so nice with your tea pot. I do hope you like tea and use this cart to serve your friends and family. Well done!
P.S. What derivation is “Handan” or is it a family name? I love knowing where people and their names come from!
Thanks so much, Barbara! Handan is my first name and it is an old Turkish word derived from Persian. In both languages it means “smile, smiley/happy face, a person who makes others smile/happy”. 🙂
Handan, you did an remarkable joy on your teacart. And you styled it beautifully for teatime.
Well done, ma’am! : – )
Thank you very much, Michele! Greg will be delighted to hear your lovely comment on the styling, as it was him who staged it for the beauty shots 🙂
Your cart turned out so lovely. Great job.
Thank you so much for linking at #overthemoon! I look forward to seeing what you share every week. Please stop by #WonderfulWednesday or #ThursdayFavoriteThings parties also. Don’t forget to comment your link #’s so I can be sure to visit and you get a chance to be featured! Pinned and shared.
Hugs,
Bev
Thank you so much, Beverly! I will definitely attend other parties also! 🙂
This teacart turned out so lovely! Now I want to go find a tea cart so I can have one, too!
Thank you so much for your wonderful comment! 🙂
I loved this. I saw one of these at an auction a few weeks ago and now I am kicking myself for not buying it. You did a great job.
Thank you so much, Pamela! I am sure there will be many more opportunities in the summer as that is the active tag sale and auctions season 😉
Your tea cart is fabulous! Stop by when you can.
Chippy White Cottage Blessings,
Rebecca
Thank you so much, Rebecca! 🙂
Oh my gosh, this is so cool! I would love for you to link up to our new link party too.
http://repurposeandupcycle.com/2017/03/07/idiyedthat-link-party-2/
Thank you so much, Lindsey! And thanks for the invite too! I linked up my tea cart and one of Greg’s projects 🙂
What a fabulous transformation. love the finished tea cart. Thanks for sharing at DI&DI.
Thanks so much for your lovely comment, Linda! 🙂
Now I want a tea cart!! That came out beautiful! Thanks for sharing on the Pleasures of the NW’s DIY party!
Oh thank you so much, Helen! I will sharing more projects in the upcoming weeks 🙂
This tea cart looks so pretty, y’all did a great job distressing this! I’ve been wanting to get a paint sprayer for a long time now, how has the Wagner held up since it’s been almost a year since you posted this? Stopping by from Ginger Snap Crafts Wow Me Wednesday party!
Hello Maggie, I love my Wagner! Truly it is just like a work horse! I never treat my tools/machines well. But my Wagner put up with all the abuse and didn’t let me down so far 🙂
Hi! I’m one of the co-hosts from the Welcome Home Wednesdays Link Up. I love your tea cart makeover. You really made this piece something beautiful. I really want to find a tea cart now! Thank you for sharing.
Thank you very much!!
That cart came out so nice. I love those large spoked wheels!
Thanks for sharing at Funtastic Friday!
Thank you very much, Kimm!
What a lovely makeover! Thanks for joining Inspiration Monday link party!
Thank you so much, Christy! 🙂
Wow, it’s beautiful! I love all your tips for redoing the cart too.
Thank you very much, Kati! 🙂
Beautiful tea cart makeover! 😀 Thanks for sharing.
Thank you so much, Lina! 🙂
I love your tea cart! Thank you for sharing at Link It Up Wednesday!
Thank you very much, Kileen! 🙂
LOVE this makeover! I just had to feature you for I DIYed that! Now, I’m on the hunt for a tea cart of my own. Thanks so much for linking up!
http://sixseeds.patheos.com/notinggrace/2017/03/diyed-week-3.html
Thank you very much for featuring it, Jen! 🙂
I love this! I’m always so impressed with makeovers like this. It turned out so good!
Thank you so much, Jenna! 🙂
When I was a little girl, almost every mom had one of those tea carts in the dining room — usually in some type of maple wood finish. I like how you’ve brought this one up into the 21st century with the farmhouse, distressed look. It really freshens up the piece. It looks great and has more years of life left!
Thank you so much, Carol! Indeed it has few more years of life now 🙂
I’m a sucker for bar carts and yours is a real beauty! Thanks for the paint mix tutorial and the great photos, and thanks for sharing at Vintage Charm!!
xo Kathleen | Or Hopeful Home
Thank you so much, Kathleen! 🙂
Thanks for sharing at the Inspiration Spotlight party. Pinned & shared.
Thank you so much!! 🙂
The makeover you gave this tea cart is beautiful!! What a transformation!
Thank you so much, Keri! 🙂
Oh my goodness! I love this! I actually have a tea cart that is still in pretty good condition –oh, but I have something in mind for it when I am ready for a change! This is gorgeous! (And THANK YOU for the recipe for homemade chalk paint because –oh my, it is pricey!)
Thank you so much, Karrilee! 🙂
This turned out so awesome! What a fun cart-love white paint and distressing! Thanks for sharing on Funtastic Friday!
Thank you so much, Heidi! 🙂
Thank you for the explanation about your name; it is lovely. My maiden name means “litter of pigs”; not so cute. I think you were right to leave your cart white. If it needs to be “dressed up” on occasion, a pretty table cloth kitty corner will do it! Poor Greg looks like a puppy who knows he’s gonna be scolded for doing something wrong; I loved that picture.
Thank you so much, Kathy! I agree a table cloth will give it the color it needs. And LOL – I also love that picture. He is so lucky that his face impressions are always funny which makes it hard to get cross with him. 🙂
Did you replace the rubber rings on the wheels? I have a similar cart but the rings are dried up and cracked and I’m not sure how to proceed. Thanks
Hi Laren, no I didn’t as they are still in good condition. I did a little research for you and found a place called Restoration Supplies. Below is the link for that online shop where you can find different types of rubber rings for tea cart wheels:
http://fave.co/2allD8B
I hope that helps! 🙂
How did you take off the actual wheel from the wheel frame on the tea cart large wheels? I’m painting mine the same and love the look of the black wheel against the white!
Hi Quincy, oh that part was easy – I just levered it off using a small flat head screw driver. 🙂
What a beautiful makeover! Love your blogs on makeovers, it’s always amazing how these old pieces can be as beautiful as new ones given the right makeovers (:
Thank you so much, Elon! 🙂
What model of Wagner Sprayer does Handan use? When I click on “My Wagner”, the Amazon link indicates it is for stains and urethanes. I would love to buy a good paint sprayer and thought Handan’s would be perfect, until I saw for stains. Does she have a special way of cleaning the tips or does she use a different model Wagner?
Hi Anne, there used to be only one Wagner – the one we linked – and it works great with properly thinned latex. We also bought a new nozzle for it called iSpray. They now make a dedicated paint sprayer that is simply the one for stains with the iSpray nozzle included. The funny thing is, it’s still cheaper to buy the sprayer we linked plus the iSpray nozzle than it is to buy the dedicated paint sprayer. It’s all in the nozzle. The back end of the machine just pushes air. The nozzle dictates what can pass through and what concentration!
You did a beautiful job! I love the distress. I am redoing a tea cart now and was wondering how the wax holds up to moisture from drinks sat on it? The cart I am doing needs to have a good protective coat on it since it will actually be used for drink and food service. Appreciate your feedback. 🙂
Hi Billie, wax is an excellent protector, as long as you’re not putting excessively hot drinks on it. To be on the safe side, I would apply 3 coats of wax to build up a good protective layer. Good luck!