DIY Centerpiece Tray & Free Plans
This beautiful DIY Centerpiece Tray is easy to build with our free plans, and it’s the perfect addition to any dining table!
So Captain Yaps-A-Lot Handan has been clamoring for me to make her all sorts of centerpiece-y type stuff for our dining room table. Lord knows what the woman is thinking. I already made her a gilded centerpiece bowl, but was that enough?
Nuh.
Then she bought a perfectly lovely long metal basket from Hobby Lobby. I even made rustic wood stars for it! But was that enough?
Nuh.
She wanted something bigger and longer and made from wood!
o_0
Hmmmm...I should probably re-word that last sentence…
Anyway, as usual, she explained what she wanted in great detail while my eyes glazed over and small rivulets of drool ran down my chin.
Long tray. Handle on top. Pine. Rustic. Farmhouse.
She was hitting all the highlights, and I thought I had a pretty clear idea of what she wanted, so I started drifting into the kitchen while she yapped spoke. Might as well forage while she uploaded information into my brain.
As I scanned the counters and cabinets for something to munch on, my eyes slid across our little vitamin caddy. Handan had brought it home from the dump three years ago and given it a little makeover. It’s been in my kitchen ever since, hosting all sorts of vitamins and painkillers and medications for various ailments from sneezing to stomachaches.
Hmmmmmm…
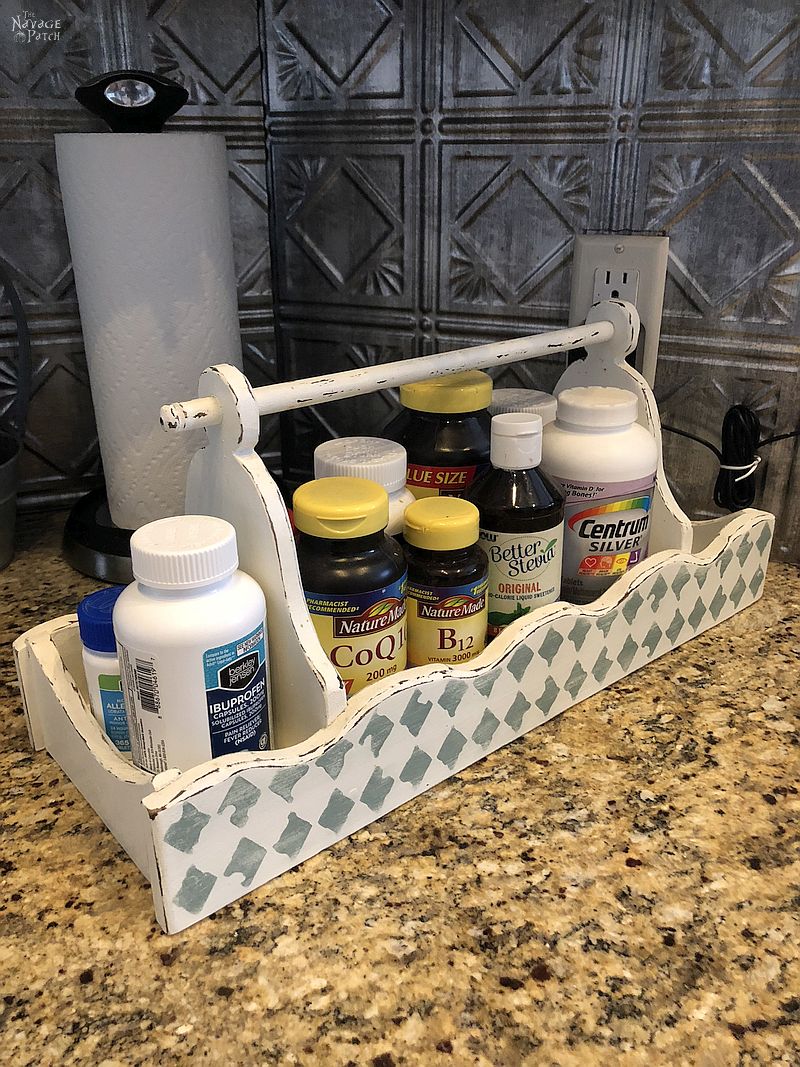
I could smell the exhaust fumes as my brain sputtered to life, the synapses backfiring as thoughts and ideas coalesced in the formless void between my ears.
I lifted a hand, extended a short, chubby finger towards the caddy and grunted.
“Like that?” I said.
“Oh, my babes, that is an excellent idea!” She said. “But make the sides straight, okay?”
“Straight sides. Got it.” I said.
“And make the handle more like this.” She said and drew her finger through the air.
“Handles like that. Got it.” I said.
Satisfied I understood my mission, I sat down at the computer, opened Sketchup and started designing.
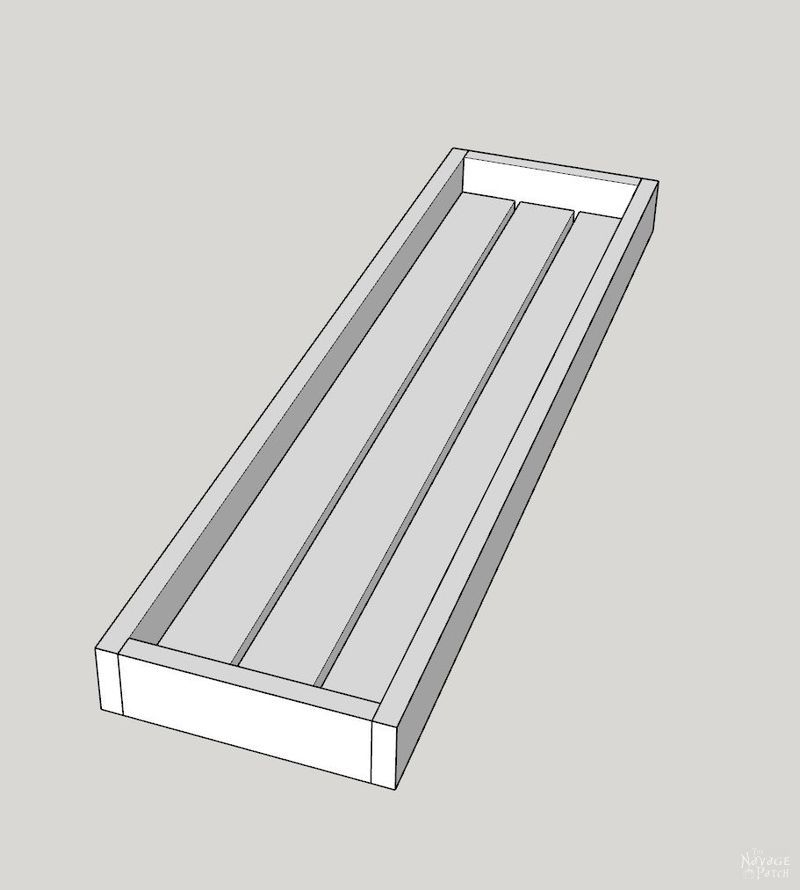
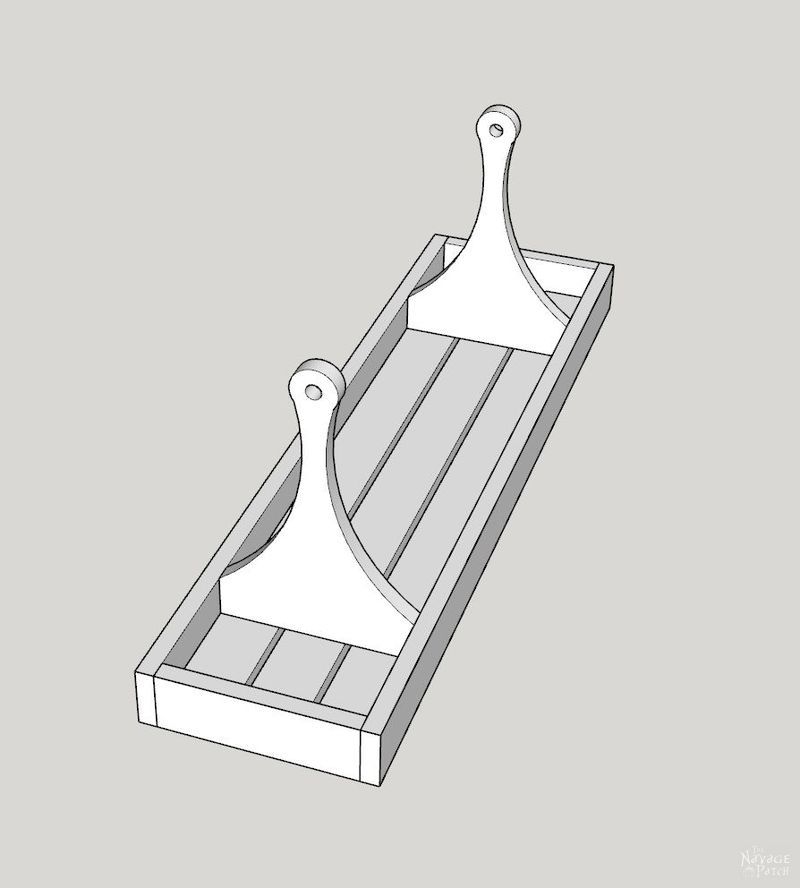
Centerpiece Tray Dimensions
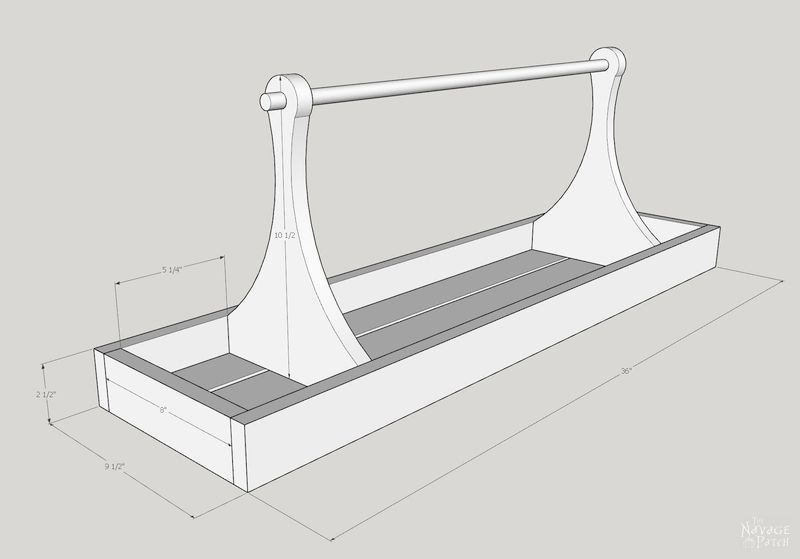
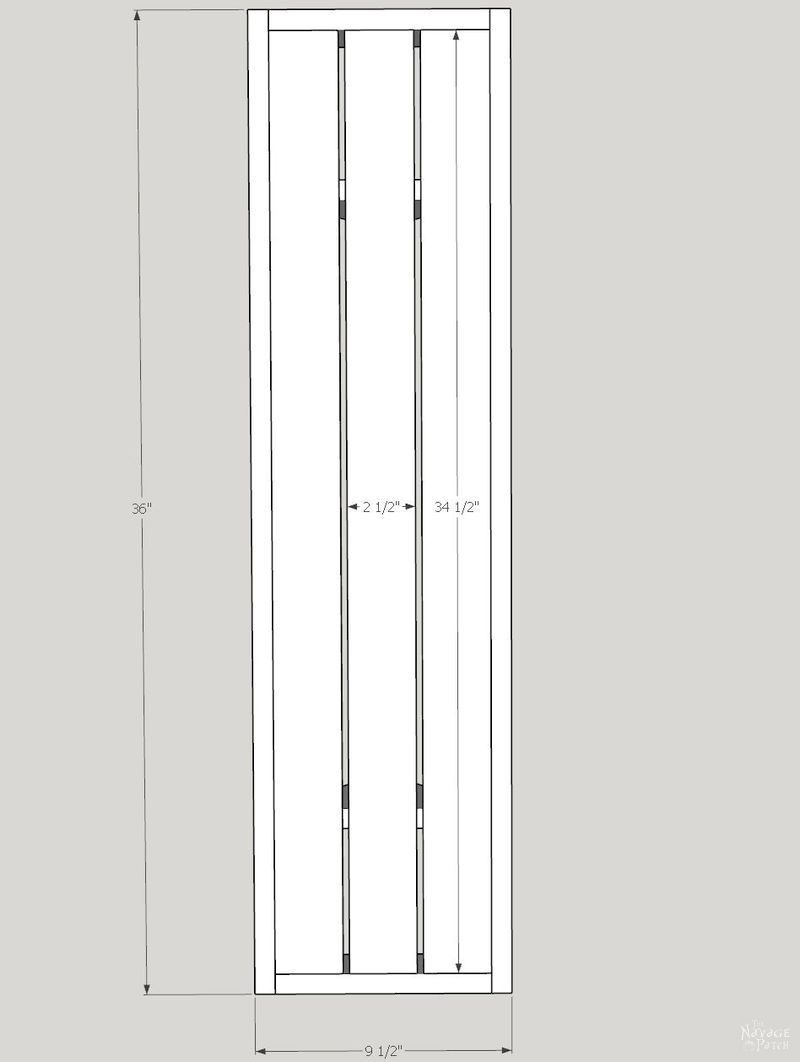
DIY Centerpiece Tray
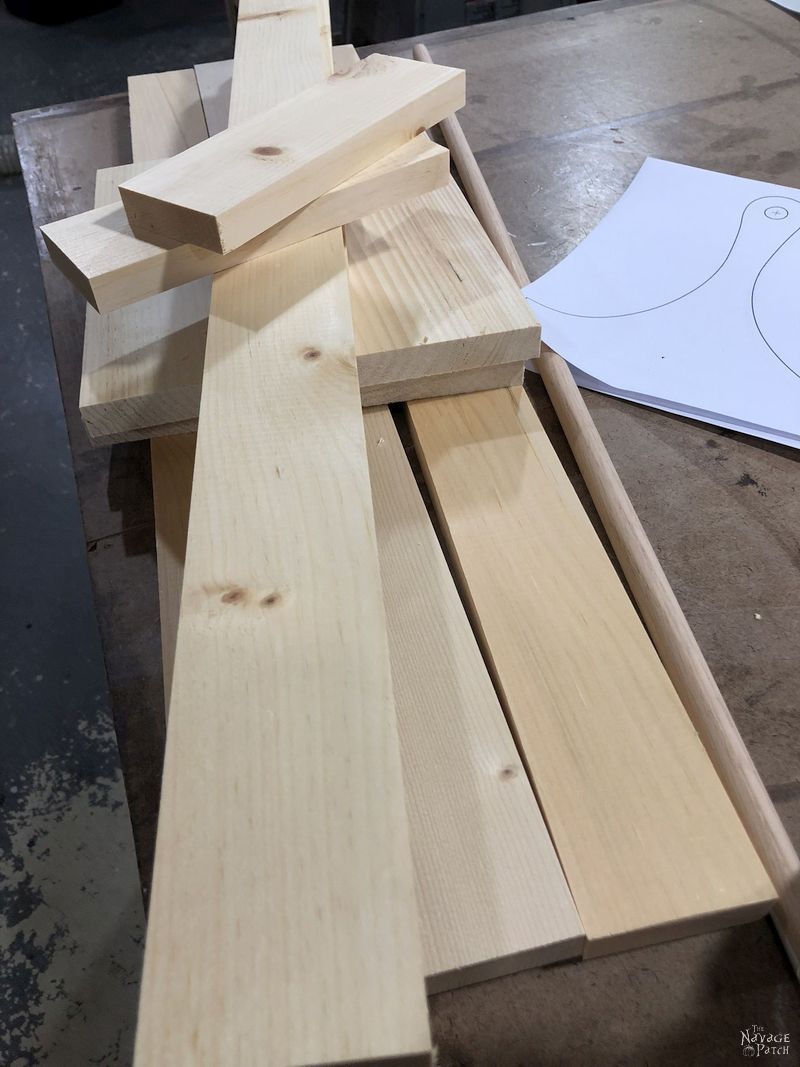
- (3) 1 x 3 x 8 pine boards
- (1) 1 x 10 x 6 pine board
- (1) 5/8 inch oak dowel
- Jigsaw, scroll saw or band saw
- Handle pattern (included with this post)
- Glue stick
- 150 grit sandpaper
- Wood glue
- Brad nailer
- Drill and 5/8 inch bit (I used a Forstner bit)
- Clamps (optional)
- Wood stain of your choice
- 220 grit sandpaper (to distress stain)
DIY Centerpiece Tray Cut List
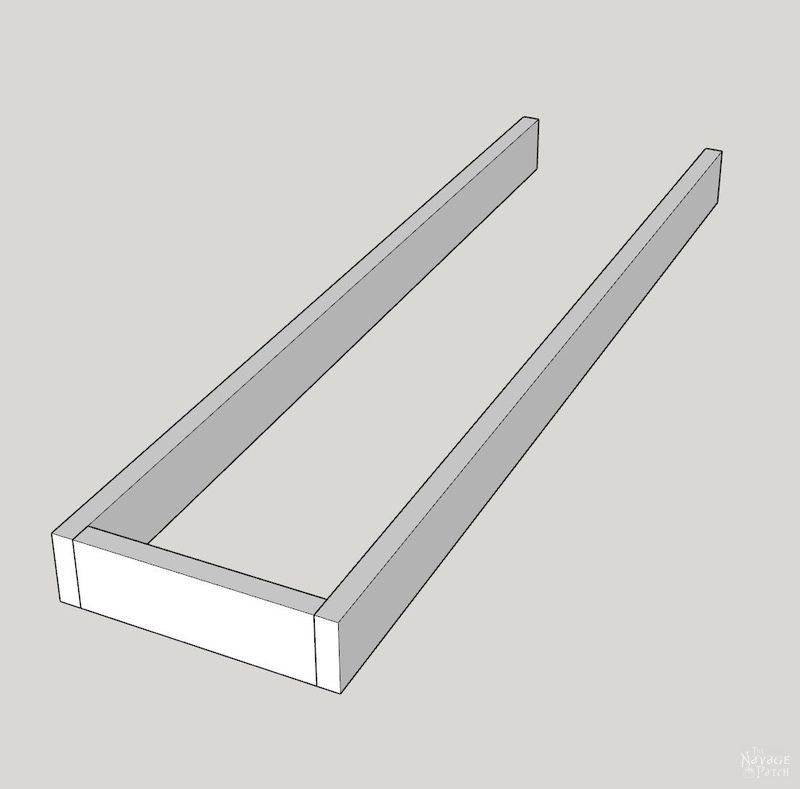
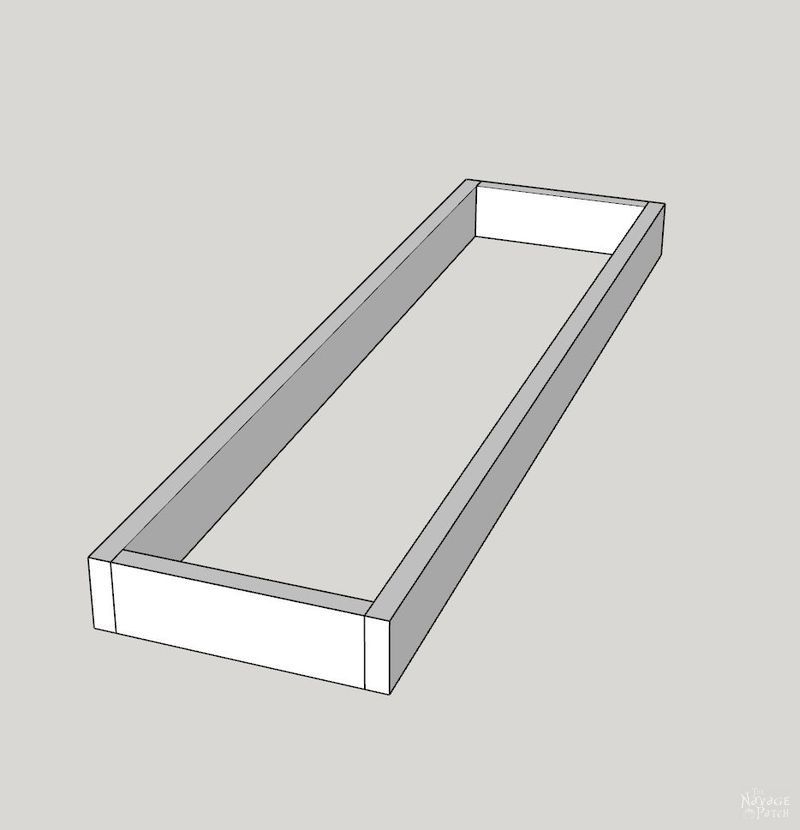
- Cut the 1 x 3s into (2) 36-inch pieces for the long sides of the centerpiece tray, (3) 34 1/2-inch pieces for the bottom, and (2) 8-inch pieces for the short sides
- Cut the 1 x 10 into (2) 11-inch pieces, and then trim the width to 8 inches
- Trim the dowel to 25 1/2 inches
As I gathered my supplies for the centerpiece tray, I found that I wouldn’t need to buy any 1 x 10 lumber, as I still had some left over from my DIY Rustic Console Table build a couple of weeks ago. I love it when scraps become useful!
How to Build a Centerpiece Tray
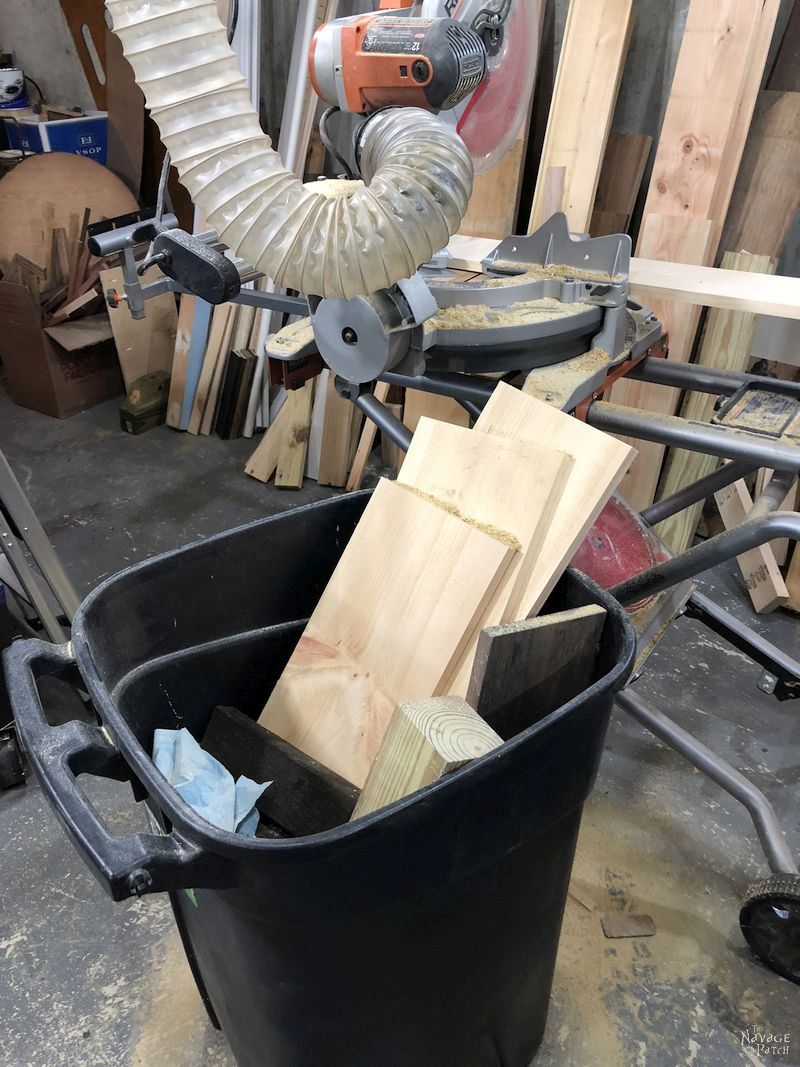
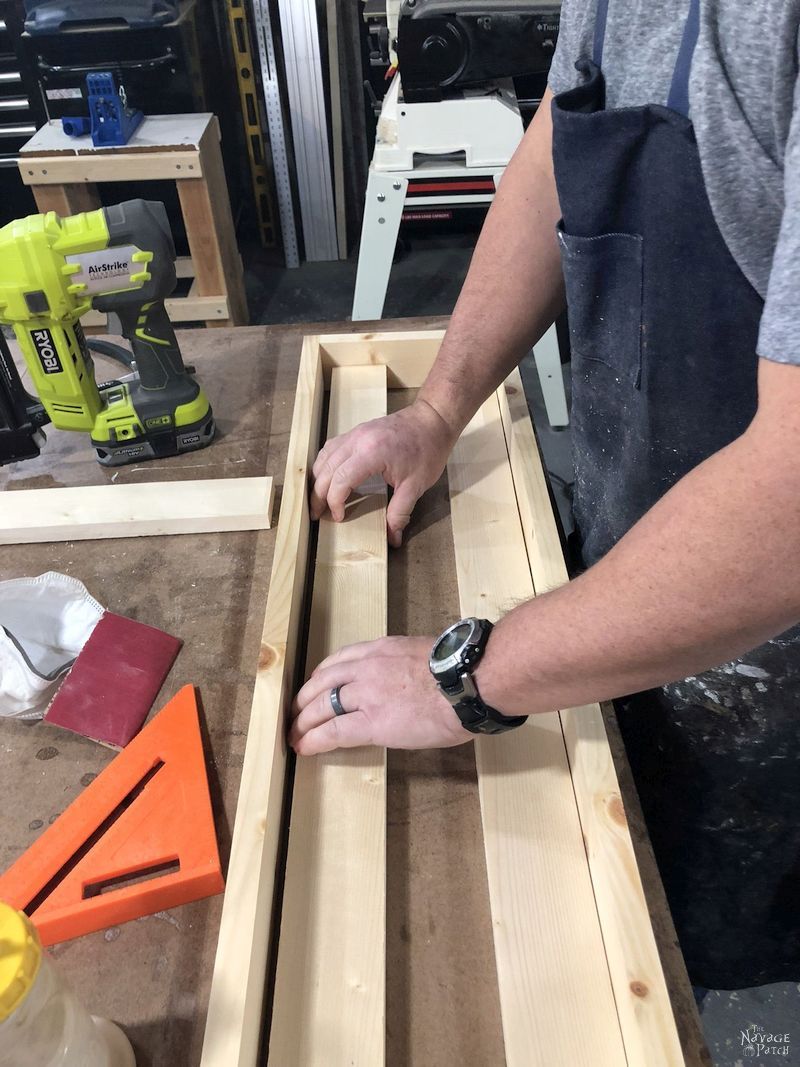
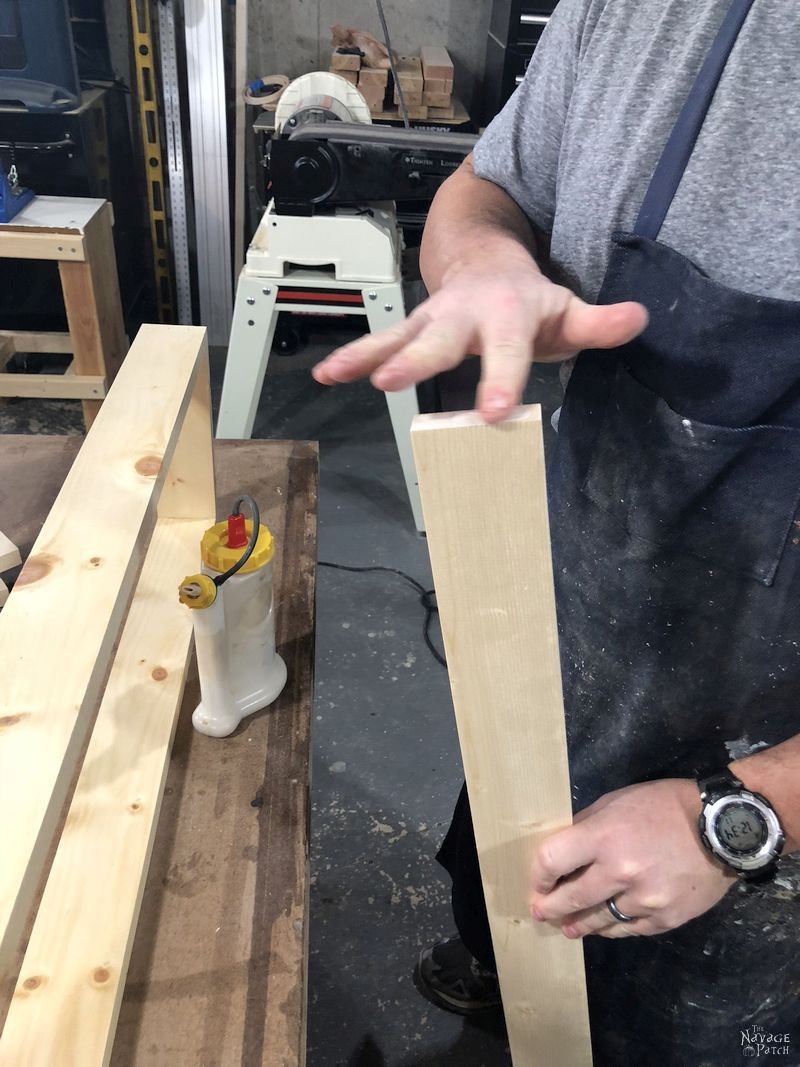
I cut all my pieces to size and laid them out on the table.
Assemble Sides of the Centerpiece Tray
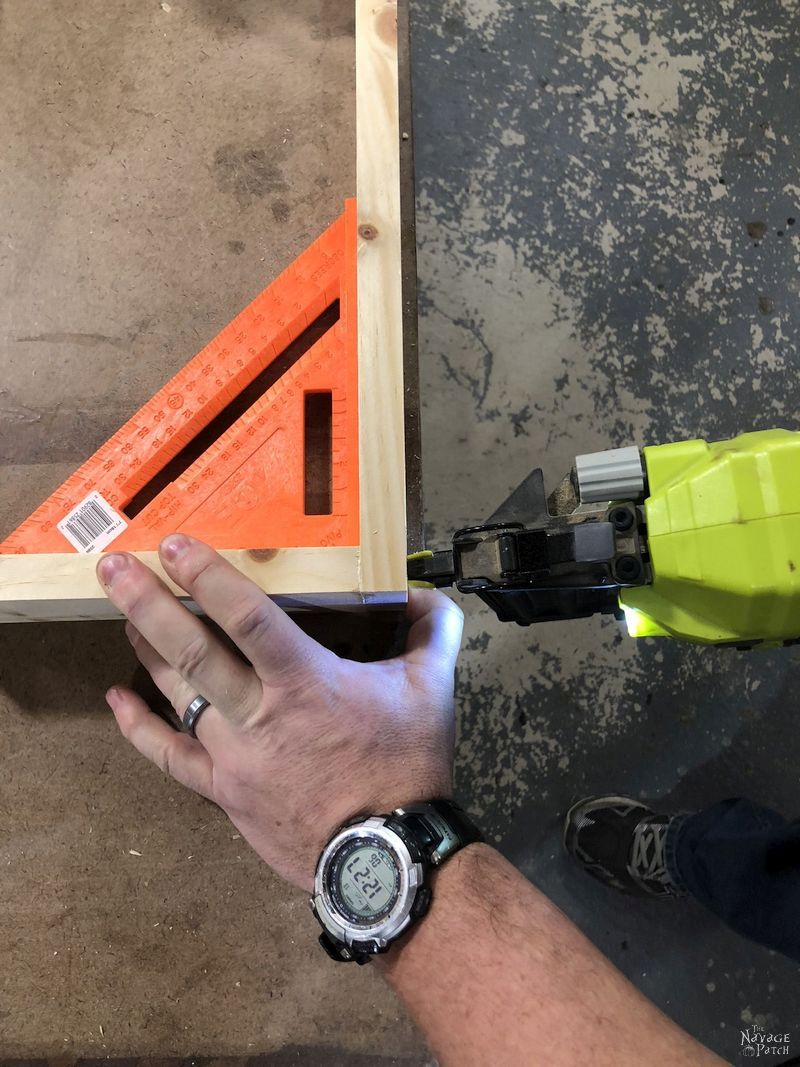
I first attached one of the short sides to a long side by putting some wood glue on the end of the short piece.
Then I lined up the pieces and shot 3 brad nails to secure them together.
You may be wondering how you can get that industrial-looking distressed floor in your home. Well, It’s easy!
- Find a house for sale that had its basement floor and garage floor painted just before it went on the market
- Buy the house
- Walk on the painted basement floor and drive on the painted garage floor
- Enjoy your distressed industrial-chic look, as the paint slowly peels with each footstep and turn of the tire!
- Bonus decor: strips, chunks and flecks of gray paint all over the house every time you walk in from the garage or up from the basement!
Okay, back to the centerpiece tray. We are here:

Next, I put some glue on the other end of the short piece and attached the other long side, again, securing it with 3 brad nails.


That brings us here:
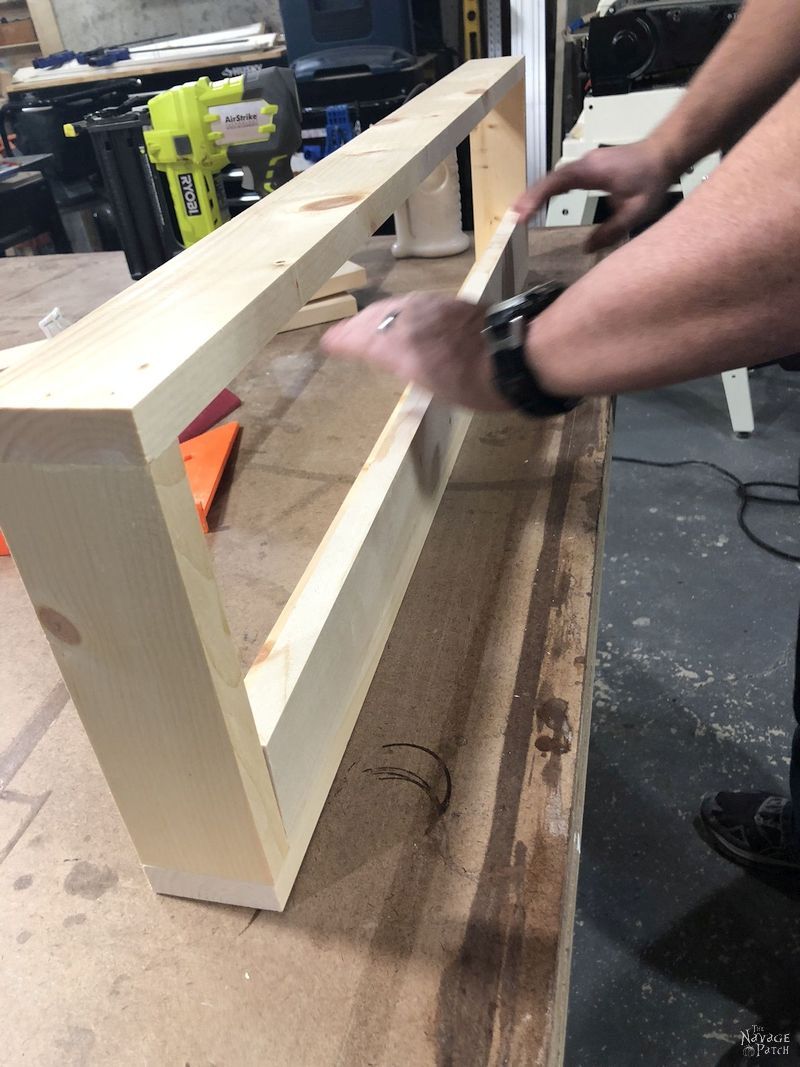
You could stop here and show the world the big, beautiful wooden sculpture of a staple you made, or you can carry on.
Still with me? Good! Next, I put glue on the ends of the other short piece and attached it in the same manner, and that brings us here:
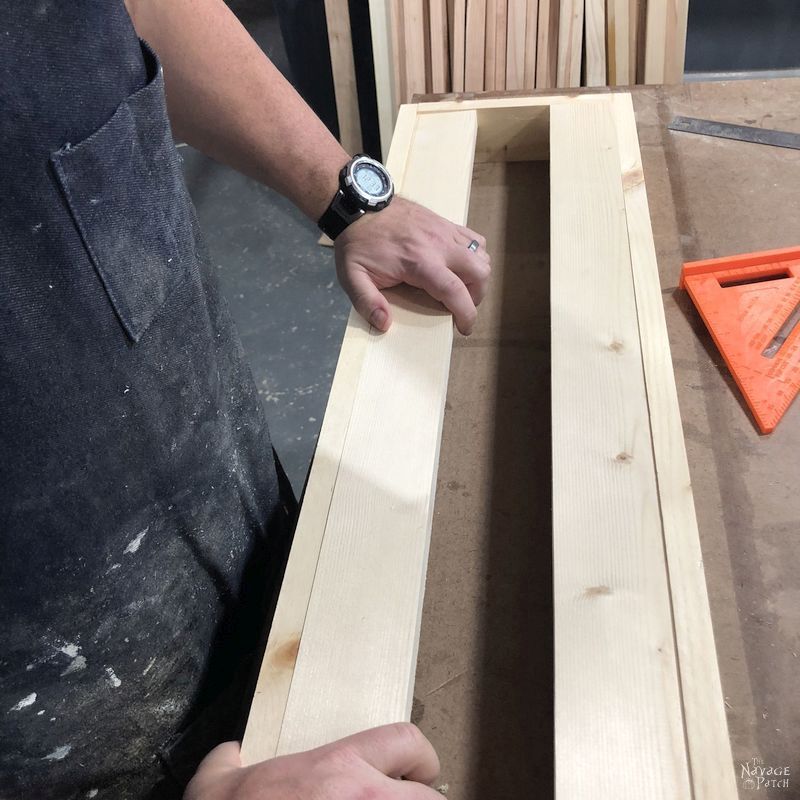
Attach Bottom Slats of Centerpiece Tray
Before gluing the bottom in, I first dry-fit them to make sure the fit was good.
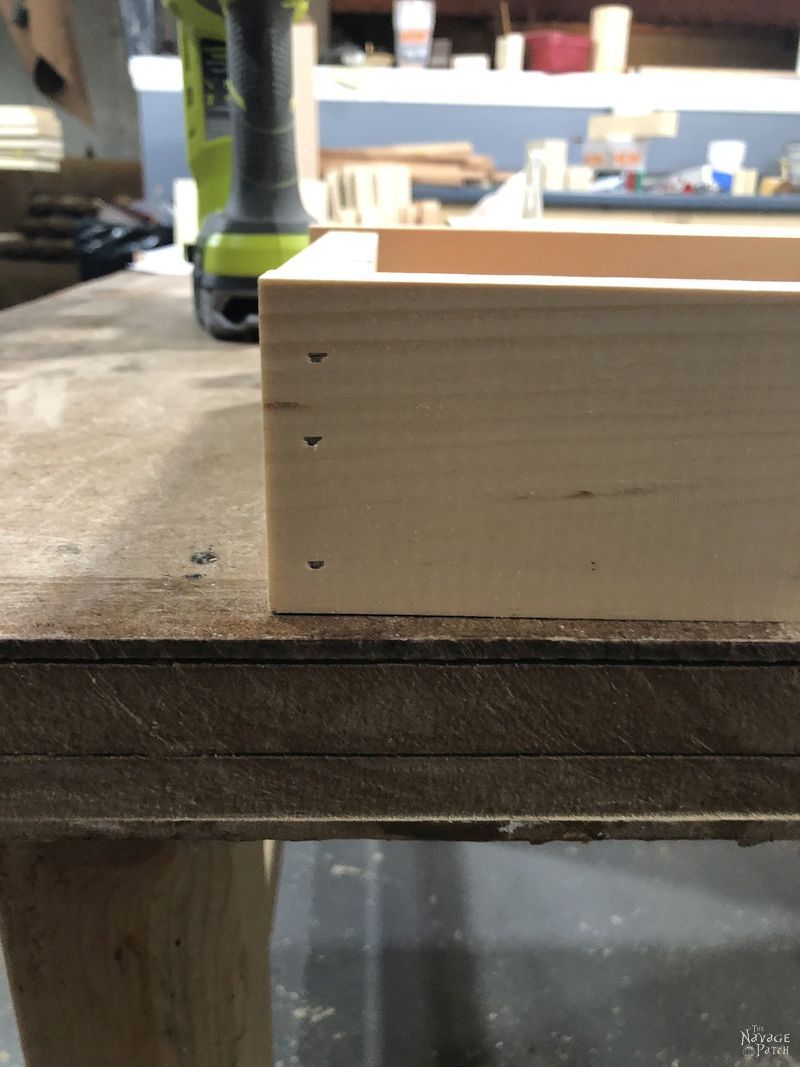
All looked okay, so I added glue to both ends of one of the bottom pieces and installed it to one side.
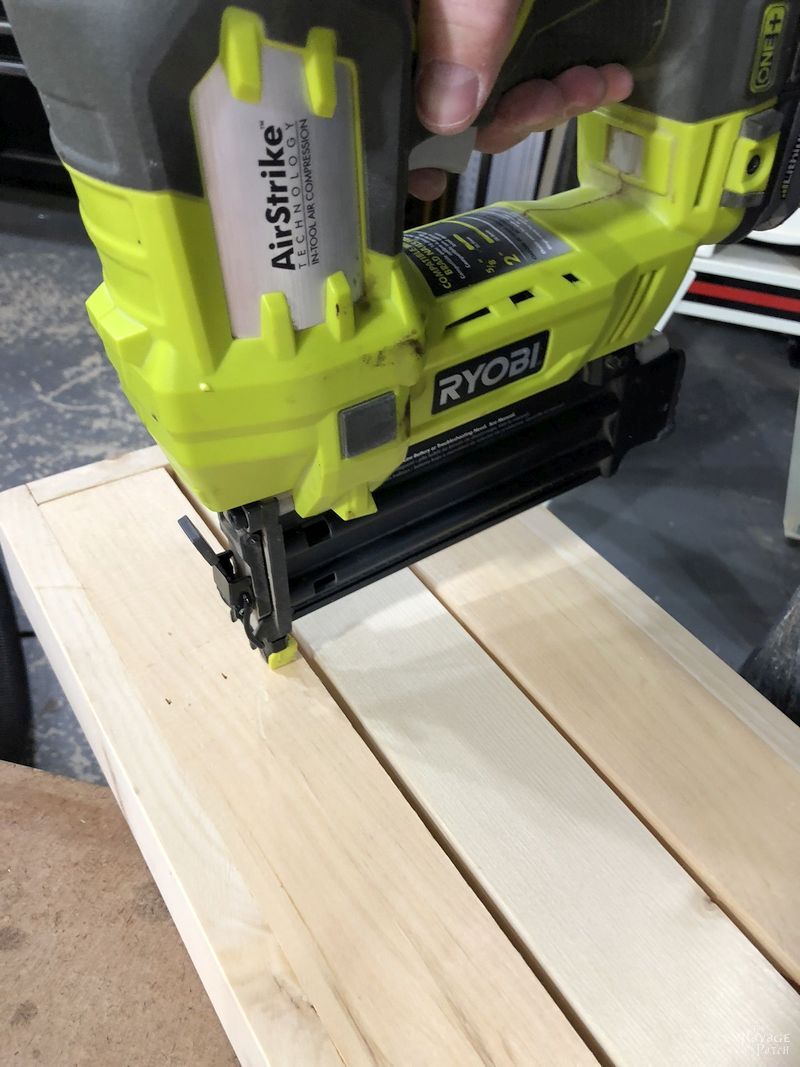
I shot 3 brad nails into each end.

Then I shot about 7 brad nails along the side edge.
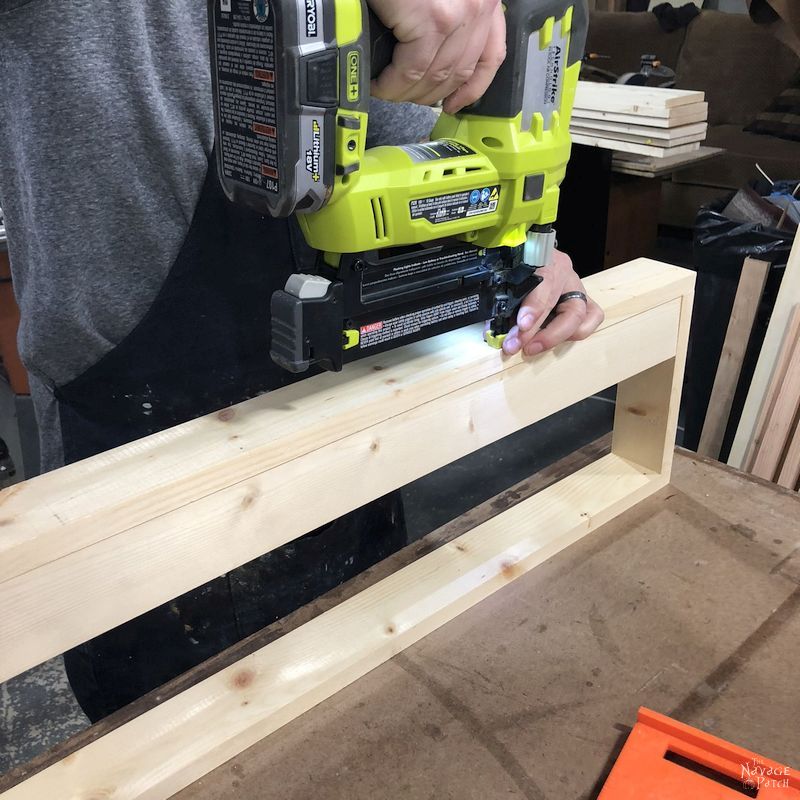
That brings us here:

I repeated with another bottom piece on the other side. I installed the bottom piece with the tray turned upside-down to prevent excess glue from streaking down the inside edges of the tray when I pushed the bottom piece into place.
Then I flipped the tray over to make sure the bottom piece was flush with the bottom of the tray.
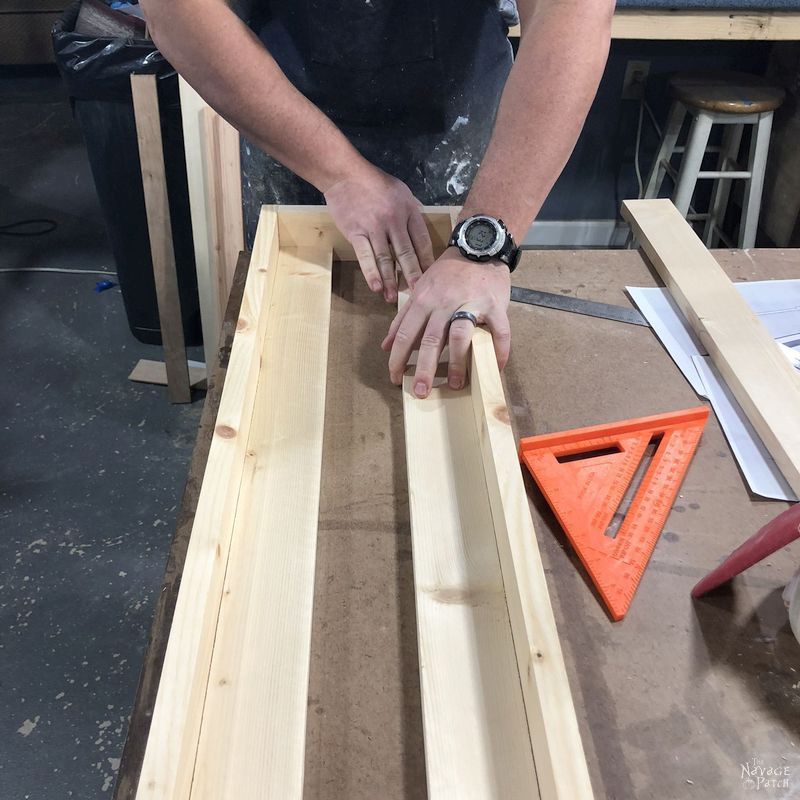
I then secured the ends and side with brad nails. That get us here:

The center bottom piece is only secured at each end with glue and brad nails. I left 1/4 inch gap on either side.

Which gets us here:
Cut Centerpiece Tray Handles
I had printed out 2 copies of the handle shape (given below – just save the picture and then print ‘actual size’).

I applied glue to the back of the paper…

Then I set the bottom of the paper against the bottom edge of the wood, and I aligned one of the sides of the pattern against one of the sides of the wood.
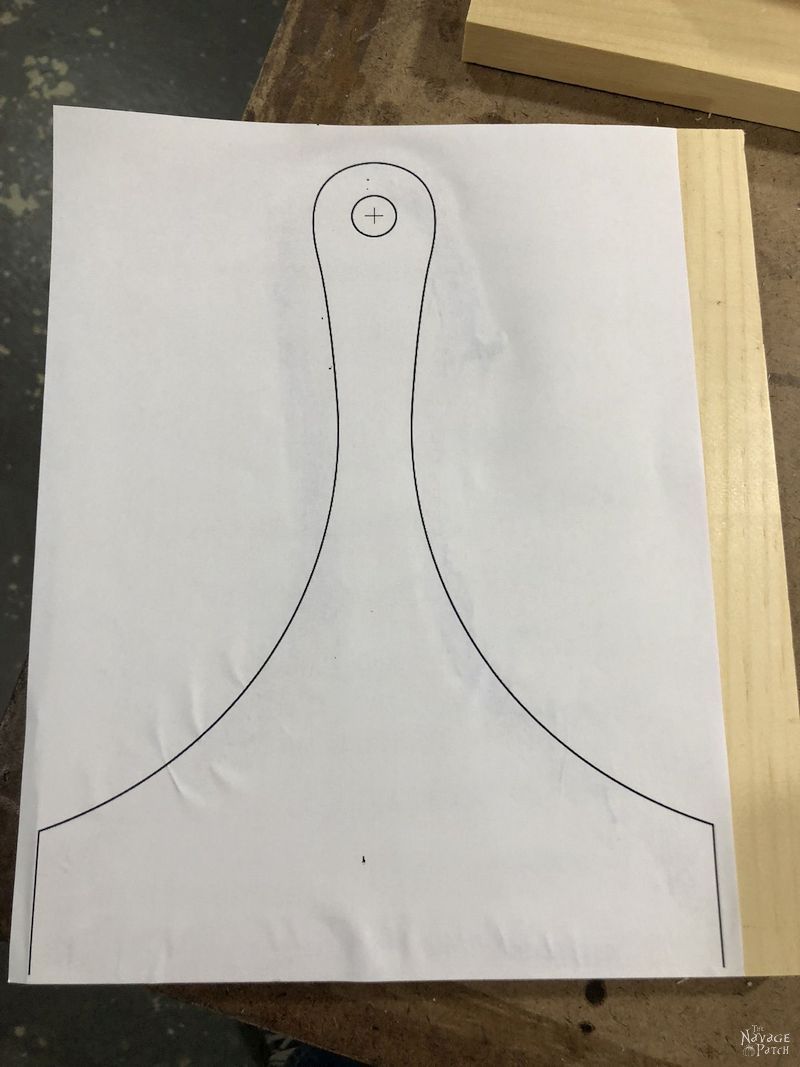
I cut my handles using a band saw, but a scroll saw or jigsaw would work just as well. Before peeling off the template, I used a center punch to mark the center of the dowel holes, though you could use a pencil or pen if you don’t have a center punch.

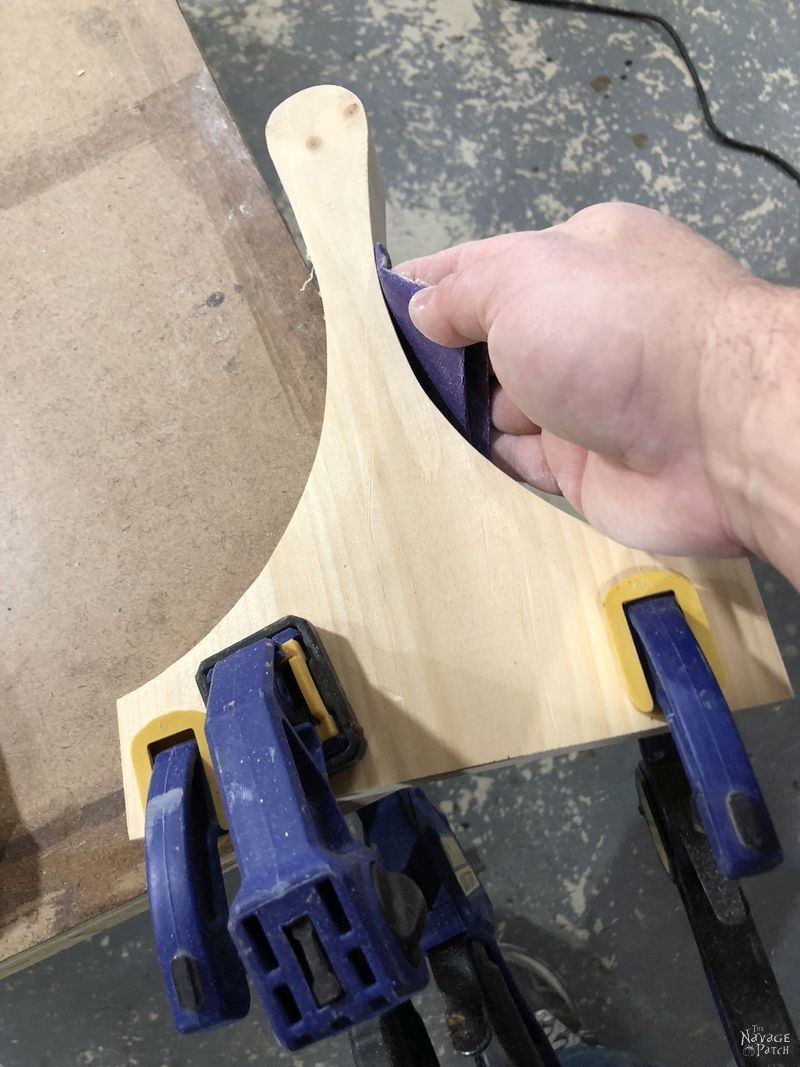
Sand Handles
My cuts were far from perfect, but hey, it’s pine, so sanding is a breeze! To get my two handles shaped the same, I stacked them on top of each other, clamped them to the edge of the table and sanded both at the same time.
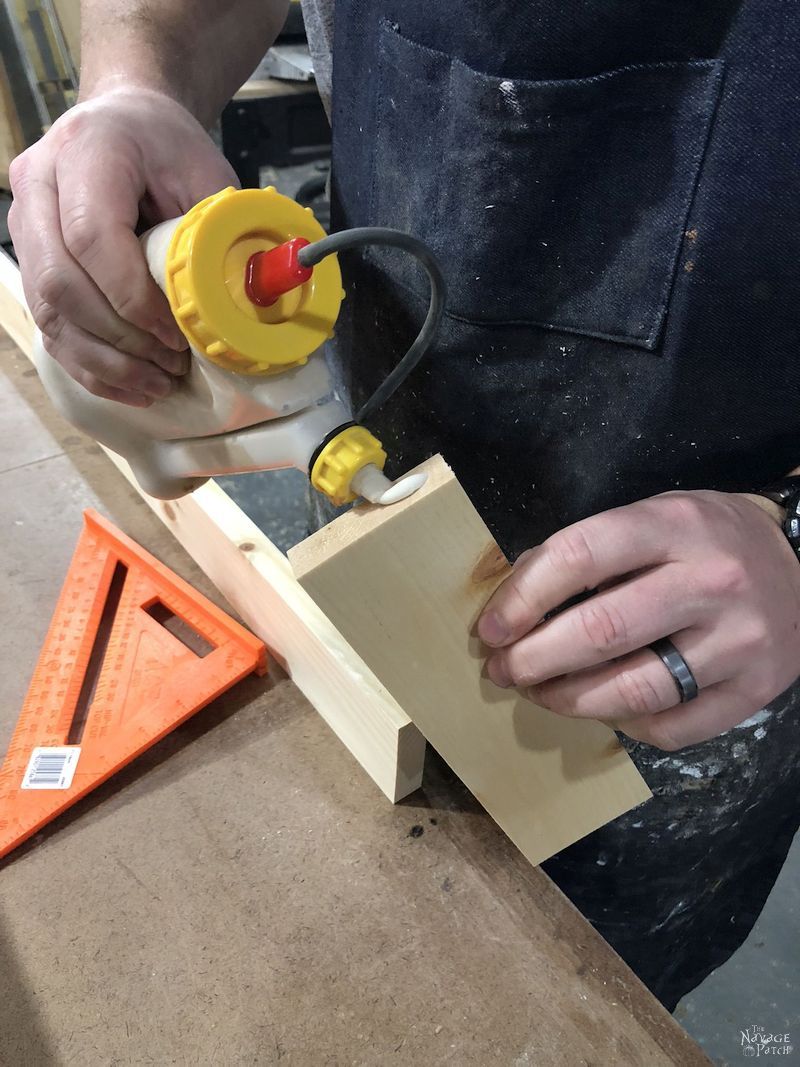
Drill Dowel Holes
Once they were shaped and smoothed, I drilled the holes for the dowels. I used a Forstner bit and a drill press, but a hand drill and standard bit would work just fine. I kept the two pieces clamped together and drilled through both at once.


Install Handles
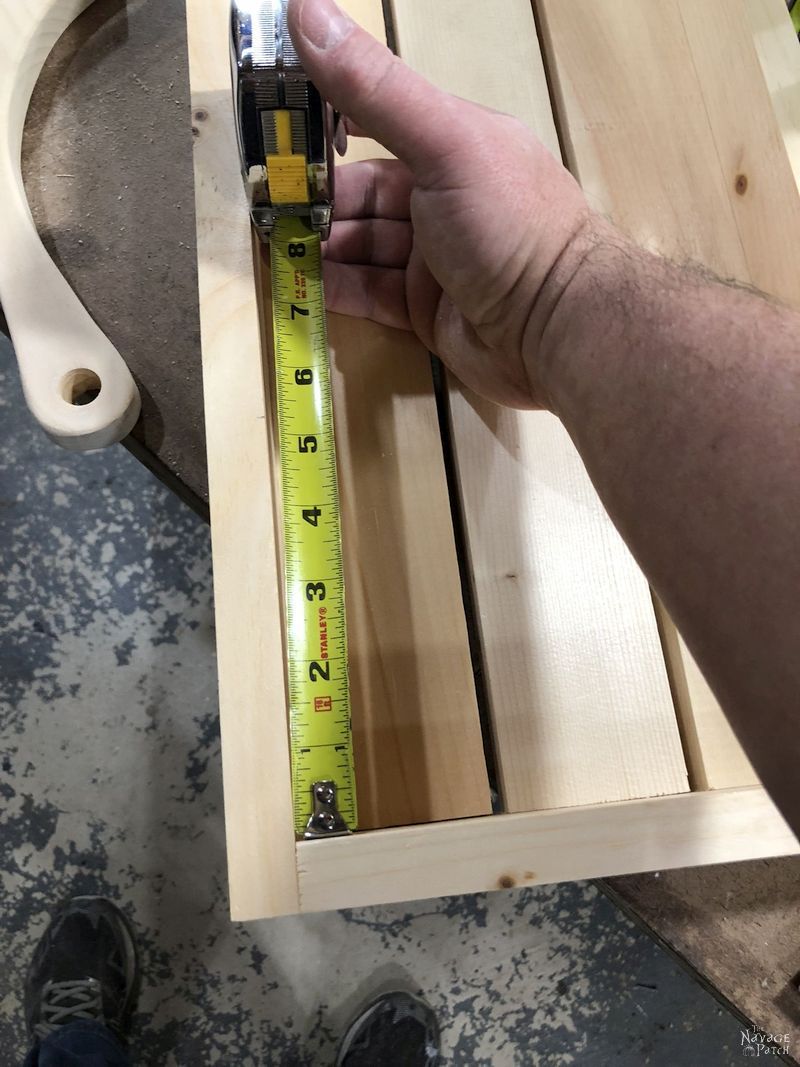
Next, I measured 5 1/4 inches from the inside end (or 6 inches from the outside end) and lightly marked it with a pencil. I did this on both ends and both sides.
After dry-fitting my handle pieces to make sure they fit correctly, I applied some glue to the 3 faces of contact, and then installed them at my pencil marks. I shot brad nails from the sides and bottom.
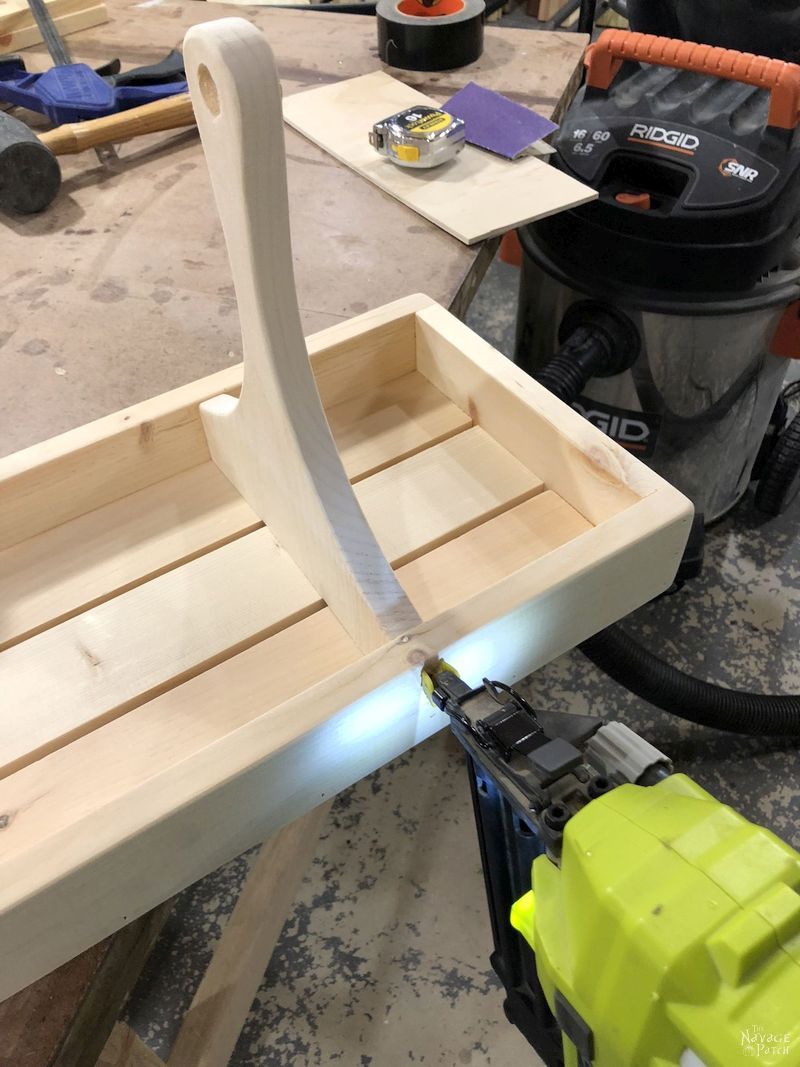
This brings us here:
As a final step, I inserted the oak dowel through the holes. I used oak because it is far sturdier than pine or poplar, and it won’t bend or bow while carrying the tray.
This brings us here:

Sand Centerpiece Tray
With the build done, I sanded all of the surfaces and edges until I had the smooth look I wanted.

Finishing My DIY Centerpiece Tray
Though the raw pine centerpiece tray looked good, we wanted something a little more old-timey. But I’m starting to get a little long in the tooth, and I just don’t have the years to wait around for the tray to hurry up and age already. Fortunately, we have ways to cheat time and make our brand new stuff look like it’s been kicking around in a barn for 100 years.
Steel wool and vinegar is a classic combo for giving an aged look. I wrote a tutorial on that, so check it out if you are interested in learning how to age wood with vinegar and steel wool.
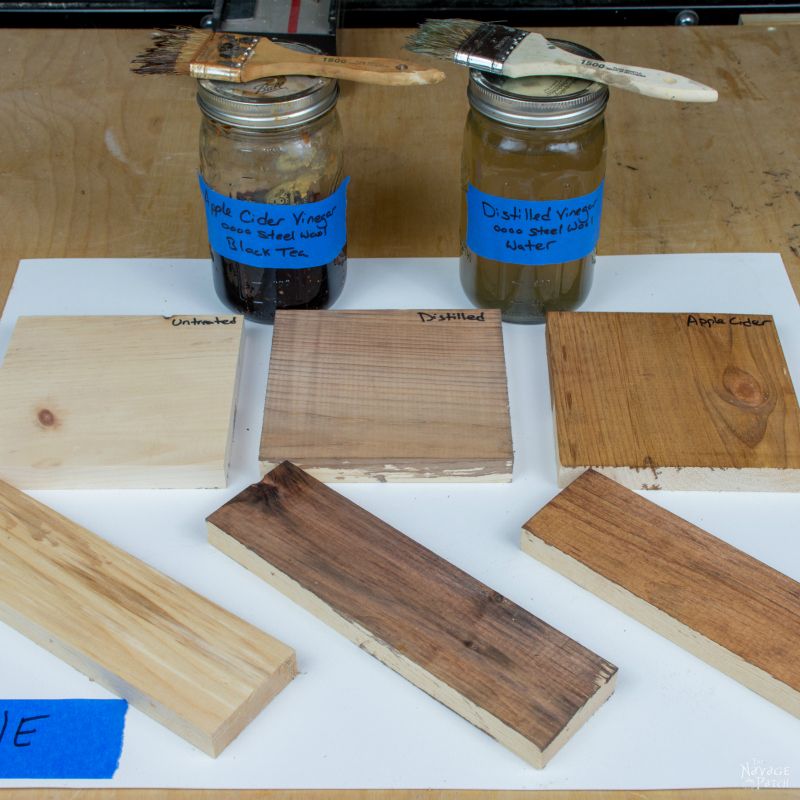
But I was after a different look than I could get with just steel wool and vinegar, so I reached for my holy trinity of stains for aging wood: Minwax Special Walnut, Varathane Weathered Gray and Varathane Kona.

I started with Special Walnut, first applying it with a brush to all the corners and inside edges and in-between the slats.
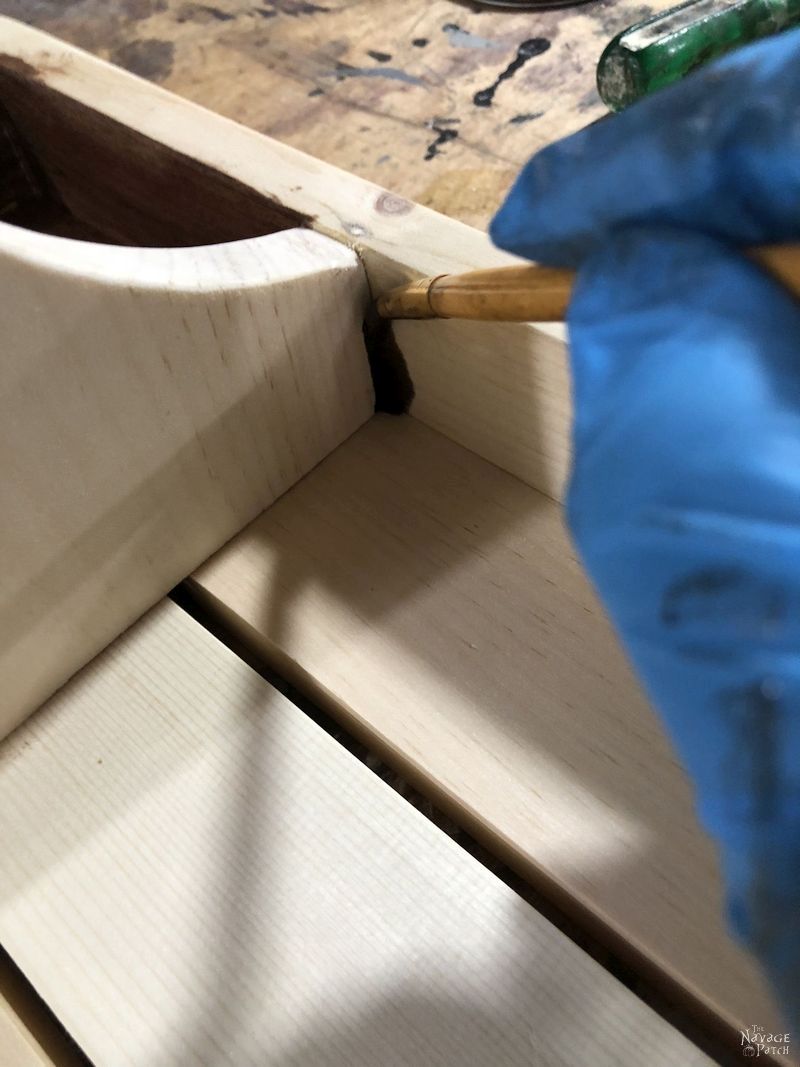
I then used a small rag to stain the rest of the centerpiece tray. Here is how it looked after the Special Walnut.
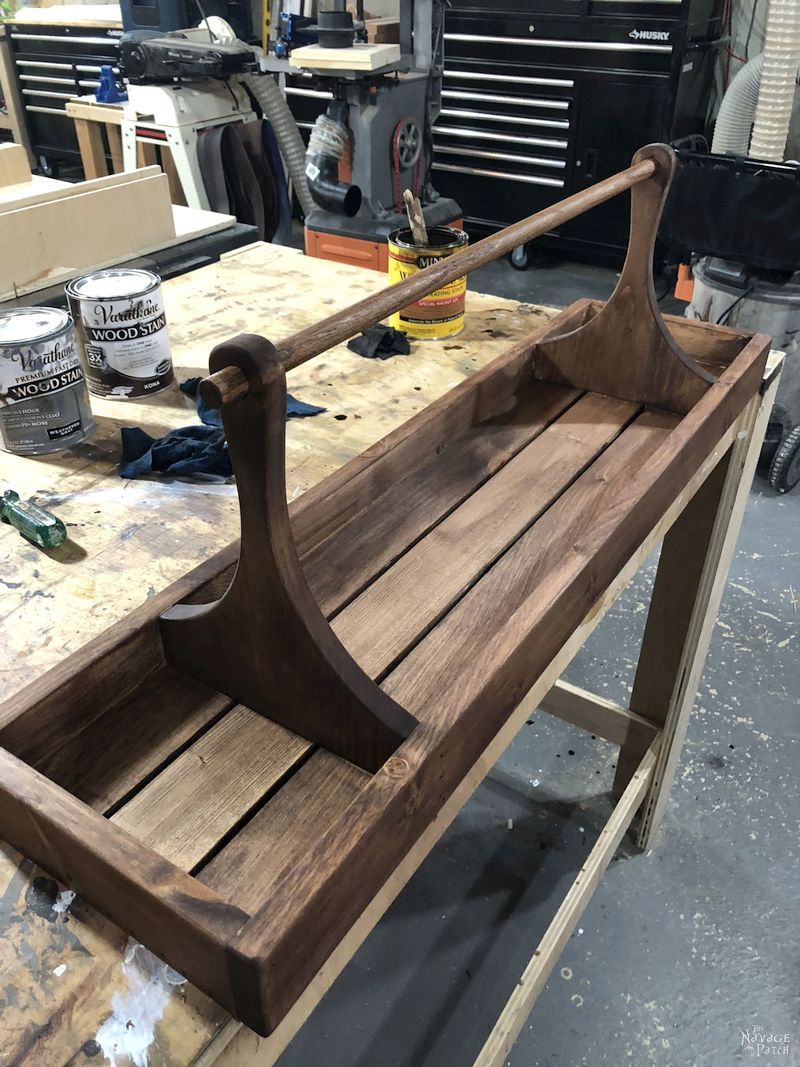
Next, I used a rag to apply the Weathered Gray. I didn’t do a complete coat – more like dry brushing here and there, wiping right away with a clean rag. Here is how it looked after the Weathered Gray.

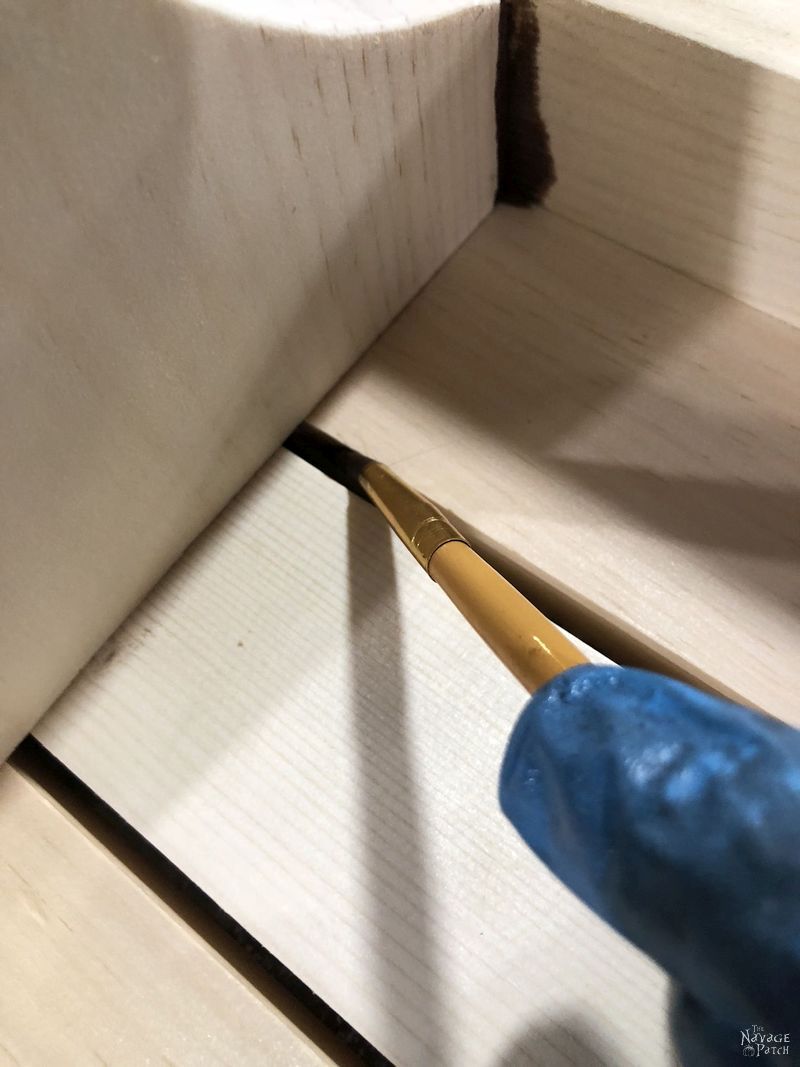
I then applied the Kona in light streaks with the small brush and immediately rubbed the streaks with a rag.

I applied more Kona to the corners and inside edges to give the look of years of accumulated grime and dirt.

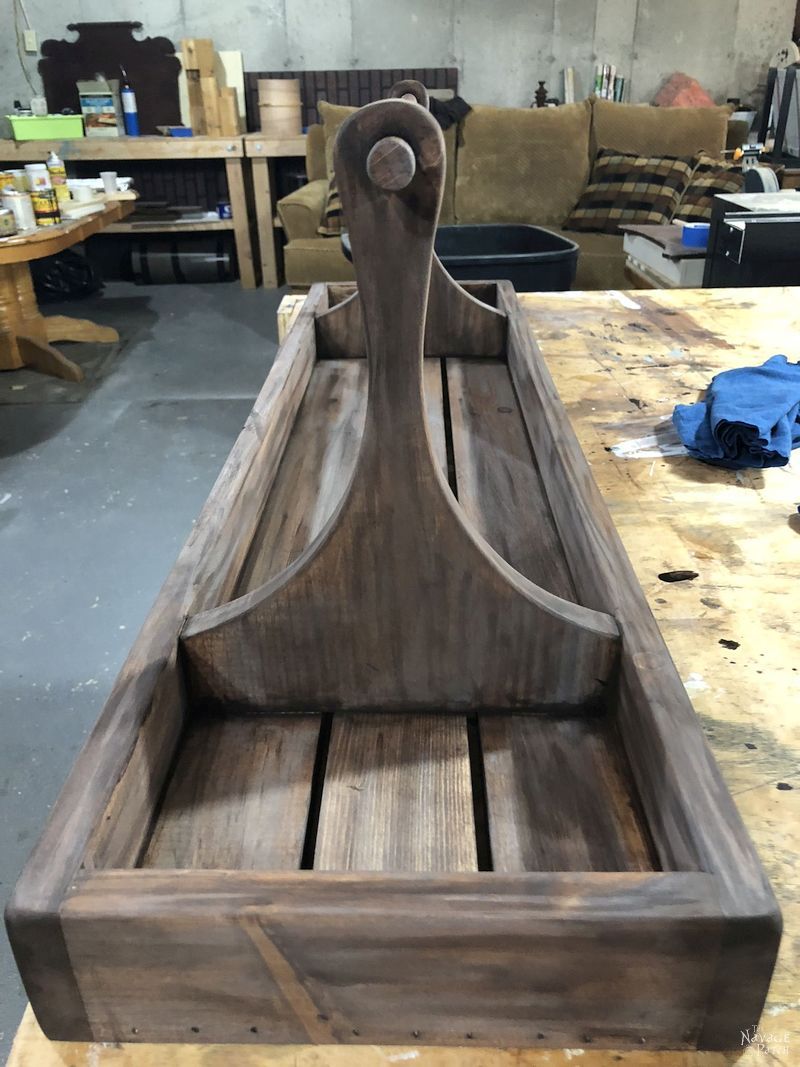
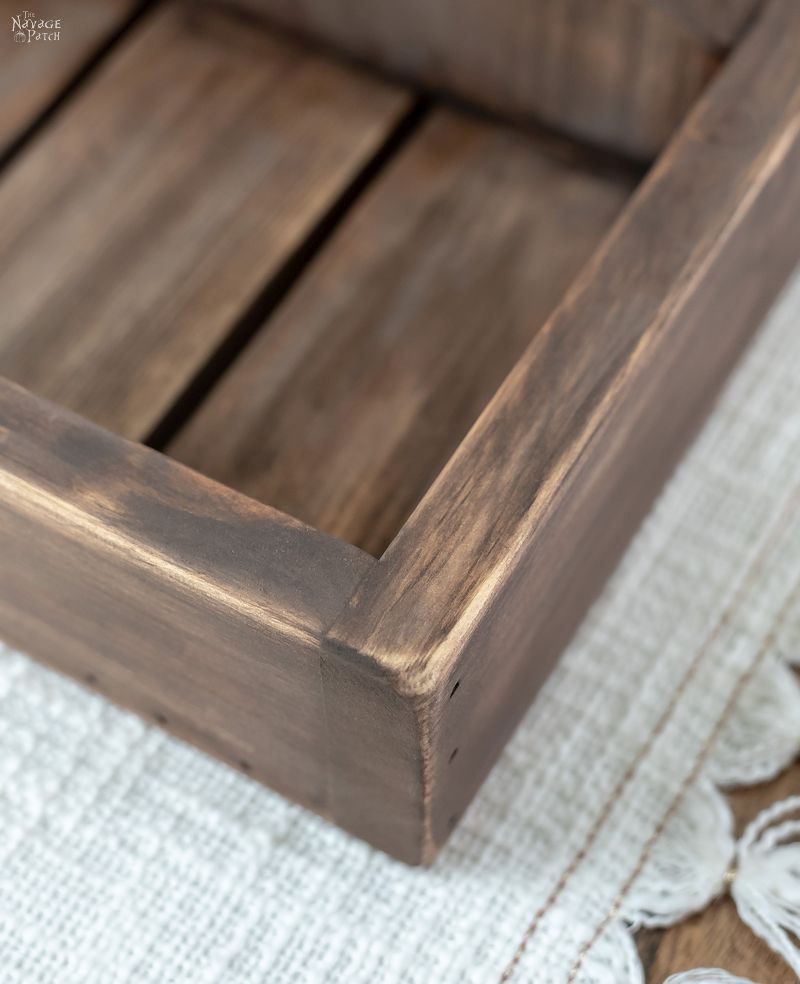
After finishing with the Kona, I let the stain dry for about 2 hours, and then I sanded with 220 grit sandpaper. Overall, I thought the centerpiece tray was a little too dark, so I lightened it up a bit with the sandpaper. I also sanded through the stain on some of the edges and corners – sort of the reverse of how most people distress. Instead of bringing out dark highlights underneath, I brought out bare wood. I love that look with stain. Sanding stain is more art than science, so just let your eye guide you.
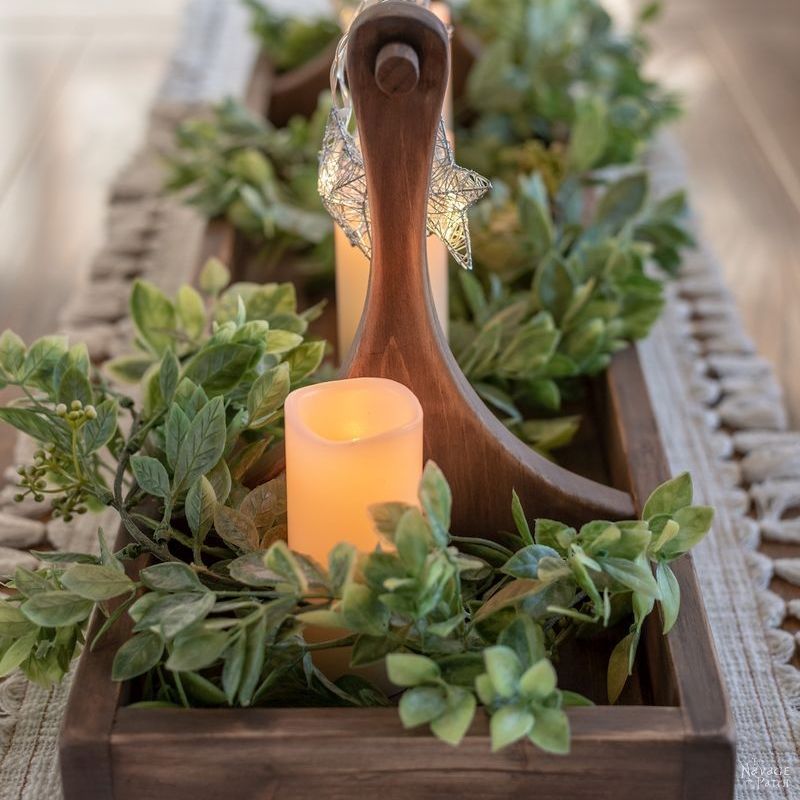
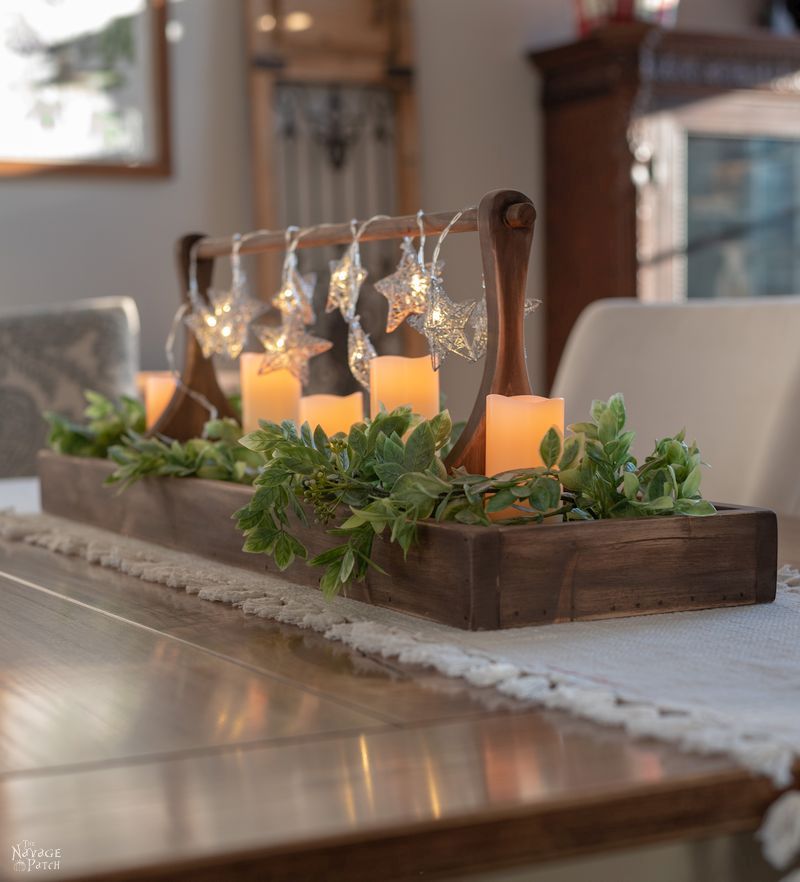
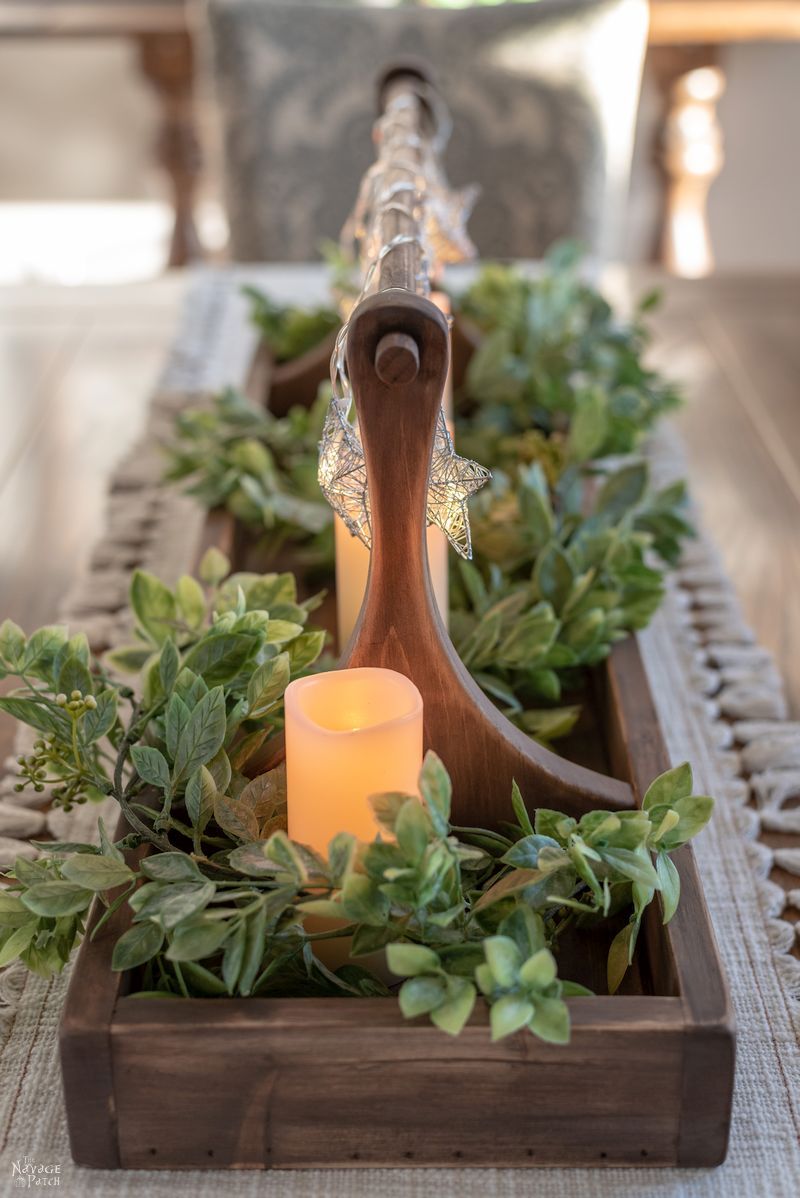
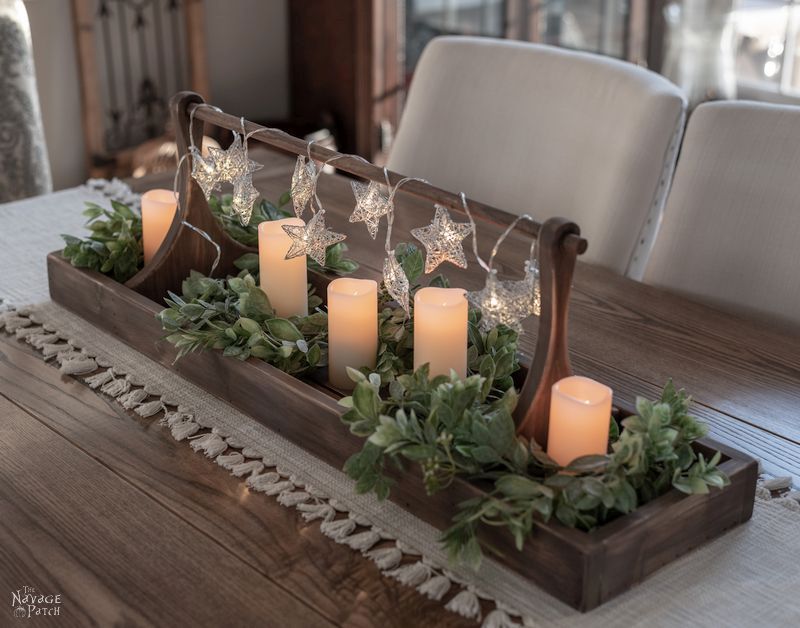
Here is my finished DIY Centerpiece Tray. I’m happy to report that Captain Yaps-A-Lot loves it! 🙂


We love it when you share our posts on Facebook and Pinterest!


WowZerZ! Came out Amazing Greg. Hope Handan is happy 🙂
Cheers.
Shaun
Thanks, Shaun! She sure is! 🙂
Really nice addition to my list of projects. Did you glue the dowels to the upright?
Hi Marvin, I did not glue the dowel as it was a very snug fit. This way, I could always swap it out if it breaks.
Again – I do not use very much pine. But, I get it FREE at Lowes.
Lucky you! How did you score that?
The tray came out gorgeous. I see Handan using it for many years to come, maybe or at least until she comes up with with another great idea. Lol I read your blog and instructions and can picture the two of you having the conversation and have to laugh out loud and then my husband wants to know why I’m laughing at my phone again!
I hope she uses it for many years, Kathy! Or at least until it gets replaced by the next must-have-must-make centerpiece, lol! 😀
Very Nice . I like that the handle pieces aren’t right at the edges. I made a fabric log carrier for a Christmas gift for our son. I also used Oak dowels (but a lot thicker) so they would be sturdier and wouldn’t break As always you did a Great job!
Thank you so much, Kathy! 🙂
Very nice. I laugh at your rehash of conversations between you and Handan. Sounds like what happens in my house, especially with the zoning out and eyes glazing over by hubby when I try to explain what my vision for a room is, though I do most of the project unless they involve table saws and power cutting.
LOL, the Zone-Out is a universal phenomenon among men! 🙂
I love the combination of the rustic and the modern lines. Seems like an awful lot of brads when combined with glue but who am I to argue with a master! I have collected a number of old wood totes and my other take away is your vitamin storage. I thank you very much for that. It’s going to fix a couple of problems in my storage barn of a home!
PS Thanks for the clue about the ad block, I have to double check it with those troublesome posts but I think you are right.
You can never have too many brad nails, Derry! The more, the merrier and the more rustic and farmhousey, LOL! I hope you get that issue solved so you can watch the videos! 🙂
I just have to comment! First, I loved the concise, simple-to-understand explanation of all the directions. LOVED the pictures of each step. Next, I love when you do “smalls” because not all of us have a great workroom like you! 🙁 I have forever been in love with your sense of humor! Keep up the great work. This is on my project list. Can’t wait to start! Thank you.
‘
Thank you so much, Linda! Expect to see more small projects this year. We know you guys love them! Of course, we’re still hard at work making over this house, so there will be some bigger projects in there as well – a little something for everyone!
It looks “just right” on your table! Great job!
Thanks, Mom! 🙂
Love it. I want a Brad nail gun, but not to expensive and I’m worried I ‘ll buy the wrong one and the nails will jam. Any ideas?
Hi Cheryl, there are a ton of brad nailers out there, the majority being pneumatic, which means you’d need an air compressor to run it. I’m going to assume you don’t want that kind, so I will focus on electric or battery-operated brad nailers.
The cheapest by far is this Stanley electric model https://amzn.to/2VTvCtv It also acts as a stapler. The downside is that it only takes brad nails up to 5/8 inch. This wouldn’t be enough to build this centerpiece tray, for example.
Next would be this battery operated model by VonHaus https://amzn.to/2SZ7OlN It is also a crown stapler, and it takes brad nails up to 13/16 inch. In my opinion, this is still not long enough for most work.
The next choice is what I use, and it is what I would recommend. It is part of the Ryobi 1+ line, which means the battery it takes works for all the tools in the line. I have many Ryobi 1+ tools, and I love them all. https://amzn.to/2VZBGAK Note that the price does not include a battery. You would have to buy a battery/charging station separately or buy another tool or combination of tools that come with one. I would suggest the drill/impact driver combo, if you don’t already have them. Home Depot carries that combo for about $100.
I hope this information helps Cheryl. A brad nailer is a must-have tool for any DIYer or serious crafter, so it’s good that you’re looking into getting one!
I love it! Handan has such great ideas; & Greg you are a master craftsman. Great job!
Thank you so much, Michele! I’d have nothing to build if it weren’t for Handan’s ideas! 🙂
Babes, great job.
Arlie
LOL – that was exactly what I said! 😀
Why thank you, Arlie! 😀
The idiot I am did not save this a few months ago, but here it is and I printed it to use my free pine lumber from Lowes.
Thanks.
Happy to be of service, Marvin! 🙂
We all want to know How do you get free pine lumber at Lowe’s
Yay!!! Step by step pictures and all! I can do this…maybe. What is a band saw? 🙂
Thank you for this Handan and Greg (the bird whisperer)
Cheryl in Florida
Hi Cheryl, of course you can do it! 🙂 A bandsaw is large woodworking saw that has a serrated metal band (the saw) that spins around two wheels.
WOW! What a lovely piece. Your finishing work really is very nice. Thank you for sharing this project.
Thank you so much, Debbie!
Where did you get the greenery and star lights?
Hi Jennifer, I made this 4 years ago and can’t remember for sure, but it had to be from Walmart, Target or Michaels!
When I saw the picture of the tray I hoped it was a dollar tree project. But so much carpentry and measuring! Maybe you could show us a way to make something similar with premade components? Thanks