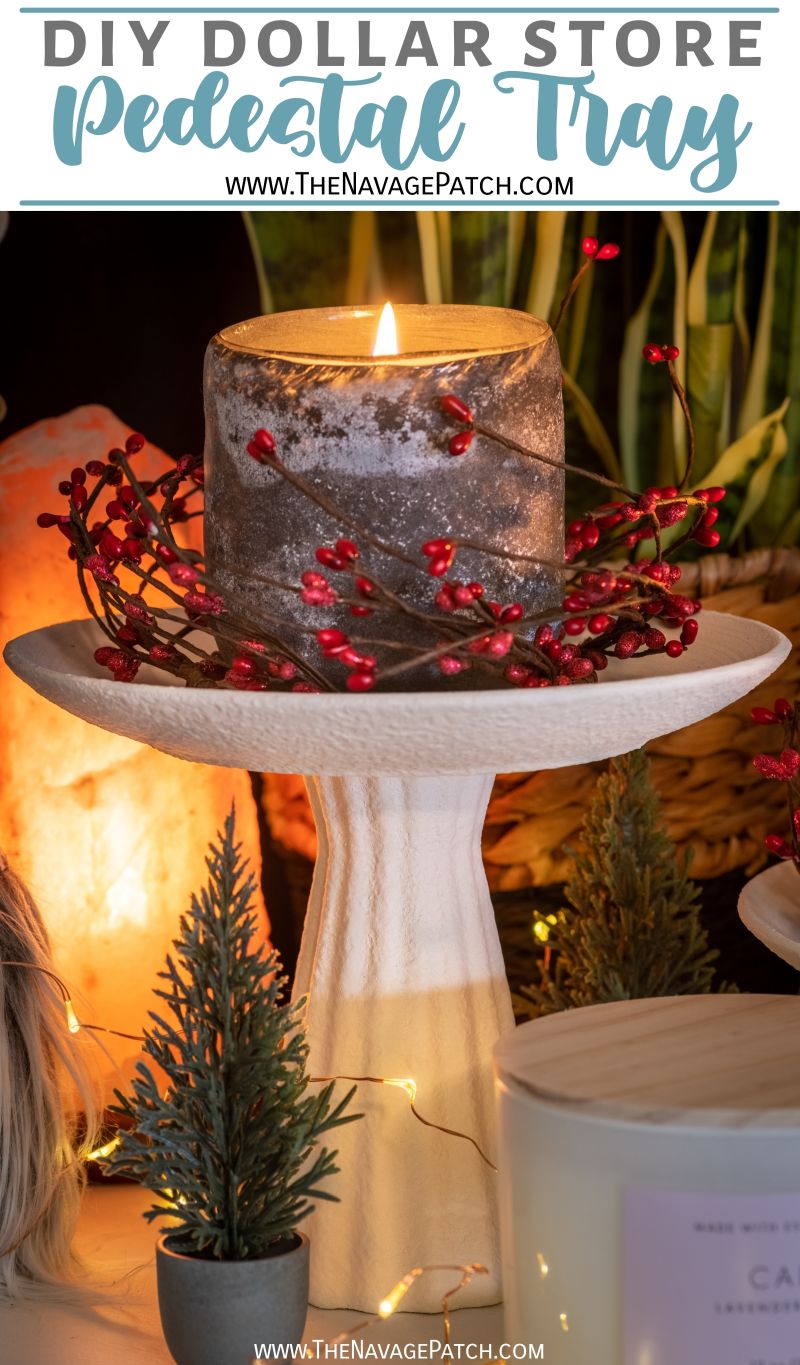
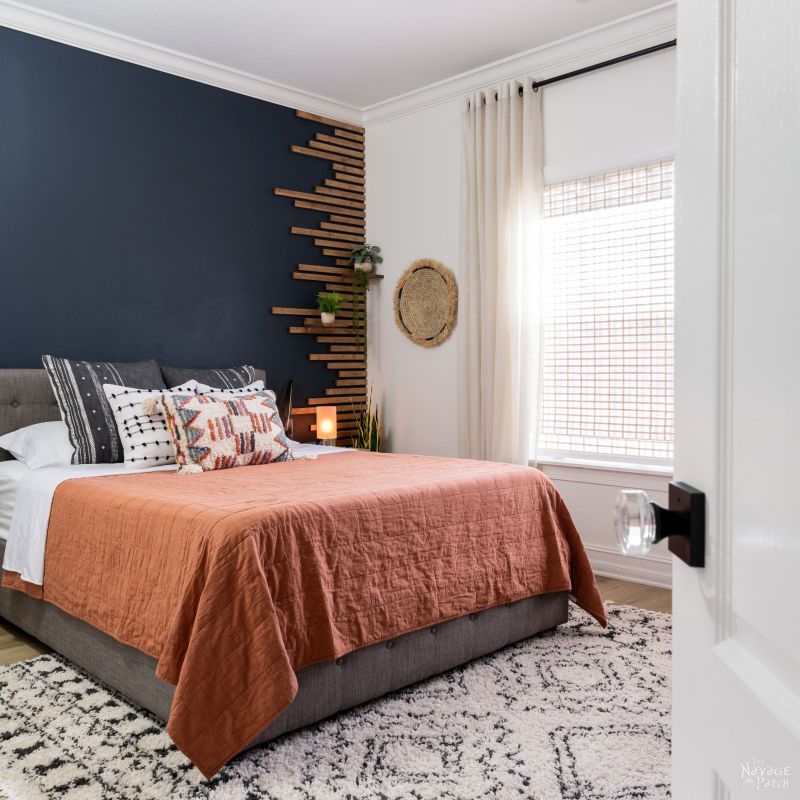
DIY Dollar Store Pedestal Tray
This DIY Dollar Store Pedestal Tray makes a perfect candle holder, ring and jewelry tray or just a place to toss your keys and spare change!
Okay, look, I know what you’re thinking, but I assure you, this time you’re wrong.
This is not a Christmas post, despite the Christmas gnome you see in the picture above.
Despite the red holly berries wrapped around the festive candles, this post and project really have nothing to do with the fat man in the chimney.
And even though you may spy a wee Christmas tree next to the gnome and think to yourself, Oh that Greg is losing his marbles! Why, it’s as plain as the nose on my face that this is a Christmas post! – I assure you, madam, it is not.
Here’s the deal. This post was fortunate enough (or unfortunate, depending on your disposition towards the trend of Christmas decor in October) to be scheduled right after the weekend in which my babes announced that we would be starting our Christmas shopping.
Why did she announce this?
Was it because she felt the time was ripe to start splurging on presents and decorating the house?
Was she overcome by the holy Christmas spirit and just felt herself moved to share the good cheer?
Perhaps she’s just had it up to here with Halloween and needed a change?
Those are all good reasons, but the truth lies elsewhere.
The truth is, she was scrolling through our Instagram feed, and she saw the unthinkable.
It was horrible.
It was hideous.
It was never supposed to happen like this!
And she saw it over and over and over again!

There, plastered all over our Instagram feed, was picture after picture and video upon video of the filtered faces of influencers showing off in the fully-stocked Christmas sections of their local Targets!
The nerve of those women!
It was more than my babes could bear, so she announced upon our waking on Sunday morning that we, too, would journey forth and frolic amongst the bristle trees and Santa heads in our local Target.
There was just one small problem. When we arrived at the far rear corner of our local Target…the shelves were emptier than the toilet paper aisles of March 2020!
Oh, they had a few packs of lights hung in a lonely corner, and there were boxes strewn about that hinted at what was to come, but in terms of real, tangible goods that my babes could hold and ogle….nada.
She was crestfallen. Where were these other influencers living that their Targets were fully Santified, while ours still looked like Halloween central?
I put my arm around her shoulder and told her those Targets were probably all up North in the nasty cold. Let ’em have their stupid Christmas crap, I told her. We’ve got sunny warm weather!
Her eyeball turned towards me and told me all I needed to know.
“Okay, let’s try another one,” I said.

Next Target – same deal.
I glanced at my babes and wasted no time suggesting we try one more.
Well, the third time is almost always the charm, isn’t it?
Look, we didn’t find the Christmas consumer utopia so brazenly flaunted on social media, but we did find one unlucky employee who just happened to be stocking shelves from a line of boxes in one of the Christmas aisles. My babes looked at her and the bounty she controlled as a wolf looks over a herd of sheep.
I could hear the poor woman swallow.
It wasn’t much…but it was enough to satiate my babes’ need for Christmas decor shopping. And I must say, we got some pretty good stuff!
So, no, this isn’t a Christmas post, but since we just bought a whole slew of Christmas decor, it may look like a Christmas post.
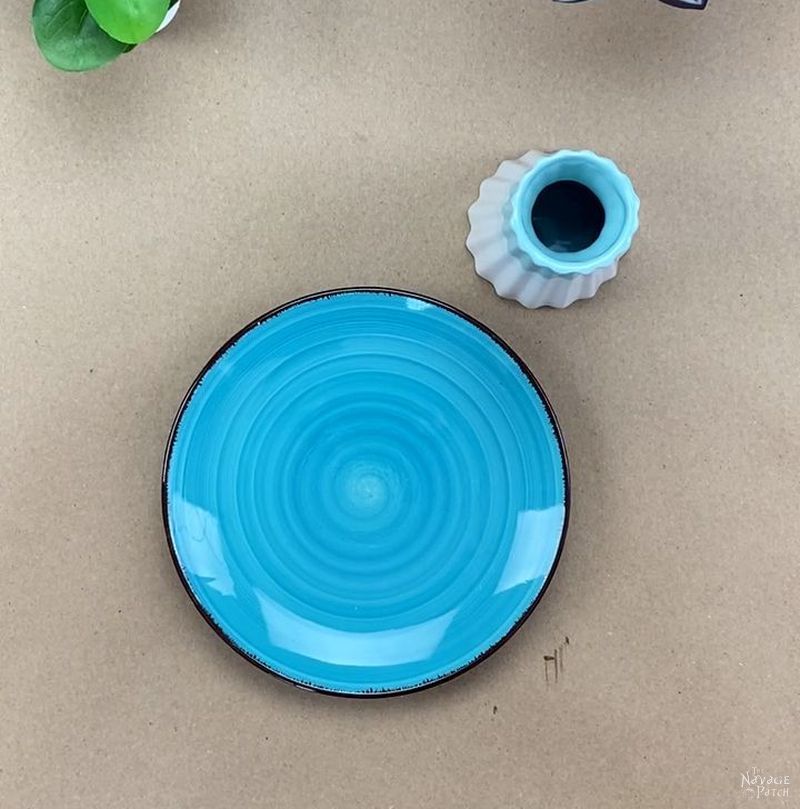
And you could certainly use these pedestal trays to hold Christmas candles or other Christmas decor. Or you could use them to hold your keys. Or your jewelry. Heck, for all I care, you could use them as glorified cinnamon bun holders!
DIY Dollar Store Pedestal Stand
SUPPLIES LIST
Affiliate links are provided below. Full disclosure here.
- Fluted vase and/or tea light holders (we got ours at Dollar Tree)
- Small plate (we got ours at Dollar Tree)
- Super glue gel (Dollar Tree has the cheapest around)
- Super glue accelerator (optional, but makes the project go faster)
- Zinsser BIN shellac-base spray primer
- White or off-white latex paint
- Baking soda
- Chip brush (you can get them at Dollar Tree)
- Lazy Susan (optional, but makes painting easier, and you’ll need one if you want the swirl effect)
So you’ve probably seen the faux-stone DIY pedestal bowls making the rounds on social media in the past year or so. Yeah, we’ve seen ’em, too. My babes wanted me to make our own version – but she wanted them to be a little different.
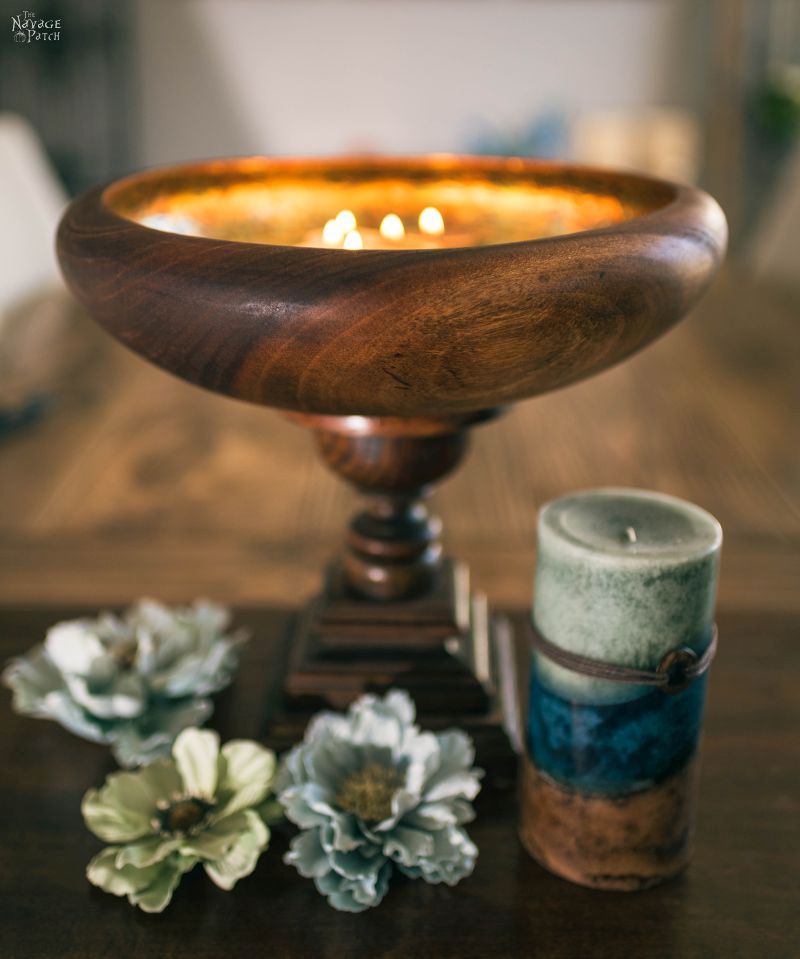
For starters, she didn’t want a bowl. We’ve got enough bowls floating around the house. We sure as heck didn’t need two more. But, hey, if it’s a DIY pedestal bowl you’re hankering for, we’ve got you covered! Check out this beauty I made for my babes a few years ago!
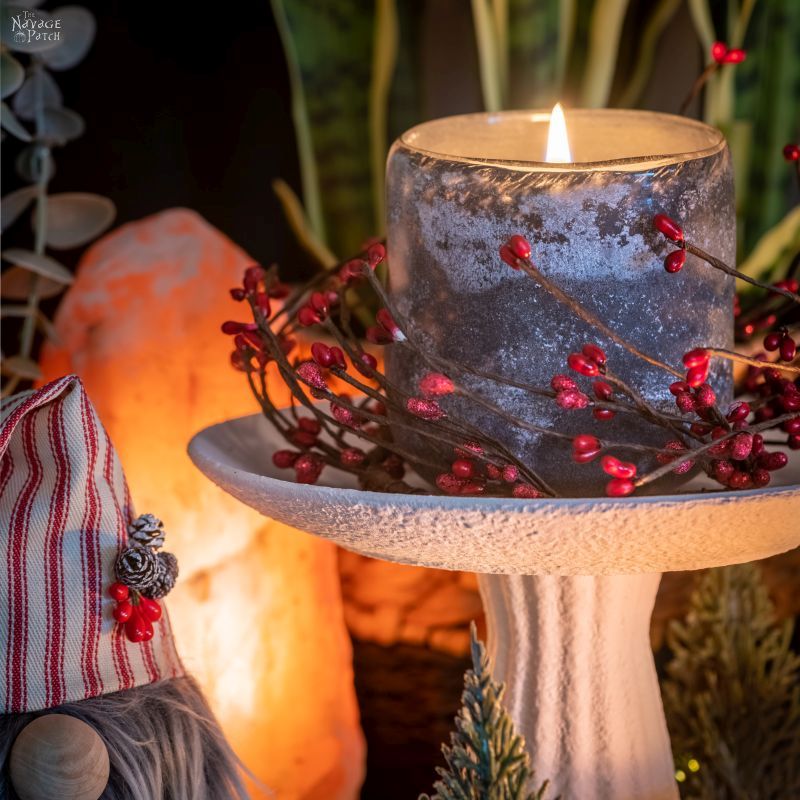
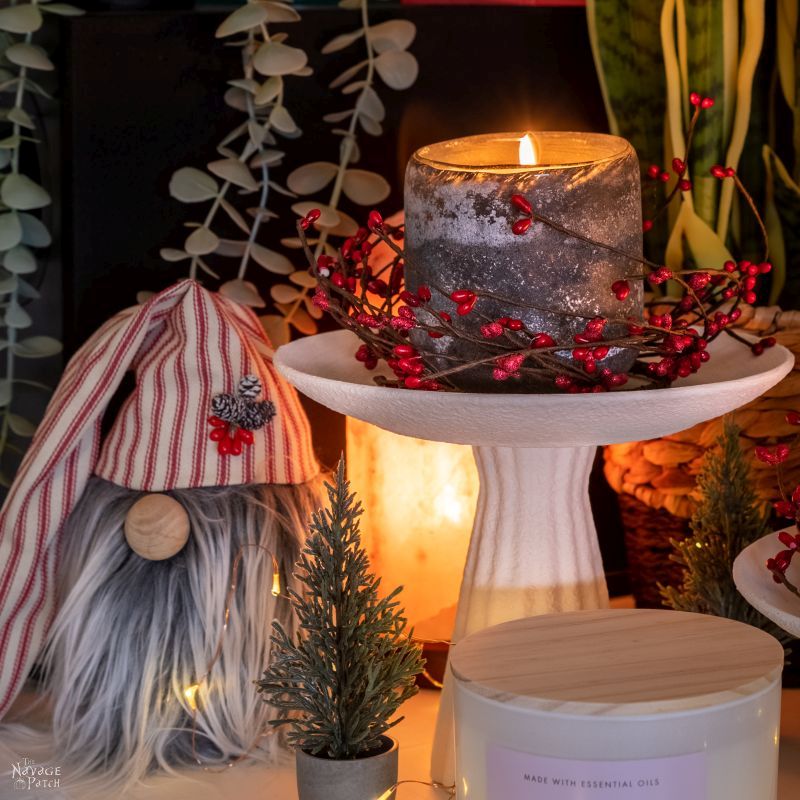
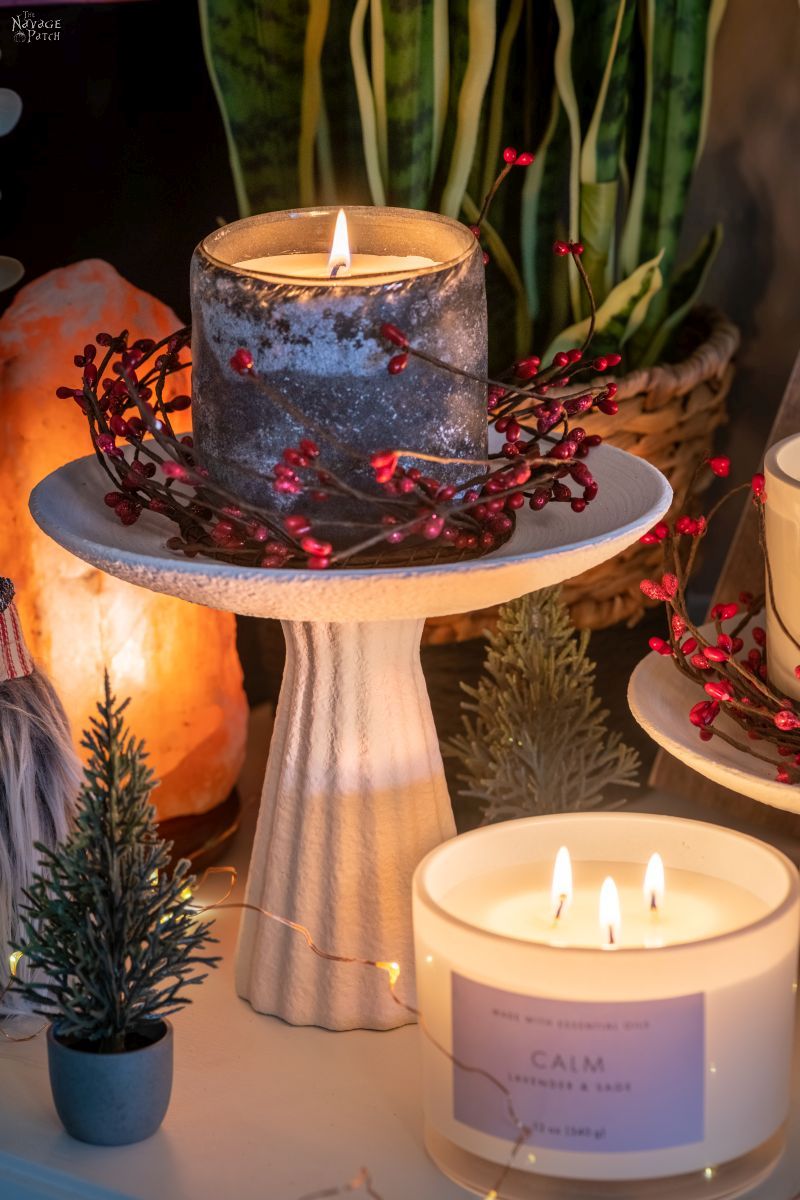
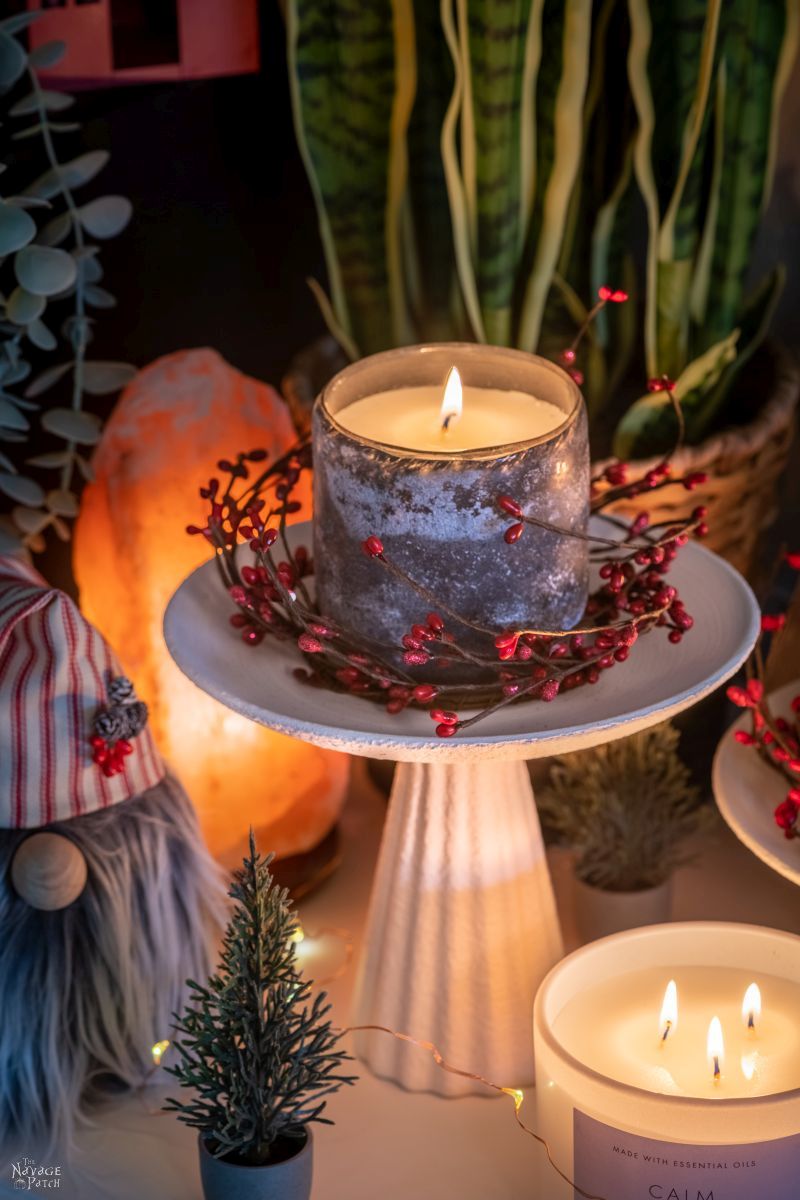
Like I said, she didn’t want a pedestal bowl. But a pedestal stand – now there’s something a little more useful for us. You see that candle in the picture above? Yeah, we’ve got about 100 or so in various boxes strewn between Florida and Georgia. Real ones, fake ones, smelly ones, plain ones, colorful ones, and white ones…you name it, we got it. Our wazoos are overflowing with candles, and we need more places to display them, because everyone knows that wazoos and candles don’t mix!
Oh sure, we could just stick them right on the furniture like a couple of schlubs, but really, wouldn’t they look better up on a pedestal? Yeah, we thought so, too.
Let’s get to it.
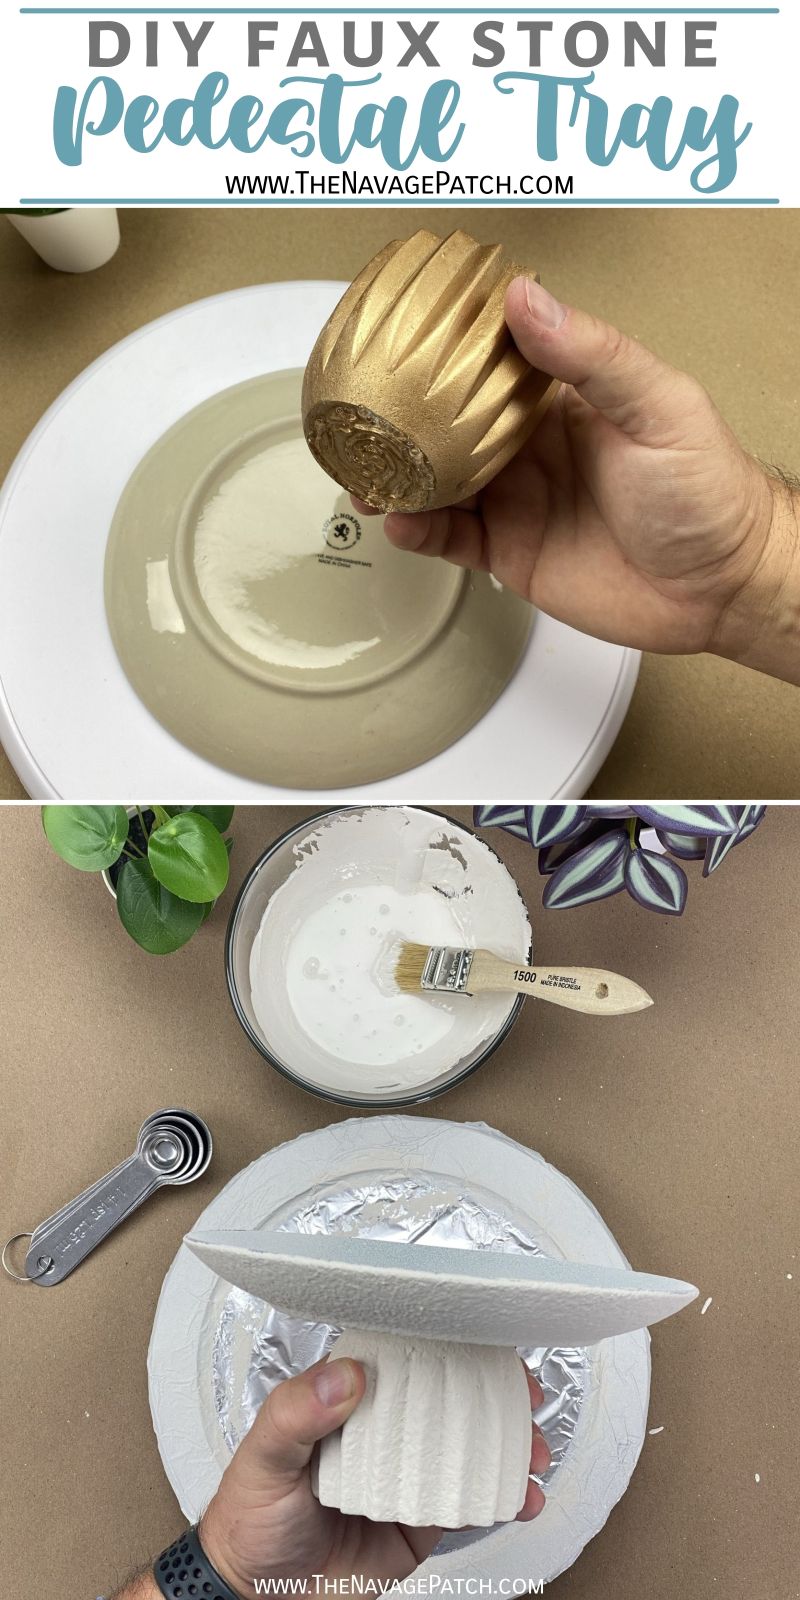
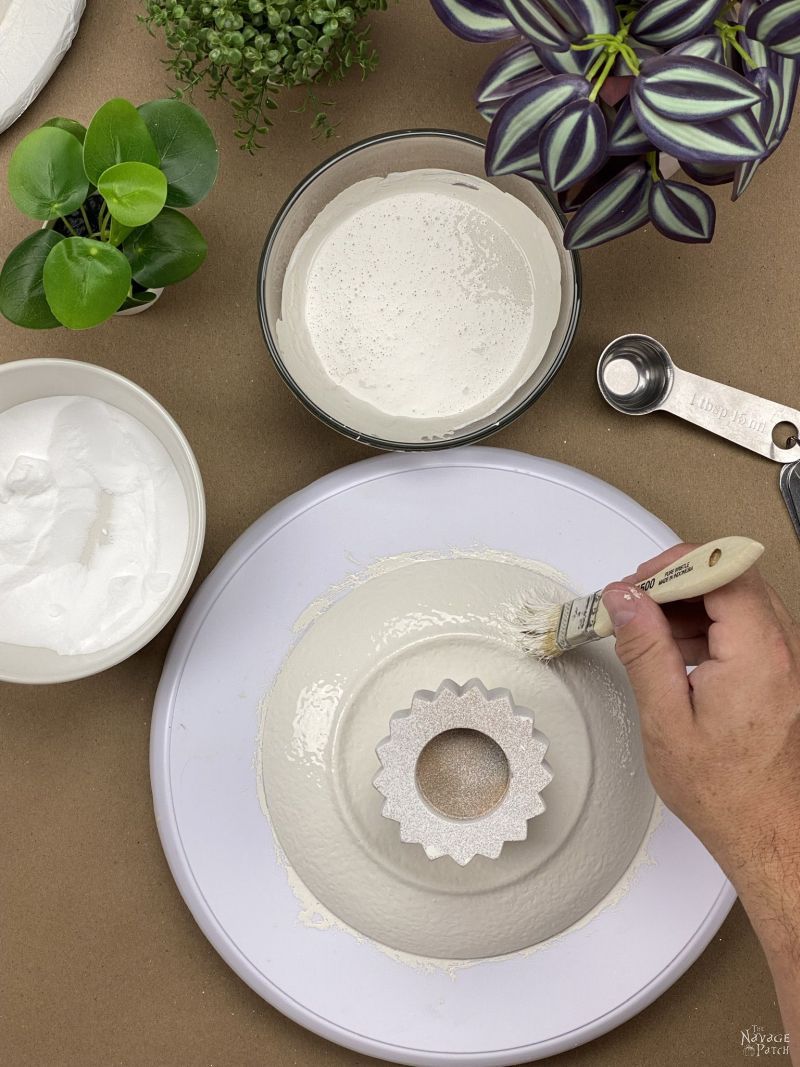
We used two different Dollar Tree materials for the pedestals – a small fluted vase and an even smaller fluted tea light holder. If you’d like to use the same materials as we did, I need to caution you about the teal light holders. Many of them are not…hmmmm, square isn’t the right word…level I guess would be better. What I mean is that when you put the tea light holder on a surface and if you then put a plate on top of it, the plate would be slanted. So just be sure to look through them until you find a level one. For the plates, we used the small blue plate shown below from Dollar Tree. We like this one for its flatness and overall shape. We thought at first we might keep the blue color, but then we decided we wanted all white.
This is the tea light holder we used for the second pedestal tray.

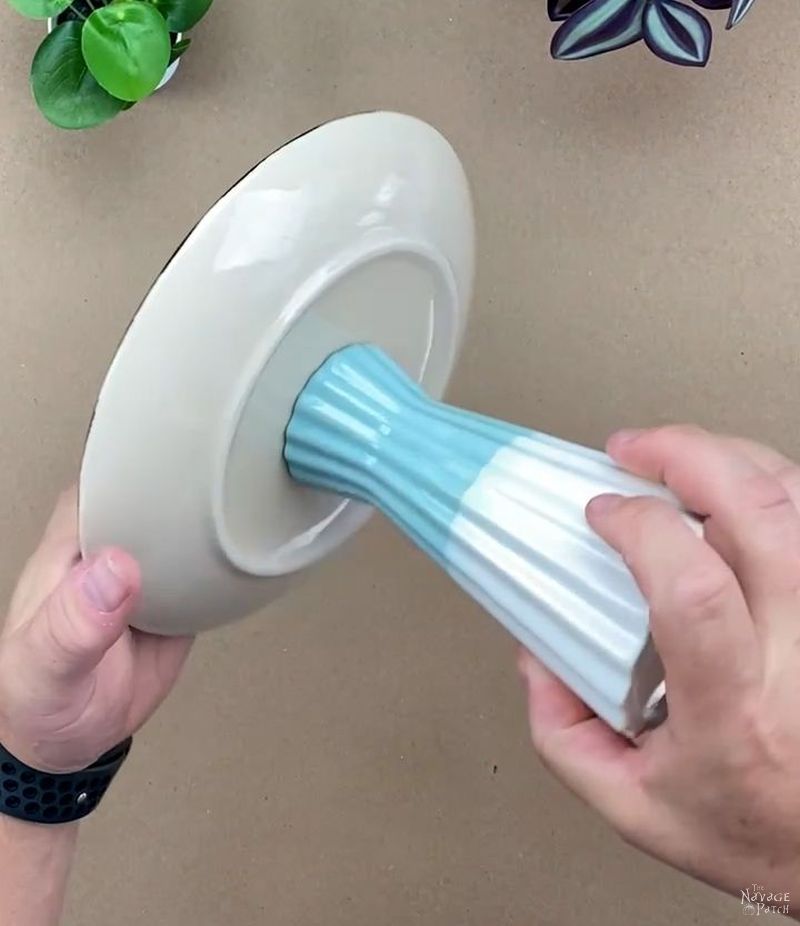
I put a generous amount of super glue gel all over the bottom of the tea light holder.

Then I placed it to the center of the bottom of the plate. I used accelerator to quickly set the glue, but it’s not necessary. Without accelerator, you just have to wait a few minutes for the glue to set.

For the pedestal tray made with the fluted vase, I put super glue gel around the rim of the vase.

I then sprayed it with accelerator so I was immediately able to pick it up.
Since both the plates and the fluted vase have extremely hard and smooth glazes on them, it would normally be tricky to get paint – especially the thick paint I’d be using – to stick properly. The solution, it turns out, is in the primer.
There is really only one primer up for this job, and that is Zinsser BIN shellac-base spray primer.
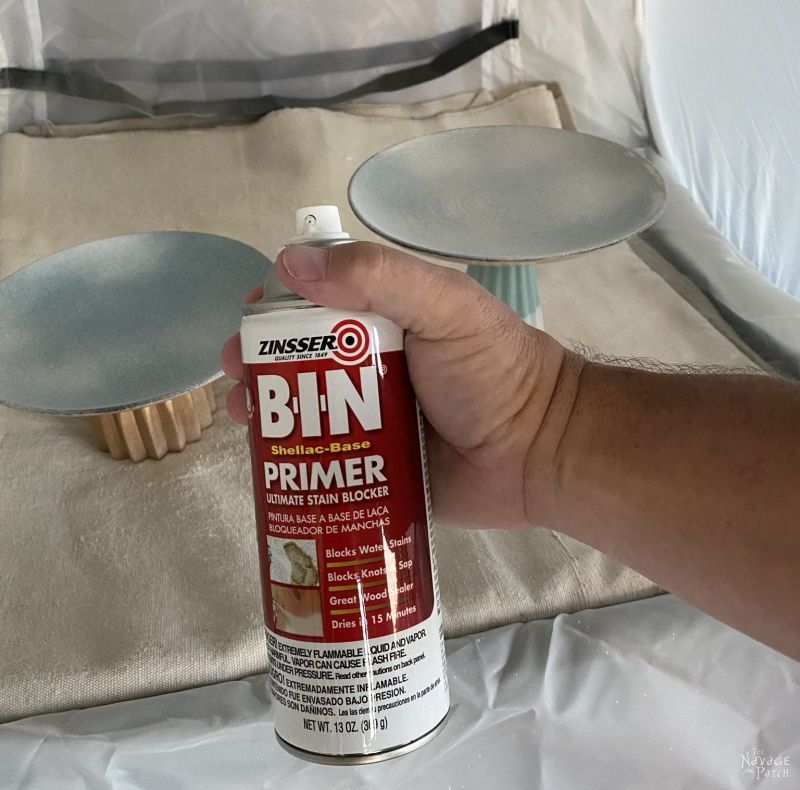
Simply put, shellac-base primer is way sticker than any other type, so it can hold where others will flake off. But there is a technique and a trick I’m going to show you.
First off, Zinsser BIN spray primer is turbo-charged. If you try to use this like any other spray primer or spray paint, you will end up with a thick layer of primer that won’t do you any good, as it will flake off just as paint would. So the first trick is to hold the can back…way back from your project. I’m talking like 2-3 feet back. Trust me. You’ll see.
The second trick is to spray in tiny micro-bursts. The goal with this primer is not full coverage of color. You’re not trying to turn the blue dish to white. If you do that, you’ve put on too much primer, and it might flake off. The goal here is to spray the barest amount of primer on the plate/pedestal so that the primer can’t flake and the surface now has some tooth for the paint to stick. Look at the picture above again, and you’ll see how much I applied to the top of the plates.
I used a custom-blend off-white paint for this project, as I think off-white looks best with the faux-stone textured paint. To make it, I start with white and then mix in small amounts of beige or other, darker off whites we have kicking around in sample jars until I get the color I’m looking for. Once I have my color nailed, I add a few tablespoons of baking soda. How much baking soda you need depends on how much paint you’ve mixed and how thick your paint was to begin with. For the smallish amount of paint shown below, I used about 3 tablespoons of baking soda, and even then, I could have used a little more.

After mixing in all of the baking soda, you need to look at how thick the paint is. Since we’ll be stabbing it on with a chip brush to get a textured feel, you don’t want it thin enough to level itself out after you apply it.
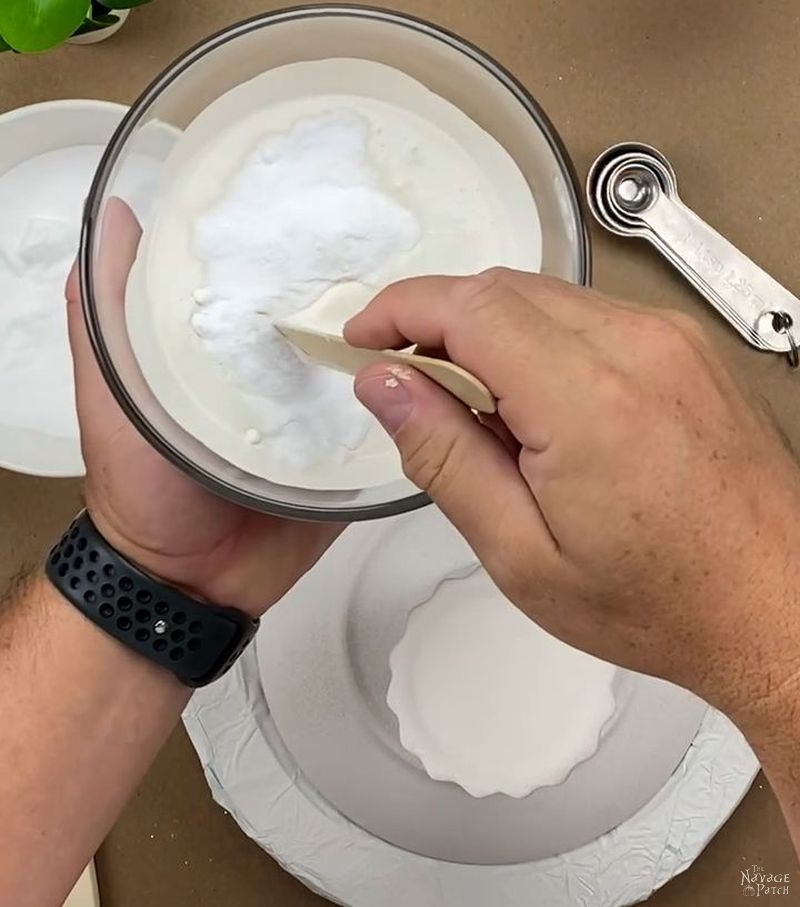
If you find you’ve made your paint too thick or too thin, you can simply add more paint or more baking soda to get the desired consistency.
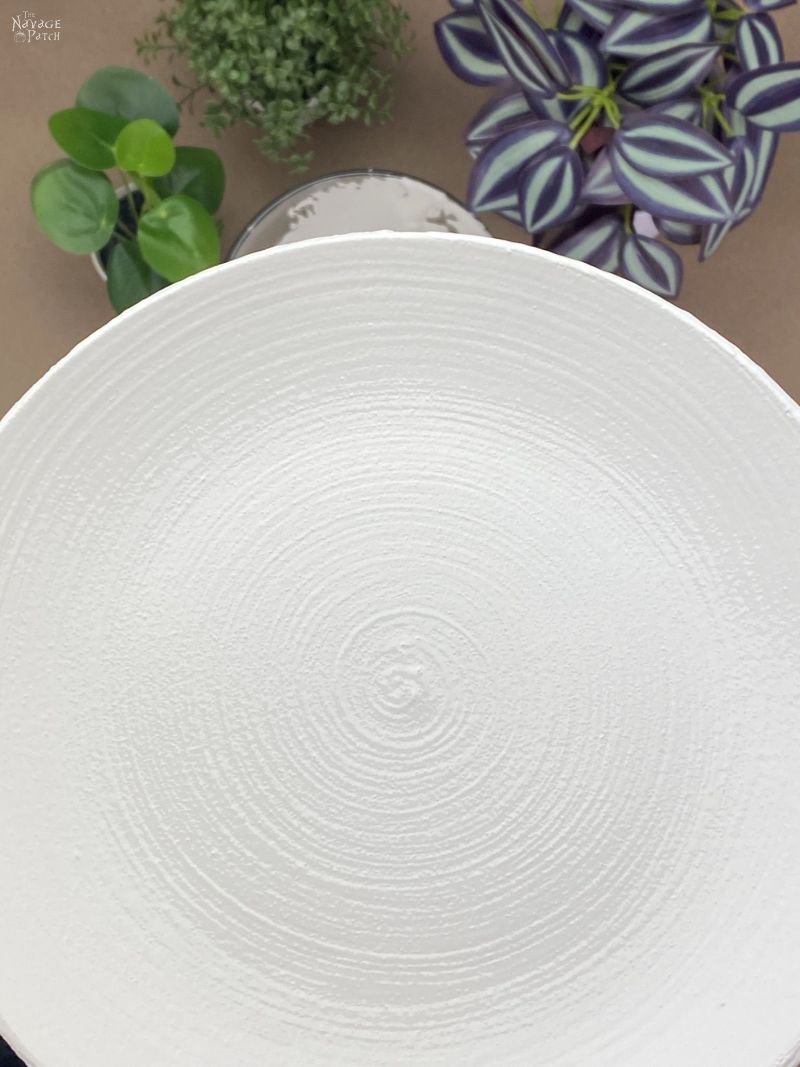
To paint, I dipped my chip brush in the paint, brushed it around on the pedestal and then used a stabbing motion to get the texture. As I mentioned earlier, this paint was just a little too thin, but I used it as is and then thickened it more before the second coat. As with all painting, two coats is always better than one.
Here it is after the second coat had dried. You can see the beautiful texture to the paint.

Now, you may be thinking, oh, well that’s great and all, but I’m just going to use stone spray paint! So much easier!
And yeah, it may be quicker to apply, but having used both techniques over the years, I’m partial to this one, as it allows me much more control over how much texture I can achieve. Plus, with this project, I did something to the top of the plate that no spray paint can do.
Behold!
To achieve that beautiful swirl effect, I first slathered paint all over the top of the plate.

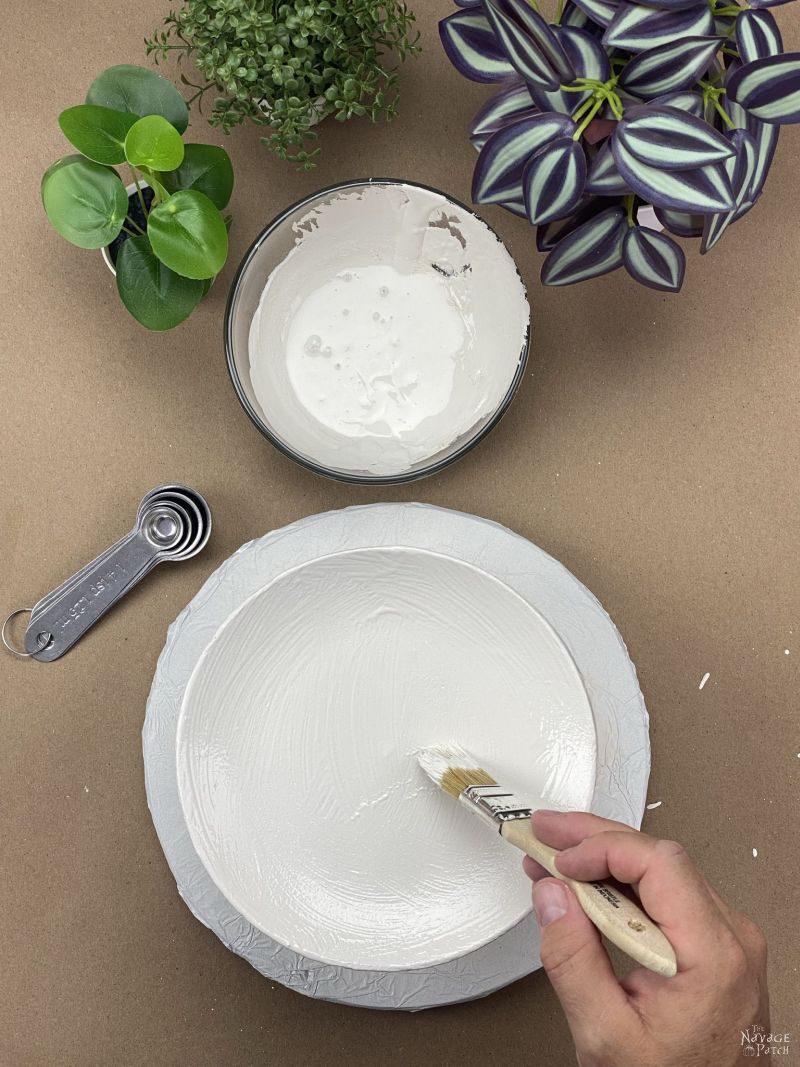
Then I placed the brush in the middle of the plate and while spinning the lazy Susan with my left hand, I slowly moved the brush towards the rim of the plate. Just watch the clip below to see how I did it.
And that was it for our DIY dollar store pedestal trays! I didn’t bother with any sort of protective coating, but depending on how you intend to use them, you may want to.

Here is a link to the Smoked Woods scented candle shown above.
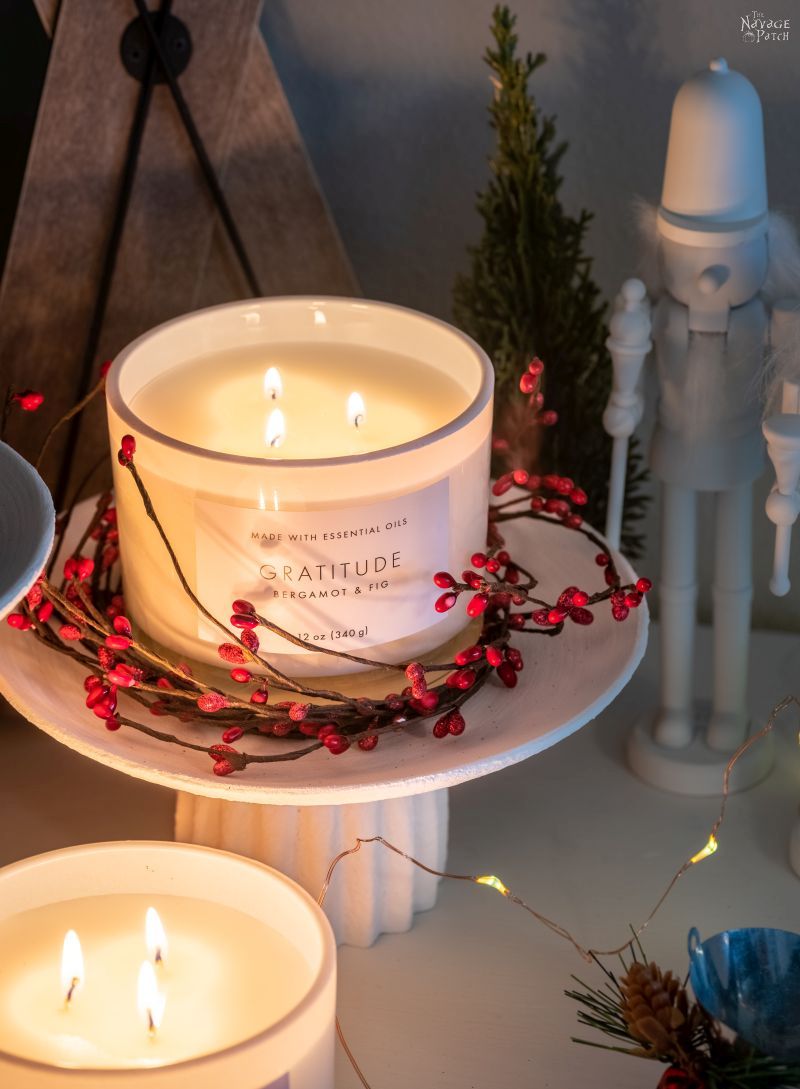
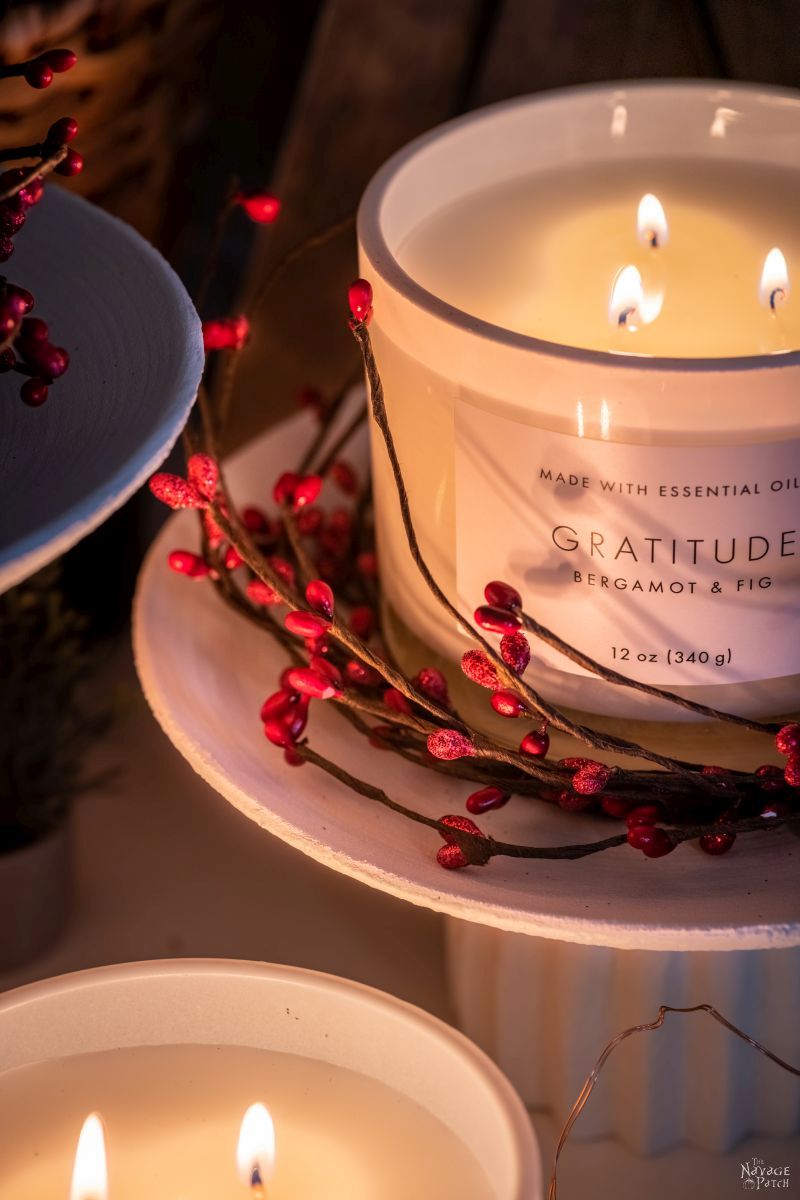
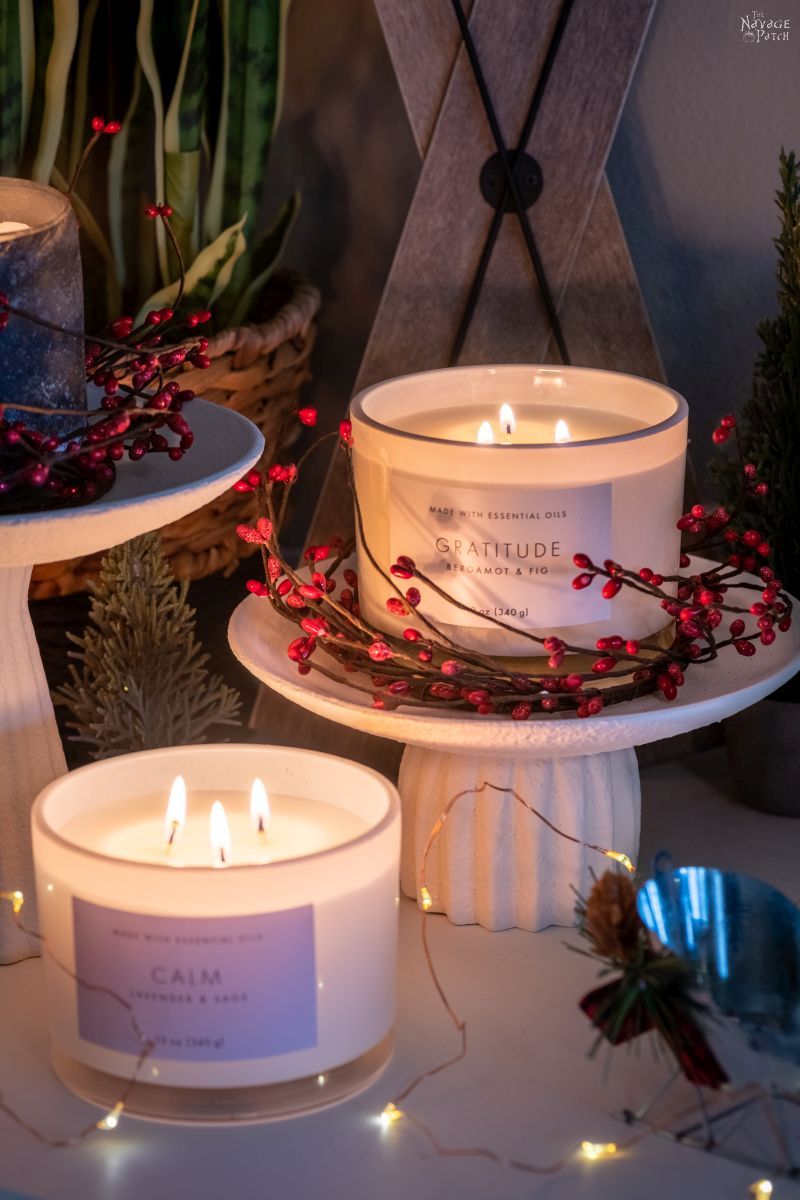
You can find the Gratitude candle shown above here.
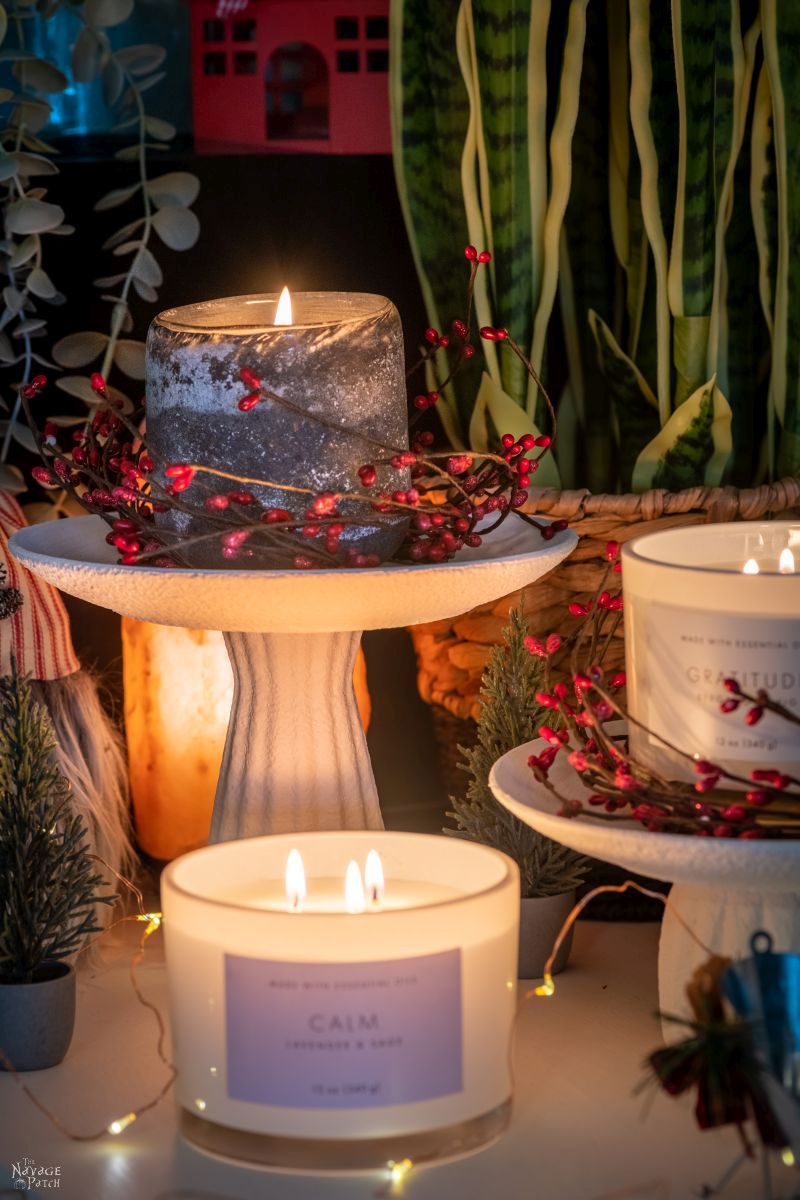
And here’s a link to the Calm scented candle.


We love it when you share our posts on Facebook and Pinterest!


These turned out really great! I plan on doing this with a bowl instead of a plate and using it for some air plants I ordered last week.
Thanks, Mo! Good idea to use it for air plants – that will look great!
Our local Target doesn’t have anything out yet either. We live in NW Missouri and have nasty winters lol. I’m looking forward to perusing the aisles in a couple of weeks.
I think by next week, everything will be fully stocked. The shelves are set up and the boxes are there…just need to unload them! 🙂
I’m going to make 6 of these for my candles in my fake fireplace to get them off the ground. Love your projects!
Thank you so much, Kathryn! When you’re done, post a picture to Instagram and tag us! 🙂
Great way to make awesome trays! With all those candles in glass, maybe you have the answer…how do you get the wax out when it is down to a 1/2″ or less left in the bottom, when you’d like to reuse the glass container AND you want to combine the wax from several candles together to make another candle?
Thank you, Susan! To get the wax out, I’d put them in a pot of boiling water. The water just needs to be about an inch deep if you only have 1/2″ of wax. You can pour out the wax into another container, and then while the container is still hot, wipe it clean with paper towels. Finish by washing with very hot water and dish soap.
Place candles in freezer. The wax will pop out
Really? Wow, that’s a good one. I’ll be trying this, Debi! 🙂
I put a stack of newspapers on a baking tray, turn the candlesticks upside down on them, and place in a 200 degree oven until the wax has all melted into the newspapers. Then wash in hot soapy water.
I love the pedestal trays! They also make nice displays of tiny trinkets in my glass front cabinets.
Thank you, Barbara! Yep, the oven also works great! 🙂
Beautiful! Hope you both are enjoying your new digs!
Monalisa, we are having the time of our lives here! 🙂
They turned out so nice. Really high end looking. Can’t wait to try.
Thank you, Karen! 🙂
I’ve been telling my customers to do their Christmas shopping early. Sounds like the shipping crisis has also hit your local Targets. I live in a university town, and our Target is RIGHT next to it, so it looks like that all the time unfortunately lol.
I really like your blogs! I’m looking forward to the eventual updates on whatever house you two pick. So that I can live vicariously through you…
Yeah, the supply chain disruptions are out of hand! Hoping things in Long Beach get sorted soon!
Rock on Greg, Rock on!! franki
I know no other way of living, Franki! 😀
beautiful and looks expensive, I will make several. Thanks great job. I am also in the process of 30 tassel angels for the older ladies Sunday School class they will love them.
Thank you, Lela, I hope they like them! 🙂
My Mom is obsessed with these type of stands/bowls/planters at the moment. I offered to make her one in a way very similar to this but she protested. I think I’m going to go ahead and then just say I bought it somewhere expensive, because these look expensive! Very nice work. I love the swirl on the surface.
I went to our local Kmart excited about Christmas stuff but the shelves had been picked clean! It was like a flock of buzzards had descended on a carcass. The only stuff left was the bits no one else wanted or the things they bought way too many of. I was so bummed out because last year Kmart killed it with their Christmas stock!
Yeah, there’s a different feel in the stores this year, Jay. While we are getting Christmas stuff in the big retailers, we’re not seeing anything “wow” this year. It seems like a retread of last year’s stuff. The pandemic and resulting supply chain fiasco have really made a mess of things. Seems like you guys are getting it even worse. Well, in one sense it’s not a bad thing…where supply chains fail, DIY comes to the rescue, right? Good luck with your Christmas hunt!
I LOVE your IDEAS. It would be so nice if I could print this without having to copy and paste just the direction and pictures without ALL the advertisements.