
DIY Cricut Infusible Ink Valentine’s Mugs (No Mug Press Needed!)
These Cricut Infusible Ink Mugs are the perfect Valentine or anniversary gift. Dishwasher safe forever and no mug press required!
Jeezum Crow, it’s been ten years!
If you told me eleven years ago that I’d soon quit my job, sell everything I own and move to Qatar to be with a Turkish woman I met on Facebook but never saw in person, I’d probably have handed you a rumpled dollar bill, told you what a funny gal you are and then asked for tickets to your next stand-up comedy show.
I sure didn’t see that one coming, but then again, I tend not to see anything coming.
If I had that kind of foresight, I wouldn’t be sitting here writing this – I’d be beached on a tropical island with my toes in the sand and a coconut cocktail in my hand.
*Sigh*
Someday…
Anyway, back to reality.
Ten years!
This is going to be our tenth Valentine’s Day together.

Okay, look, if you’ve been reading this blog for a while, you know my feelings towards V-Day.
And you know my feelings towards cutesy, saccharine, vomit-inducing Valentine’s projects.
For three years, I managed to avoid V-Day at The Navage Patch, but last year, Handan informed me in no uncertain terms that we’d now be making Valentine’s projects and writing about them.
And when I say “we,” I of course mean “I.”
Remember these cutesy heart candle holders?
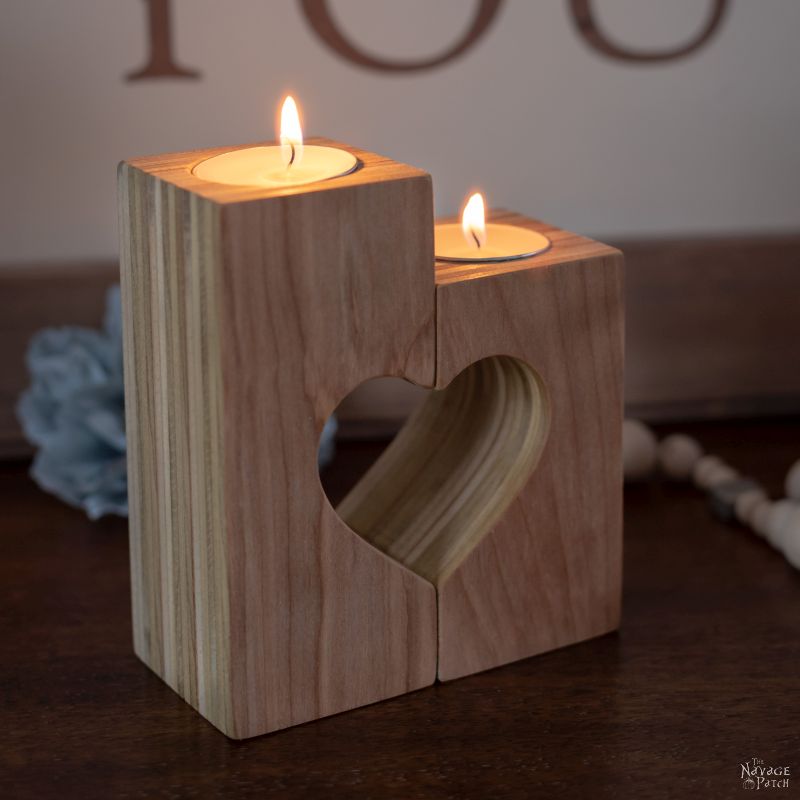
Yeah, that was my first Valentine’s Day post.
It wasn’t so bad, I guess.
I mean, my eyes didn’t start bleeding or anything, and I still had all my man parts after all was said and posted.
But it was enough for one year.
And how quickly time passes, because here we are again, and here I am about to show you another Valentine’s project!
But here’s the thing.
Whereas with last year’s post, I approached it like a kid who’s forced to eat a bowl of lima beans, this year, I’m totally stoked about it!
Why?
How?
What could possibly have happened in the past year to turn a rock-chewing, chest-thumping, fire-breathing hunk of manliness like me [insert laughter here] into a gentle Milquetoast who’s looking forward to his Valentine’s Day project and post??
I’ll tell you what happened.
Cricut happened.

About those heart candle holders above?
Yeah, yeah, they’re pretty cool and all, I admit it.
But they took a fair amount of work.
Not that work’s a bad thing.
But simpler is usually better, especially when it comes to holiday and gift crafting.
Simple has become somewhat of a mantra around The Navage Patch in the past year or so.
Simple Stupid rules the day!
Now here’s a new motto:
Craft Simple.

Or if you want to get all hipster about it:
craft. simple.
Or…
craft.simple
Companies should hire me to write slogans for them. I could do this all day (and get paid for it)!
Anyway, nobody does craft.simple like Cricut.
Here’s another one for you:
This Valentine’s Day, spend less time making and more time baking!
Erm, okay, maybe that’s a tad too 1950s.
Okay, how ’bout this, then (for the fellas):
This Halloween, spend less time making and more time raking!
Hmmmm, okay, okay, so my slogan skills may need a little work.
Oh, let’s just get on with the post, shall we?
This is a sponsored conversation written by me on behalf of Cricut. The opinions and text are all mine.
Seriously, do you think I’d let anyone else write for me? And look, the only opinions I have that aren’t mine belong to Handan. Any sensible husband has his wife’s opinions if he knows what’s good for him.
Valentine’s Day Infusible Ink Mugs with Cricut Explore Air 2
Today, I’m going to show you a trick with Cricut Infusible Ink that no one else has done.
(For those of you unfamiliar with Infusible Ink, have a look at this post for an introduction.)
I’m going to show you how to make Cricut Infusible Ink mugs…
[drum roll, please]
…without a mug press!
Yep, you’re reading it here first, folks. This is a Navage Patch World Premier!
My babes and I came up with an editable mug design that works perfectly for Valentine’s Day (or your anniversary), and we figured out how to do it without extra expensive equipment!
And these mugs will last forever.
Put them in the dishwasher as many times as you like – you’ll never, ever, lose the writing.
Craft Simple.
It’s what Valentine’s Day crafting is all about!
Let’s have a peek at what you’ll need to make these Valentine’s Infusible Ink mugs.
SUPPLIES LIST
Affiliate links are provided below. Full disclosure here.
- Cricut Explore Air 2 or other Cricut smart cutting machine
- Standard Grip Mat
- Cricut Infusible Ink Transfer Sheets in black and red
- Brayer (optional)
- Weeding tool
- Heat-resistant tape
- Scissors
- Mug designs (ours are available in Cricut Design Space)
- 15-ounce sublimation mugs (you can save more by buying sublimation mugs in bulk)
- Silicone mug wraps
- Rubbing alcohol
- Oven roasting bags (optional – you can get them cheaper at your local grocery store)
- Oven
Infusible Ink Mugs Tutorial
Look, I’ve been rambling on and on about Infusible Ink, but (almost) all Cricut projects start with a smart cutting machine, and for these mugs, I used our Explore Air 2.

If you’re interested in an Infusible Ink project that doesn’t require a Cricut Maker or Explore Air, check out these sugar skull totes and pillows we made with Infusible Ink markers!

Okay, back to the Infusible Ink mugs and our Explore Air 2…
Step 1 – Open the design in Cricut Design Space

Step 2 – Decide which way you’d like the arrows to face and delete or hide the other two
Step 3 – Edit the year
From here, to edit the year, first click on one of the four designs and then click UnGroup (circled in red below).

Next, double-click the “10.”

You’ll see a text box appear.

Change that “10” to whatever number you’d like. Kudos and congratulations, madam, if that number is 50 or more!

Press enter, then repeat with the rest, and you’re ready to go!

For these mugs, I used a black Infusible Ink transfer sheet for most of the writing and a red Infusible Ink transfer sheet for the heart.
Infusible Ink transfer sheets are stiffer than iron-on vinyl, and I find it helps to use a brayer to really secure the sheet to the mat.
Pro tip: when working with Infusible Ink transfer sheets, always wash your hands first and dry them thoroughly. Sweaty hands will ruin a perfectly good transfer sheet. Ask me how I know!

We have this design sorted into two mats – one for the black writing and arrow and one for the red heart.
I first set the Explore Air 2’s material selection knob to Custom and then selected Infusible Ink Transfer Sheet for the material in Cricut Design Space.

When cutting text with Infusible Ink, remember to mirror the image. Ask me how many projects I’ve botched because I forgot to do this step!

Time to cut!

Cutting the first mat…

Besides black, I think we’ve got the most manly-looking Explore Air 2 on the block. There was a time back around the turn of the century (I’ve been waiting at least a decade to say that) when nearly every shirt I owned was this color blue. Man, I was obsessed with this color!


Once our Explore Air 2 had finished its job, I peeled the Infusible Ink transfer sheet from the mat.

Next, I loaded the red transfer sheet for the two hearts.

This is an easy design to weed.
Translation: even my fat sausage fingers could do it with minimal need for the weeding tool.

I peeled the red heart from its transfer sheet and positioned it on the main design transfer sheet.


Update February 2021: to lessen the chance of grid lines getting transferred to your mug (as can happen if your oven is too hot), we recommend trimming your design as closely as possible.

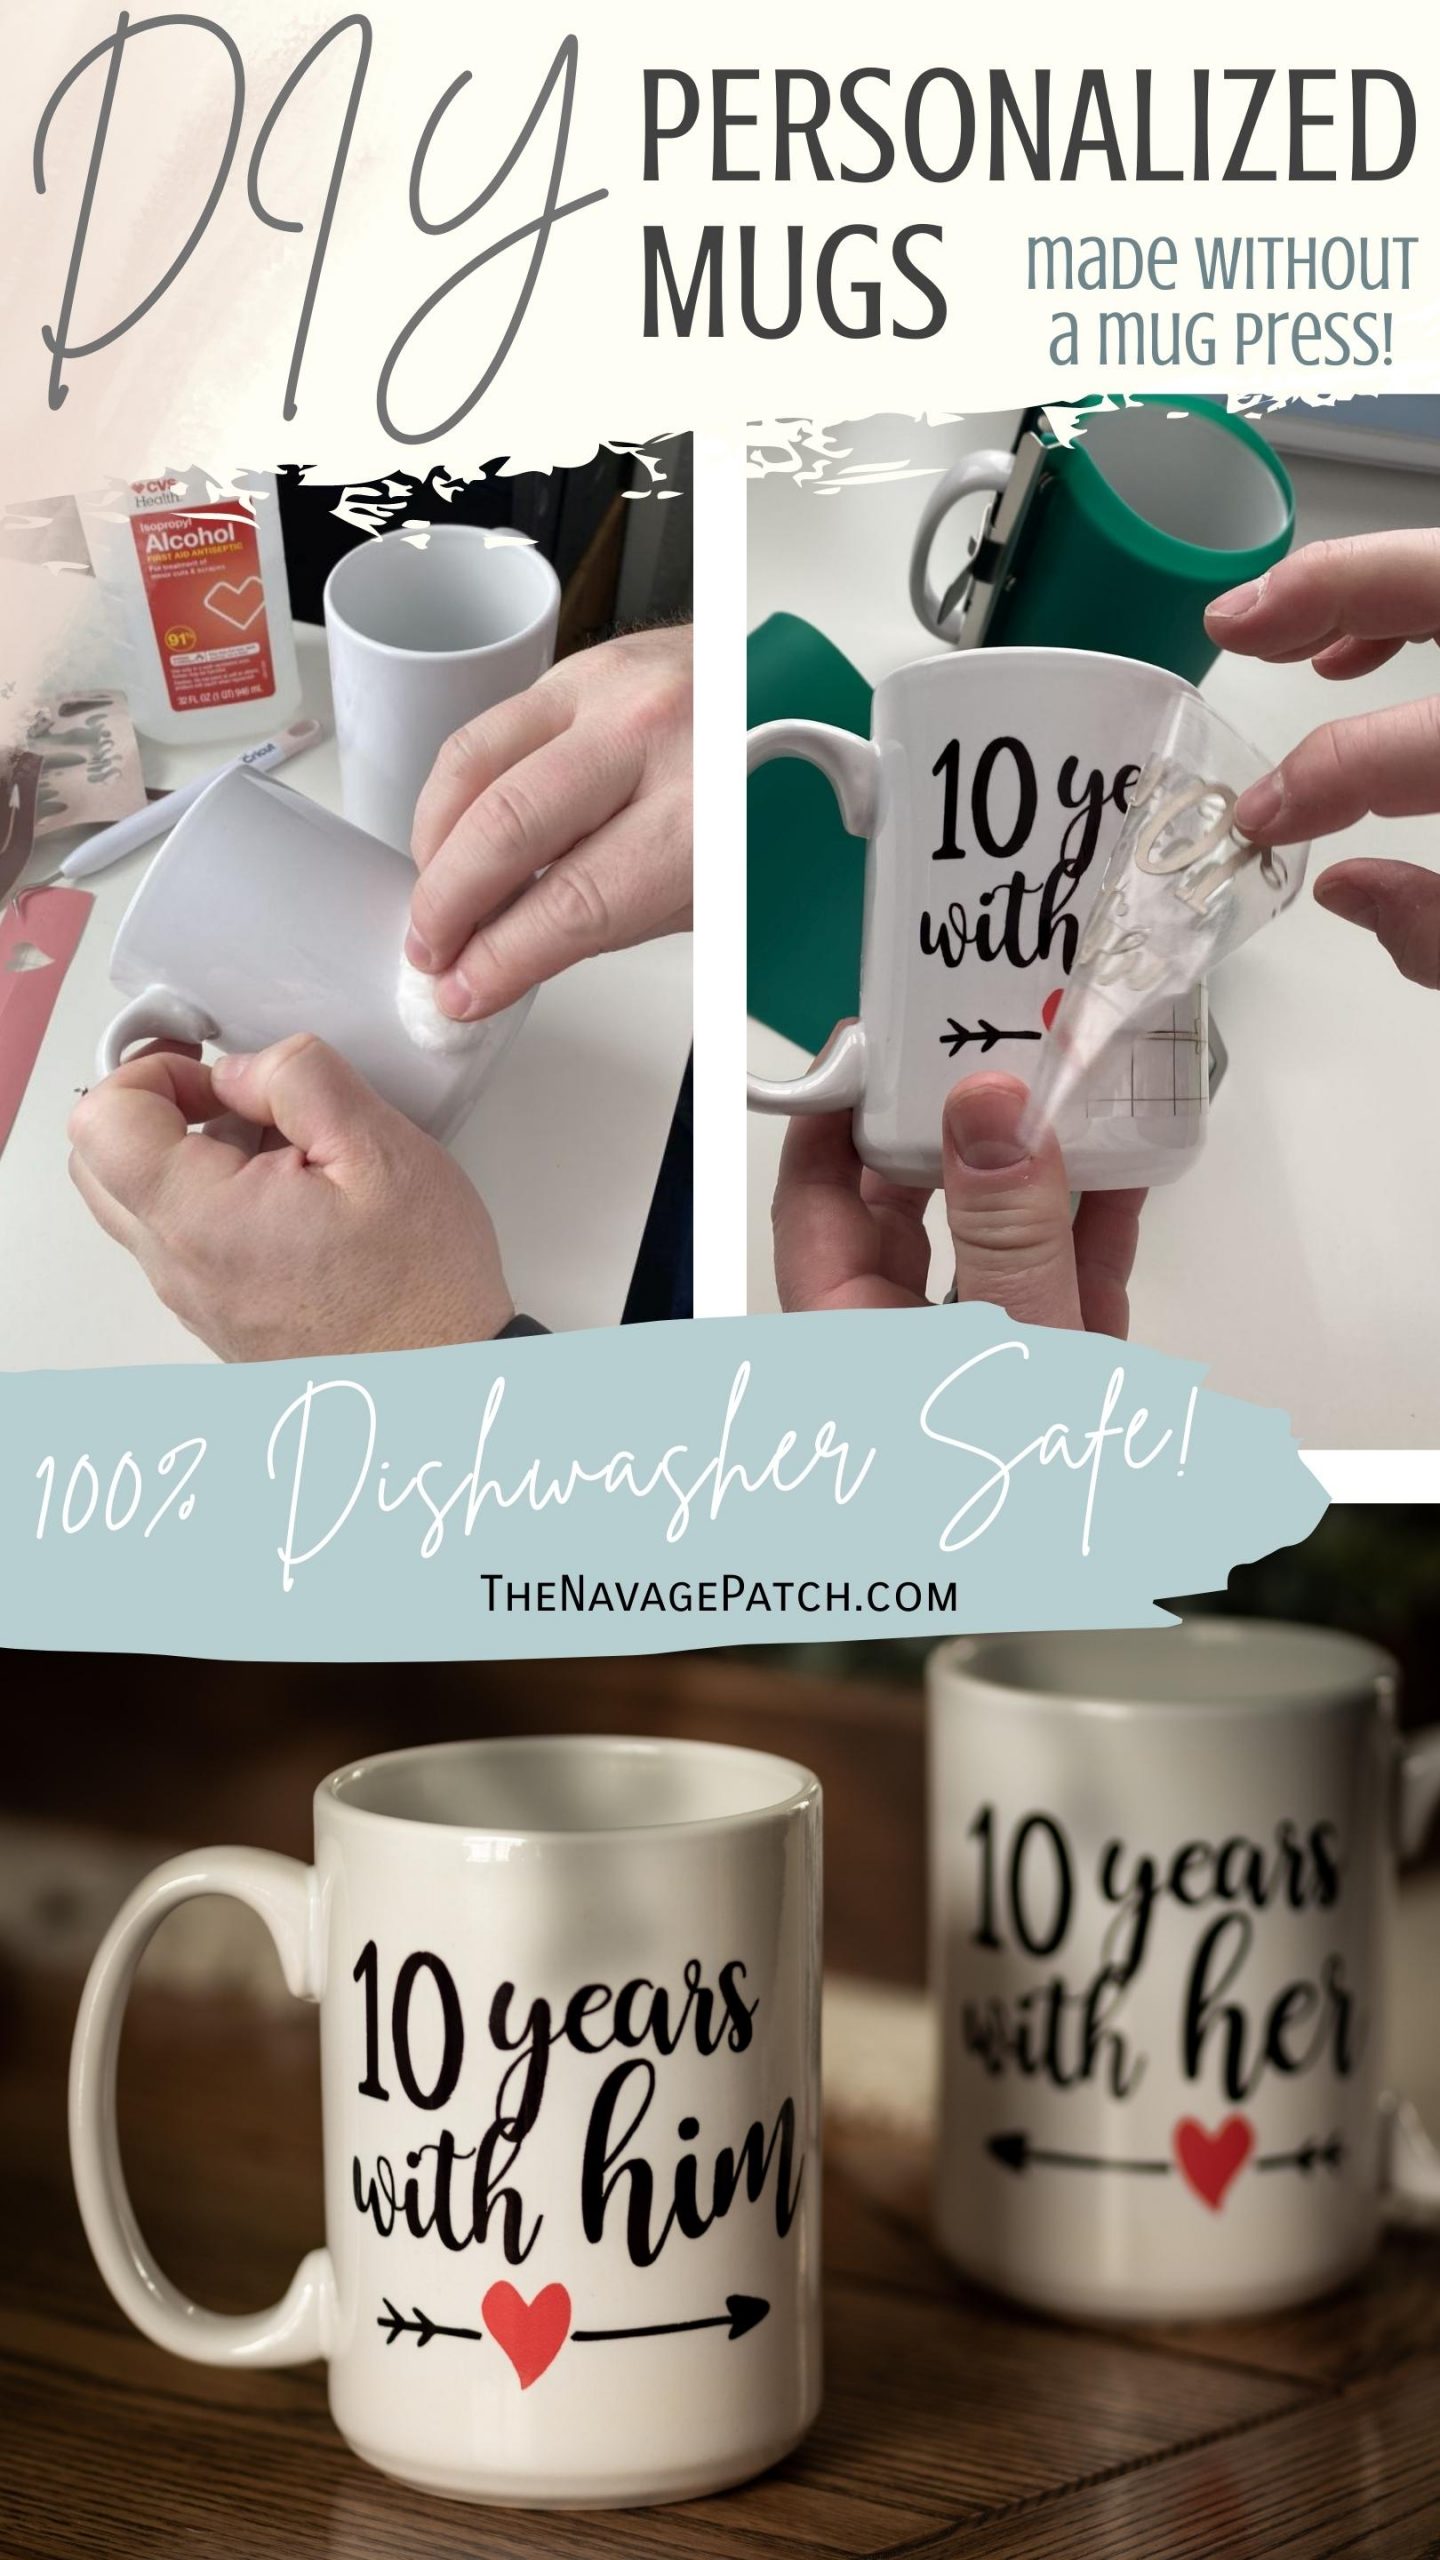
Infusible Ink works best on a dry, oil-free, lint-free surface, so I wiped the mugs with rubbing alcohol before applying the transfer sheets.

I just eyeballed the placement.


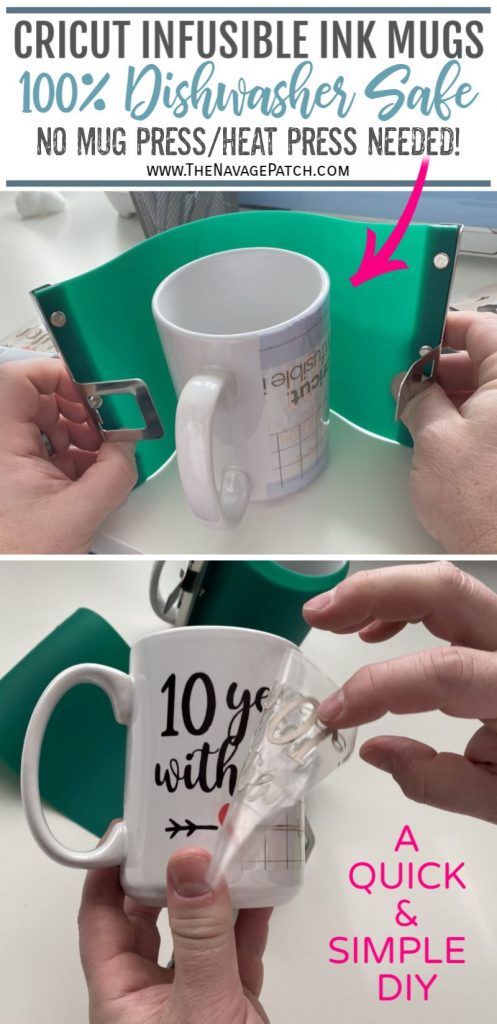
To keep the transfer sheet perfectly stable, I put heat-resistant tape along the top and bottom edges.


Then I secured the transfer sheets in place with sublimation silicone mug wraps.


The wrapped mugs went into a 400 degree oven for 15 minutes.

Some people have the notion that the gases given off during the sublimation process are toxic. They are not. But if you’re concerned about the fumes, you can first put the mugs into an oven roasting bag.


Just seal the bag with heat-resistant tape, and you’re good to go.

After 15 minutes, I took them out and let them cool for 30 minutes.


The moment of truth…
A perfect transfer!

And a perfect mug.
Let’s just talk about Infusible Ink for a second.
Before Cricut’s Infusible Ink, any sort of dye sublimation project required a dye sublimation printer (starting in the hundreds of dollars and going much higher from there), a compatible blank and a heat press. If that blank was a mug, it required a special mug press which starts at about $75 and goes up from there.
Infusible Ink has freed us from the sublimation printer.
Our oven technique frees us from the mug press.
We can now make perfect and permanent personalized mugs with just our Cricut cutting machines and a household oven!
More FREE Infusible Ink Mug Designs


I don’t know about you, but of all the personalized doodads I’ve made with Cricut (whether Infusible Ink or vinyl) – mugs, T-shirts, totes, pillows, coasters, onesies(!) [I blame you for that one, Cricut!] – Infusible Ink mugs are by far my favorite.
Most of us use mugs every day, and some of us are practically tied to them! There’s rarely a moment between 6am and 10pm that one of our personalized mugs is not in or near my or Handan’s hand.
And when I think of all the personalized gifts, Infusible Ink mugs again reign supreme.
Would you rather get a personalized t-shirt or a personalized mug as a gift?
That’s what I thought.
Craft simple Cricut Infusible Ink mugs – an all new way to make ‘n’ bake!
*sigh* I guess I can’t quit my day job just yet…


We love to see our DIY projects out in the wild! If you try this DIY project and take a picture and post it on Instagram, be sure to tag us – thenavagepatch


Share it on Pinterest & Facebook!


CONGRATS Guys. Here is to 100 More together!!
Thank you, Shaun!
Love the post, thanks for sharing your great ideas for the infusible ink mugs and the iron on foil mugs. I will definitely be making some.
Thank you Aleida and good luck!
Any thoughts on how I would seal a platter with vinyl on it?
Hi Greg:
have you ever tried to use Cricut Infusible Ink on wood? I was working with the Infusbile Markers and tried it on nice smooth, sanded wood; I kept the heat press on extra long and only got a faint image. Maybe you’ve got some ideas?
Thank you! I’m enjoying your site!
Celeste
Hi,
Can I use this same process on a ceramic baking dish or cookie jar? Does it not work on glass?
Would I just use my Cricut press to transfer it?
Hi Tia, no, the infusible ink won’t take on anything that isn’t approved for dye sublimation. The sublimation mugs have a special coating applied that allows them to take the ink. If you’ll be applying infusible ink to mugs, you’ll need to use silicone mug wraps and a 400 degree oven. All the details are in the post. Good luck! 🙂
Great info. I guess now I have to get the mug wraps which will be worth their weight in gold for a great outcome. Thanks.
Oh, yeah! We’re buying mugs in bulk now, lol! 🙂
Do you mind saying where you’re getting the mugs and other Cricut materials?
Thanks from a Cricut newbie!
Hi Gregg, all the products used are linked in the Supplies List section of the post. Welcome to Cricut World!
Happy ten years together and here’s to many more! Love the mugs. I hear you on having favorite mugs. We have a set our goddaughter gave us that say Hubby and Wifey and I use mine all the time. Hubby’s favorite is actually the Initech one I got him (he’s an Office Space fan).
BTW, great photos of you two!
Now you can make him a Damn it feels good to be a Gansta mug! 🙂
Warmest congrats on your upcoming 10th anniversary to my favorite DIY couple! Love the mugs!
Hi Gail – thank you so much! It’s been quite a journey to get to this point, lol! 🙂
AWESOME!!!! I just started following you and you’ve already helped me with a project I’ve been wanting to do, but thought I had to have a special cup press to do it. I’m getting some of those silicone wraps and some mugs this week. This is fantastic! Thank you!!!!
Congratulations on 10 years. Goes by fast (mostly) doesn’t it?!
Thank you, Cynthia! I’m so happy you found us AND that we’ve been able to help you out in that short time! And yes, it sure does go by fast! 🙂
This tute is great, Greg. I have the Cricut Maker, and had planned to use their vinyl. Their vinyl isn’t considered dishwasher safe, but can withstand some rough treatment. You have solved the dishwasher issue using the ink. And it’s totally doable! I really appreciate your blogs and have tried some. Love your humor. 10 years is just a start by the way. Many more to go!!
Thank you, Cynthia! We’ve used Cricut’s iron-on foil vinyl for mugs with good success, but yes, after a few months of dishwasher washing, letter will start coming off. Infusible Ink is permanent though! These mugs will last forever! Good luck with yours! 🙂
Love this! Have been looking for a better way to create mugs that are dishwasher safe. Will these be microwave safe as well?
100%! We’ve been using them every day since that post. that includes microwaving and dishwasher. They still look as good as the day I made them!
Cricut Premium Permanent that Cricut started producing in 2019 is dishwasher safe.
Wow, that is SUPER cool!
Congrats on 10 wonderful years! My hubby and I had our 20th last year and we just couldn’t believe it…..seems like it was just yesterday. Here’s to 20 more and then 20 more after that! 🙂
Thank you, Brigitte, and happy 21 to you! 😀
Congrats on your 10 wonderful years! I just about to start preparing my wedding on 10th October this year!
Quick question, instead of mug, can I do champagne glass with the oven? Thanks!
Thank you, Yolanda, and congratulations on your upcoming wedding! Unfortunately, Infusible Ink (or any dye sublimation ink) will not work on glass, so champagne flutes would be out of the question.
Congratulations to you both, great photos of you lovely people with your fabulous mugs. I sometimes wonder if i am the only woman on the planet who couldn’t give two hoots about Valentines day? I’m a cynical one, always thought it was a money, making scheme. In Wales there’s The Welsh valentine, 25th of January ‘St Dwynwen’s Day’ ‘Dydd Sant Dwynwen’ she is the Welsh patron Saint of lovers.
Thank you, Catherine! Oh, I think there are plenty of people out there who share your view of V-Day! 🙂
Handan, Please don’t be mad at me ..this is me being filled with envy. You have the prettiest crows feet I have ever seen. I am so jealous. Love the mugs too. And yes, love you too Greg and your sausage fingers. Did you make a mug for Barrish.?
Thank you, Melita, lol! I haven’t made one for Barish yet. He needs to pick a design first! 🙂
Thank you so much, Melita! Of course I won’t be mad at you – I see the crows feet as a sign of happiness and constant smiles. With Greg and Barish in my life, those smile wrinkles on my cheeks and eyes will only get deeper and I truly love them all! 🙂
Here’s to an exciting decade and to many, many more! Plus many more crafts and DIYs!
Thanks, Jay! 🙂
Congratulations!! Question… is it safe to use your regular oven or should this be an oven not used for food? I have always heard the sublimation inks give out toxic gas, not sure if it’s the same for the infusible ink? Thank you 🙂
Hi Jaime, yes it gives off gas, but sublimation dye gas is not toxic, and I’m assuming Infusible Ink gas is not toxic either, as there are no warnings anywhere in Cricut’s literature or on their website. If you still have concerns, you can seal the mugs in an oven roasting bag before baking them. 🙂
Can you use regular mugs? And do you need to use the wraps?
Hi Jen, no you need to use special sublimation mugs – they are linked in the post. And yes, you need the silicone wraps, as they hold the transfer sheet tightly against the mug – just as you would need to press down when doing a transfer with a neat press.
I think these are very nice. But I think the two of you are just too cute together at 10 years together. When my husband and I were married just 10 years none of these machines that you use to make these cups existed. Almost all of the crafts you do didn’t exist because people weren’t crazy about crafting so much. We are celebrating our 56th anniversary on February 1st and we are going to Disney World to celebrate with our family who live in the area. My husband is retired from Disney so we go as often as possible.
Enjoy your anniversary just as much as we will. God bless the both of you for all the great work you are doing. I love your blog!
Wow, congratulations on 56, Barbara! Blessings to you and your family. Have a great trip to Disney! 🙂
Hi Karley, I’ve updated the post with a simple and cheap solution: oven roasting bags! Personally, I don’t worry about doing a few mugs in the same oven I cook with. Ovens are vented, and the gases released will be vented out into the kitchen. Any way you slice it, those gases will end up in your home, whether from a food oven, a craft oven or just a heat press. In my opinion, they are sufficiently diffuse not to be of concern. I’d wager each of us inhales more toxins each day just walking down the street. But yes, better safe than sorry, so the roasting bag technique is the answer! 🙂
Thanks for your quick response and updates. Definitely got me thinking. I’m curious what the experts have to say on the topic since everything online is very vague. Thanks again!
Hi! New to the whole Cricut thing but your tutorials are very straightforward and well explained. Thank you!
Question. Instead of the sublimation wraps could I use an easypress mini?
Thanks in advance!
Hi Christen, though we haven’t tried it, other folks on YouTube have and it was a total failure. The mugs came out with unevenly infused ink and lots of ghosting (doubled image). We’ve used the EasyPress Mini with great results to apply foil iron-on vinyl though!
I too didn’t have success I’m letting them sit longer but darn it. Do you think the mini press would work with the infusable ink on the mugs ?
I found that the mugs in the link didn’t take me to sublimation mugs ? I found some new ones so I hope I have better success with those when they get here! ?going to try HTV on the mugs that came to start with ?
Hmmm, that’s weird! I just clicked the link, and it took me right to the sublimation mugs we got from Amazon. Well, I hope your second attempt goes better than the first!
Hi Cassie, no the mini press wouldn’t work on mugs. For Infusible Ink, the heat source needs to be constant and unmoving across the entire design. The curved surface of the mug doesn’t allow for that.
Super cute design! Having trouble downloading the editable mug design with my PC. I click the link and get redirected to Design Space online which no longer works for me. I have the offline version now. Please help! My 10 year anniversary is next week and wanted to make these for us as well. My mugs and silicone wraps are being delivered today. Thank you!
Hi Amber, I’m not sure how to help with that, as Cricut’s desktop software is so new, and we’re still figuring it out, too. Let me check with Handan to see if she has an SVG version or something similar.
Just out of curiosity, what does Jezzum Crow mean to you? Where did you learn that phrase?
Hi Barbara, it’s a euphemism for “Jesus Christ.” I use it to express wonder or startlement for comedic effect. I can’t remember where I first heard it – that would be way back in my youth. But it resurfaced in my life in the 90s as one of the catchphrases of Marge Simpson’s sisters on The Simpsons. Ever since, I’ve kept it in my repertoire of exclamatory remarks. 🙂
Awesome. Thanks for sharing.
Thanks, Nikki! 🙂
This is a wonderful tutorial. Are you using a convection oven? Also, are the mugs microwavable?
Thanks, Pat. Just a regular oven, and yes, they are microwavable! 🙂
I did not read other people’s comments. But thank you for making it so simple that I am going and make one today.3/31/2020.
Marita
Awesome! Let me know how it turned out, Marita! 🙂
Thank you so much for sharing this! I was wondering if you wanted the back ground to be pink and then have lettering on top of it would you just layer it all at once then put in the oven or would you do the background color first in the oven then let it cool and do the lettering second?
Hi Susie, to get two colors with Infusible Ink, you’ll need get them both on there at the same time. You would accomplish this by weeding one of the colors and sticking them onto the other color’s transfer sheet.
Do you think the oven method is better than using the Easy Press Mini? I’m having a hard time getting my hands on the silicone wraps in a reasonable time frame right now, but I do have the EPM at my disposal. I know the EPM was almost designed for the Infusible Inks so temperature and handling isn’t a concern. Just curious if you think the oven would produce better results.
Hi Becca, the Easypress Mini won’t work with Infusible Ink on mugs. Infusible Ink needs constant heat across the entire transfer. The curved mugs won’t allow for that from the Easypress Mini.
I love this – thank you! I have used your instructions for other designs & colors, but when I tried the black, it came out brown. I thought maybe I needed to add time in the oven, but then the mug just came out burnt looking. The deep black on yours looks great! Any ideas how I can get mine to look that nice color rather than brown? I used a convection oven – could that be it? Appreciate any tips!
I don’t think convection would make any difference, as long as the temperature is 400 degrees, but I can’t say for sure. Might be worth a shot in a conventional oven. Not sure why your black would come out as brown, though?
I did my first mug today and I noticed that there is a very pale square around my design (where the tape that hold the ink was) any recommendations on how to avoid that?
Do you have any suggestions for getting a transfer onto the inside bottom of the mug? Along the lines of those “You’ve been poisoned” cups everyone has seen. Can i just stick the image down there, or does it need some weight on it?
Hi Sarah, it would help to have some weight on it – not only to help the transfer but to keep the image from ghosting. The slightest jostle can ruin a transfer.
This is revolutionary! Congrats on your anniversary and thanks for the tutorial!
Thank you, Anna! Have fun with it!
You two are adorable!
Well, one of is, anyway, lol! 😀
Thank you so much for sharing!!! You really are so great people!! thank you a lot again!!!
Thank you so much, Lisa! It is our pleasure! 🙂
I was told you have to use a sublimation mug, not the ones you find at the dollar tree. Also does
everything have to be white?
That is absolutely correct, Rebecca. Only sublimation mugs will work – the infusible ink will not stick to any other surface. You don’t have to use white, but it certainly will look better if you do. I’m not sure you can even find sublimation mugs in any other color. I wouldn’t make much sense to do it on anything but white, as only white will show the true colors of your design plus give you actual whites (the negative space of your design)
Hi, this might be a silly question but do you think I could use an airfryer instead of an oven to do this? We only have Nuwave Brio Airfryer right now but it heats up to 425 degrees. Thanks!
I don’t see why not!
Hi! I love this post! I’m planning on making mugs for my wedding clients (I’m a wedding photographer). I want to use the 12oz campfire mug. Since they are wider, what size silicone wrap should I use? Thanks so much!!
Hi Sara, are you sure those campfire mugs are suitable for sublimation? I’ve never seen the campfire style sold for sublimation. Because they have a lip, it would be difficult to get a tight wrap with the silicone.
Congrats Greg and Handan on your first 10 years as husband and wife! My wife Ursula asked me what I wanted for my 61st Birthday and I said I want a “Cricut Joy” so I can re do the lettering on the glass doors at church! Without batting a pretty eye she agreed and said go get it! On 102820 we celebrated our 20th Anniversary of marriage and had I seen this earlier I might have tried to make her and I a matching his and hers 20th Anniversary coffee mug! I guess I could try and order everything and get it done in time for Thanksgiving or Christmas! Stay safe!
Hi Roger, Congrats on your 20th and on your Cricut Joy! You’ll have a ton of fun with it, especially making these mugs. For more ideas, check out our Infusible Ink Christmas mugs! –> https://www.thenavagepatch.com/diy-personalized-mugs-cricut-infusible-ink/
Is that just regular transfer tape or a heat resistant tape?
Hi Cheryl, I used heat resistant tape to secure the infusible ink transfer sheet to the mug.
I was just wondering if you have ever tried this with the markers? I only have paper so I am thinking it would burn up in the oven…..unless I completely covered it in tape?
Let me know if you have any suggestions and I am going to try this and see if it it works.
Hello, I just found your site and am loving it so far. I tried the mugs following your steps and using the same supplies. Thanks to Amazon! I have three mugs, three different results. I have only used black infusible ink on sublimation mugs, The black didn’t transfer 100% on the first mug. I left in the oven longer for the nect batch and it doesn’t look black, it’s looks scorched. Any tips? Thanks
Hi Yusagi, it’s crucial that your oven be at 400 degrees. Do you have a digital thermometer to check if your oven’s true temp? It sounds like your oven is running hot. We experienced the same thing when doing our Christmas mugs recently in a new house with a new oven. Turns out the oven was at times 70 degrees hotter than the dial read. By using a digital thermometer in the oven and finessing the controls, I was able to get the temp to 400, and the transfers were perfect like they were when we did our Valentine’s mugs. I’m sorry for your frustration and expense with the mugs! We went through it, too!
Hi just wondering do I have to buy the silicone muy wraps or can I just use the oven bags ?
Hi Wendy, you do need the wraps, as they secure the transfer sheet against the mug, which is necessary for sublimation transfer.
If you had sublimations could you use this same method to apply it to the mug with the same results? Or does it only work with the infusible ink?
Hi Jessie, it would be the same technique (I believe) for sublimation.
If I write on sublimation paper with the Cricut Pens, would the process be the same for mugs? Thank you!
Hi, I came across your post while troubleshooting my oven sublimation issue. I used a sublimation blank can cooler, invisible ink and silicone wrap. The grid lines from the invisible ink backing transfeted to the can cooler as well. Have you ever had that happen? This was my first time doing this.
Hi Lisa, yes, we’ve had that happen. It can occur if the oven is too hot or if the sublimation coating on the mug wasn’t properly applied by the factory that made it. The best way to avoid it is to trim the excess transfer plastic as much as possible. It’s also very helpful to use a digital thermometer in the oven to make sure you’re at the right temp.
I cannot seem to find the “10 Years with Him/Her” svg image in cricut design space.
I tried the link provided in the post but it will not load. Not sure what I am doing wrong. Is it not available any longer? I would love to make these for my hubby and I this
Valentines Day. Please help!!!
It is available and working, Sarah. I will email you to sort out your problem.
Thank you, Greg, for responding so quickly. I made them last night and they turned out great! I adjusted the size to fit an 11 oz. mug, and had to play with the number “27” to get it to look right. I was a little nervous but they look wonderful! I am very pleased with how they turned out. My husband loves them too. Thanks again!!!
I’m do happy to hear that, Sarah! 🙂
Hello I tried to cut this tonight and Design Space is trying to have me pay .99 cents. Do you know why?
Hi Sarah, I’m so sorry about this. This post was a sponsored post done by us on behalf of Cricut. For this particular post, we agreed to use fonts and images from Cricut’s library. Unfortunately, there’s no way around that $0.99 charge. All of our other SVGs are free, but this is the one exception, and that money goes to Cricut, not us. Again, I’m sorry for the confusion.
I just made my first mug using your tutorial. Never mind that I bought all the mugs, wrap, tape, and Infusible Ink sheets back in the summer before Cricut came out with their mug press. Doesn’t matter, because it turned out great. I used a different design, but again, absolutely perfect. Thank you for your clarity and pictures. I will keep using this method until I run out of mugs. Again, your directions are wonderful and your humor is truly entertaining. I am so glad I stumbled upon your website back in the summer
That’s so great to hear, KC! We were surprised and delighted when Cricut told us about Mug Press, but it doesn’t mean we don’t still support the good old oven method! 🙂
Looked through comments and didn’t see this issue. I had the grid marks from the Cricut infusible transfer sheet come through to the mug. Baked at 400 for the correct time using silicone mug wrap. Any suggestions? Appreciate your help!
Hi Nancy, we had that problem when we did our first mugs in our new house with a new oven. Apparently this one runs really hot, so 400 was actually at times almost 500 when I started monitoring it with a digital probe. Likely that is the cause. The good news is that Cricut now has Infusible Ink sheets sized for mugs without grid lines! If you haven’t heard, they just introduced their own mug press (read about it here), and it is awesome! But you don’t need it – the oven method still works just fine. So for your next attempt, I’d first stick a digital temperature probe in there and verify that 400 really is 400, and I’d have a look at the new line of Infusible Ink mug transfer sheets.
Looking forward to trying the mug but stop wait what?!
You were in Qatar?
So was I. First year of teaching at Al Jazeera then a two year stint in Shanghai in China, then five years up the road at Al Khor. Just retired due to arthritis.
Good luck with Navage.
We sure were! If you have some time to read an adventure, start here. The rest will follow from there!
Is the Cricut Transfer Sheet heat safe or did you use a special transfer sheet. I can only find heat resistant TAPE on the Cricut site. Thanks! I bought all of the supplies and can’t wait to make my first mug!
Hi Leah, yes those infusible ink transfer sheets are safe to heat – in fact, it’s what they’re designed for! Just be careful not to get hotter than 400 so you don’t transfer the lines of the transfer sheets. Cricut now makes line-free infusible ink transfer sheets specially made for the Cricut Mug Press. Those are even easier to use – they are pre-sized for mugs!
Do I need to have a white mug? I have a ton of plain mugs that came with a set. I’d like to use one or at least maybe experiment. Would I be wasting my time? It is black but I’m curious if a light color infusible ink would work. I also have the markers. Tell me your thoughts!!
Hi Jennifer, as long as the mugs are meant for sublimation ink, you should be fine, but there’s a reason almost all are white – Infusible Ink (sublimation) looks best on a white background!
I’m so loving this. Super cute! Thanks for this.
Thank you!
This is tutorial is my go to. Thank You for taking the time to put this together. I have used it about 3-4 times already. Can’t wait to explore more of what you have on here.
So happy to hear it, Carla!
I love this idea! It’s such a fun and creative way to make personalized gifts for Valentine’s Day. Thanks for sharing the step-by-step process—can’t wait to try it out!
I love this DIY project! The no mug press method makes it so easy to create personalized gifts for Valentine’s Day. Can’t wait to try this out with my Cricut! Thanks for the great tips!