How to Attach in Cricut Design Space
Learn how to how to Attach in Cricut Design Space with our simple, one-page and easy-to-follow Cricut Cribs!
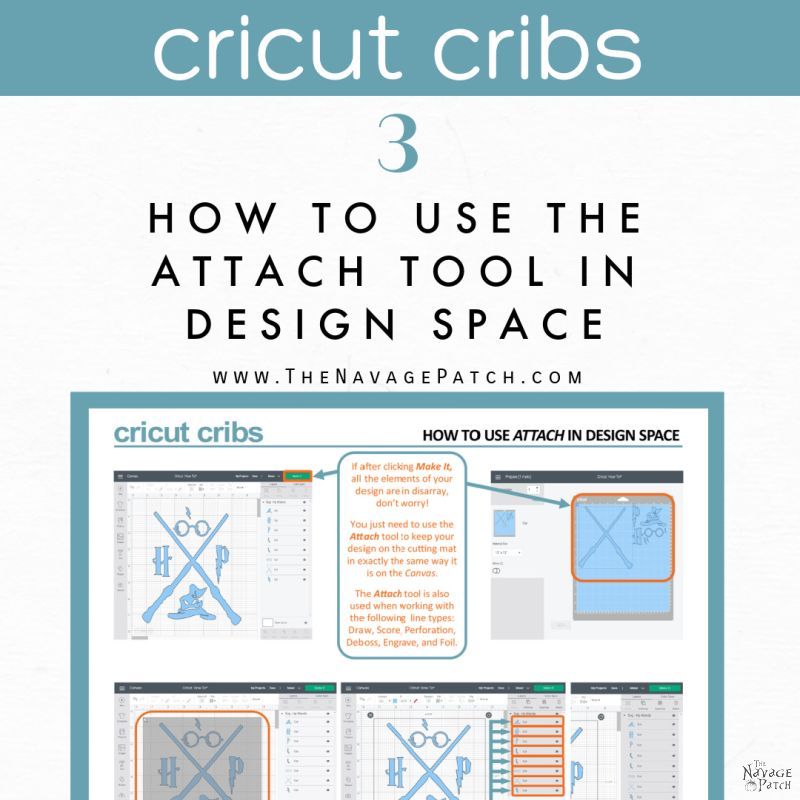
About that Jumbling Problem…
Cricut Design Space is a little loco when it comes to moving a design from the Canvas to the Cutting Mat. Let’s say you have a beautiful design, like the one below (which you can find in our Free Harry Potter SVGs post, along with many others). Now, any rational madam (such as yourself) would think that when you click the Make It button, the design below would be transferred as-is to the Cutting Mat.
Unfortunately, that’s not what happens. Instead, Design Space delights in taking all the elements of your design and grouping them separately on the Cutting Mat, as shown in the second picture below. It’s like that anal-retentive coworker whose desk is a study in supply segregation. Pens here, pencils there, papers in this corner, and a calculator over yonder…and never shall the supplies mix and socialize.

The first time this happens to you in Design Space (assuming you don’t know what you’re doing, like I didn’t know when I started), you freak out a little bit. Then comes the inevitable feelings of guilt that you did something wrong or that your design is broken! The Attach button (or, more to the point, not knowing about the Attach button) is probably one of the main things that scares noobs away from Cricut Design Space.
But it doesn’t have to be that way.
Not anymore.
Fortunately, there’s a simple command in Design Space that solves the Canvas-to-Cutting Mat jumbling issue: the Attach button.

How to Attach in Cricut Design Space
Step 1 – Select the design elements you want to attach
There are two ways to select the elements of your design. The quickest and easiest is to draw a selection box around your design. I like to start in the upper left corner of the design, click and hold the left mouse button and then drag diagonally down and to the right until I’ve got the whole design engulfed in the selection box. My babes, on the other hand, like to start at the bottom right corner and then move the mouse diagonally up and to the left.
She’s weird.
Note that the selection box is gray, not orange. That orange box is merely calling attention to the gray box.

The second method for selecting the elements of a design is to hold down the Shift key and then, one-by-one, click on each element layer until they are all selected. Two ways of accomplishing the exact same thing.

Step 2 – Click Attach
Click the Attach button in the lower right part of your screen. It’s the one with a paper clip icon.

Step 3 – Make It!
Once your elements are attached, you’ll see the “Attach” layer at the top of the Layers Panel. Next, click Make It.
Your design will be loaded onto the Cutting Mat exactly how it appeared on the Canvas.

Tip: UnGroup first
Sometimes you’ll try to attach some layers, but they just won’t cooperate. Like the jumbled image, this is another one of those “WHY, damn you?!” times for the Design Space noob. Those feelings of guilt and shame come rushing back.
(You did something wrong!)
But you didn’t! The most-likely culprit is that your design is grouped. Now, I know what you’re thinking: aren’t grouped and attached the same thing?
No, madam, they are not. Grouping in Design Space is a way to make multiple images (or layers) behave as a single image. This is useful when you want to make adjustments or edits to the group as a whole – for instance, rotating or resizing the design below. If the layers below weren’t grouped, you could, say, flip the hat upside-down or reverse the letters. Once grouped, any action would be performed on the grouped design. Grouping differs from attaching in that a grouped image sent to the Cutting Mat will still end up all jumbled, as the formatting seen on the Canvas is not preserved when it is sent to the Cutting Mat.
If your design is grouped and can’t be attached, simply select the layer group and click UnGroup.

Now you may proceed to select your element layers and then click Attach. In this case, we’re selecting all of the layers except the “H” and the “P.”

You can see the attached layers below are a darker gray, and they are nested under “Attach” in the Layers Panel. When we click Make It, the attached design is sent to the Cutting Mat with layout preserved, but the letters are placed off to the side.

Tip: Attaching makes it one color
If your design has multiple colors, which Design Space would normally sort into multiple Cutting Mats, the Attach function will make all the attached layers the same color as the bottom layer of your selection. Thus, you only want to attach layers that you want to be the same color.
Tip: Excluding elements from an attached set
Let’s say you attached the entire design, but then you decided you wanted to make the “H” and the “P” a different color. Instead of detaching the group, re-selecting the layers you want as one color, re-attaching, selecting the layers for the other color, attaching, and sorting the design into two Cutting Mats (one for each color), you could simply click on the eye icon next to the “H” and the “P.” This removes them from the Canvas, and you can click Make It to have the rest of the design sent to the Cutting Mat to cut the first color.

When it’s finished, simply click the eye icon again for the letters to bring them back and click the eye icon for all the other layers to hide them. Then click Make It to send the letters to the Cutting Mat, and make that cut with different colored material.
*******
So what happens now?
Well, from here, you have a ton of possibilities, and they are the subject of our other Cricut Cribs!
Remember that all the Cricut Cribs can be found on our Cricut Tutorials page.
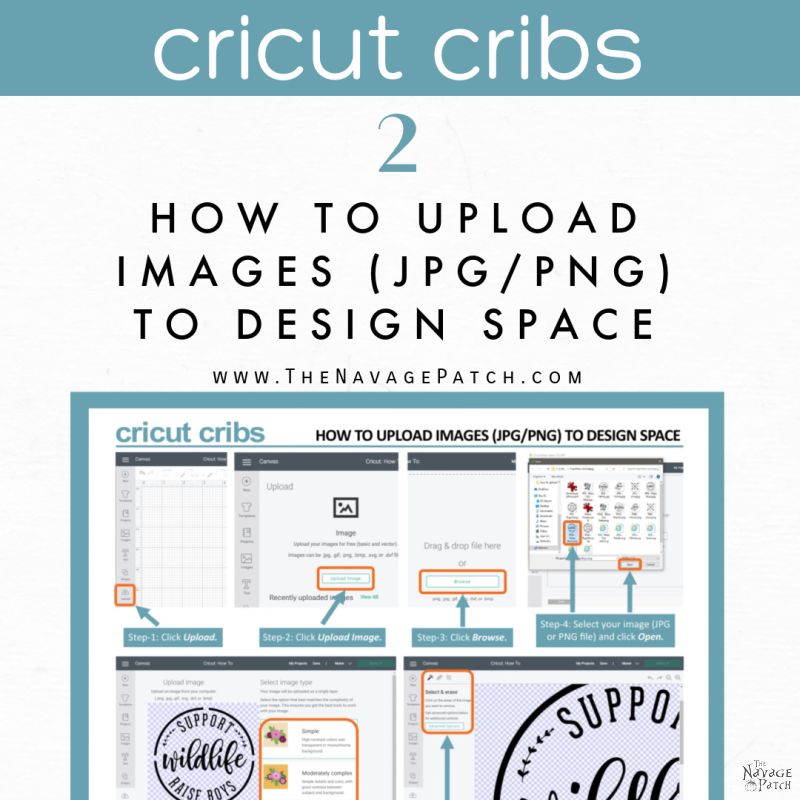
Free Printable Cricut Cribs: How to Use the Attach Tool in Cricut Design Space
Now it’s time to click on the button below to download the free printable Cricut Cribs and get on with your Cricut crafting! Please remember this Cricut Crib is designed as a one-page PDF and to fit 8.5×11 inch paper. But you should also be able to print it on A4 size paper by selecting the “scale to fit” setting on your printer. You’ll find this one-page Cricut Design Space Tutorial under the “Cricut Cribs” sections of TNP VIP Lounge.
take me to your
amazing freebies library
If you’re not a TNP VIP member, you won’t be able to access our Freebies Library. But that can be easily fixed! Subscribe for free on the form below and become a Navage Patch VIP. Once you subscribe, a password will be sent to you in our Welcome email, and that will give you access to TNP VIP Lounge [Freebies Library]. If you didn’t receive our Welcome email, can’t find the password or have any other questions on this process or on our free printables, please check our Printables FAQ page.
We love to see our printables out in the wild! If you display our free printables in your home or use our free SVGs in your projects, and take a picture and post it on Instagram, be sure to tag us – thenavagepatch
Share it on Pinterest & Facebook!

Thanks to you I have finally gotten brave enough to wipe the dust off my one year old Cricut and start using it. I love your Cricut Cribs and have been printing them to refer to while learning to use my Cricut. I’ve been able to print the 2nd and 3rd Cribs pages but for some reason I can’t print the first one. I’ve tried everything I can think of with no luck. I keep getting an access denied message. Do you know how I can fix this? It seems weird it’s only the one I am having problems with.
That is weird, Pam. I double-checked the file, and I’m able to print from Google Drive and after downloading that PDF. If you could screenshot that message, it would help me troubleshoot your problem. Thanks!
I certainly do wish that you had been inspired to take on a Silhouette instead of the Cricut! Lol. Over here on the dark side- I could use your encouraging, down to earth guidance. Just like the Cricut though – once you master those skills – you can rock the creation! I have referred your crib notes to a number of my younger relatives- Cricut owners! and they are Lovin you as well! Thanks so much
Awwww…maybe you should join us here on the light side, lol! Well, I’m glad some folks in your family are finding some value in our Cribs. Maybe someday you will too! 🙂
You are a genius!!!!! Thank you for this post.
So glad you’re enjoying the Cribs! 🙂
Man, I could have used this exact post a year ago. Thanks so much for this! I’ve used my Cricut a bit but have never felt like I was using to its full potential. I think it’s time to get back at it. Keep them coming!
You’re welcome, Sharon! We’ll have another one out real soon!