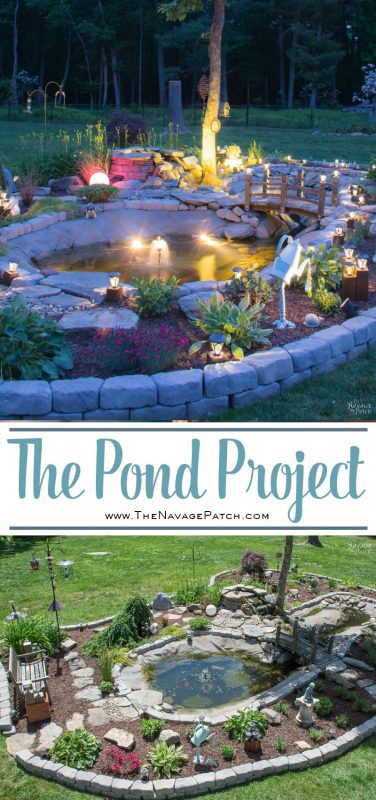
The Pond Project – Part 3: The Reveal
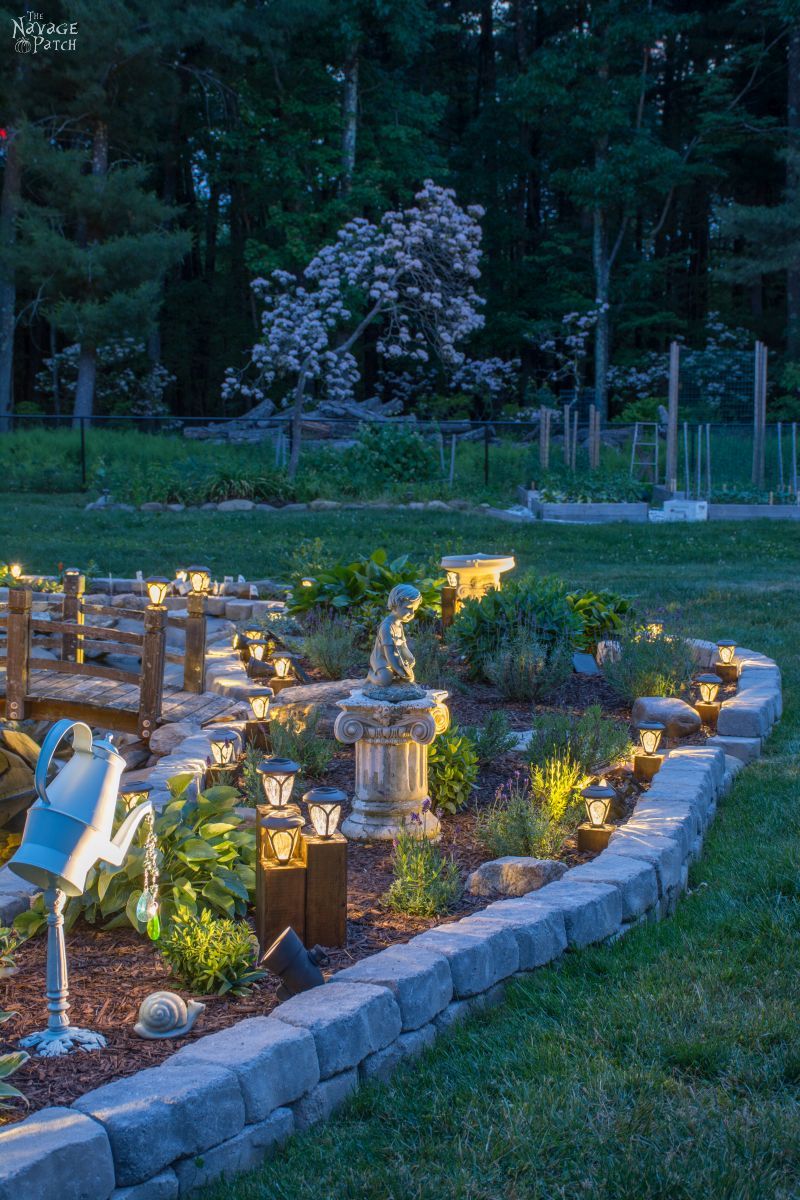
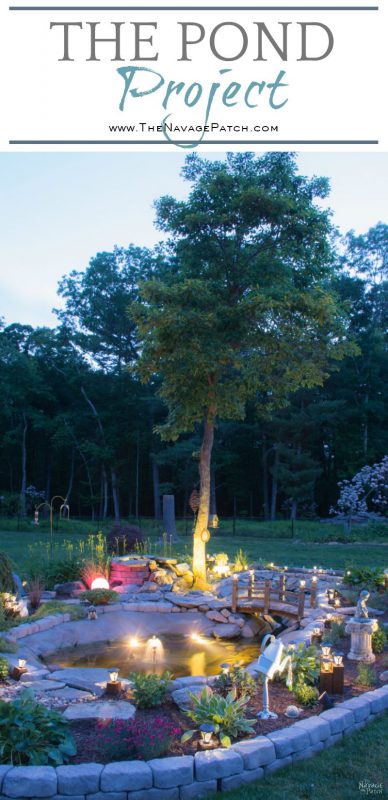
Here’s a big overview shot. Though we now enter the “Reveal” part of the post, understand that this project won’t be fully finished until the plants, flowers and succulents all grow into their final forms and places. Next year, we’ll follow up with an update. But for now, let’s get on with it!
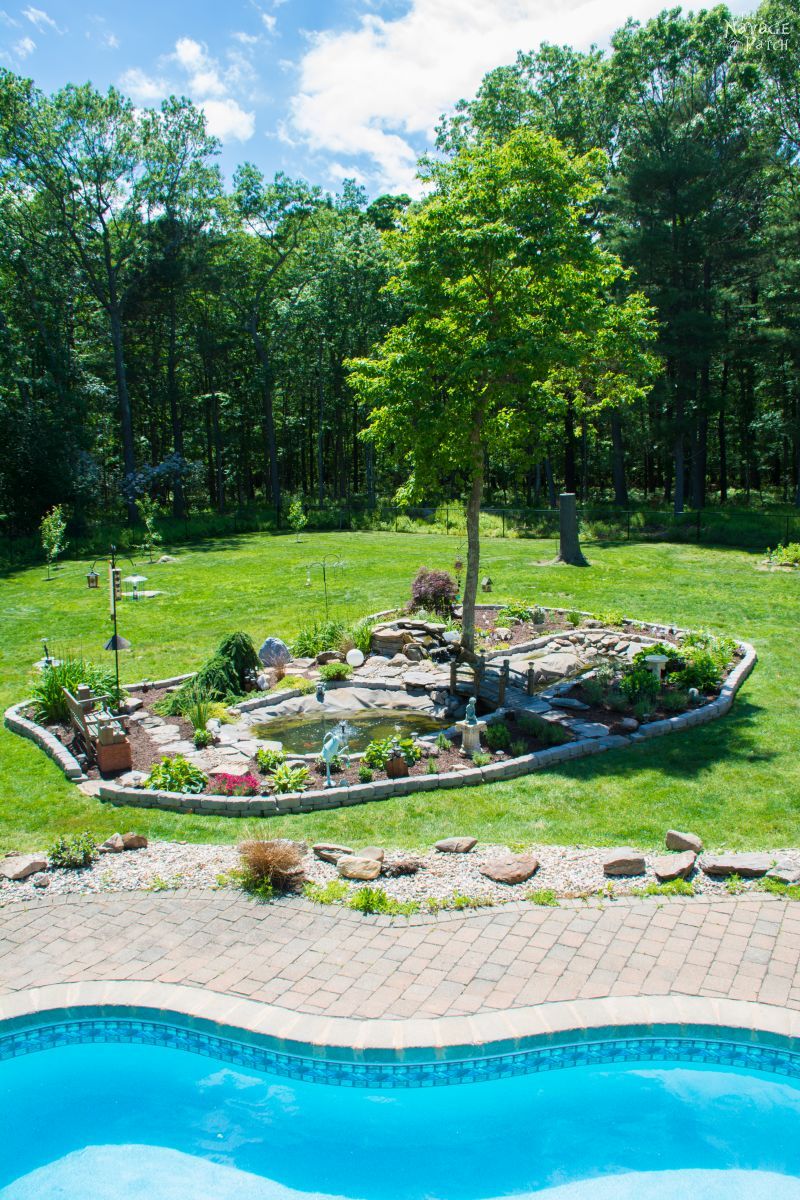
That wall makes weed-whacking easy.

Who doesn’t love to whack some grass?

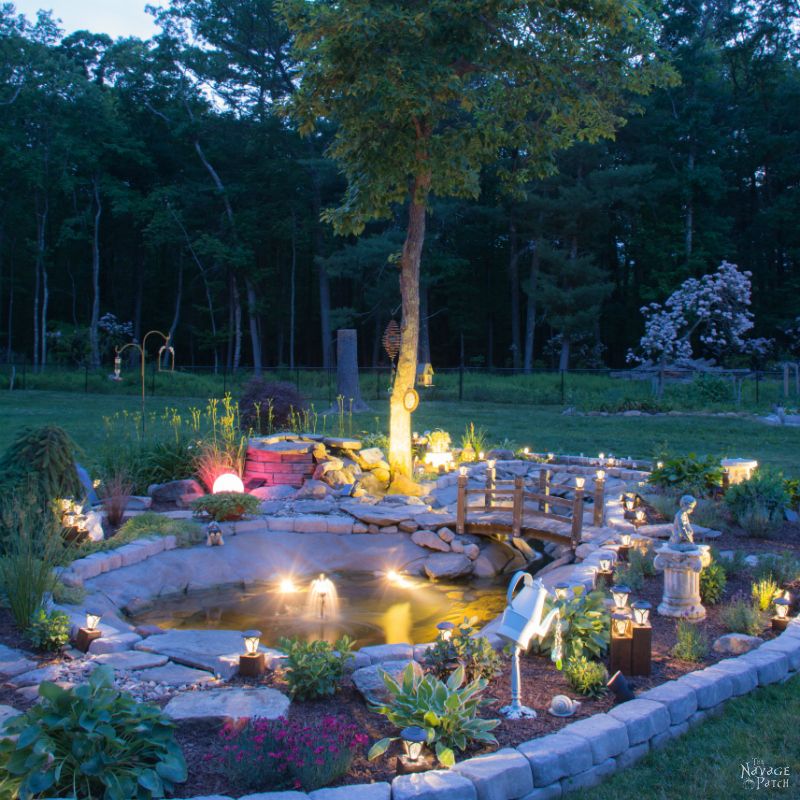
As night fell, I got ready to take some sunset shots…

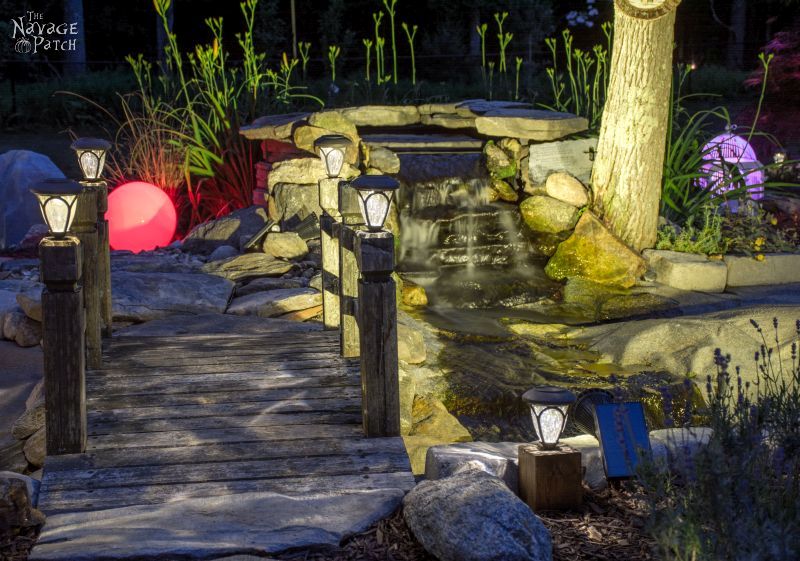
From now on, I’ll shut up and let the pictures do most of the talking. Enjoy!


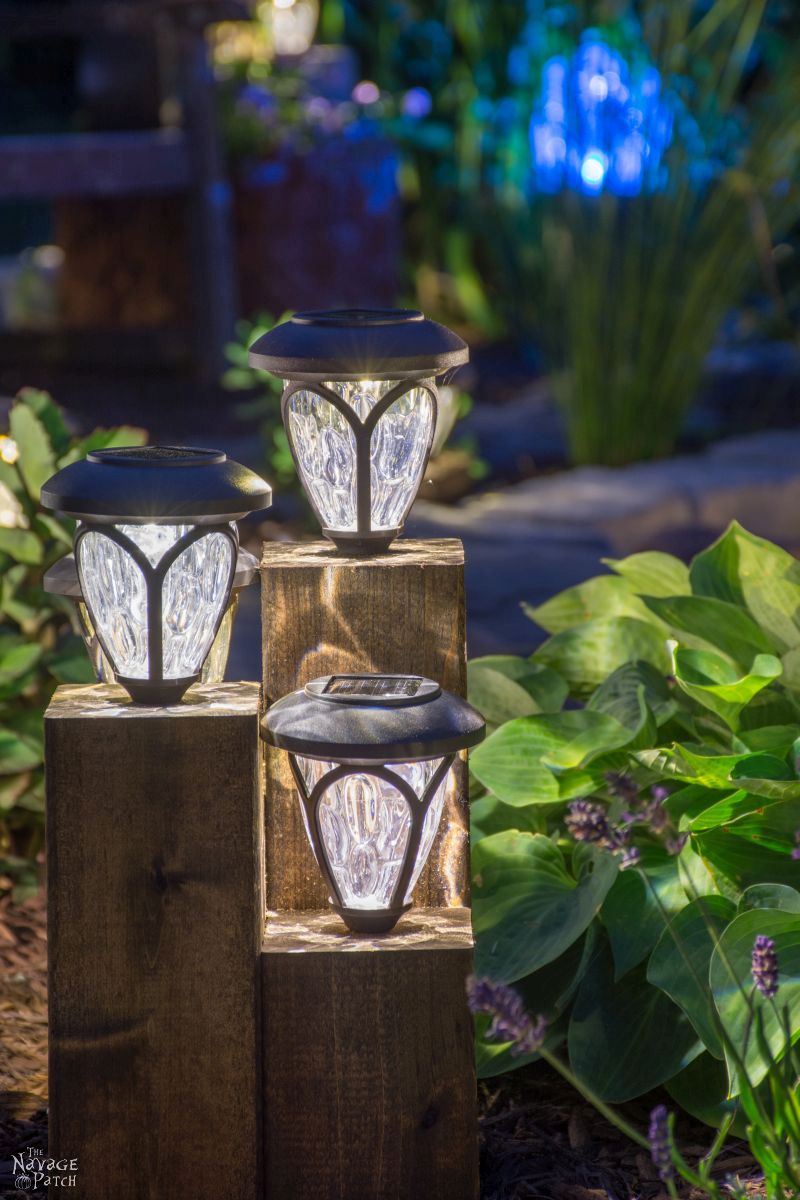
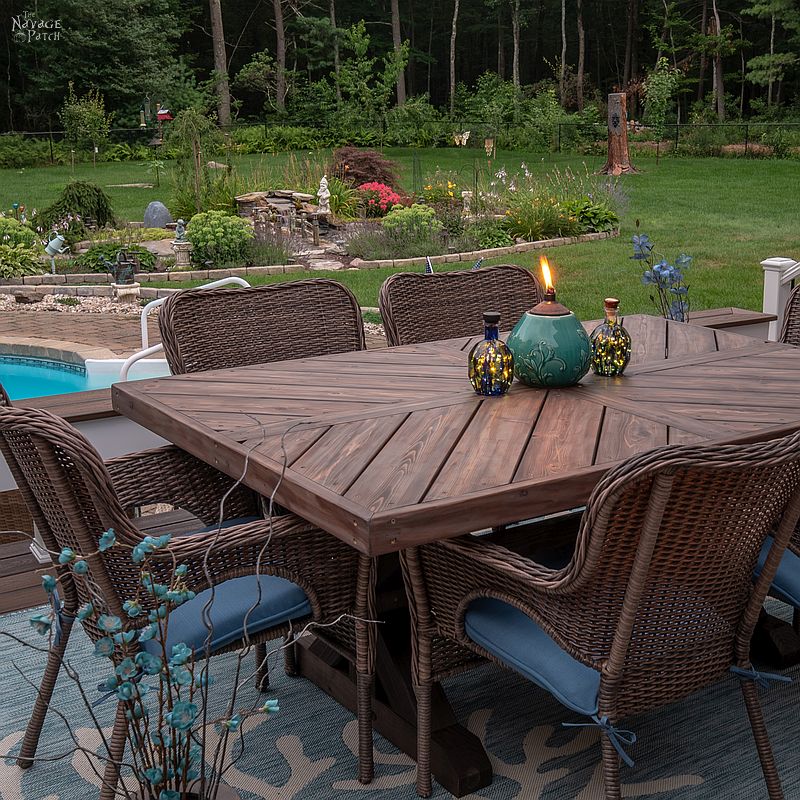
The tallest of this grouping of three 6x6s is used as a drink holder.


The lights cycle through colors.


We hope you enjoyed the results as much as we do! This was a long and physically draining project, and we are both so happy it is finished! Now, it’s time for us to enjoy the fruits of our labor before moving on to the next phase of the Big Backyard Makeover 2016! 🙂
We love it when you share our posts on Facebook and Pinterest!


Beautiful job! Amazing how the cedar blocks class up the solar lights – and also make a great drink holder. Very impressed.
Thank you, Kay!
Wowza! I liked your before but your after is awesome! Your hard work paid off! I love the night pictures best. Your fix for your solar lights makes them look so much more expensive. I can’t wait for my invite to your next BBQ!
Thank you, Giselle! I barbecue every weekend, so just let us know when you’ll be coming! 🙂
What magic you two have worked. As I was taking the “evening tour” I felt as if I were walking through fairyland.
Thank you for sharing.
Thank you, Sherry!
My goodness, the transformation is amazing! It looks beautiful during the day. The evening is stunning as well. Great job, excellent team effort.
Thank you so much, Melva! We do make a pretty good team! 😉
handan and greg you busted your arses on this but it turned out beautiful, i am glad you left some day lilies and the lavender will smell so good and i am sure the fish survived because they knew they would be going uptown xx
You really made this a beautiful, relaxing area. Love all the plants, lights, & the unique design features. Great job guys. Now on to challenge my hubby to help do our yard. Thanks for sharing.
Thank you, Susan!
Thank you so much, Chris! Now I call the pond area “our Oasis”. You should come and visit us one day to see it in person. Although it looks really good in the pictures trust me they don’t do justice to what you would see with your eyes 😉
Thank you, Chris! Oh yeah, those fish are now living in a penthouse in the sky compared to their old digs! Hey, Chris, are you British?
Wow! You two did such an amazing job on this beautiful pond! I love everything about it but the light cubes really sold me? I definitely have to make them for my garden! Enjoy your labor of love?
Thank you so much, Peggy! We have been enjoying it every night and day!
Awesome job looks great!!
Thank you, Sandra!
You guys, this is amazing. A lot of work but obviously worth it. And it becomes magical when the sun goes down and the lights go on. Enjoy the fruits of your labor !
Thank you, Mary! It was a pretty brutal project, but sooooo worth it in the end! 🙂
Wow, wow and another wow!!! Your back breaking work paid off and then some. Great idea for the solar lights and very fitting along a water feature. Love your adorable statuary especially the little boy laying on the rock with the binoculars. Just when I’m swooning over the fact that you have a pond with a waterfall and a cute walking bridge I see you have a pool too. Sorry, a little green with envy over here!
Thank you, Marie! All credit and glory to Handan for the lighting, landscaping and garden doodads! I’m just the dumb muscle 🙂
Fantastic job! I made 2 little ponds myself from the forms and have fun. moving stuff around every year. Wish i had your property size to make an oasis like you have.Enjoy your beauty!
Thank you, Katie!
Absolutely stunning! I liked every idea you implemented. One of my favorites is the way you solved the light situation where the cones kept breaking. Your solution is a standout! I have a small koi pond at my home in WV that my daughter-in-law and grandkids are to landscape this summer while my husband and I are at our home in Maine. I am most definitely sending your blog to her for inspiration. Thank you for sharing your project. I’ll keep a good thought that your wife let’s you have free time during your next summer. Oh, by the way, I love your sense of humor.
Thank you, Susan, and good luck with your pond!
Ok..I looked at your work over and over so many times! Magnificent- glorious! You both are very talented and have great imagination! I moved from a house to an apartment a year ago. I miss yard design so much. Yours is far beyond the best I’ve ever seen. Kudos!
Thank you, Gale! 🙂
Absolutely breathtaking! You two make a fabulous team!! Thank you for taking us along on the journey. You have inspired me!!
Thank you, Ronda!
I love reading all your post..I can always count on learning something and get a little giggle all at the same time..AMAZING work on the pond..
Thank you so much, Jennifer! 🙂
You guys really outdid yourselves!! Your finished project is absolutely beautiful. I really love the night pictures the best. I can only imagine what it looks like in person. BRAVO
Thank you, Michelle! (It is much better in person! 😀 )
Magical! Did you make the bridge too?
Thank you, Lynette! No, the bridge was here when we moved into the house. It had lost its arch over time, so I cut some rounded pieces to fit underneath and screwed them in to prop it back to its original form.
Awesome. I love it and know the amount of work involved because of my own little project. I am 73 years old and last year started building my own pond with stream & waterfall. I made lots of mistakes & learned so much. This year I re-worked the entire project. Congratulations ,looks fantastic.
Thank you, Sandra! Kudos to you for building your own pond! All the hard work more than pays off in the end!
Wow, that was a huge undertaking! Congrats. I’m sure it’s relaxing to sit out there. Thanks for linking up with Funtastic Friday.
Thank you, Victoria!
Amazing, but it couldn’t be any other way coming from you two. There is no detail missing and I am sure you will enjoy lots of days and nights at your backyard.
Thank you, Pili! We have been enjoying it every day and night since we finished!
I think y’all did a great job with a lot of hard work! I was just wondering though, why is the water level in the actual pond not a little higher than it is?
Hi Nancy, thank you! The water level is actually as high as it can go without completely submerging the skimmer box leading to the pump. So we could technically add more water, but the surface wouldn’t stay as clean. Eventually, the succulents we planted around the rim of the pond will grow down towards the waterline and cover up the rock liner that is showing there now.
It all looks so amazing! And your ideas for the solar lights are fantastic – I think they all come with flimsy stakes and tubes.
I wish my dogs were afraid of the pet fence flags – it would really simplify keeping them from stomping and eating my plants.
Thank you, Vanessa! Yeah, keeping dogs out of the plants and flowers is a real pain…especially if they’re in hot pursuit of a squirrel or chipmunk who happens to dash through the garden!
I can imagine fairies gathering here! So pretty. Visiting from Mix It Up Monday.
Thank you, Brandi!
Wow! It’s like your own enchanted garden! I love how peaceful and soothing it looks and probably sounds too, with the fountain. You guys did an amazing job!
Thank you so much, Pamela!
I love it! I bet it’s so peaceful to sit by it and just watch what is going on. Lovely. Thank you for linking up to Tips and Tricks.
Thank you, Kathleen!
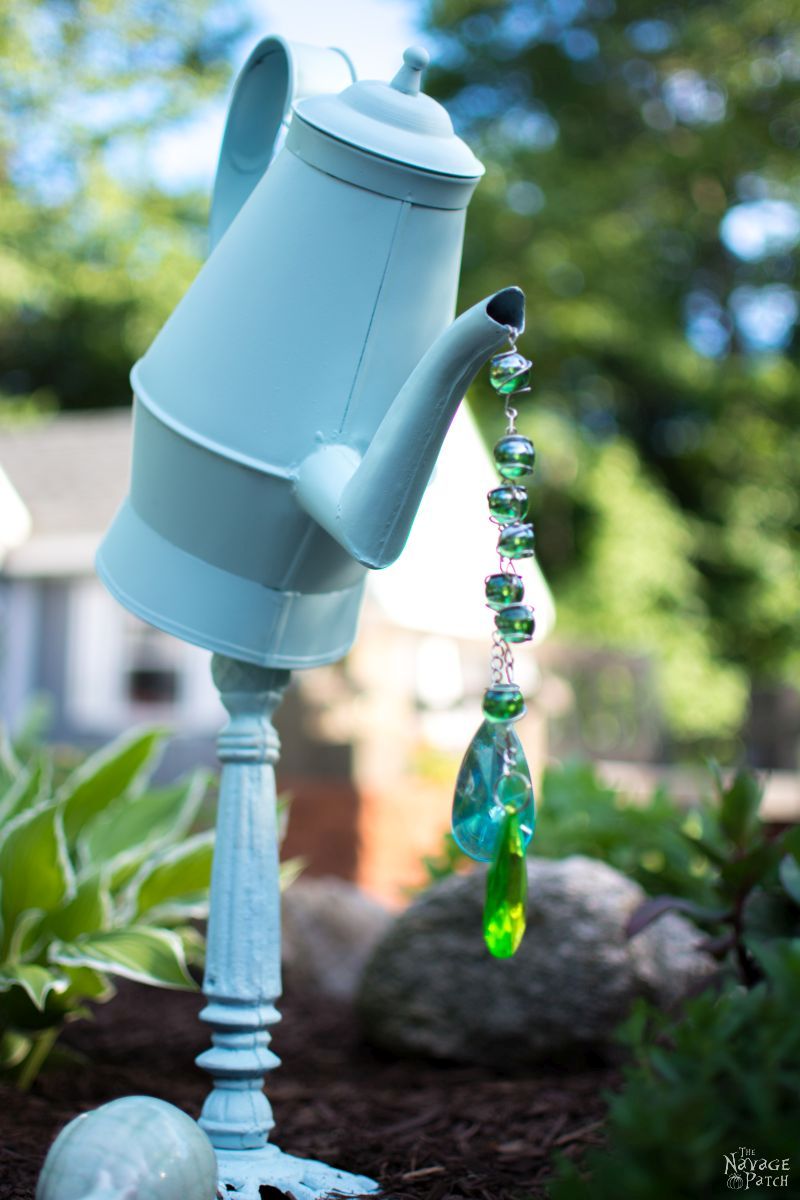
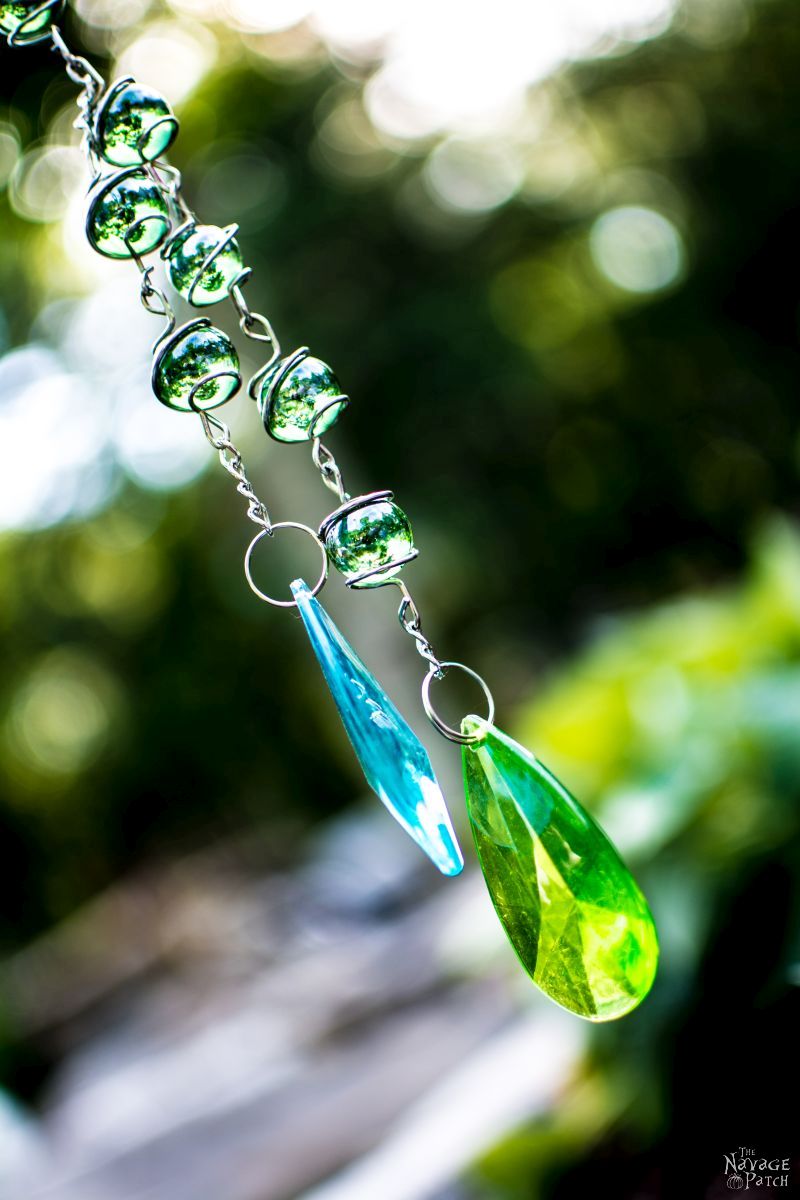
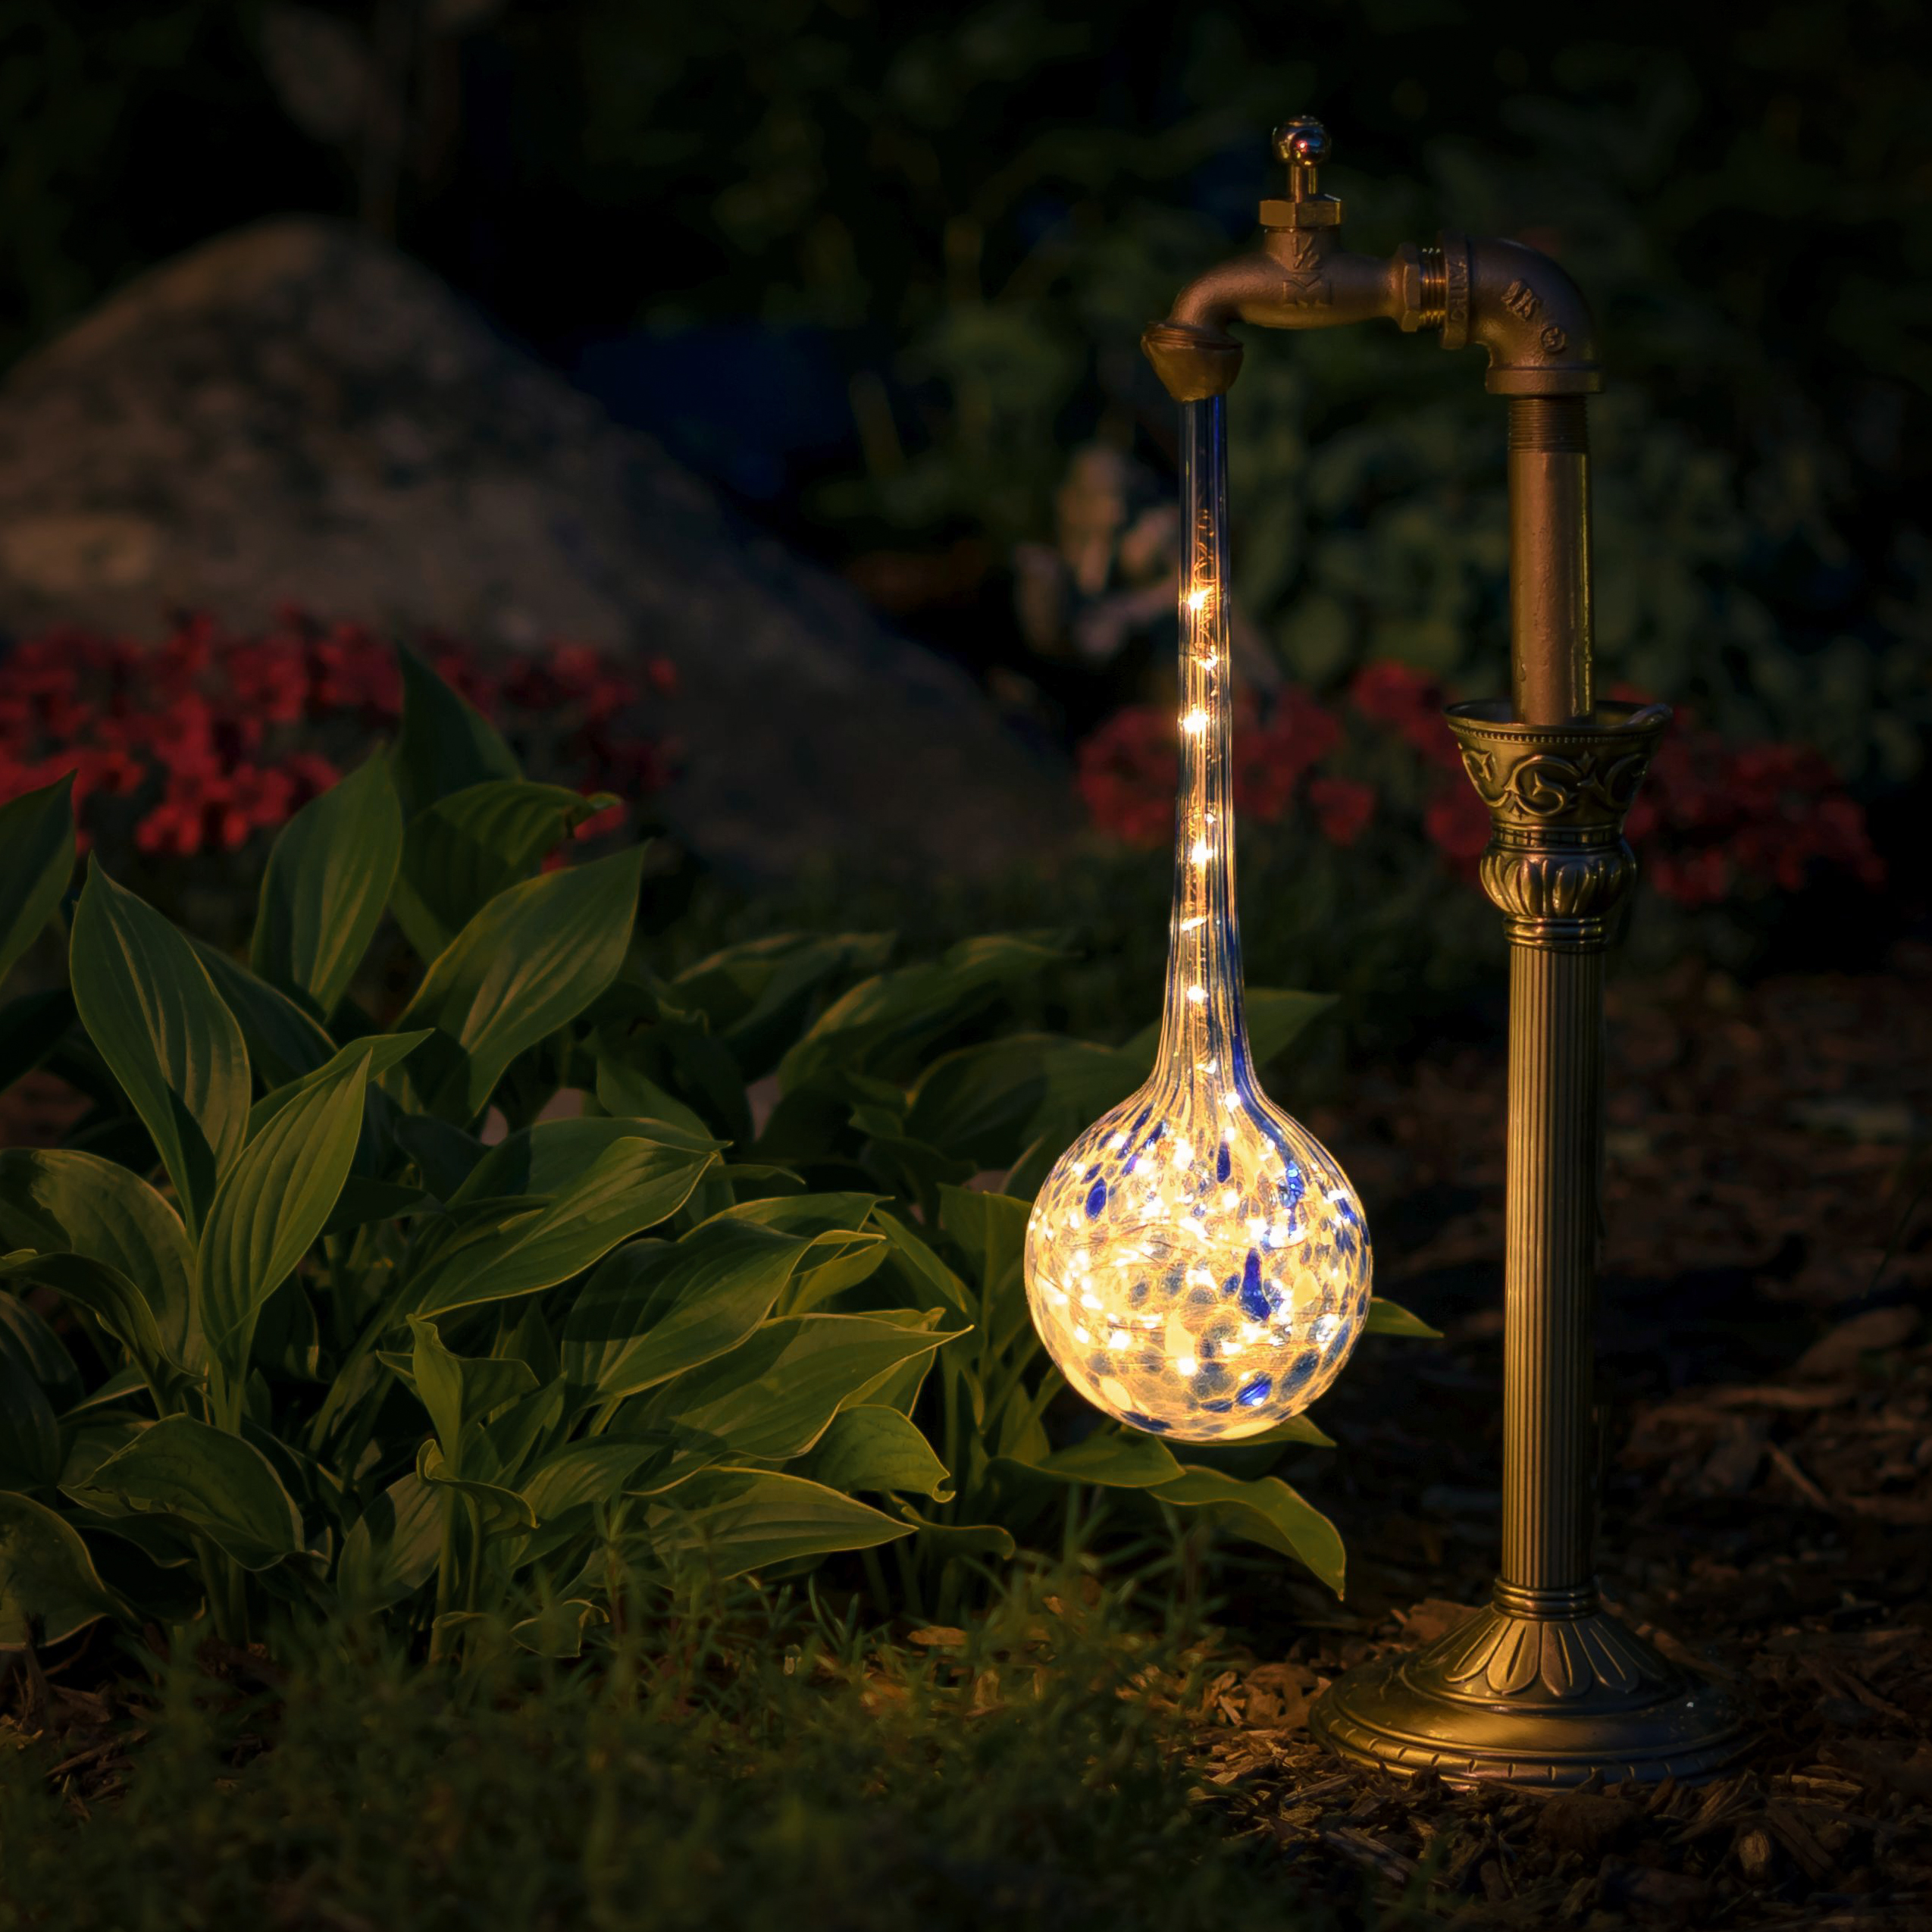
Great job guys! I love the cedar for the lights – you took a flaw and turned it into a design feature. The watercan with the jeweled water dripping from it was fun – but I could just go on and on!
Thanks for sharing with us at Throwback Thursday!
Mollie
Thank you , Mollie! 🙂
Oh, I have pond envy – it looks stunning! Such a beautiful job with so many lovely details – you must be delighted with it 🙂
Thank you, Sarah – we love it!
what an awesome project! great job! I love the way you lit it all up and the cute little bridge. fantastic! thanks for sharing this 😀
Thank you, Tianna!
You guys are amazing! Love the bridge over the pond and the pitcher with the faux water coming out! Great ideas! Thanks for sharing with us! Blessings, Janet
Thank you so much, Janet!
You guys seriously need a landscaping/gardening show this is amazing! Thank you for sharing this with us at Celebrate Your Story. Have a wonderful week and please sit back and enjoy your work!
Thank you, Sandra! But if we had a show, then I’d have to do this full time, and I’d NEVER get to enjoy it! 😀
Just “WOW”! Wait until those planting start maturing… it will be a triple WOW! Beautiful setting. You guys are rocking it!
Thank you, Robin! 😀
WOW – looks like it was a tremendous amount of work but the final result is absolutely breath-taking! I especially love your clever way of dealing with the crappy spikes on the solar lighting – not only does it solve the problem but adds visual interest as well. Genius! Thanks for sharing this awesome post! (Stopping by from My 2 Favorite Things Link Party)
~Taylor-Made Homestead~
Texas
Thank you, Tammy!
Beautiful! We have a pond and now I kind of feel like it needs a bit of a redo. I am inspired! I love the lighting elements!
Thank you, Jen! Good luck with your redo!
Wow!! Absolutely beautiful!! I love the tea/coffee pot with the crystals – Thanks for sharing on the Pleasures of the NW’s DIY party!
Thank you, Helen!
Thank you for sharing such an inspirational project!! I have a couple of gnomes that would love to visit your gorgeous new pond!
Thank you, Sonda! All gnomes welcome!
Thanks for sharing such an inspirational project. I have a couple of gnomes that would love to visit your gorgeous new pond!
Oh my I love this, what hard work and a wonderful payoff.
Thank you, Kellie!
Thanks for sharing on Peace, Love, Linkup! The next party goes live tomorrow at 6. I hope you stop by and share more great content : )
Thanks, Ashleigh!
Your vision and the finished product are amazing!!!
What a peaceful sanctuary to enjoy and be blessed by.
Thank you so much for taking us on the journey of the pond.
So glad I stopped by.
Thank you, Karen! We’re happy you stopped by, too!
Wow!!!! Beautiful may you enjoy it and may it bring you peace and happiness awesome job very inspiring
Thank you, Mari! 🙂
Fantastic! Wow, that was so much work. I am loving the night lit pictures and I just may have to copy your solar light cubes! Great idea.
🙂 gwingal
Hi Nikki, thank you so much!
I will never cease to be amazed at the projects you guys take on, having fun all while doing it and Look At That Yard!!!!
You guys did an awesome job, it should be featured in a magazine!!! It is perfect to share on the Friday Features Linkup, thank you!!!
Enjoy your new garden!!!
Thank you, Karren! Oh, but we are not ready for a magazine! Yeesh, I can’t even imagine the work we’d have to do to prepare for something like that!
I don’t even know where to start complimenting you on this project. Everything is just so gorgeous!! I’m absolutely in love with the jeweled pot decoration and the cedar posts for the solar lights, I think because I can envision something similar in my yard. But oh, my, that pond. Everything about it is amazing. It looks so relaxing and inviting!!
Thank you so much for sharing to the Monday Mish Mash Link Party.
*Hugs*
Thanks you so much, Amy! 🙂
I have to chime in on the lights too! We will totally steal this idea for our shade garden. Great job. #waywow
Thank you, and awwww, shit, I love your site!!
This is truly a work of art! It’s spectacular! The work that went into this project certainly shows in the reveal. There are so many fabulous details. Thanks so much for sharing at Snickerdoodle Sunday. I’ll be featuring your pond project reveal at today’s party.
Awesome! Thank you so much, Beverly!
It’s beautiful! I would love to have a pond, that way maybe the frogs would take their dips in the pond instead of the pool. But the few times I tried algae kept growing even though I had a pump, plants, and fish. So I finally gave up. Thanks for sharing your beautiful pictures.
Thank you, Linda! It’s taken me three years to figure out how to control algae. All it needed was the proper dosing of algaecide and a good filtration system. The water has been crystal clear so far!
What an awesome garden! So much hard work went into it.You guys are a great team. I especially love it at night. Thanks for sharing at Vintage Charm! xoKathleen
Thank you, Kathleen! Night time is the best time 🙂
Hi! I came over from Tuesdays at our home. Your pond is just gorgeous! We had a big pond at our old house and now a big one here! I do have one question: why is your water level so low? Just curious? How deep is your pond? Thanks for sharing this!!! So nice to meet you.
Hi Pinky, the pond is about 2.5 – 3 feet deep. It is actually filled to the top of the skimmer, but it looks low because we intend to the have succulents grow down to the water line, but right now they’re just newly planted. All that area that looks like unfilled pond will be filled with plants and flowers hopefully by next year!
Absolutely stunning!! This is to die for!!
Hugs,
Deb
Thank you, Deb!
What a great project!! And this post was the Most viewed last week and will be a feature this week!! Great Job!! Thanks for sharing on My 2 Favorite Things on Thursday!! Hope to see you again this week!! Pinned!
Thank you, Elaine!
I just read your ‘about us’ and that is one great love story. After looking at a bucket of solar lights and trying to decide whether to finally dump them, your creativity with the cedar post may change my mind. I am impressed that you moved the Japanese maple and it lived. Here in FL I swore to never use landscaping clothe again. Grass growing thru it like Kudzu. I like the old method of wet newspaper.
Good job guys.
Thank you, Myrna! I’ve heard that wet newspaper works well…I think I’ll try it in the next area we landscape!
Simply beautiful ! I love your pond and your landscape. Please post when the flowers come in. I enjoyed your pictures…. Thank you for the inspiration ! ?
Thank you, Alice! We will follow up with pics when everything is in full bloom (though that may be next year!)
What a beautiful accomplishment! I hope I can create such a wonderful spot in my garden when we get to finally move back home to hawaii. This desert is he’ll and I miss my blues and greens. Not to mention the cool trade winds. Plus now that hubby has retired from AA this could keep him busy. He loves gardens. Thanks so much for sharing! I may ask advice later.
Thank you, Sharleen! We’re here for you anytime you have a question.
Love, love, love it!!!! You guys did an amazing job!! What you did with those solar lights from Home Deopt really made them look expensive! One question though, what are the glowing orbs & where did you get them? Ok 2 questions. 😉 I’m going to have to be a regular follower now. 😀
Thank you so much, Mei! We are so glad you are enjoying The Navage Patch! Just as everything else in our garden, those glowing orbs are also DIY. I had an old Ikea globe lamp which I haven’t used for a long time. So I took the glass globe off and put it out in the garden with solar color changing spotlights underneath. It is very easy to do. During winter I only take the glass globes in and leave the spotlights out in the garden, then when in spring i again place the glass globes on those spotlights.
If you’d like to do something similar here is the link for the color changing solar spotlights: http://amzn.to/2m8tD2Q
And here is the link to similar glass globes: http://amzn.to/2mqdbgs
If you are wondering anything else, just ask. We try our best to answer every question quickly 🙂
Have a great day!
Looks magical! Nice work!
Thank you so much, Charlee!
This turned out amazing.. Great work. I have an unusual question for you.. In the pics, you had some kind of cover over your swimming pool.. Can you tell me what that is and where you got it? It looks shaped exactly for your pool. Thanks, Marcy
Thank you, Marcy! Here’s the website for the pool cover we have.
https://www.looploc.com/
It was installed by a local pool company. They came and measured for the cover and then sent the dimensions to the manufacturer for a custom fit. It’s a fantastic investment and well worth the cost.
I have dogs that would knock into my solar lights & break the stakes, too. What I did was I cut conduit just a little bit longer than the metal post on the solar lights, pounded them into the ground & then slid the metal post over the conduit. Now if the dogs plow into them, they barely move. I might have to straighten them out a bit but they don’t break anymore!
That’s a great idea, Jodi!
That’s excellent work, keep it up, and I like your blog.
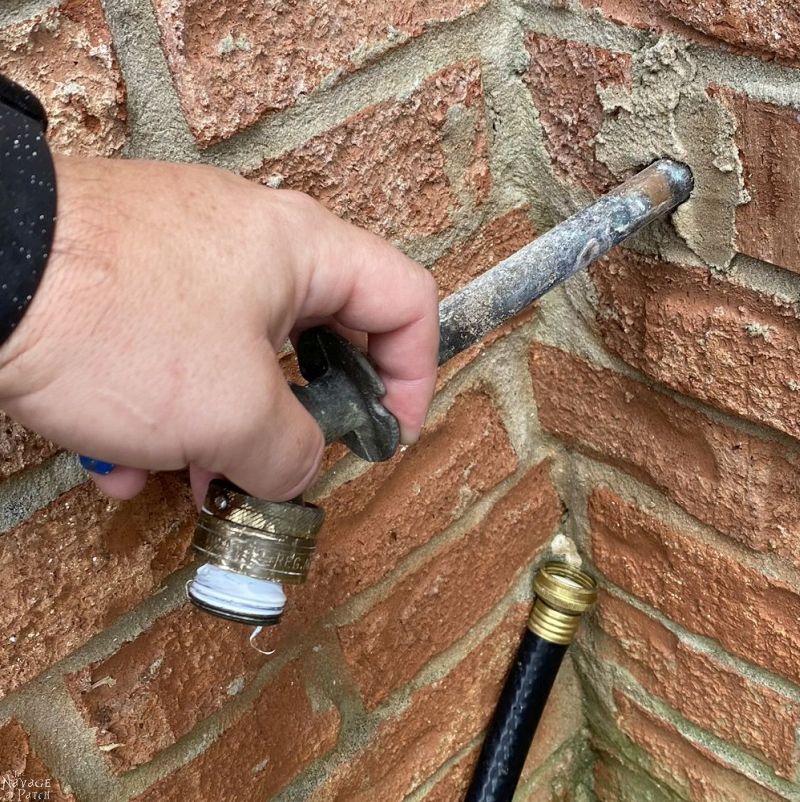
What did you use for your pond liner and It doesn’t look like you tried to hide it but left it receding into the pond,. is that right? Beautiful job. I never think to take pictures of all my projects.
Hi Vicki, the stone-looking liner is a decorative liner called Rock on a Roll. It is meant to be seen, and eventually it will grow moss in some areas and in other areas, succulents will grow over it. The black waterproof liner is underneath it.
Hey Handan and Greg,
I wish you would show us some updates of the pond area. I absolutely love what you did! I hope the fish are happy. You worked so hard. I wish I had your energy!!!!!!!
Marian
Hi Marian, I did an update two years ago (which was two years after finishing the project): https://www.thenavagepatch.com/the-pond-project-two-years-later/
But there won’t be any more updates, as we’ve since moved to Georgia! 🙂
Wow, this turned out beautifully! You guys are so talented, I can’t believe you did this yourselves! I’m working with a landscape designer to redo my backyard and I would love to have a pond area that looks as good as yours. I’m going to show my designer some of your pictures so they get an idea of exactly what I want!
Thank you so much, Sarah! 🙂