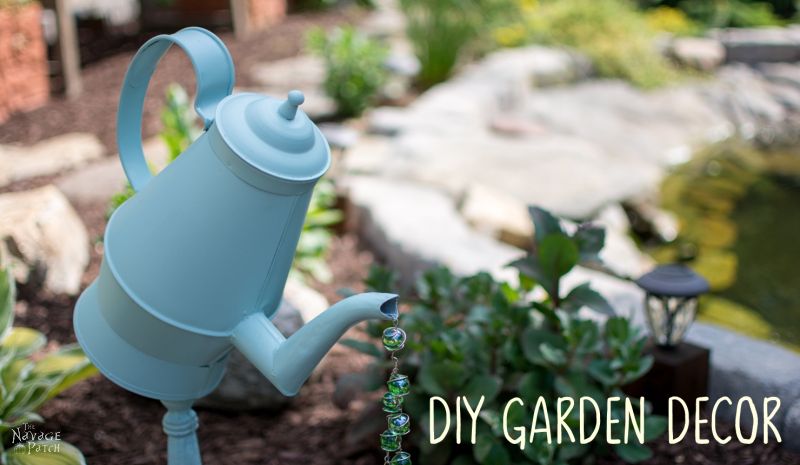
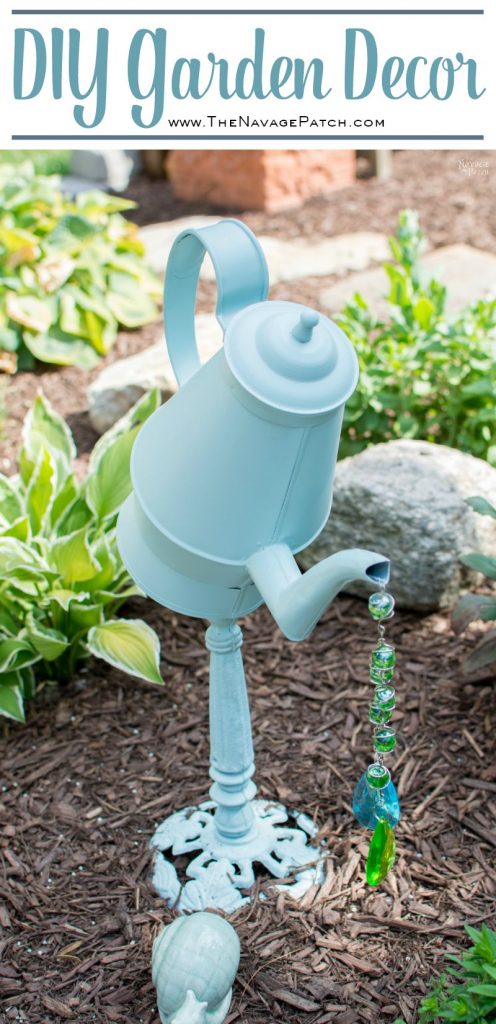
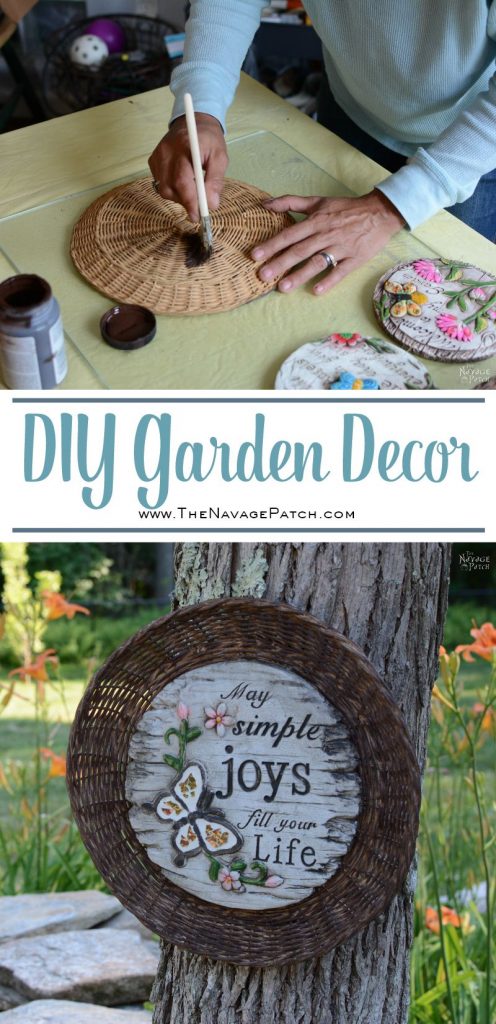
DIY Garden Decor
First off, I want to say that the idea is not mine. Two years ago, I saw a picture on Christy’s Front Yard Makeover One Year Later post (from Confessions Of A Serial DIYer), and I pinned it to one of my garden-related Pinterest boards. Two weeks ago, going through my pins again for some inspiration, I saw that picture…and the next thing I know, I was adding the dangling beads to my teapot. That is how quick and easy it was 😉
I started with priming the teapot. The original red color was so ugly, I couldn’t wait to change it. While the primer dried, I got on with fixing the broken iron stand. All it needed was a bolt and nut, so that was pretty easy.
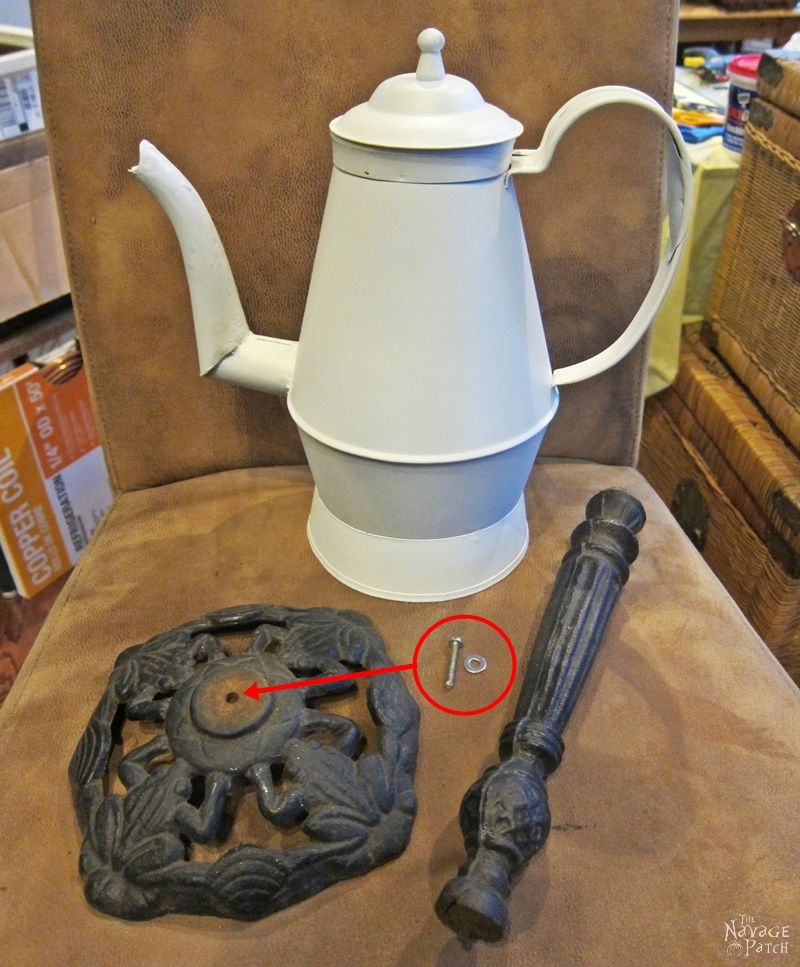
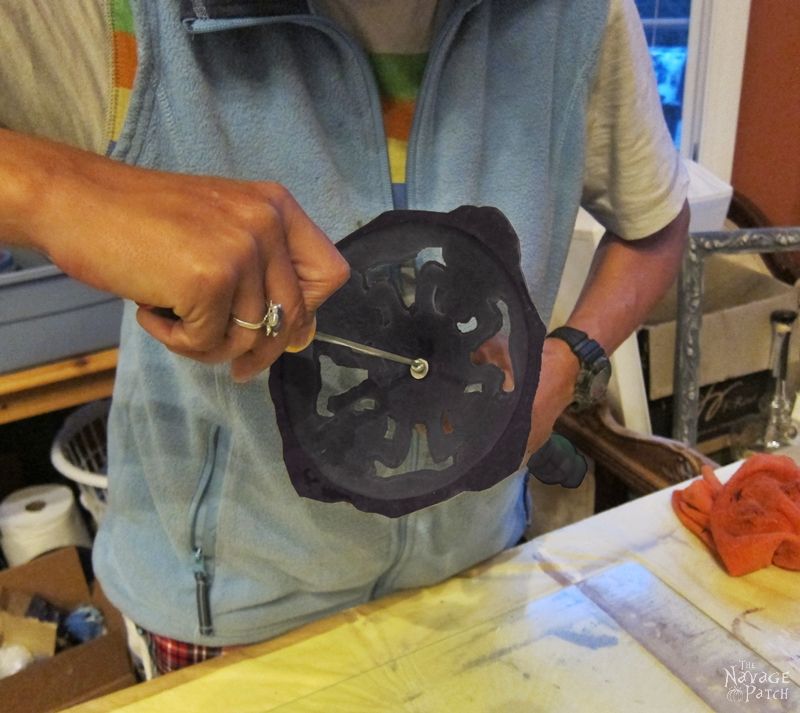
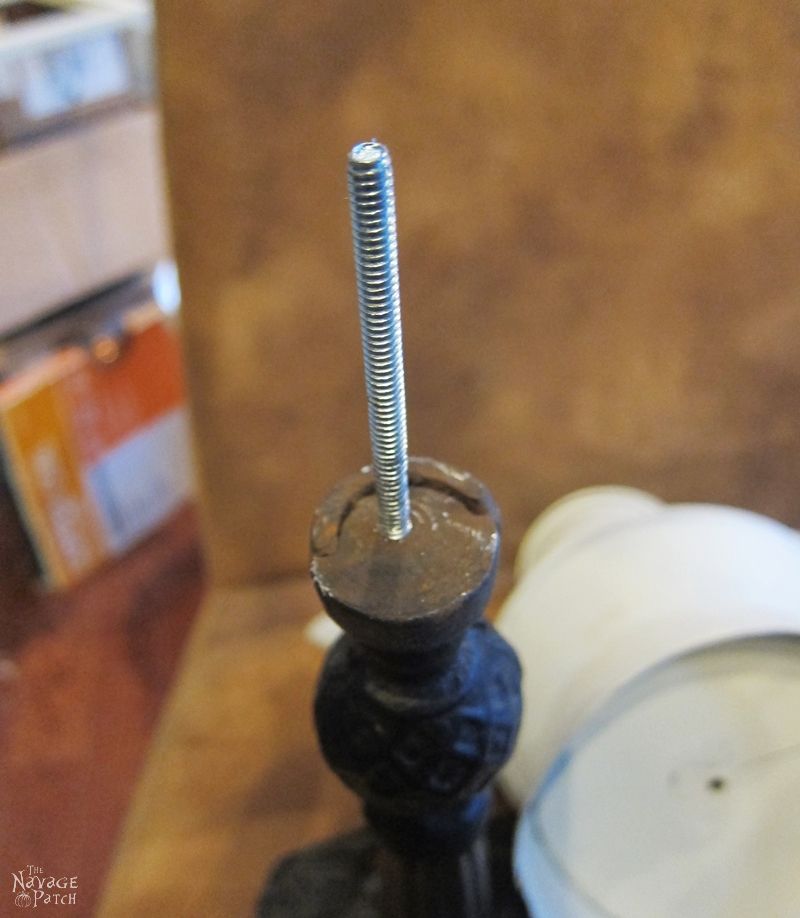
Then I placed the pot on top of the iron stand, trying to see the easiest way to put these things together. The iron stand had a two-sided screw on the top, but it was too short to hold the teapot. I replaced it with a longer one…
…and I poked a hole at the bottom of the teapot using a nail and a hammer.
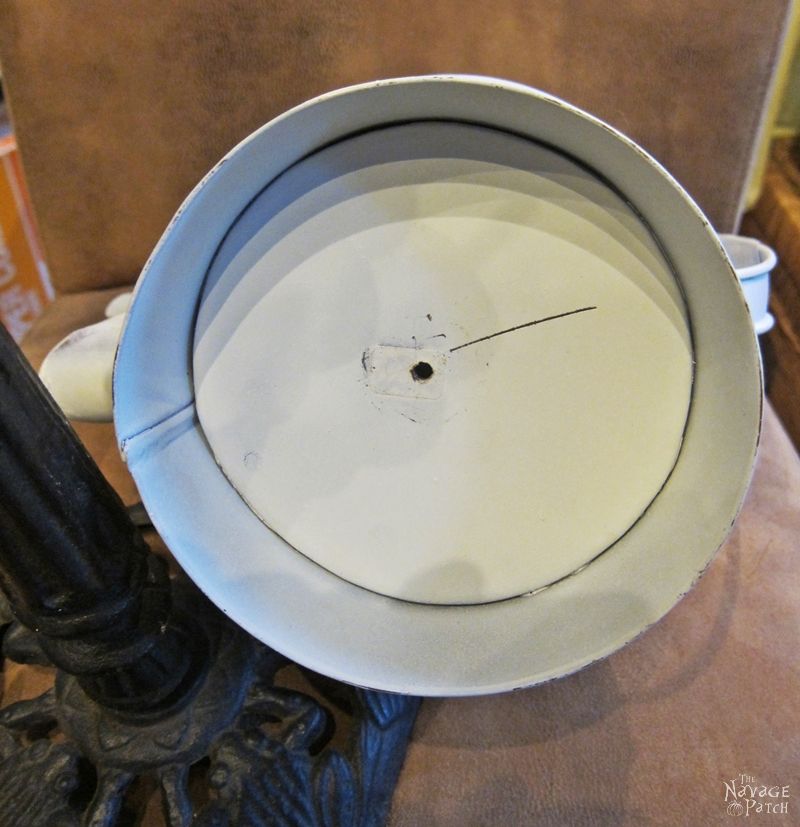
When I poked the hole, I made it so it would be a little bit off-center, closer to the spout.
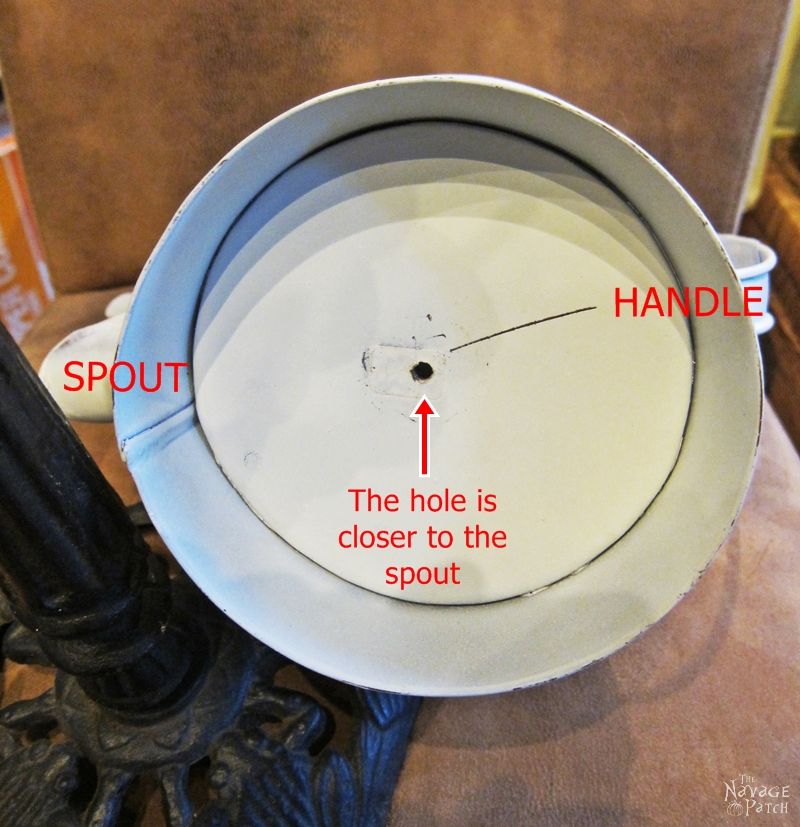
I did it this way so when I placed the pot and tilted it towards the spout the whole thing would look more balanced, not like how it looks in the below picture.
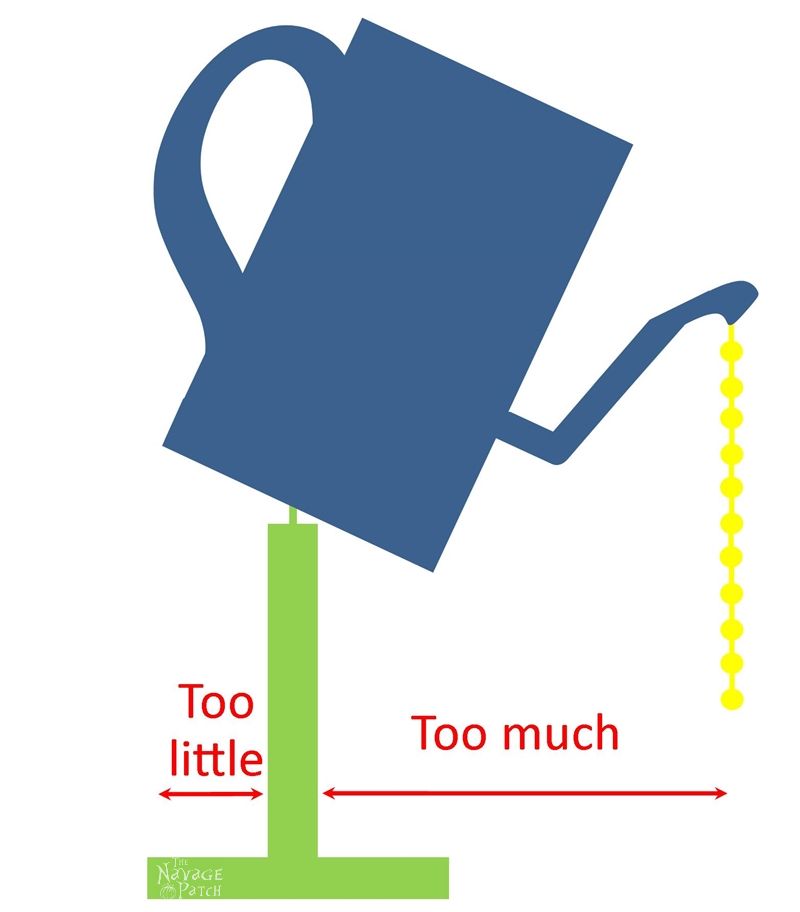
See what I mean? But it is all because of the teapot I had: it has an odd spout that sticks-out too much. If your teapot / coffee pot doesn’t have an odd spout like that, just poke the hole in the center of the bottom and you should be fine 🙂
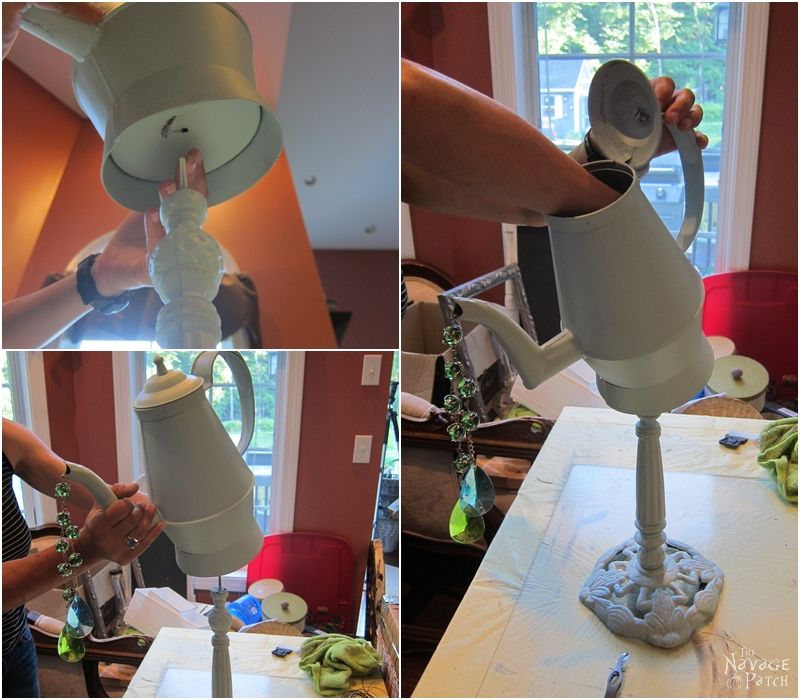
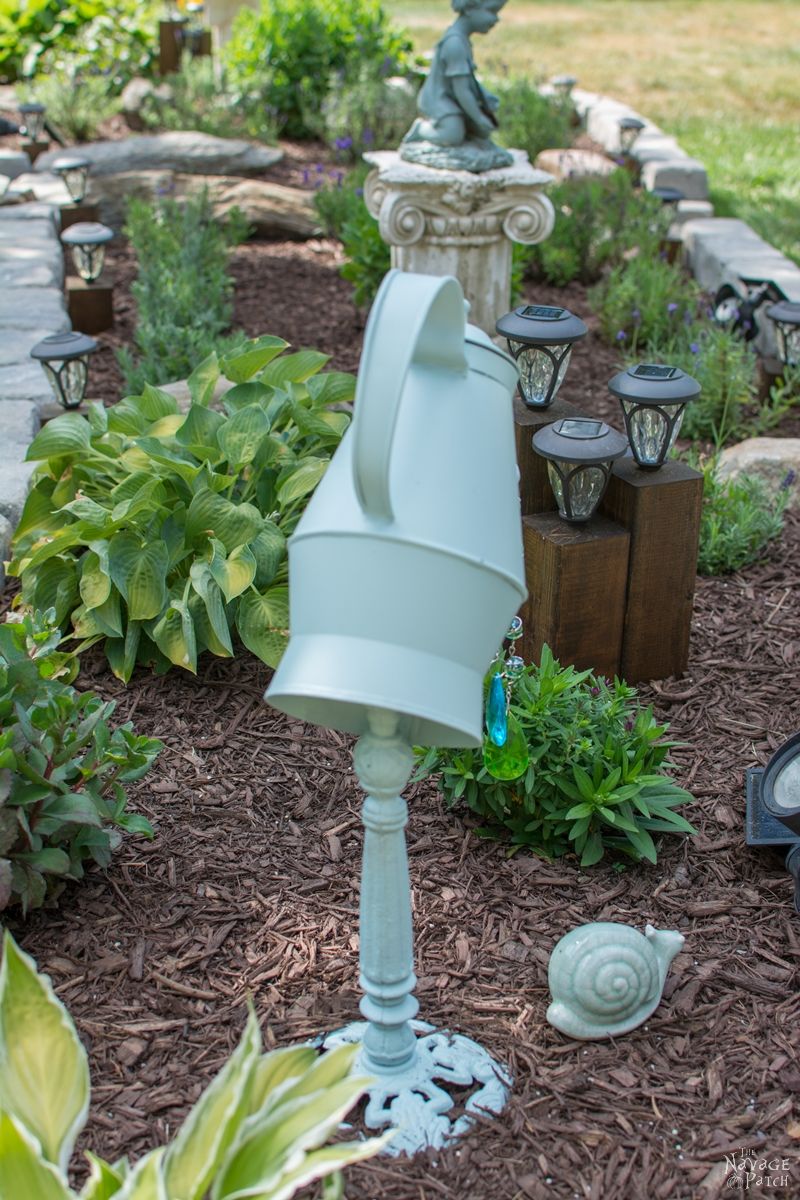
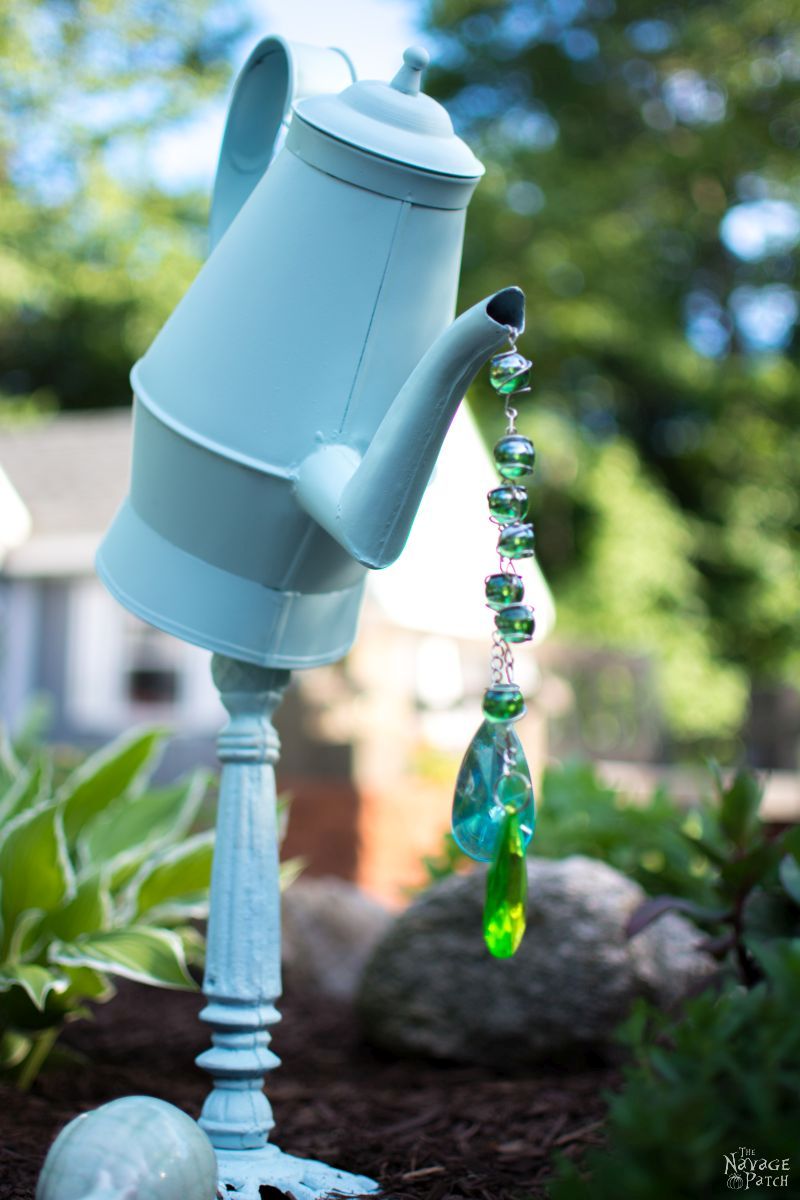
After poking the hole, I placed the teapot on top of the iron stand to see if it fit and looked decent. Seeing everything was how I wanted, I spray painted the whole thing with 2 coats of Rust-Oleum’s beautiful blue color: Robin’s Egg. Then I set it aside for a day to give the paint a bit of time to dry properly and harden before I fiddled around with it to attach the beads.
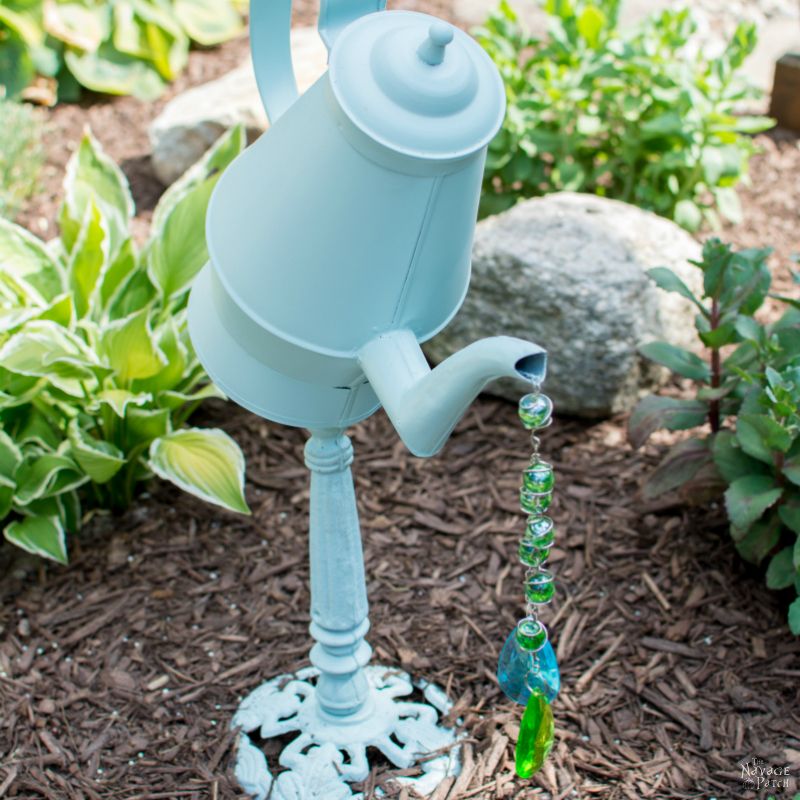
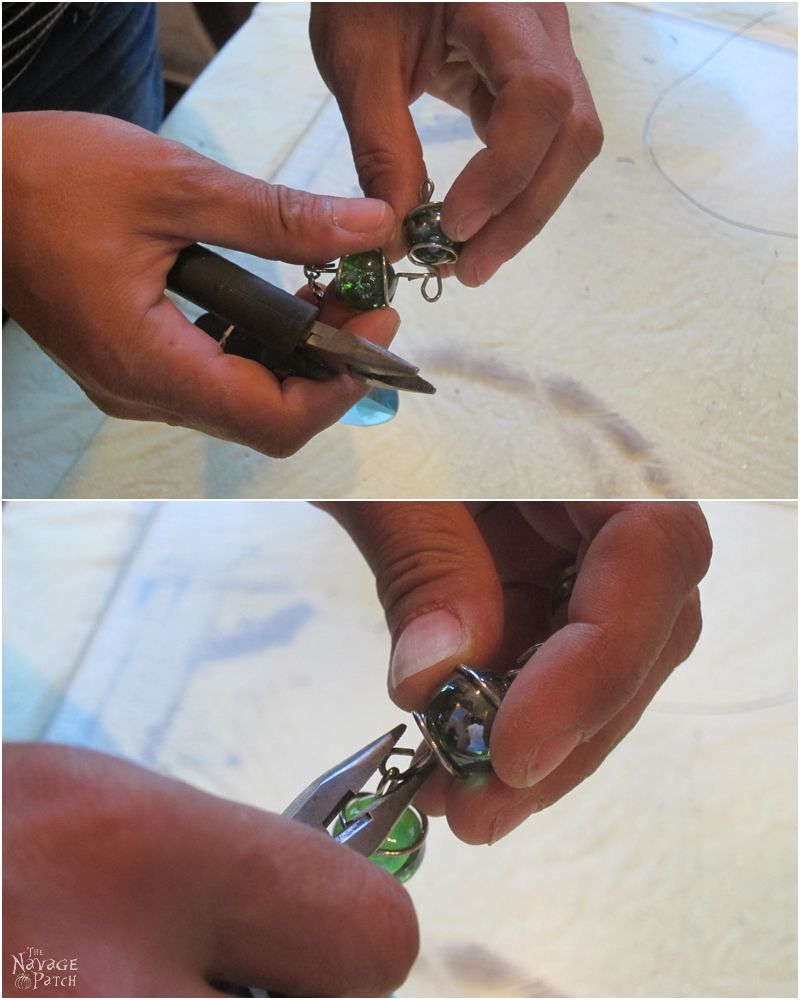
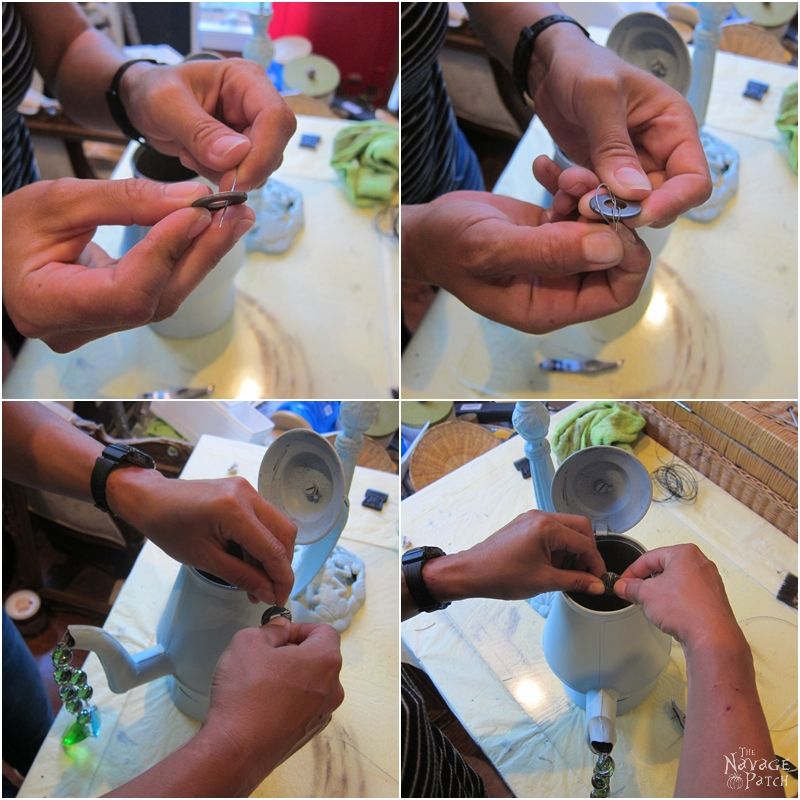
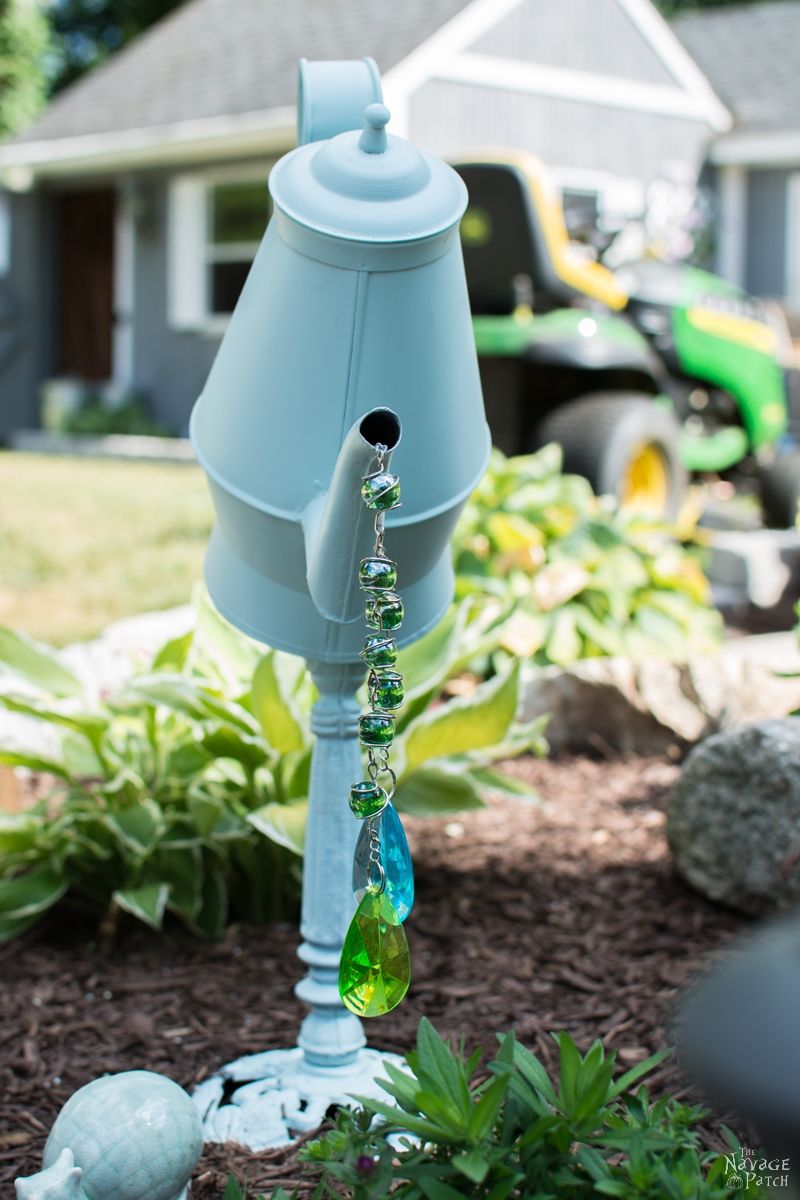
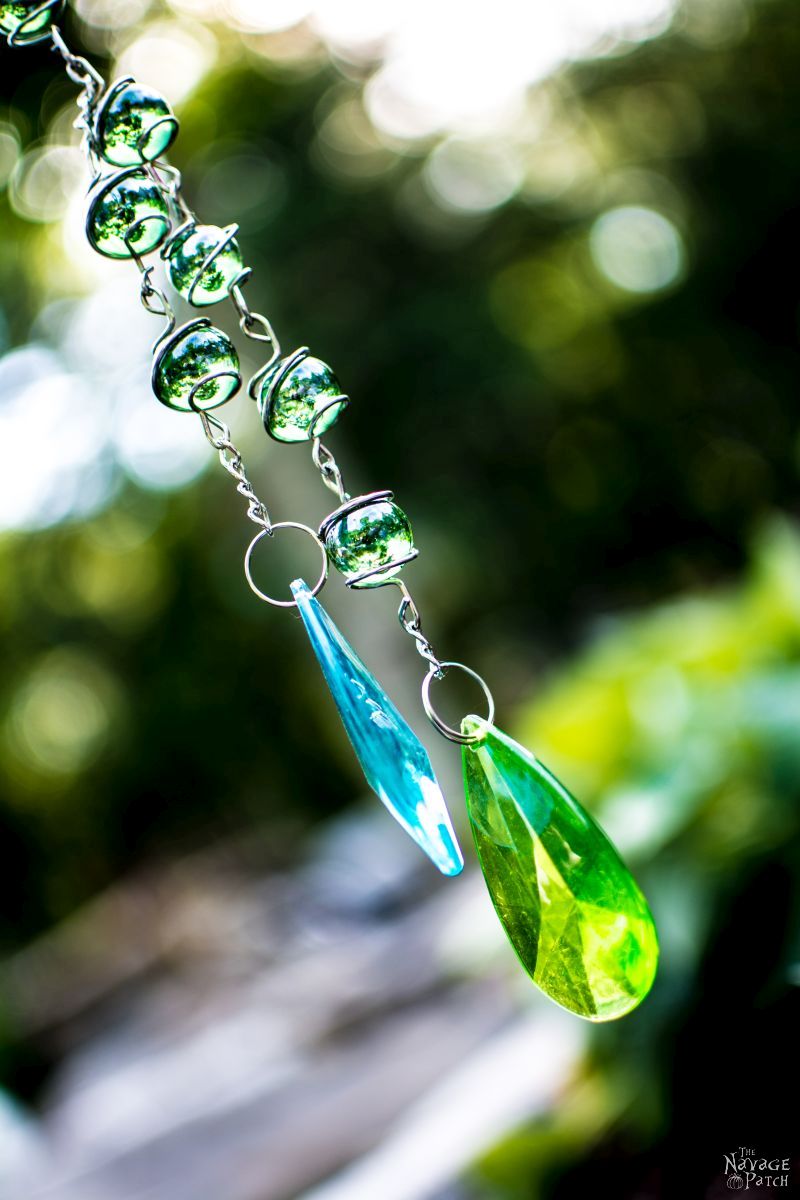
Meanwhile, with a pair of pliers, I re-arranged the beads to look like drops. These beads were part of a garden ornament that I got from Dollar Store. The original ornament was a big, cheesy-looking flower with lots of different colored beads hanging from it. Luckily, I had two of them which had enough blue and green beads to make the water drops.
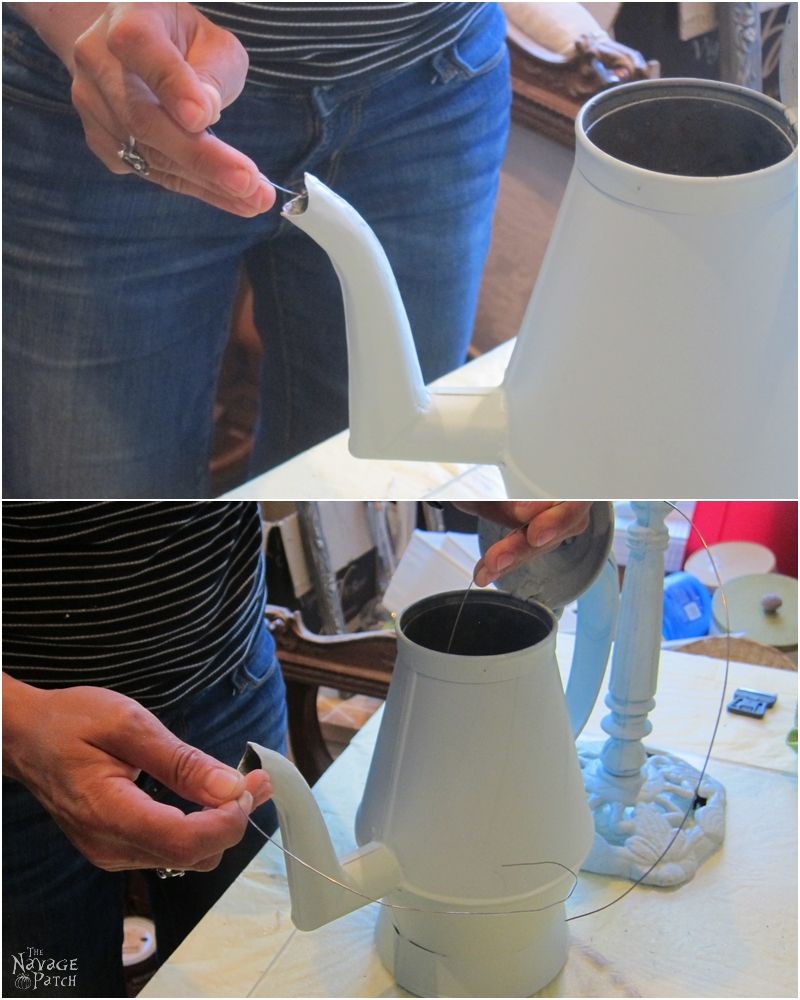
The next day, when the paint was nicely set, I attached the beads to the post with a piece of wire and a washer. To do so, first I cut a wire long enough and pushed it in from the opening of the spout to have one end coming out from the spout and the other coming from the pot (as shown in below pictures).
Next, I attached the jewels to the wire coming out of the spout…
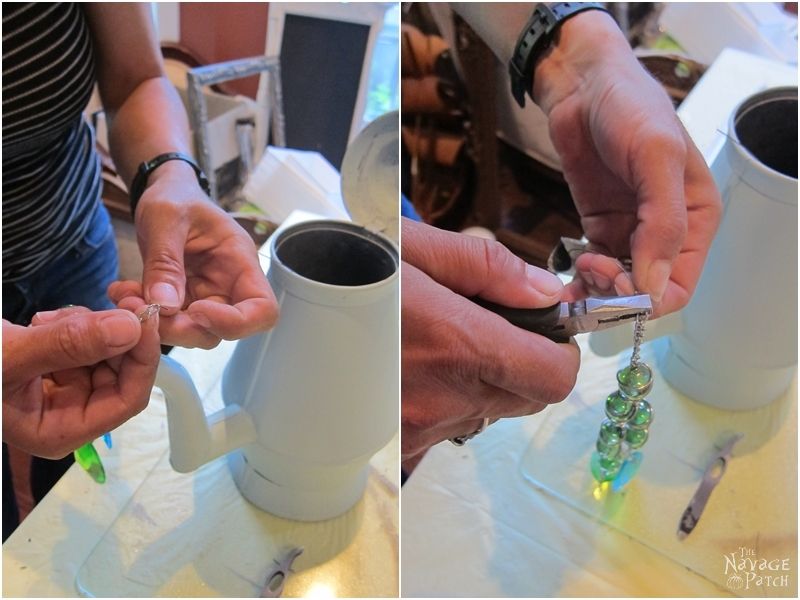
…and pulled the other end of the wire until the jewels were snug against the spout.
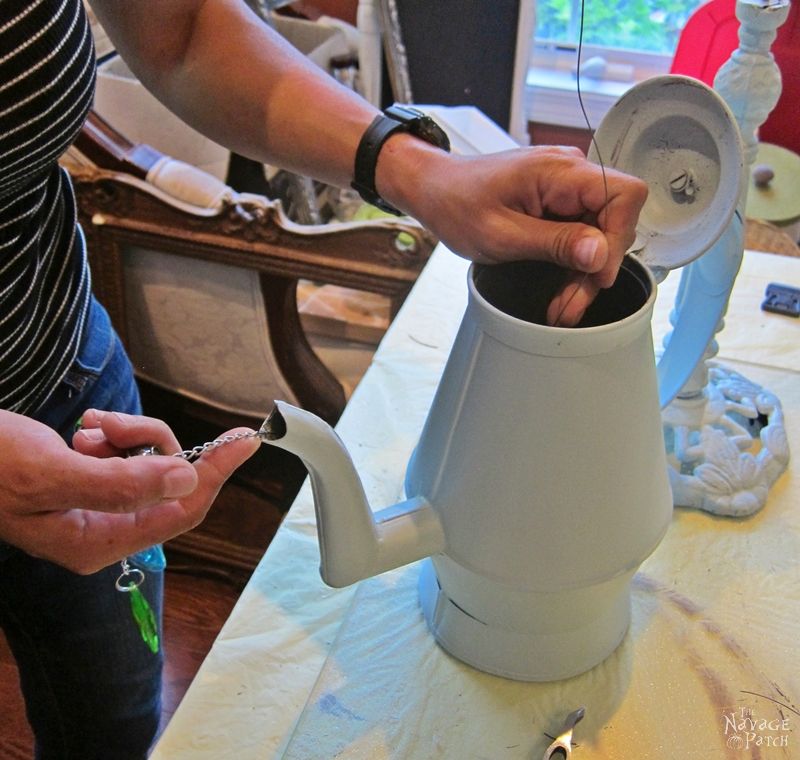
To the other end of the wire, I attached the washer then started wrapping the wire around the washer until all the slack was wound up and the washer was snug against the spout’s opening hole inside the pot.
Now that the beads were attached, I placed the pot on top of the stand, tilted it a little towards its spout and screwed the nut down about 3/4 of the length of the double-sided screw. Note, that I didn’t tighten the nut, otherwise I wouldn’t have been able to tilt the pot. The nut is there just to prevent the pot from coming off in case the whole thing got knocked over. The friction created by the ridges on the screw against the hole poked in the bottom of the pot is enough to keep everything in its place under normal conditions.
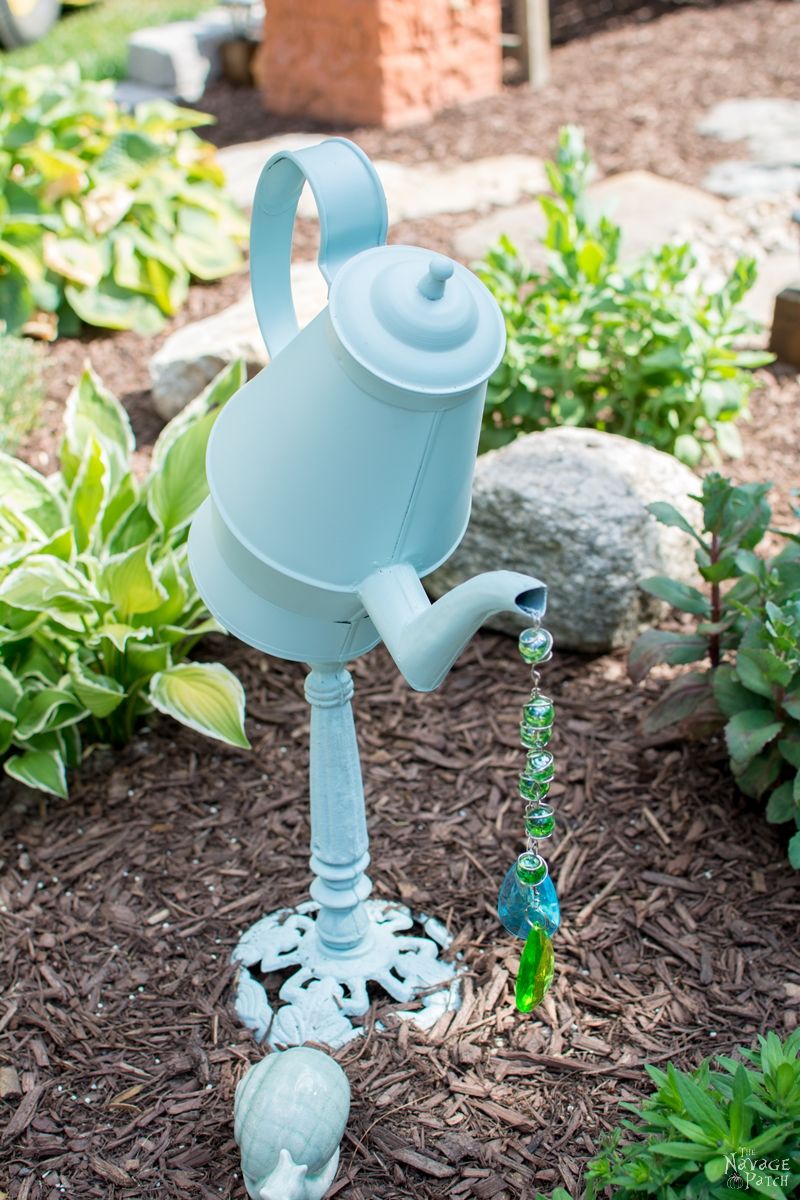
See how easy that was? Now I have a beautiful garden feature for a couple of bucks!
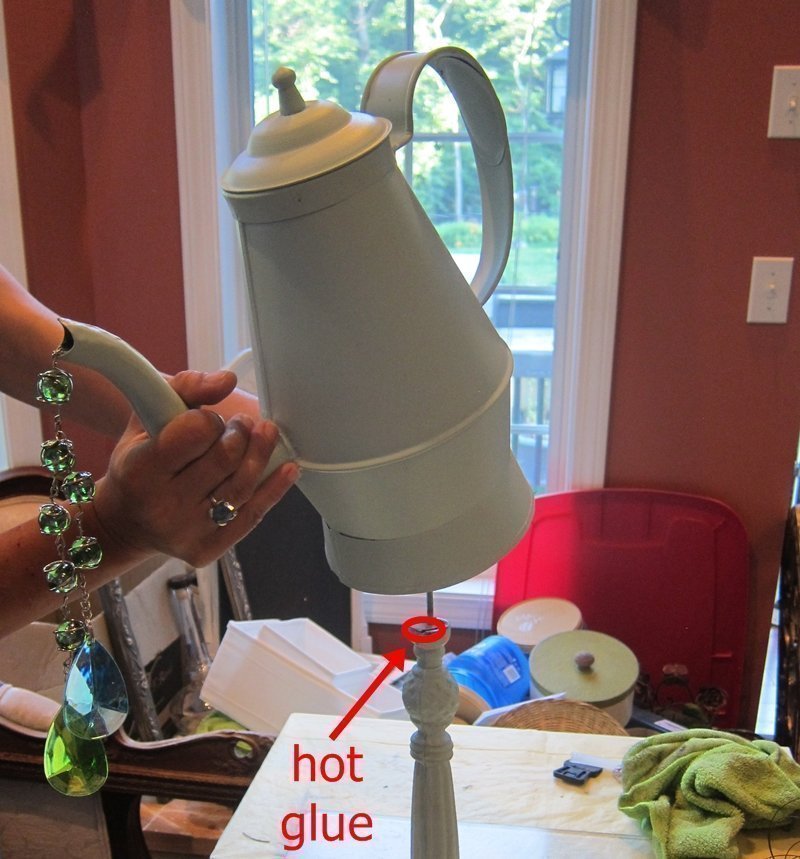
Before I go into the beauty shots, I wanted to note that if you don’t have an old metal base like I had, a spindle and a piece of wood for the bottom part can be the way to go. Also, as the beads I used are heavy enough, my teapot stays in a tilted position without any issues. But if you are having trouble keeping your pot in a tilted position, then you may want to try hot gluing your teapot / coffee pot to the spot where it touches the base (as shown in below picture).
And now the beauty shots!
Before you leave, here are some more garden decor and lighting ideas for you:

DIY Cedar Cube Landscape Lights
Handan, xo
We love it when you share our posts on Facebook and Pinterest!


I can’t believe what a difference darkening the wicker made! I love you teapot! Your photography is awesome too!
Thank you so much, Giselle! I wish I could take the credit for the photography but Greg is the photographer in our home as he has a better eye for it 🙂
I think you are amazing even I can do some of these
That teapot is the cleverest thing ever!
Thank you so much, Mimi! 🙂
the teapot is super cute. love your interpretation of it.
b
Thank you so much!
That teapot is ADORABLE – I saw it at the LouLou Girls Fabulous Party and had to see how you made it! Excellent project!
Thank you so much Katie! 🙂
Nice job. I bet you love spending your time outdoors now.
Thank you so much! I always loved outdoors, but having a nice scenery in the background makes all the difference 😀
Love what you did with the Dollar Tree plaques as I have the same plaques!! The tea pot piece is adorable!! Great transformations and thanks for the inspiration!!
Hugs,
Deb
Thank you so much, Debbie! 🙂
What amazing and fun projects! All of them! I love how you added the beads to the pot, so creative.
Thank you so much, Valerie!
Love it all – I definitely want a tour of your basement!
Ann
https://theapplestreetcottage.blogspot.com/
Thank you so much, Ann! Oh yes…the basement 😀 I think this fall we might be able do that, because by then at least some of the stuff will be getting their re-dos and moving upstairs. In other words the basement will look a bit less messy 😀
As soon as I saw your adorable tea pot I was reminded of
Christy’s (I pinned it too). You reminded me that pin has been sitting on my board long enough unmade. Love how adorable yours turned out too and it looks great iin your pond garden!
Oh I love Christy’s version, Marie! Having a metal one in hand made the installation much easier for me, but if I could find a pretty ceramic pot I would definitely go with the way she did hers.
Handan – I just love the teapot idea. Thinking I’ll take an old watering can that I have, and apply the same process to it. I’ll be using an old metal lamp for the base. Your page has been ear-marked for sure! Thanks much for sharing…..
Oh yes! You definitely can do it with a watering can too. And using a metal lamp for the base is a very smart idea. In fact now you lit a light bulb in my head for my metal lamps in the basement 😉 Thank you, Cassie!! 😀
Can’t wait to see your new “light bulb” idea! 🙂
Such adorable ideas! Love the tea pot 🙂
Blessings,
Edye | http://gracefulcoffee.wordpress.com
Thank you so much, Edye!
I just love the garden teapot! So creative to add the beads to make it look like water!
Thank you so much, Emma!
I love that tea pot – and I love your creativity! Thanks for sharing on the Pleasures of the NW’s DIY party!
Thank you so much, Helen! 🙂
Cute garden decor! Love the teapot and how you have the beads hanging out like dripping water. Too cute!
Thank you so much, Linda!
Your arm must be sore from patting yourself on the back! These are wonderful creations and we are so happy to have your links in our line up at Celebrate Your Story.
Thank you so much, Sandra! 🙂
love the tea pot and the wall plaques so cute thanks for sharing have a great weekend
Thank you so much, Lorraine! 🙂
I am in love with the teapot and plan on making one myself. I have a question and was wondering if you had a tutorial on how the copper spiral wind chime was made. Most of it I can figure out from the photo I was just wondering if you had any tips on bending the copper so it stays uniform all the way down. Did you wrap it around in spirals then stretch it out? I have some copper that did not work from another project and have been looking for something to do with it. Copper is kinda pricey and it is driving me crazy just sitting in my junkyard (AKA my basement). Thanks and absolutely stunning job you 2 did on your pond!
Kat – I would love to hear the “how to” as well, have a bit of copper lying around, and love this idea!
Thank you so much, Kat! As I mentioned in the post I will be sharing some more garden decor tutorials in a future post (hopefully next week). That one will have the spiral copper garden decor and some other small stuff I again made with copper tubing 😉
Once that post is out I’ll inform you via e-mail, ok?
Perfect. I couldn’t wait and gave it a go myself. I did have some trouble with it but I persevered. I would like to do another one but will wait till yours is posted to see how yours is done. I have a terrible feeling working with this copper tubing will get quite addictive. It is pricey but so worth it, unless I screw it up.
Hello Kat,
Just wanted to inform you I finally finished the coiled copper wind chime post. I apologize for the delay, but I am sure you will find that tutorial useful 🙂
Happy crafting!
As a teapot collector, I love the idea of having a teapot in my garden! So very cute, and the jewels make it perfect! I’d love for you to share your passion for DIY on Fresh Market Friday, where we select a Featured Fresh Find every week.
Thank you so much, Crystal! Also thanks so much for the invite! I will definitely attend to your party 🙂
Your Garden goodies turned out a treat! So clever!
Thank you, Sam! 🙂
The plaques look great against the dark wicker and that tea pot is wonderful! Thanks for giving such a detailed tutorial on how you made it. Pinning. Thanks for sharing at Snickerdoodle Sunday.
Thank you so much, Beverly! 🙂
Beautiful and clever in a nutshell!
Thank you, Florence! 🙂
I love this!! What a great upcycle project, and the addition of the beads “pouring” out is so cute. Thank you so much for sharing this to the Monday Mish Mash Link Party!
*Hugs*
Thank you so much, Amy! 🙂
Handan, I love both these projects, you and Greg certainly have a gorgeous garden. I love little plaques after you’ve added the bamboo plate holders, they look substantial and they pop against the dark stain. But my favorite of the two projects is the tin watering can! I love how you put it on the pedestal, leaning over, spilling out water. And the beads! I love them. It looks so cool. I bet when the sun glints off the beads it’s really cool! Thanks for sharing how to do this, I’m hoping that I can find a watering can to use in our garden soon!
Thank you so much, Nikki! We still have 2 more areas (big areas, in fact very big areas ugh!) to finish in the backyard but it is getting there finally.
The metal teapot is also my favorite! It indeed looks great with pond lights or sun shining on the beads 🙂
Thanks so much for the shout out, Handan!! Your version is absolutely adorable and that stand is too perfect!! 🙂
Hi Christy, I am so happy to see you here! Thank you so very much for your lovely comment. You have been an inspiration to me since before we started blogging, and I have your entire project gallery spread around my Pinterest boards! 🙂
Thank you once again for the visit, and I hope you have a fantastic week!
I didn’t understand how you got your pot tilted on the iron post! I do LOVE the finished project…it is absolutely adorable!
Hello Nancy,
I updated the post to clarify that part. I hope that helps 🙂
You scouted for amazing finds at the Dollar store and made them look so good in the end. I like the concept of using the plaques against the wicker. Can’t believe they cost you only a dollar. Wow! And your garden looks like a haven! Thanks for sharing the beautiful pictures Handan and to Greg for taking them so well 🙂
Thank you so much, Cindy! 🙂
I loved both ideas and now want to try my hand at something! Thanks for the initiative !
Thank you so much, Norma! I am so glad you’ll be trying these projects. I’m sure you’ll enjoy them both! 🙂
Love how those plaques turned out just by darkening and gluing them to the plate holders.However keep an eye on them,as sometimes hot glue doesn’t hold up outside with the changes in the weather.A better alternative for outside gluing is GEsilicone II(2).I use this for all my outdoor gluing and it holds up for years and years.You can get it at any of the BB stores.
I have one of those old teakettles,think i’ll get some fairy lights for it.
Thanks for all the ideas and sharing your work,it’s all just great.,
Thank you so much, Kathi! 🙂
I love both of your garden art ideas, especially the teapot. Your instructions are very thorough and easy to follow, too. Since I live in Florida, however, the hot glue would never hold. The heat would soften it and the items would fall apart. I’d have to use E6000 or a waterproof epoxy.
Thank you so much, Kathy! Oh yes, hot glue isn’t the best outdoor glue option for Florida. In dryer and colder climate it holds up pretty good, but for hot climate I wouldn’t suggest it.
Good idea!
Great design! The teapot looks incredible. Love the creativity. I’m going to design this for myself for my garden decor and would recommend this to my friends too. Great post. Keep psoting.
It would pull up about the tea pot.