DIY Looped Yarn Pillows
DIY looped yarn pillows are fun to make, and they’re infinitely customizable to suit your tastes and sense of style!
Now, I know what you’re thinking, but I assure you, this time you’re wrong. It’s okay, it’s okay! There’s nothing wrong with being wrong. Even I once thought I was wrong, but as it turned out, I was mistaken.
Anyway, I was saying that you, estimable madam, are likely incorrect with an assumption you may have made upon reading this post’s title.
It is possible…just possible…that when you read “Looped Yarn Pillows,” your prodigious intellect immediately leaped to the conclusion that I made some pillows with loop yarn, aka loopy yarn, aka loopity yarn, aka loop-it yarn.
And who could blame you? After all, I’ve plopped several loop yarn projects at your digital doorstep over the years, as a cat might deposit a delicious rodent for its master.
Loop Yarn Wreaths
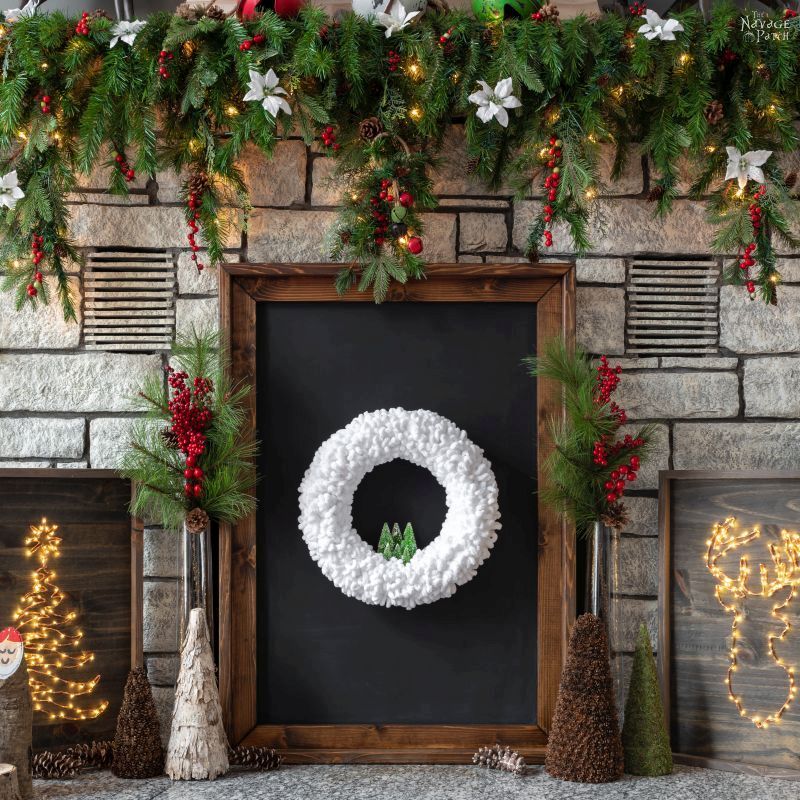
As fun as loop yarn is to play with, I assure you, not a single fluffy loop was used to make these looped yarn pillows.
Okay, now that we’ve got that straightened out, lemme tell you a little something about my babes: she does nothing by half measures. If an idea is worth looking in to, it’s worth exploring to the bitter end. Why on earth else would she command me to craft not one, not two, but three loop yarn wreaths?
So it was with loop yarn wreaths, so it is with yarn pillows.
I don’t know what it is with my babes and yarn. She certainly loves the stuff, and for a blog that has (to my knowledge) nothing to do with knitting (thank heavens), we have enough of it on hand to knit technicolor sweaters for entire US Ski and Snowboard Teams.
I’d say she’s preparing and practicing for grandchildren, but since I’m the shmuck fumbling with the stuff, I fear she may have more sinister plans.
Anyway, I recently made my babes a nifty little shag tree pillow made from yarn.
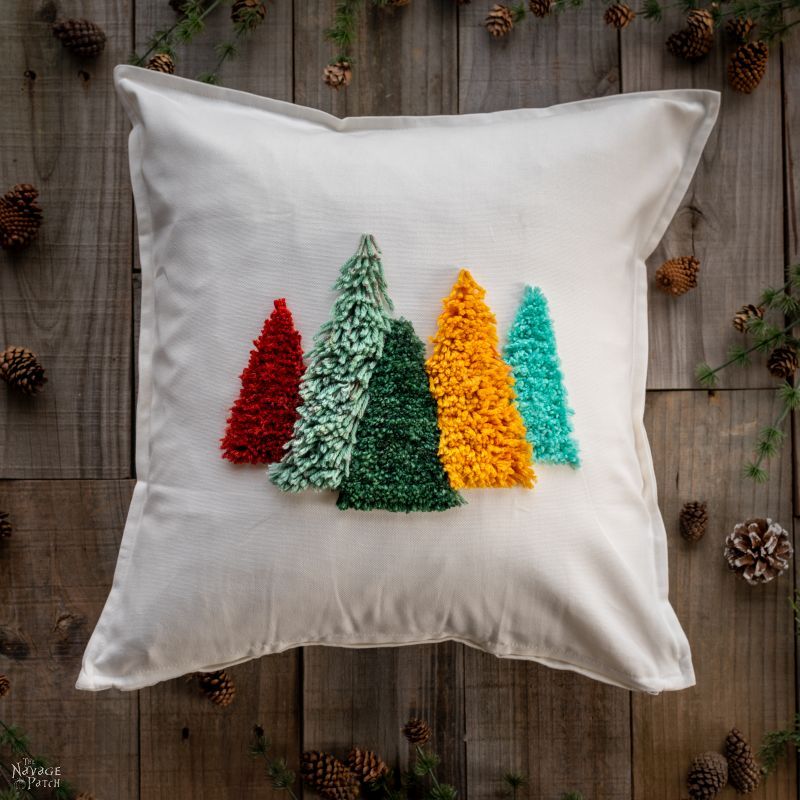
She loves the pillow, no doubt there.
But I could see from the glint in her eye that she wanted to explore the combination of yarn and pillow covers further. As 2021 rolled over and gave up the ghost to 2022, she suggested I make some more pillows using a similar technique to the one I used to make the pillow above.
Her idea was to make small loops (smaller than the ones I used for the shag pillow) and then glue those loops onto the pillow. I agreed that it would look good, and I suggested that here and there (or everywhere), I could cut the loops. I’ll be showing you both results.
When gluing yarn to pillow covers, you want to use either fabric adhesive or hot glue sticks made for bonding fabric. It makes a difference. I made one pillow with regular hot glue, and after a day of Handan using it to support her back on the sofa, the glue failed in spots, as it couldn’t properly bond to the pillow cover. Lesson learned. Of course, if your throw pillows are just for show and won’t get any actual use, feel free to use regular hot glue – it’ll hold well enough for decorative purposes.
DIY Looped Yarn Pillows
SUPPLIES LIST
Affiliate links are provided below. Full disclosure here.
- Yarn in assorted colors
- Throw pillow covers (we get them at IKEA)
- Metal knitting needle (or needles in various thicknesses)
- Fabric adhesive or hot glue gun with fabric hot glue sticks
- Small scissors

The easiest way to make yarn loops is with a metal knitting needle. I first tied one end of the yarn onto the pointy tip.

Then I started twirling the needle to coil the yarn.

I let my left thumb guide as my right hand twirled.
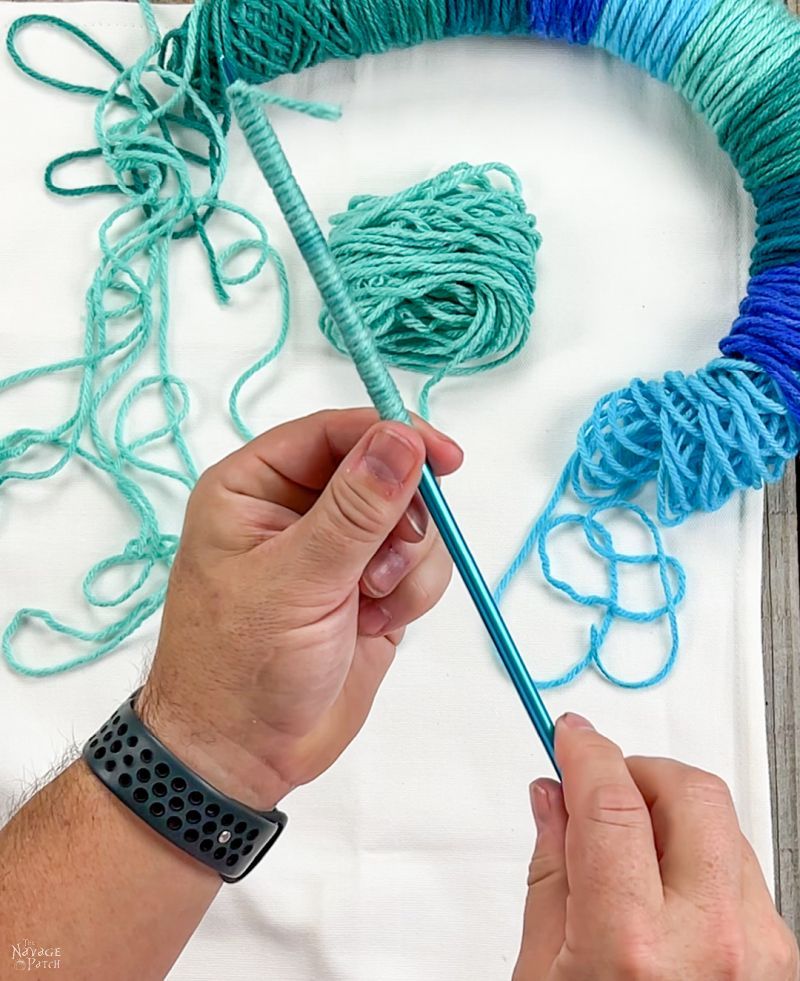
This was a long wrap – almost the full 14 inches of the needle. The key is not to wrap the yarn too tightly – especially if doing a long wrap – or the needle will be a little tricky to remove. Not impossible, just tricky. It also helps to use chunky yarn – the thicker the yard, the easier the needle will pull out from the loops.
When I had the length I wanted, I cut the yarn.

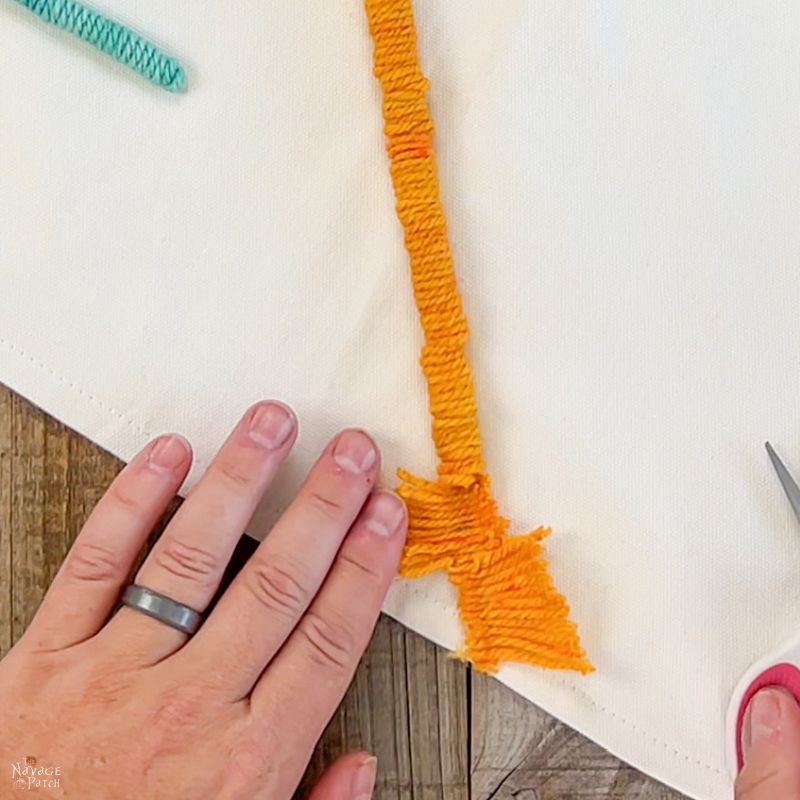
A ran a line of hot glue down the coils. As this was the first one, I hadn’t yet discovered the easy way. I’ll show you that for the next wrap.

I placed the wrapped needle on the pillow cover and held it until the glue set.

While waiting, I trimmed the ends.

Then I pulled the knitting needle out from the loops. This is where not wrapping too tightly pays off.

When I first tried making a looped yarn pillow, I didn’t have knitting needles. To make the loops, I used a thin wood dowel. When it came time to pull the dowel from the loops…it wouldn’t budge. The dowel was too rough, and there was just too much friction to overcome. I had to run a razor blade along the top of the loops to cut them open in order to get the dowel out. While brainstorming how to get the dowel smoother, it dawned on the little walnut in my head that I could just go buy some metal knitting needles and be done with it. Again, lesson learned!
After gluing that first line of loops, I discovered an easier method. After wrapping and cutting the yarn, I placed it exactly where I wanted it on the pillow, and then I rolled it over 180 degrees. I then ran a line of hot glue down the length of the loops.

And then I rolled the needle back 180 degrees to its original placement.
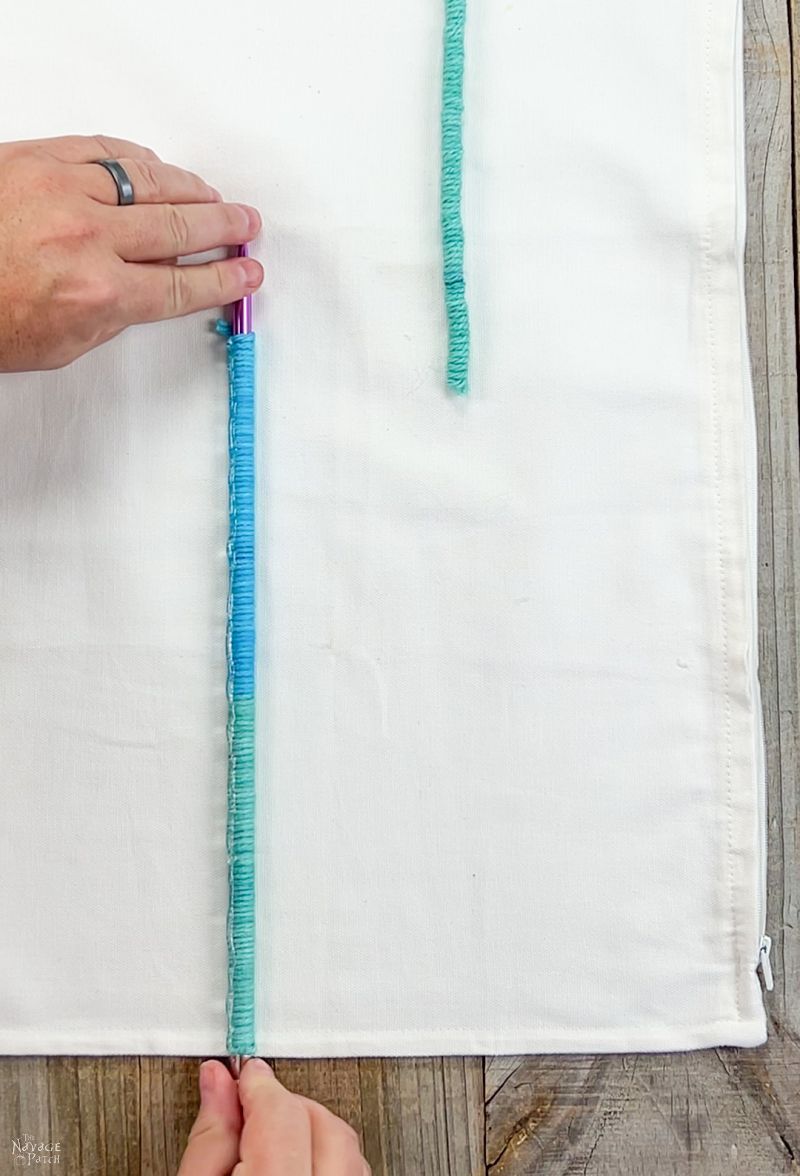

I let it dry, and then with one hand holding the loops in place, I slid the needle out.

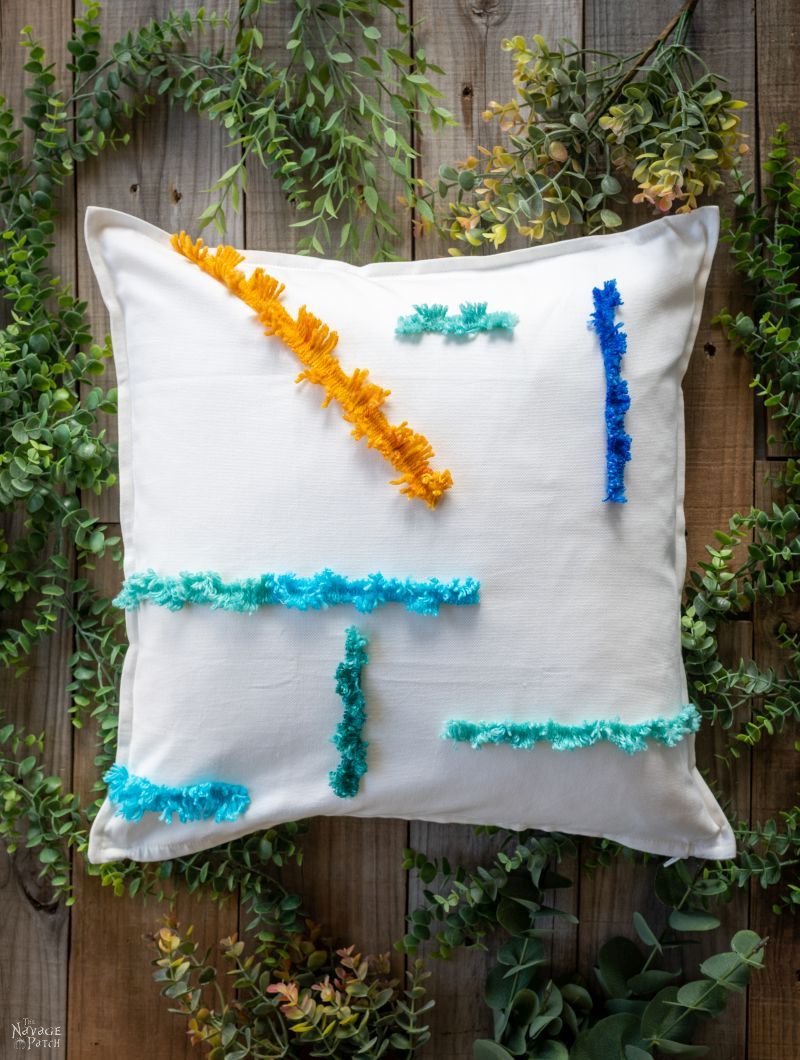
So that’s the basic technique – wrap, glue, pull. How you employ that technique is entirely up to you. For this colorful pillow I used three different knitting needles to get some variation of loop sizes. Here’s a short loop line made with a thicker needle.


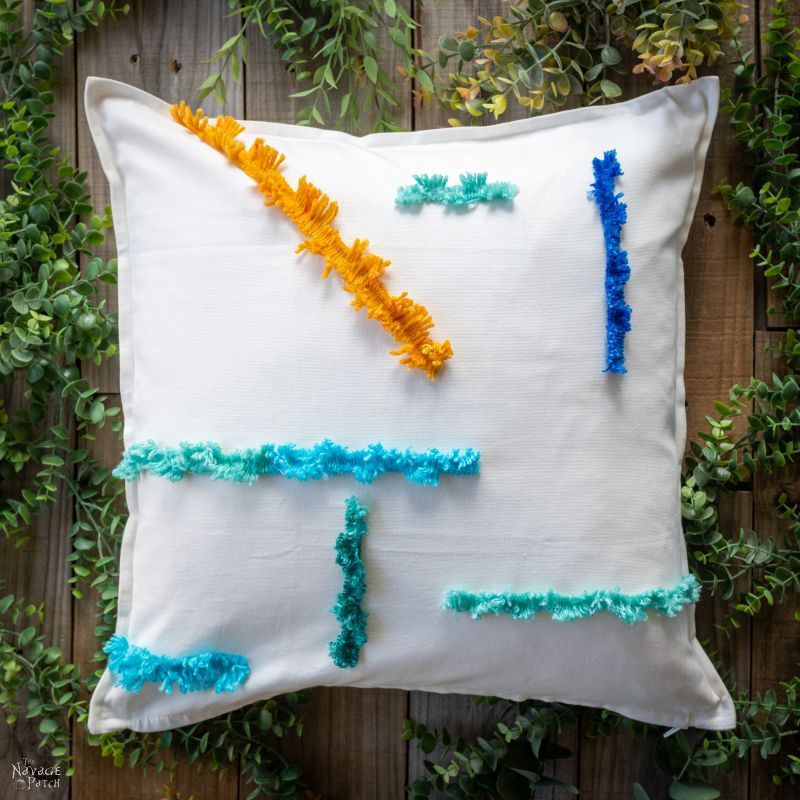
When finished, I had something like this. I added a diagonal in yellow for contrast in color and arrangement.

Now, if you like this look, you can stuff the pillow cover and call it a day. I took some pics of this pillow and another I made so you can see how they look with intact loops.


It’s neat, orderly and colorful.

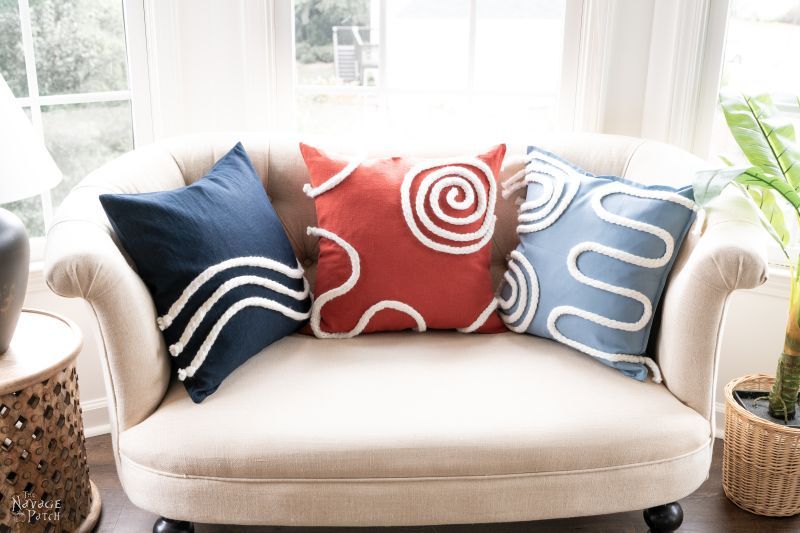
I made another with a blue pillow cover and white yarn. It is neat, orderly and stately.


But maybe neat, orderly and stately is not your cup of tea. It sure as jelly ain’t mine!
So after a few days of liking my looped yarn pillows (but not loving them), I decided to rig up the camera one more time and do a little…surgery.
I knew from my failed wood dowel attempt that cutting right down the middle didn’t look very good. But what if I staggered my cuts? Figuring I had nothing to lose (I’d already take then the first rounds of beauty shots), I pressed record and began to operate.
Instead of cutting straight down the top of the loops, I cut about an inch from the left side of the loops.

This caused the yarn to stick out to the right.

Then I cut about in inch up the right side of the loops.

And that caused the yarn to stick out on the left.
I kept cutting, alternating right and left.

Soon I had the whole line cut open.

I figured I’d give the same treatment to two more lines and be done with it. But once I started, I couldn’t stop! I had to cut them all!

You can judge for yourself which style you prefer. My babes and I like the scruffy look of the cut yarn!


For the blue pillow, I kept it half and half.

So what do you think? Which style is your favorite? Let us know in the comments!
And speaking of yarn pillows, check out these easy DIY throw pillows made with braided yarn!


Just like a man with a scruffy face, scruffy all the way! My next trip to ikea I’m picking up some pillow covers.
Thank you for all you share with us!
You’re so very welcome, Terry – it is our pleasure!
You are the craftiest person I’ve run across. Simple but awesome projects.
I will deflect that compliment over to Handan, lol! Thank you, Susan! 🙂
Fun project. Here’s an idea… How about running 2 colors of loops right next to each other, then cutting in alternate sections? The centers would blend the colors, might look interesting depending on the color choices.
That is a great idea, Deb! I’ll be expecting some pictures after you try it, lol!
Love the idea! I have looked for new pillows to bring color into my room. Now I can make and use the colors I want. Thanks
Thank you, Toni! Have fun with it!
This is very charming and turned out much better than my pea brain first imagined it would! I especially LOVE the pillow with the little trees!!! Please let us know just how you accomplished it because it would be so fun to have for Christmas.
Love to you both and thanks!
Caye
Hi Caye, thank you so much! There’s a link to the shag tree pillow tutorial in the post! 🙂
So glad to see you back after taking a few weeks off! After all the Christmas inspiration, I’m looking forward to trying some of your other creative adventures! I still love the look of your loopy white wreath so I think I’m going to try that this week. By the way, I didn’t know about fabric hot glue! Just have to purchase some of that! Thanks again, Greg!
Thank you, Carol! Good luck with the loop yarn wreath, and yep, fabric hot glue is a must! 🙂
Are you clever or what?
Thank you, Cecelia! 🙂
I like the yarn cut and fluffy better too. Very pretty and looks easy to do. I think both pillows are very nice.
Thank you, Amanda – it is very easy! 🙂
loved the project have a blessed day sue
Thank you, Sue! 🙂
I actually like both ways to shag. I plan to try all of the ways to decorate a pillow. I have another idea too. I will let you know how it turns out. Thanks Greg.
Can’t wait to see it, Marian! 🙂
Hi Greg – just wondering if all is okay!
This is the last posting received and it was back in January. Email does not seem to be working so really hope all is well with you all
🙂
Kind regards
sue
All is good! Big news coming soon! 😀