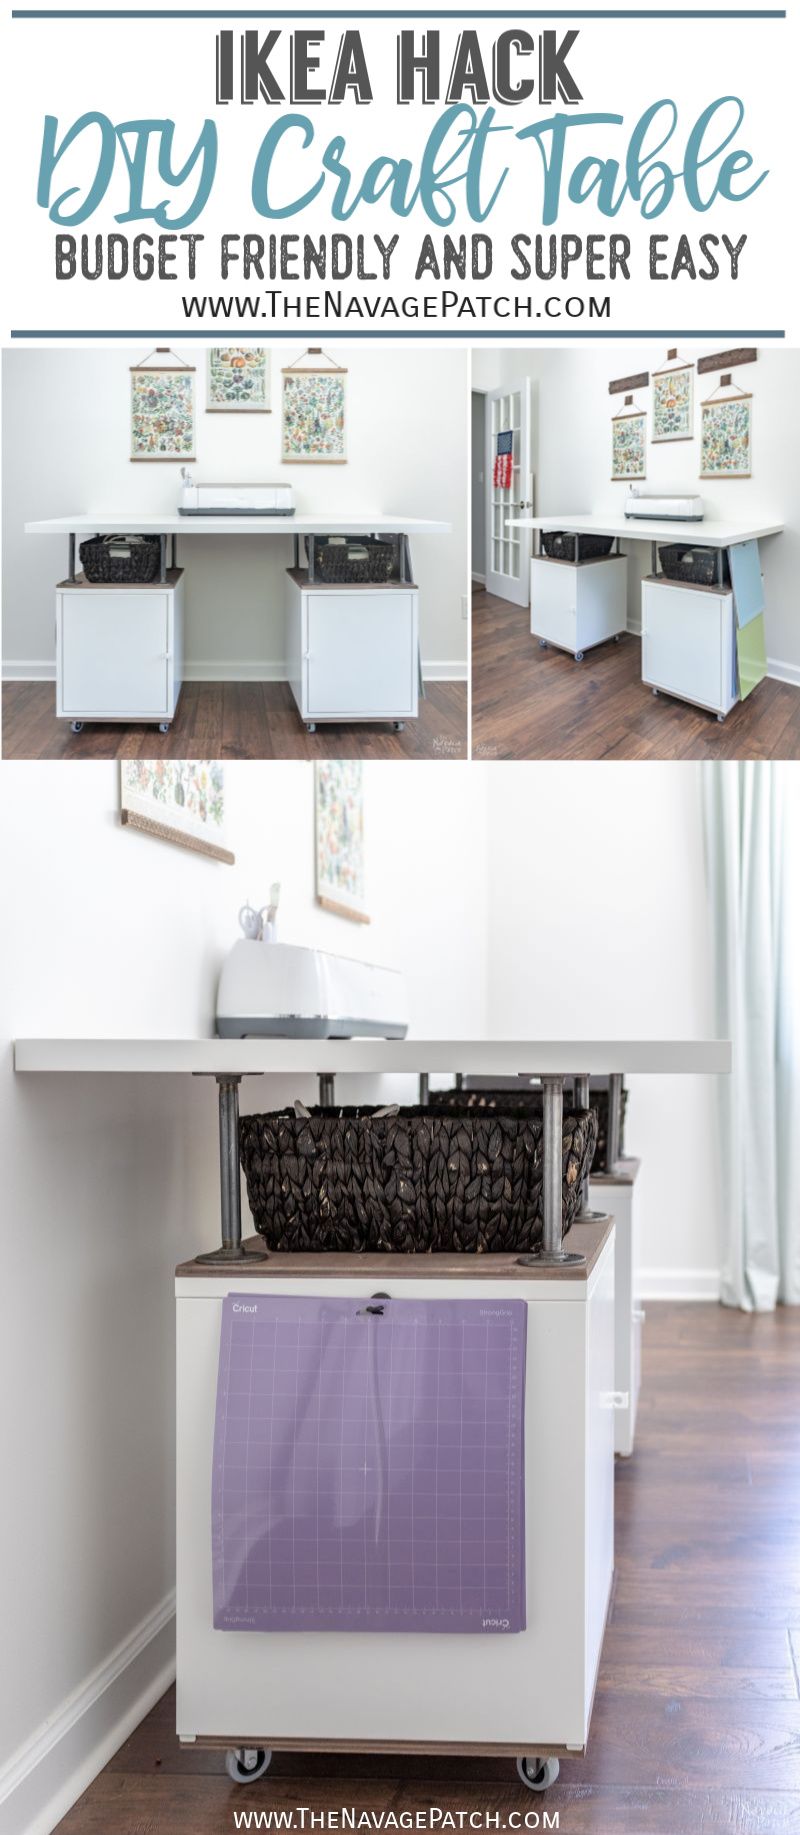
DIY Craft Table – IKEA Hack
This DIY Craft Table is a brilliant IKEA hack that gives us tons of work space for our Cricut Maker plus enough storage for all the accessories & materials!
It’s like déjà vu all over again!
Another room makeover, another trip to IKEA.
It’s a good thing I’ve tempered my former loathing for the Swedish furniture Goliath, or these makeovers would really be a drag!
I enjoy IKEA now, and as long as I keep a tight hold on Handan’s hand at least 50% of the time, the whole trip is entirely pleasant and not too expensive!

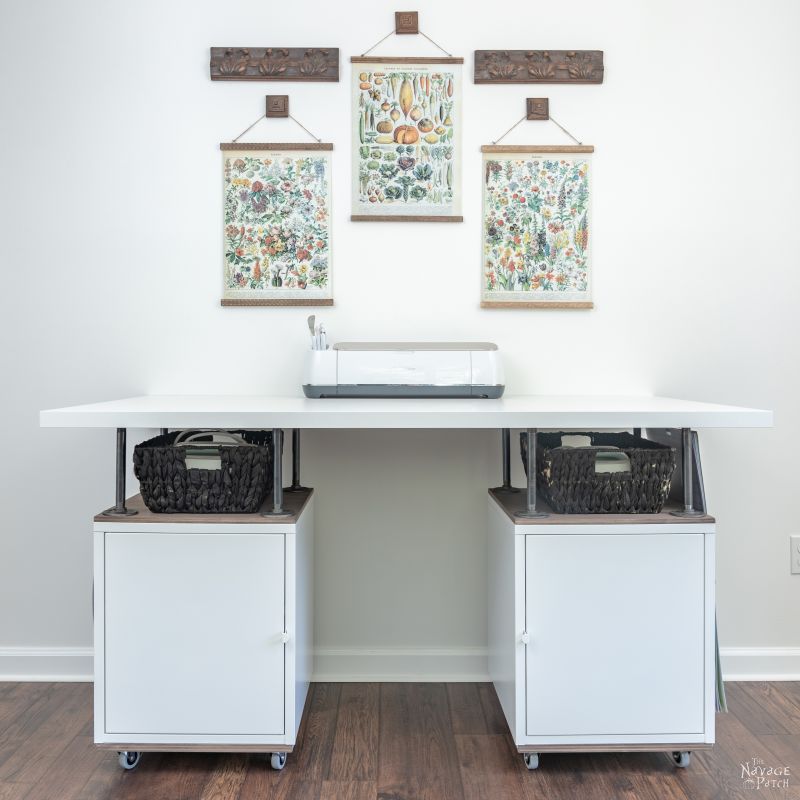
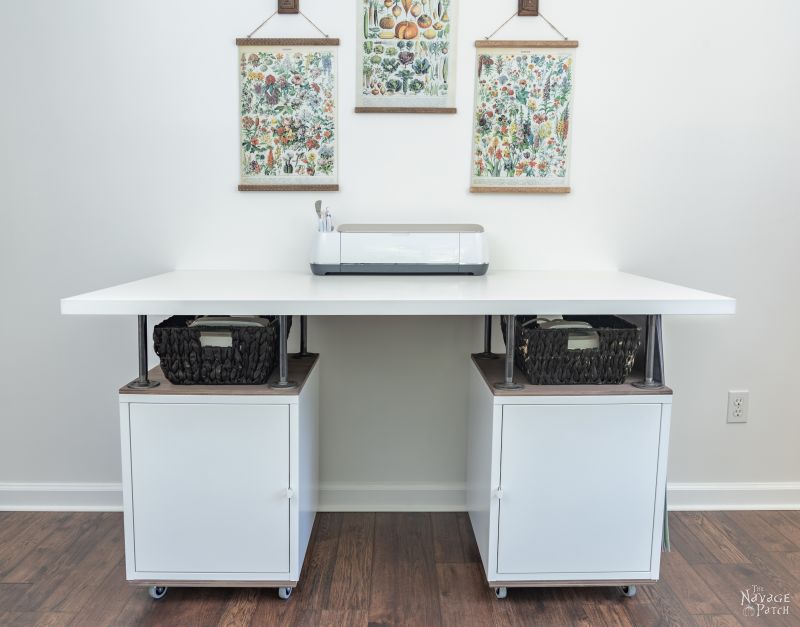
One of our main goals with the new craft room is to have a Cricut station / craft table, where we can keep the Cricut Maker and all its supplies and accessories. The Cricut is one thing – it’s a single machine, so it keeps itself neat.
But all the other stuff?
Jeezum Crow, it’s an ever-evolving and constantly-expanding ecosystem of color and texture, and if you don’t keep it organized, I’m pretty sure the vinyl and transfer papers and mats and stencils and other crap start to interbreed and multiply!
Yeah, so we needed a Cricut Station. We also needed a work surface up top – let’s call it a craft table, because it won’t only be used for Cricut projects – and we needed storage below for the Cricut ecosystem.
We thought about buying something (briefly), but Handan couldn’t find exactly what she had in mind, and what she did find was way too expensive.
Remember, just like Barish’s bedroom makeover, the theme of this craft room makeover is Cheap, Easy and Quick.
Then we thought about designing and building one of wood, but I hemmed and hawed and suggested that there was probably a quicker way than that.
And then my babes hit upon the idea. How she does it, I don’t know. I’ve a better chance divining the meaning of life than understanding the mind of that woman.
One minute, we had no plan. The next minute, I’m holding Handan’s hand through the halls of IKEA as we sought out the components of a DIY craft table.
Go figure.
Anyway, her plan was to get a couple of cheap metal storage cubes – part of IKEA’s office collection. For those who love their ridiculous Swedish monikers, the cubes we sought are called HÄLLAN. They are pretty unassuming and pretty cheap at $40 each.
If you look at it too long, you risk keeling over dead from acute boredom.

So, is it mandatory to capitalize everything when writing about IKEA? Do you think that also translates to speech?
Like, should I be shouting when I say the word “HÄLLAN?” And does it rhyme with “Allen” or “Van Halen?”
And what about IKEA internal emails? Do you think the CEO writes in all caps?
When he gives a speech, is he shouting and screaming in Swedish to all his minions?
I suppose these are questions for another time. Let’s get back to our DIY craft table.
Handan wanted two HÄLLAN units with casters (called RILL in IKEA Swedish) added to their bottoms. On top of each, she wanted wood, and on the wood, she wanted black pipe. On top of the black pipe would sit a tabletop – another inexpensive IKEA purchase called LINNMON.
LINNMON (remember to shout it in your mind), is a lightweight and very inexpensive composite tabletop – only $23 for 47″ x 24″ piece.
We loaded up our car with the craft table components mentioned above, plus a few more for some other craft room projects coming up, and headed back to The Navage Patch.
DIY IKEA Hack Craft Table
- (2) IKEA HÄLLAN metal storage cubes
- (1) IKEA LINNMON tabletop
- (8) IKEA RILL Casters
- 1/2 inch plywood
- 3/4 inch plywood
- (8) pieces 8 inch x 1/2 inch black pipe
- (16) 1/2 inch floor flanges
- Construction adhesive
- Clamps
- Stain
Step 1 – Build the storage cubes
And here’s the best part about it. When we got home, Barish offered to build the two HÄLLANS! I may have softened on visiting IKEA, but my distaste for building it is as strong as it ever was!
Hey, one step at a time, right?
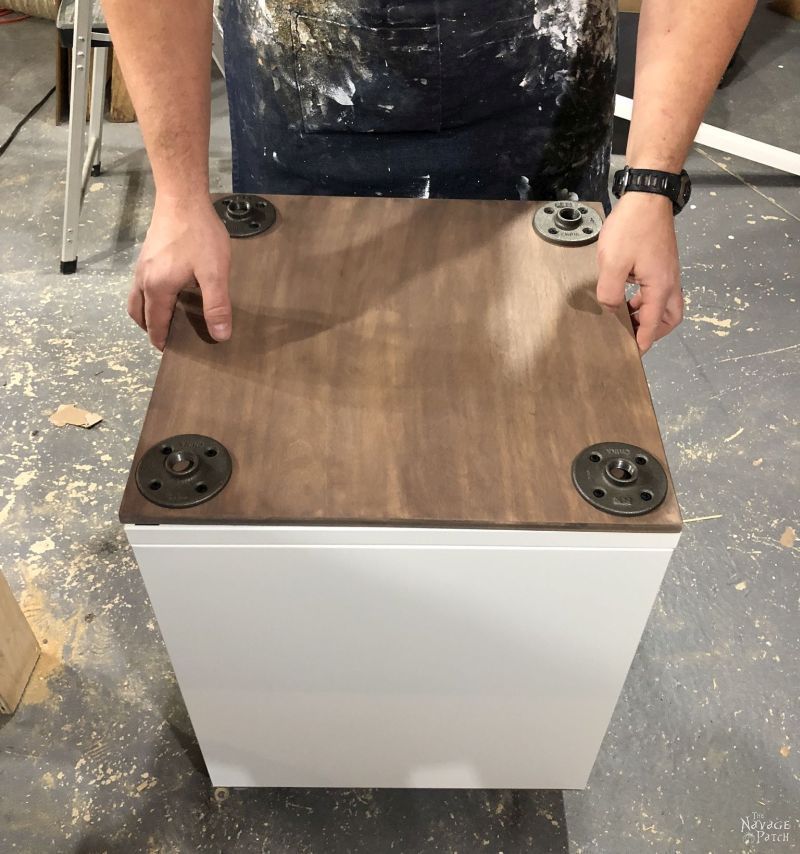
Step 2 – Add plywood to the storage cubes
After Barish assembled the plain and homely things, we took them to the basement. I took some measurements and cut two pieces of 1/2 inch plywood to fit precisely on top of each and two pieces of 3/4 inch plywood that would fit precisely underneath. I sanded to get rid of the sharp corners and edges.

We’ve been using a ton of Minwax’s Special Walnut stain lately (we love it!), but we wanted to go a little lighter in the craft room.
I decided to play around with stains, to see what I could come up with.
First, I applied a coat of Varathane Antique White. I stained only the tops of the 1/2 inch plywood and only the edges of the 3/4 inch. Here it is before I wiped it off.

On top of the white, I applied a coat of Special Walnut, figuring it would just give a slightly lighter shade of our favorite.
Ermmm…what the heck?

I guess pre-staining with white was a little too much for the Special Walnut to handle. I wanted lighter, not au naturale!
Okay, I needed to darken this, but Special Walnut wouldn’t cut it right now – the wood was saturated with white. What to do?
I cast my eye over to my Wall of Stain and spied a can of Varathane Kona – our favorite dark stain. On its own, it’d be too dark for this project – even with the base coat of white.
But what if…
I shook the can, opened it, stirred it and then poured a bit into a plastic cup. I then poured an equal amount of white and mixed the two together.
The color in the cup looked like a slightly richer and even more “true brown” version of Varathane’s Briarsmoke stain. I’d guess that Briarsmoke came to be when a Varathane Stain Engineer started playing around with Kona and White. I hope his picture is hanging on the Engineer of the Month wall.
Anyway, it looked decent enough, so I applied a very light coat.
It looked great! (You’ll get a look in just a sec)
I flipped the bottom pieces over and installed the casters.

Once the stain dried, I put some construction adhesive on the bottoms and installed them underneath the metal cabinets.

Next, I installed 4 flanges on each piece of 1/2 inch plywood. Now you can see the color I ended up with. Pretty good light brown, I think!

To attach the top to the metal cube, I again used construction adhesive.

I positioned the top and pressed it in place.
I clamped it all up, and then Handan got to work scraping away the excess glue that the clamps squeezed out.


While she was scraping the glue, she noticed that the top corners weren’t glued down. I hadn’t put enough Loctite around the edges or corners.
Crap.
I unclamped the whole mess, pried the top off, squirted on some more Loctite and then put the top back in its place. While doing so I noticed the glue in the center of the cube had not been flattened by the plywood. That meant the the whole middle would not have been glue down. I had a solution for that!

We clamped it up again, and this time I added a big weight in the middle.

That ridiculously big iron pulley hook weighs at least 60 pounds, if not more. It’s the perfect presser for the places a clamp can’t reach! I protected the wood underneath with shop towels, and I spread out the weight with a block of wood.

We let the glue cure overnight and built the other cube the next day.
The day after that, we carried the cubes upstairs to the craft room for final assembly of our IKEA hack DIY craft table.
Step 3 – Add black pipe to the storage cubes
I screwed the black pipes into their flanges and screwed the top flanges on the pipes.
Handan perfectly captured my unintentional Butt-head impersonation.


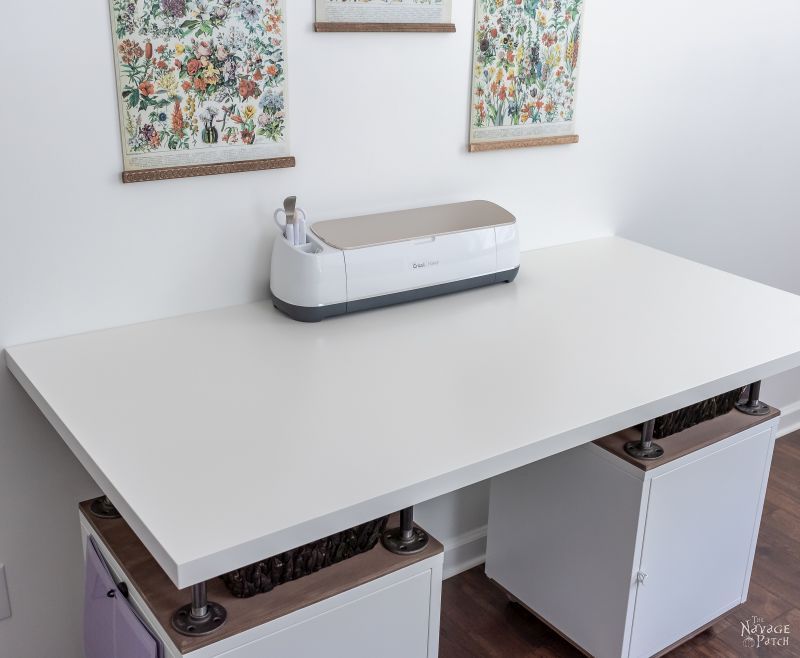
Step 4 – Attach the tabletop
For the final step, we placed the tabletop on the flanges and centered it with the help of a tape measure.
When we had it in place, I secured the flanges to the underside of the tabletop.

And that was it for our IKEA hack DIY craft table project! Another Handan brainchild brought to life by yours truly and his fabulous wife.
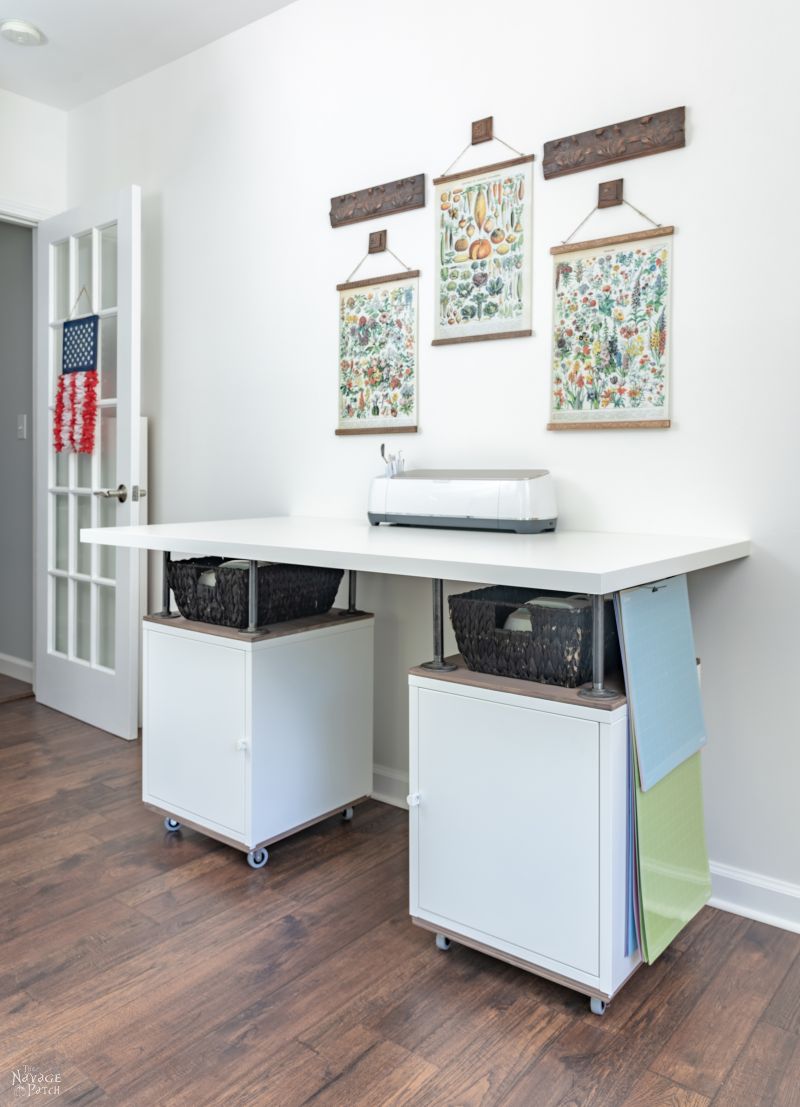
The top is big enough for any Cricut project, but we’ll use it for other small crafts, too.
The space between the tabletop and the storage cubes is where we now store our EasyPress 2 heat transfer machines.
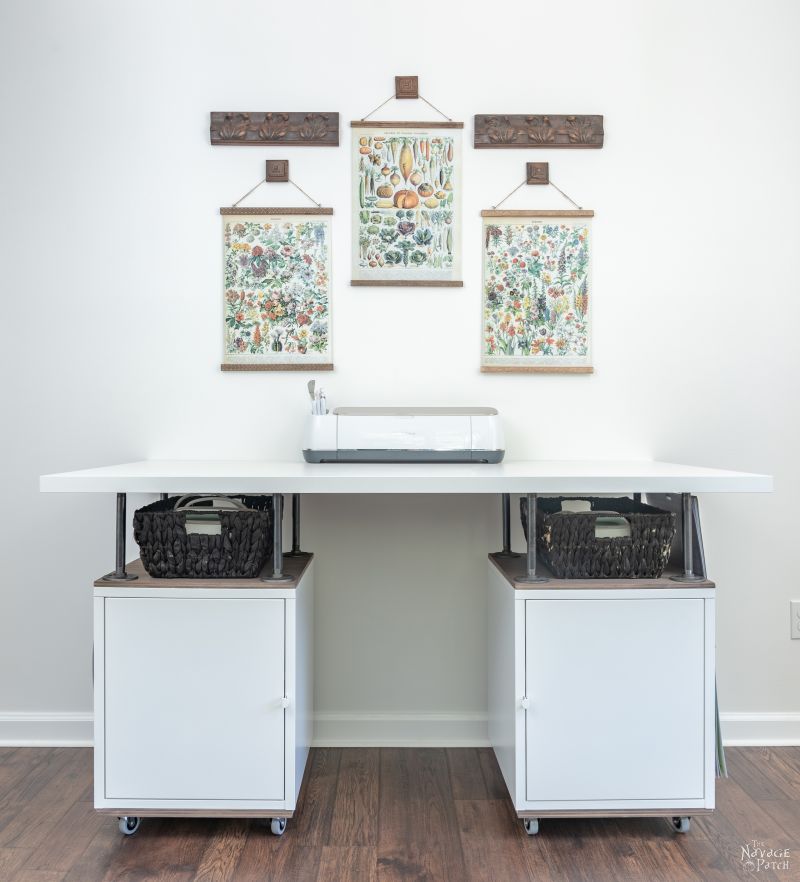
I screwed an L-bracket underneath the table on one side to hold some of our Cricut mats.

We store all of our Cricut materials inside the cubes.

Here are the transfer papers, vinyl and more mats!

And on the other side we put a magnetic hook to store – yep – even more mats!
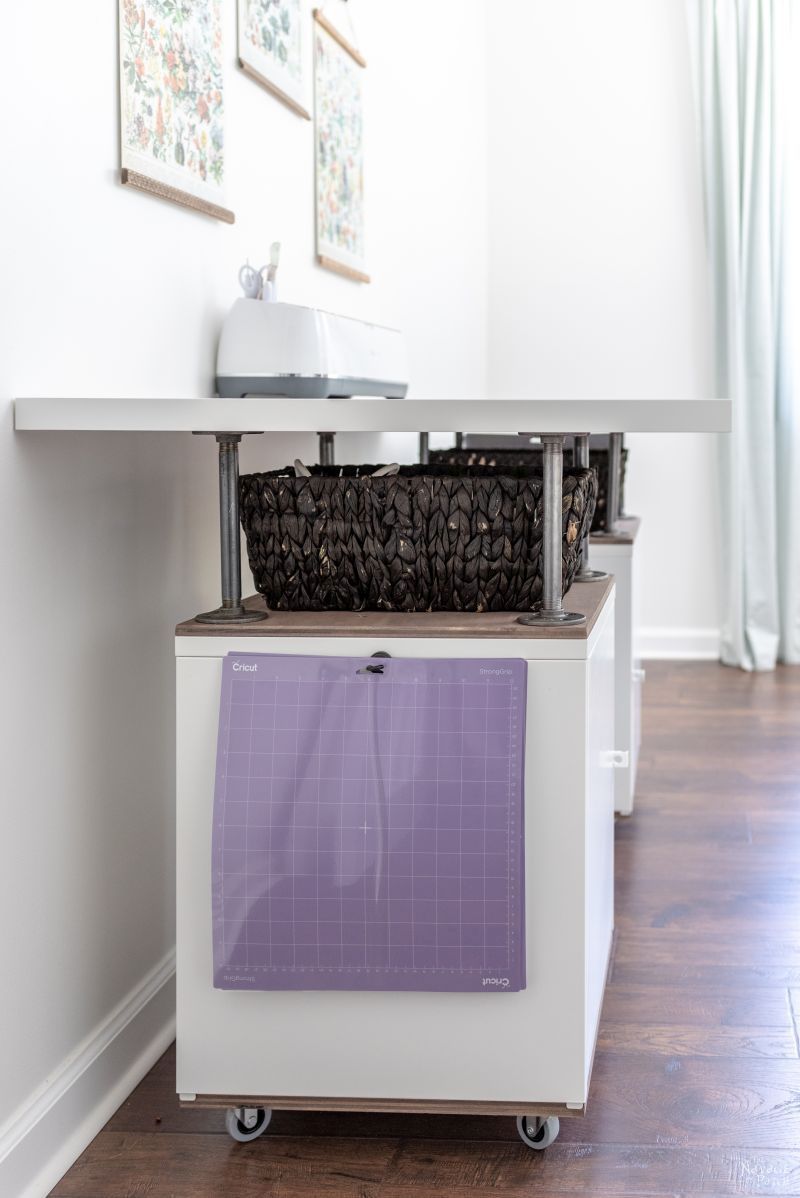
The beauty of the metal cabinets is that we can stick magnetic hooks wherever we want to hang things or we can add magnetic shelves if we need storage space for little doodads.
But the best part about our DIY craft table might just be the wheels. Now that we have laminate flooring instead of carpeting, we love that we can roll or slide our furniture around the room for photo ops or to create more work space!
How do you like our new Cricut and craft table? Let us know in the comments!
If you’re following along with the craft room makeover, here’s how we stand:
Craft Room Makeover Checklist
Craft room ideas and laying out the game planPaint the walls, ceiling and trimPaint the French doorCarpet removalInstall laminate flooringDIY craft table for CricutBuy curtains and install curtain rods- Buy or DIY a computer desk
- DIY Closet makeover
- DIY Industrial Bookcase (West Elm Inspired)
- Antique Sewing Machine Drawer Upcycle
- Upcycled craft room storage
- Craft room makeover reveal
Click here to see more craft room makeover posts as we continue to cross items off our checklist!
We love it when you share our posts on Facebook and Pinterest!


Looks fantastic! Great idea, Handan! Lots of storage that looks like it was made for a Cricut and it’s paraphernalia. I really like the semi-industrial look with the pipes that’s been softened with the white and stained wood. Good job all round.
Thanks, Jay! It’s perfect for our needs!
Apart from being a decent looking table, it was really easy to put together. That saved Greg a ton of time and saved me from his yapping (bitching) LOL.
I really love this a lot! The combo of materials is perfect in the looks department and the functionality is great. Really love how the room is coming together.
Thank you, April – we are loving it, too! 🙂
That is so awesome! It is perfect for the Cricut and accessories. One thing I like about about your projects is how they can be adapted for other uses, as well.
I do have one question. How do you clean the black pipe before using it? And do you seal it in some way?
Thanks,
I’m looking forward to the rest of the projects and room reveal.
Thank you, April! Regarding the black pipe, we used to clean it with Goof Off, because they’d always stick those stupid labels on each piece. Now they don’t do that anymore, and it seems like they are making the metal a nicer color (I think they know mostly DIYers are using it now). So weather we’re just going use it as-is or paint it, I like to clean them with mineral spirits and a rag. I don’t bother sealing them – it’s not really humid enough here for them to rust.
Another brain child birthed and completed in excellence. Love it. So neat and organized. I love crafts, but absolutely hate clutter. Great job. Thanks for sharing.
Thank you so much, Dorothy! I don’t know where I’d be without Handan’s brain! 🙂
My husband isn’t handy. Could Handan please send you to Minnesota so I can have this desk too? Of course, she is invited, I’ll show her the Mall of America and whatever she wants while you build this. 🙂 Thanks!
Okay, you take Handan to the Mall of America, and I’ll go fishing with your husband. Sounds like a plan! 🙂
Is this a type of desk you can sit at? What measurement is the middle section? What height did it finally work out to be? I Love it and need a work table.
Hi Judy, yes, we made it so we could sit at it, too! Our desktop is 33 inches high, but if that is too high for you, you could make it with 6 inch or 5 inch pipe instead of the 8 inch that we used. There is 20 inches of space between the two cabinets – more than enough for legs!
So smart! I bought my own birthday gift a couple months ago: a Silhouette. I’m a slow learner but I’m trying hard to show my guy my money wasn’t wasted. But, where to store it and all the “stuff” that just keeps sneaking home from Joann’s has been a head scratcher. It needs to be neat and tidy but accessible too. Problem solved! Thanks for the great idea I’m stealing it!
I love your printables. My old printer is about to give up the ghost. What would you suggest I replace it with?
Thanks.
Hi Rulayne, congrats on the Silhouette! You’ll love it once you get into it! The printer we own and absolutely love is this Canon. For the price, i don’t think you can beat it! https://amzn.to/2xT9AMs
Your craft table is fantastic! Storage, space to spread out projects, and a chic white cabinet and top with some stained wood thrown in. What’s not to like! Ikea furniture is a staple for some projects, and you have greatly enhanced its capabilities!
Thank you so much, Barbara! IKEA furniture just loves to be hacked! The simpler the piece, the better the hack! 🙂
Love the table and taking advantage of the metal sides to add more storage- but I REALLY love the giant pulley you used as a weight. I could make a fabulous lamp out of THAT!
That would be the world’s heaviest lamp, lol! 🙂
Another great IKEA hack. I have to try the Kona and White mix because I just stained two accent tables with special walnut and they still have a reddish undertone. I might try going over it with the mix to see if I get the color I was trying for. (More a rustic brown). Good thing it has been too wet and humid this week so I haven’t poly coated yet.
Can’t go wrong with Kona! Give it a try!
What are the dimensions of the HALLAN cabinets?
Is it possible to make this without the raised pipe system? Would it still be enough support for the table top to sit on the 2 cabinets?
Hi Lorraine, it sure is! We used the pipes to give us a little more storage room underneath, but you could certainly just put the table right on top of the cabinets!
Hello
Awesome !
How high is this ?
I like to stand at my craft area
Is it tall enough ?
If not – what do you recommend ?
Why did you use the metal storage rather than the kalax?
Just curious !
Mine will probably be in the garage ;(
7 kids no room for craft room !
Xx
Hi Heidi, I don’t have that table near me at the moment, so I can’t measure it precisely, but it should be about 34 inches tall, which is counter height. I always worked standing up, but if I over wanted to sit, I used a counter-height stool. We used the Hallan metal cubes simply because they were cheap. You can make this with anything! I made an upgraded version for our new home with Alex drawers (which are taller) and plywood to give it a little extra height. You can see pics of the new and improved craft table here.