Small Walk-In Closet Makeover
This small walk-in closet makeover makes maximum use of our son’s limited space giving him more than enough room for his clothing & shoes.
I think the kid has more clothing than I do.
Really!
I mean, it wouldn’t be shocking at all if the X chromosome were on the other foot, so to speak, but for a teenage guy, he’s gotta lotta duds!
Okay, to be fair, this is entirely not his doing. If he had his way, he’d probably wear the same damn t-shirt and jeans until the sun turns blut and the fish walk out of the sea.
No, the person to blame here, the reason he needs a closet makeover in the first place is…
…
…you guessed it! His mother…aka my wife, my babes, and the occasional bane of my existence when her to-do list interferes with my please-don’t-make-me-do list.
Well, let’s just call him the theoretically best-dressed kid on campus, because some of his finest threads are still in his closet while he’s away chasing knowledge.
Anyway, with the guest bedroom makeover finally put to bed, and the holiday season thankfully and mercifully in our rearview (love it when it starts, love it more when it ends!), my babes set her sights on her baby’s (yes, he’s still her baby at 19) small walk-in closet.
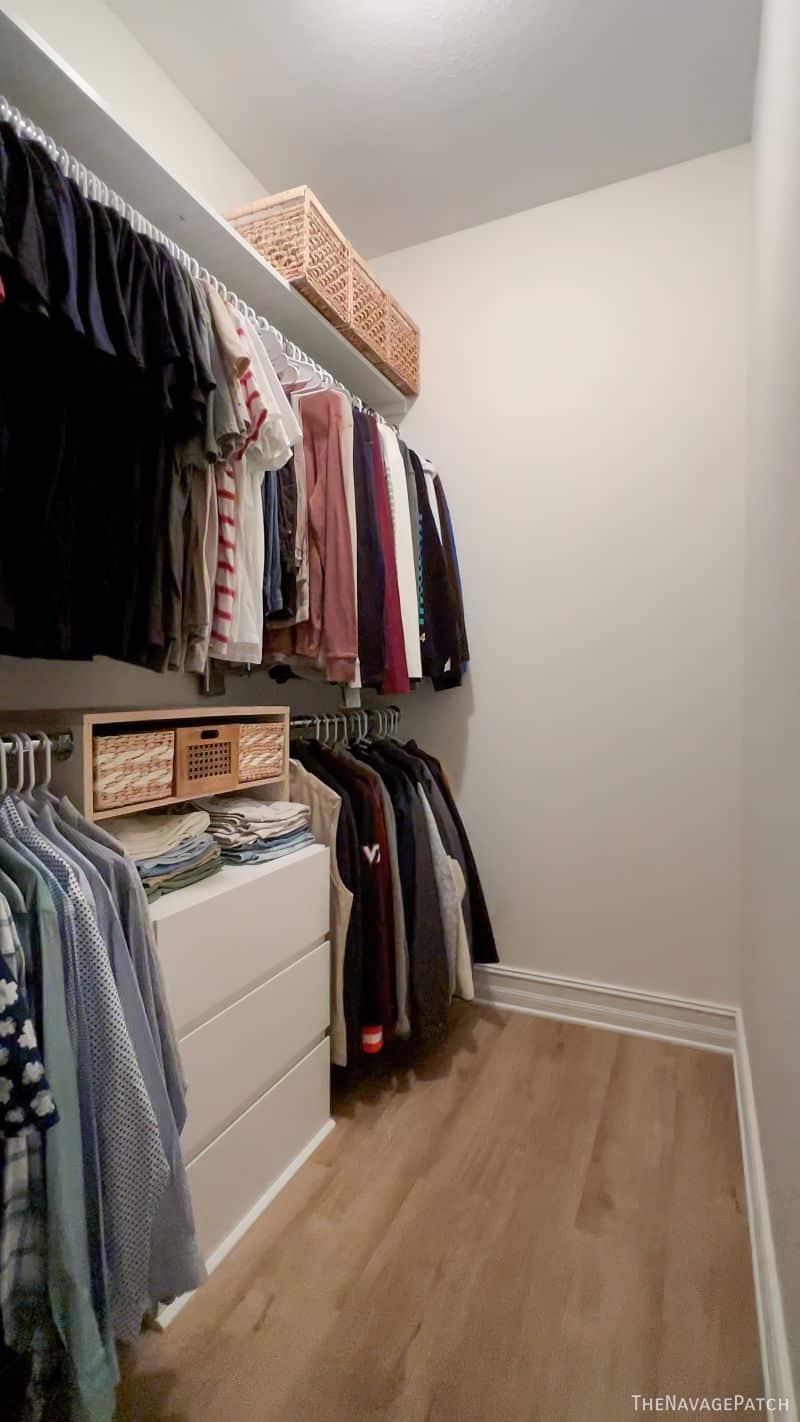
Besides laying LVP in there during his bedroom makeover project last spring, I haven’t had much interaction with that closet. It has held his clothing on hangers packed like sardines onto the single wire shelf “system” so thoughtfully provided by the miserly and (most-likely) Christmas-and-puppy-hating monsters who built this house and nearly every other house in America.
To find out what the world really thinks of you, open up a closet. If there’s wire shelving in there, someone somewhere has it out for you!
Anyway, back to the sardines. You’d have needed a pry bar to extract one his shirts, and a truck-mounted winch might not have been out of the question were Baris to find himself in need of a stout jacket.
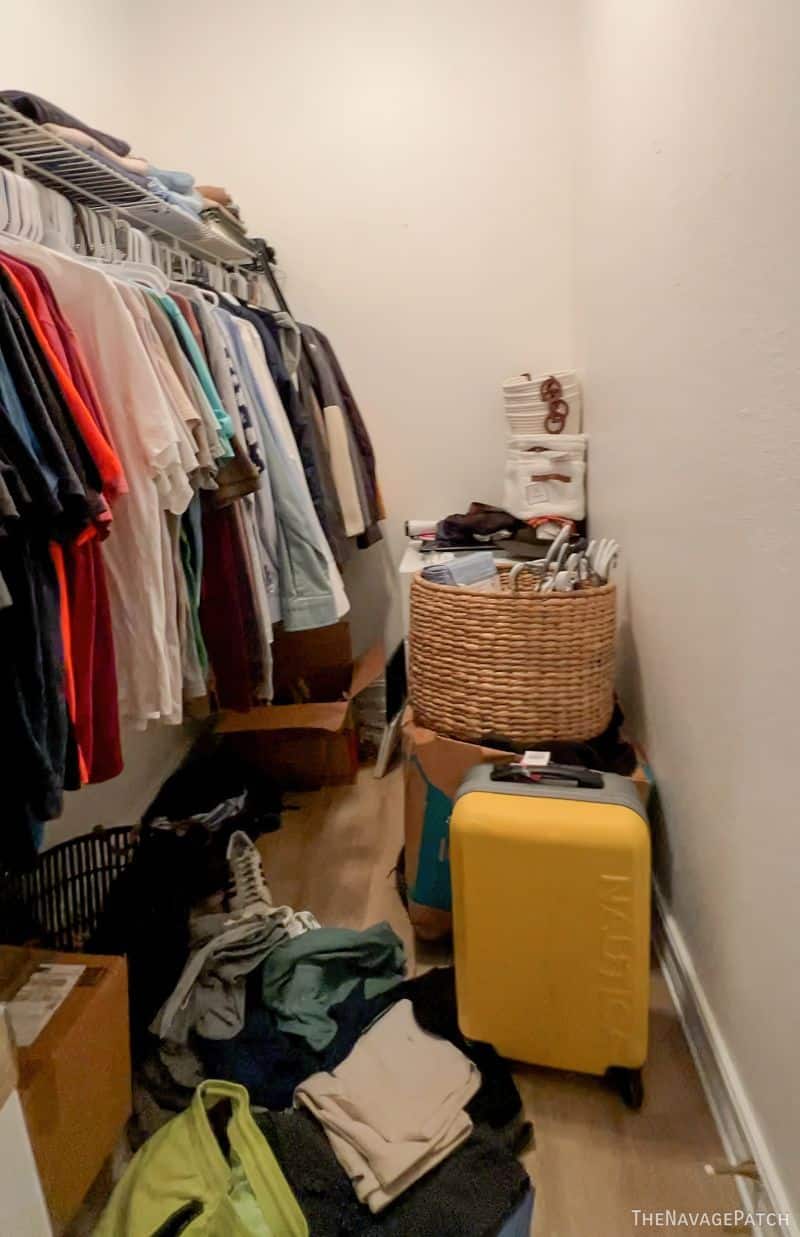
And that wasn’t even all of his clothing. The rest remained in boxes and suitcases along with the forlorn remnants of his Georgia rooms and the tattered remains of his Connecticut bedrooms. Yes, rooms. The little stinker had two rooms in those states. Ah, the benefits of being an only-child!
So yeah, it was time for little big man to have a closet worthy not only of his impressive clothing collection, but of himself – a young man I admire and respect and who astounds me with each new moon.
SMALL WALK-IN CLOSET MAKEOVER VIDEO Tutorial
On Tiktok
We love to see our DIY projects out in the wild! If you try this DIY project and take a picture and post it on Instagram, be sure to tag us – thenavagepatch
More Organization Ideas
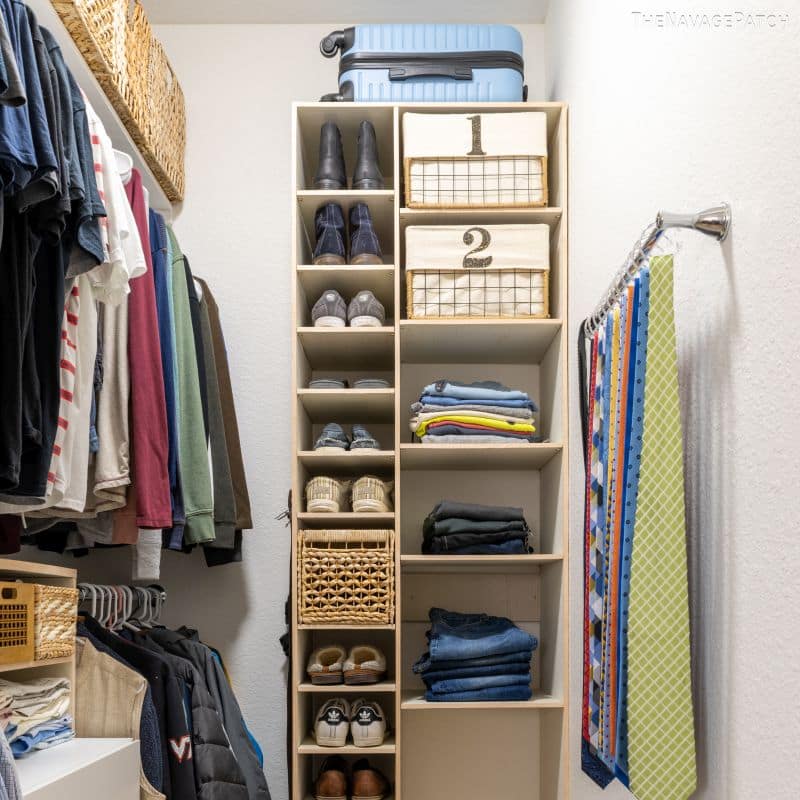
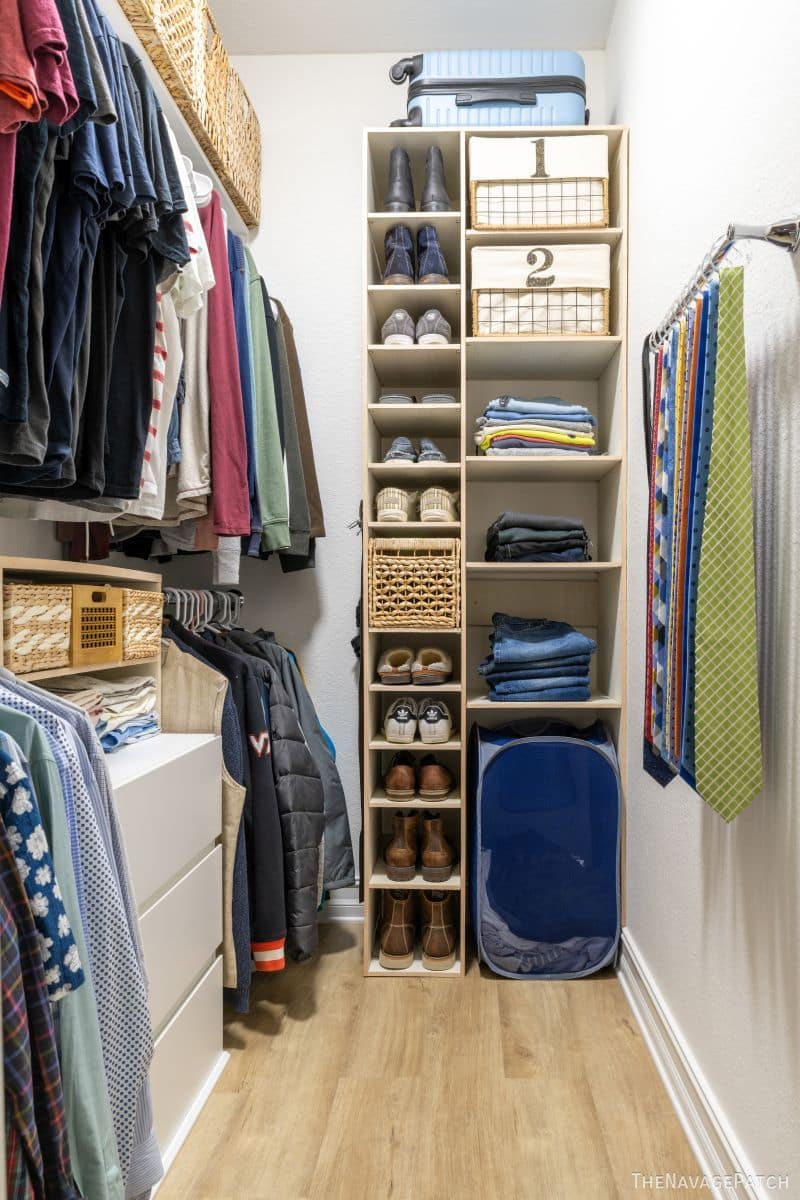
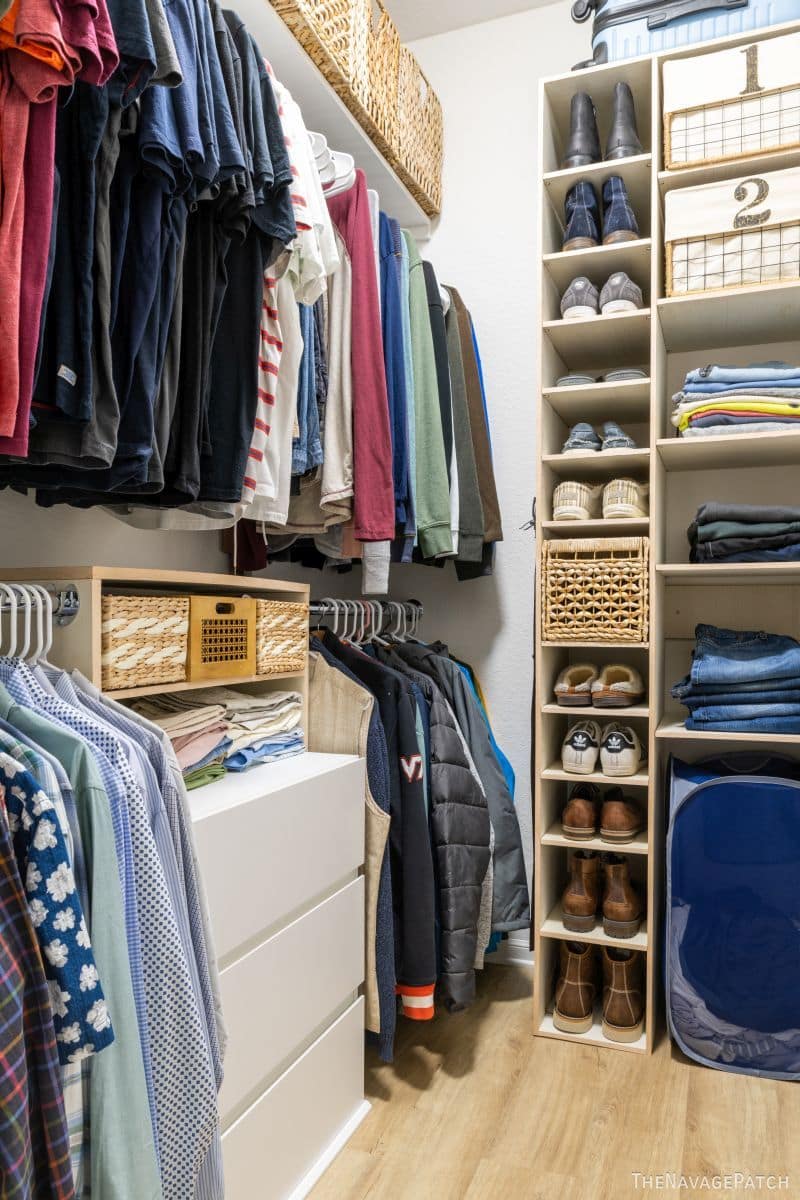
Small Walk-In Closet Makeover
Step one in such an undertaking is universal: out with the old to make room for the new. In this case, it was out with the clothes – temporarily. I put them the only place I could – his bed.
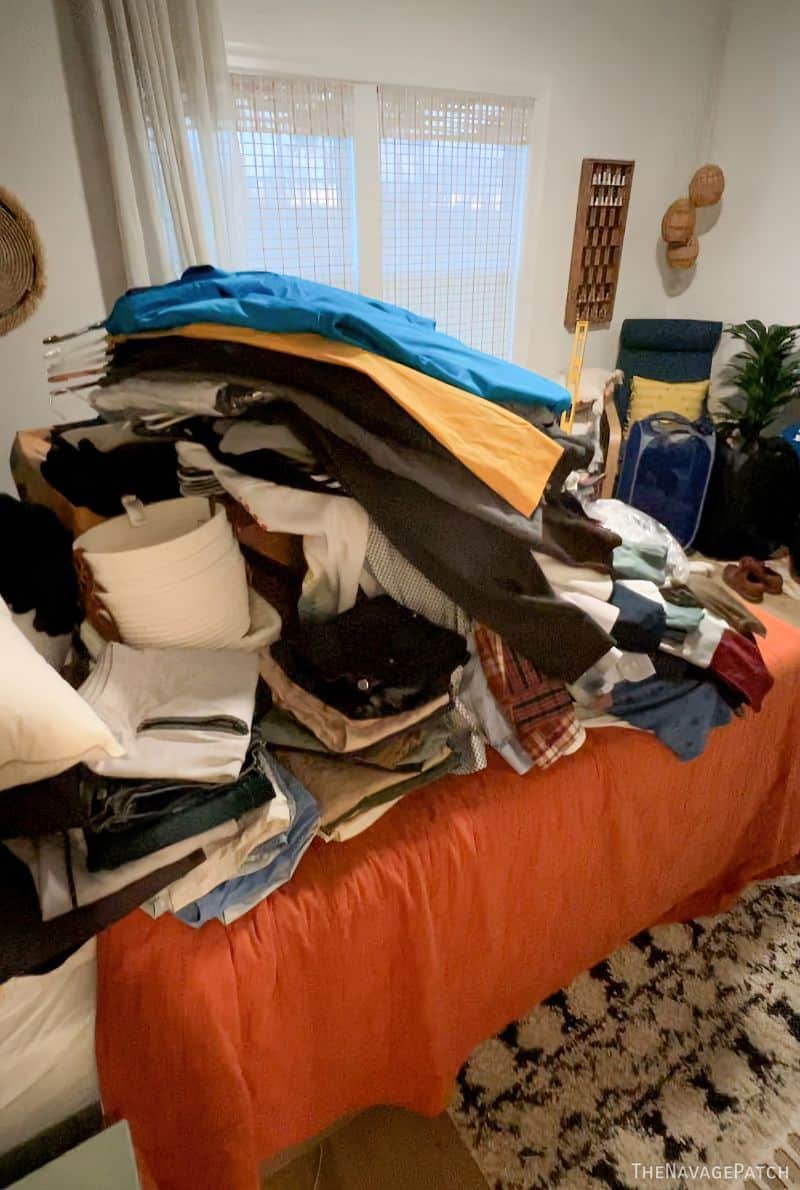
Fortunately, he was still away at school studying for final exams, so he wouldn’t be needing that bed for a little while longer.
Can you believe they built a closet this big and put one dinky little wire shelf in it? America’s home builders should all be living in shame.
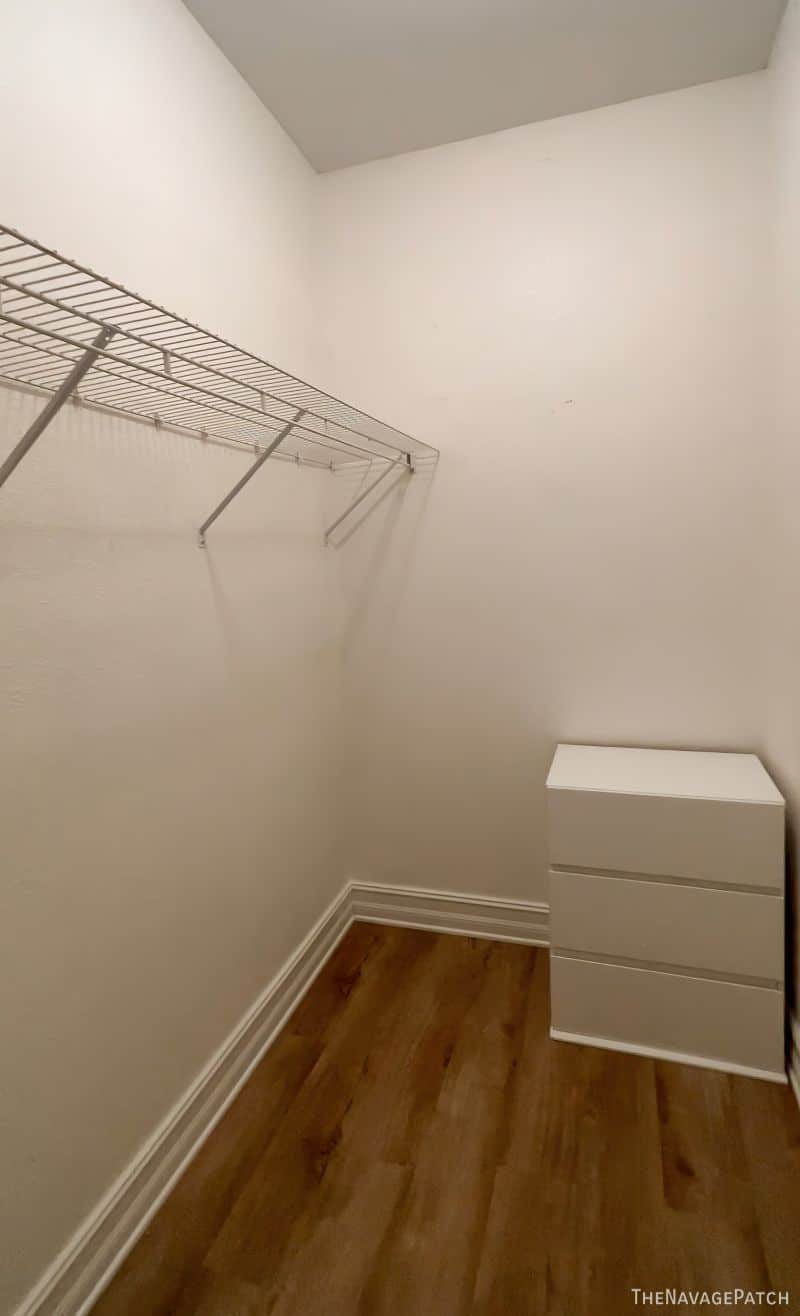
That little chest of drawers was from Target, and it will be part of the new-and-improved closet.
Next, I did the thing that gives me profound joy every time I do it: I removed the wire shelving with extreme prejudice.
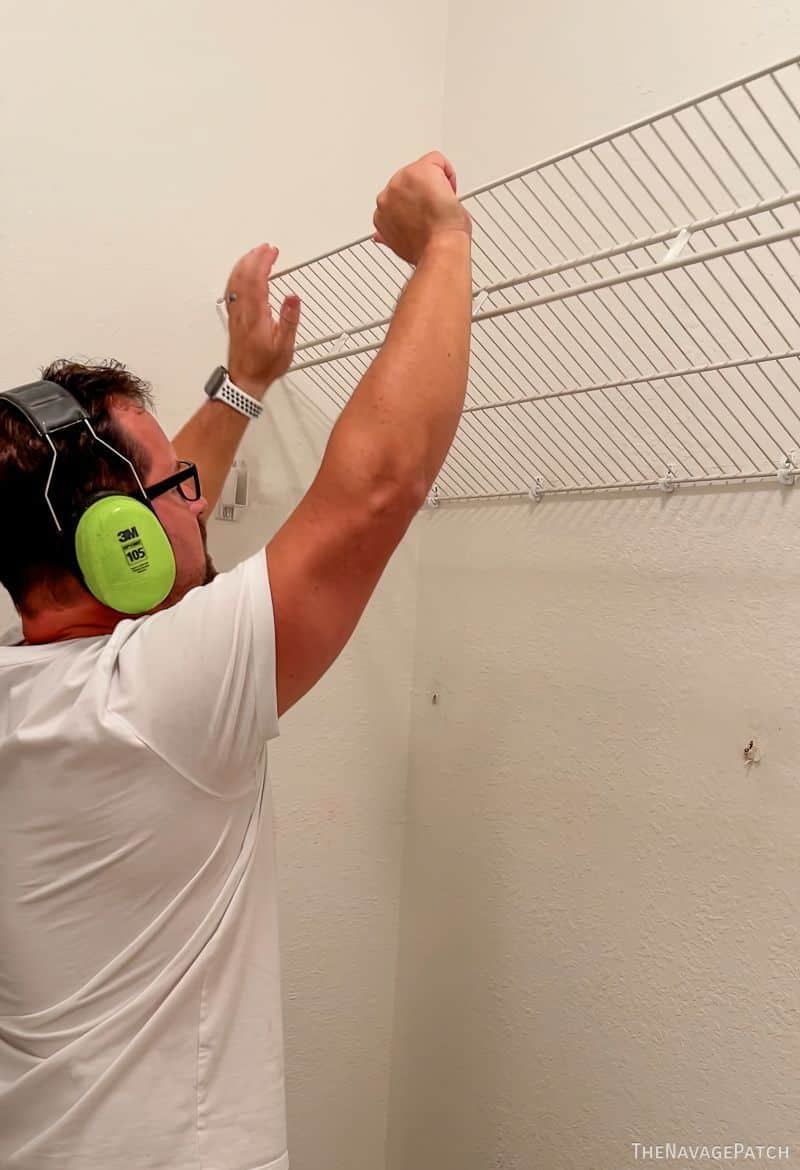
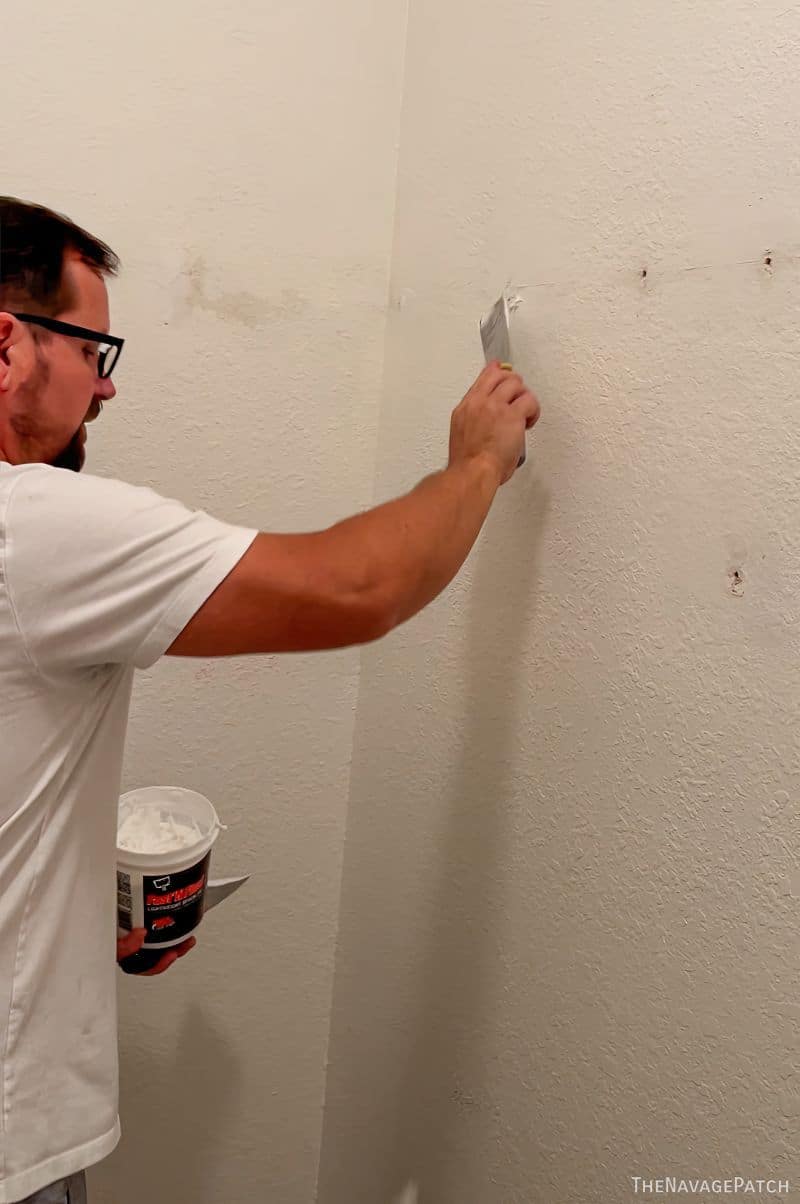
The removal of wire shelving also leaves craters in the drywall, but it’s nothing a little spackle can’t handle!
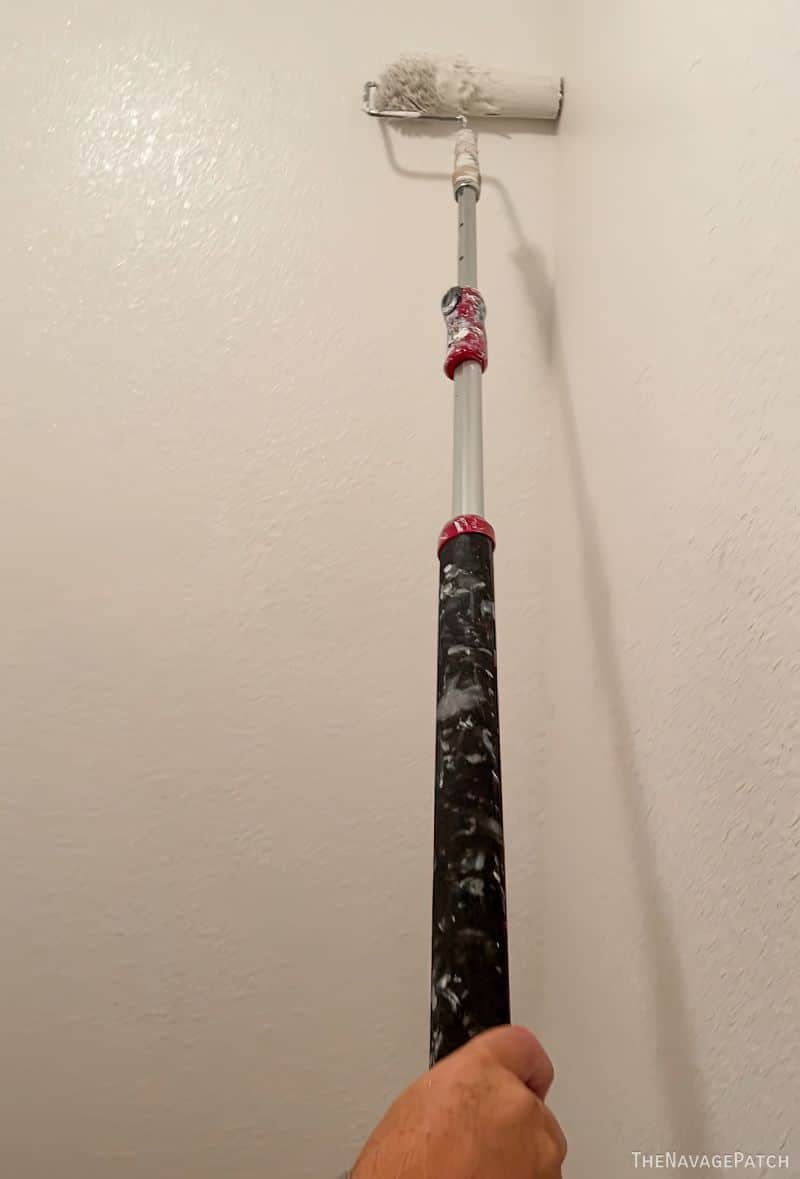
Two coats of paint put me right back to where the builders were in 2006, just before they defiled the space with wire shelving. I hope the rocking chairs in their retirement homes have warped rockers and creak like banshees.
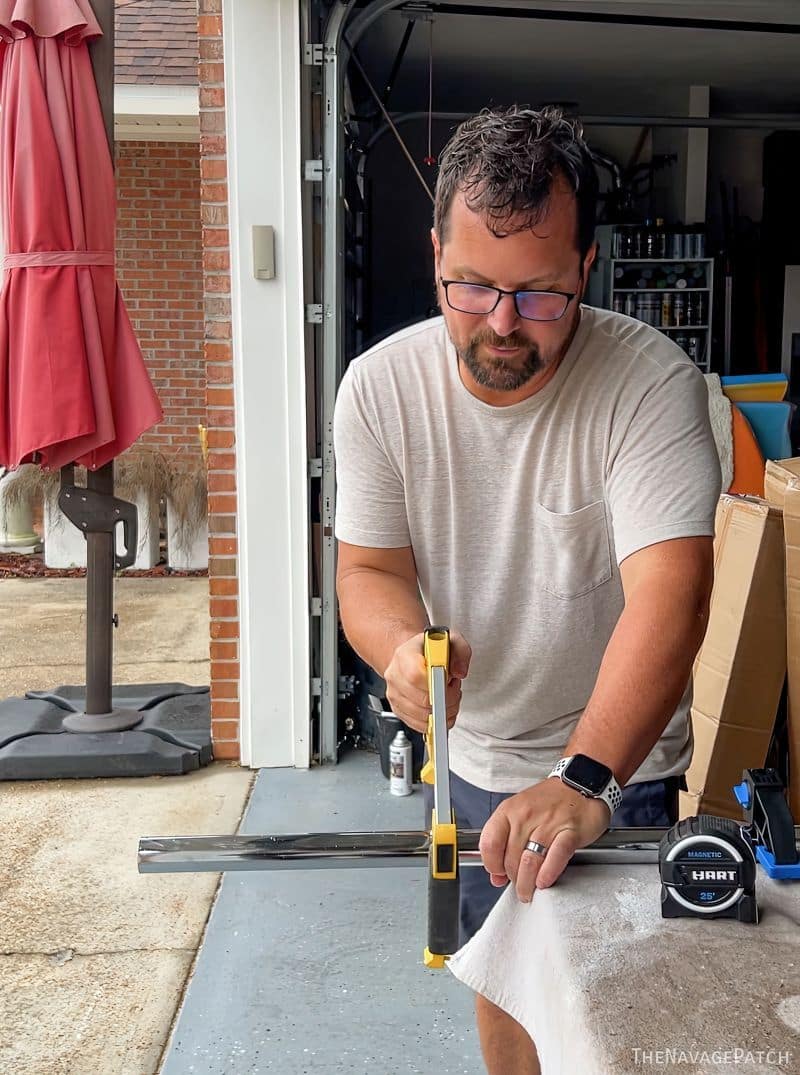
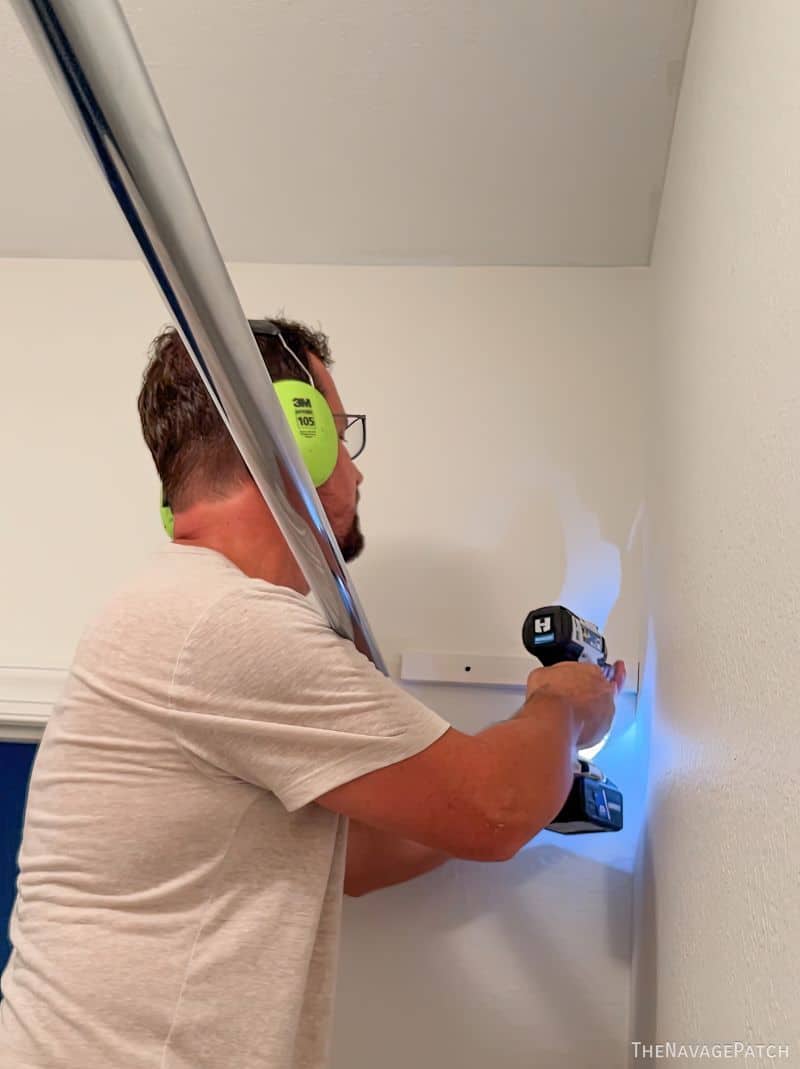
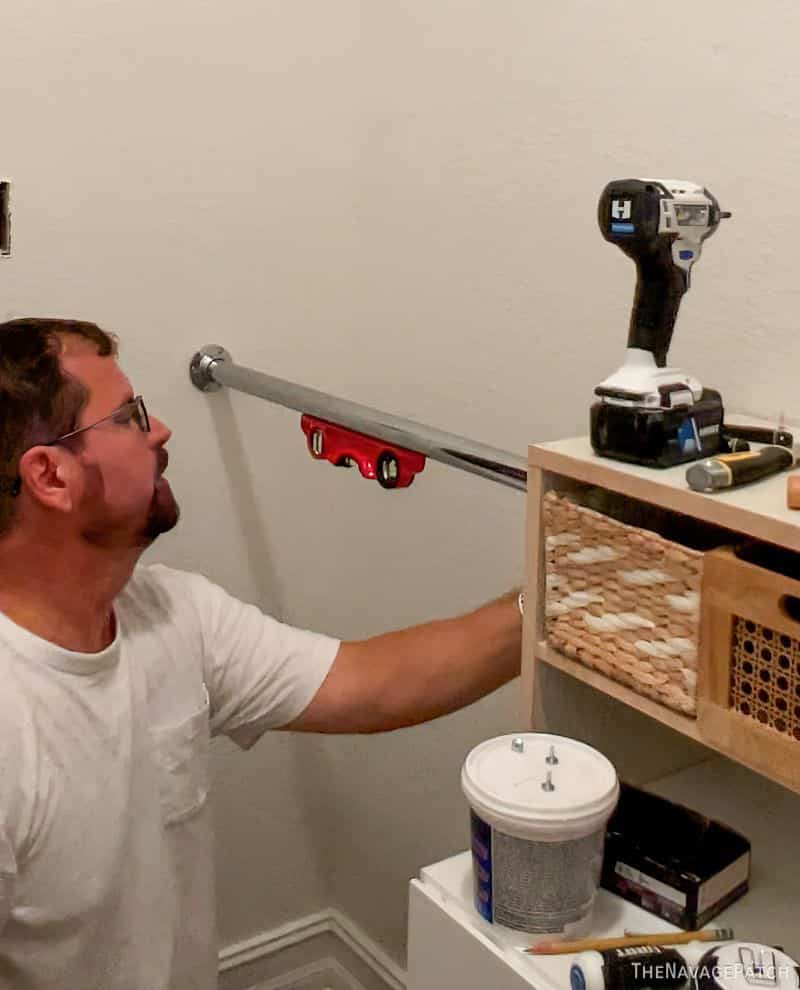
Everyone knows the closet pole is the cornerstone of every closet, but not everyone knows that you don’t have to stop at just one! I started with one 7-footer to cross the length of Baris’s closet. I bought a heavy-duty 8-footer and lopped off a foot with a hacksaw. This heavy-duty pole will span 7 feet without needing a venter support – at least in the way we’re going to fill it.
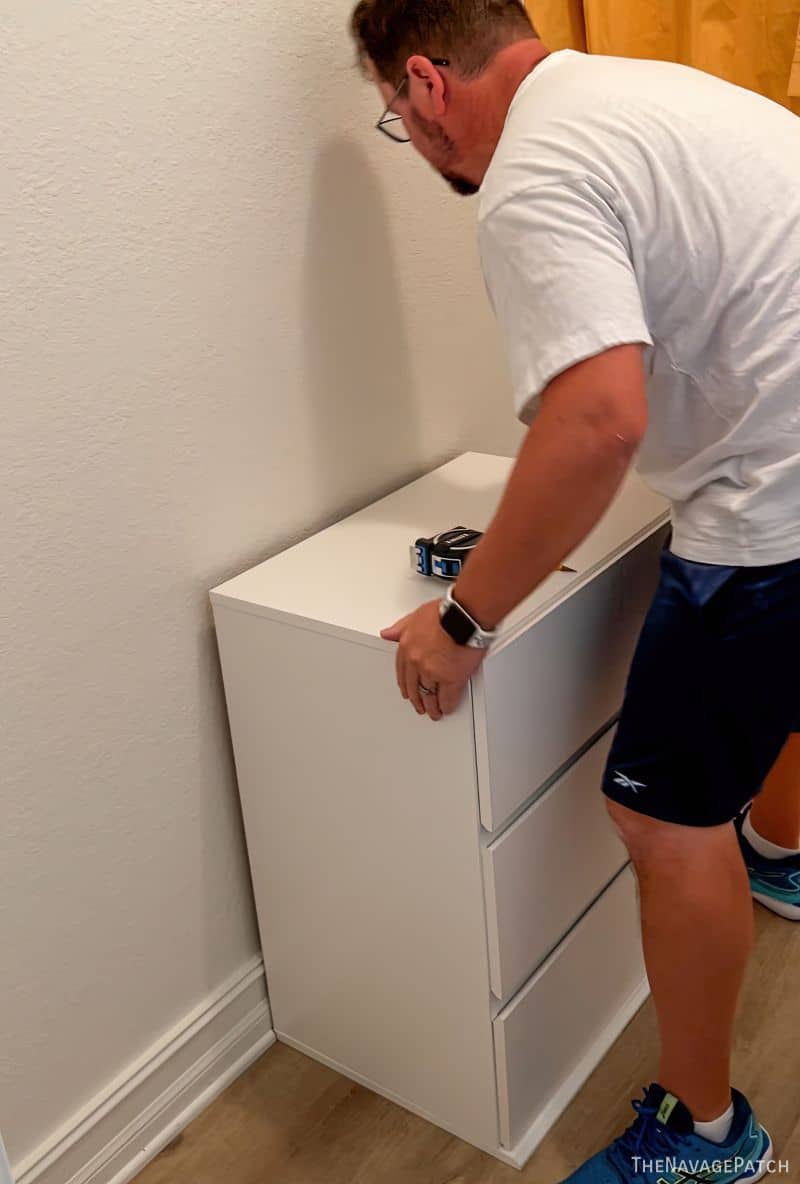
I mounted the pole far enough from the wall so the hangers hung free but close enough to be under the shelf I’d be installing next.
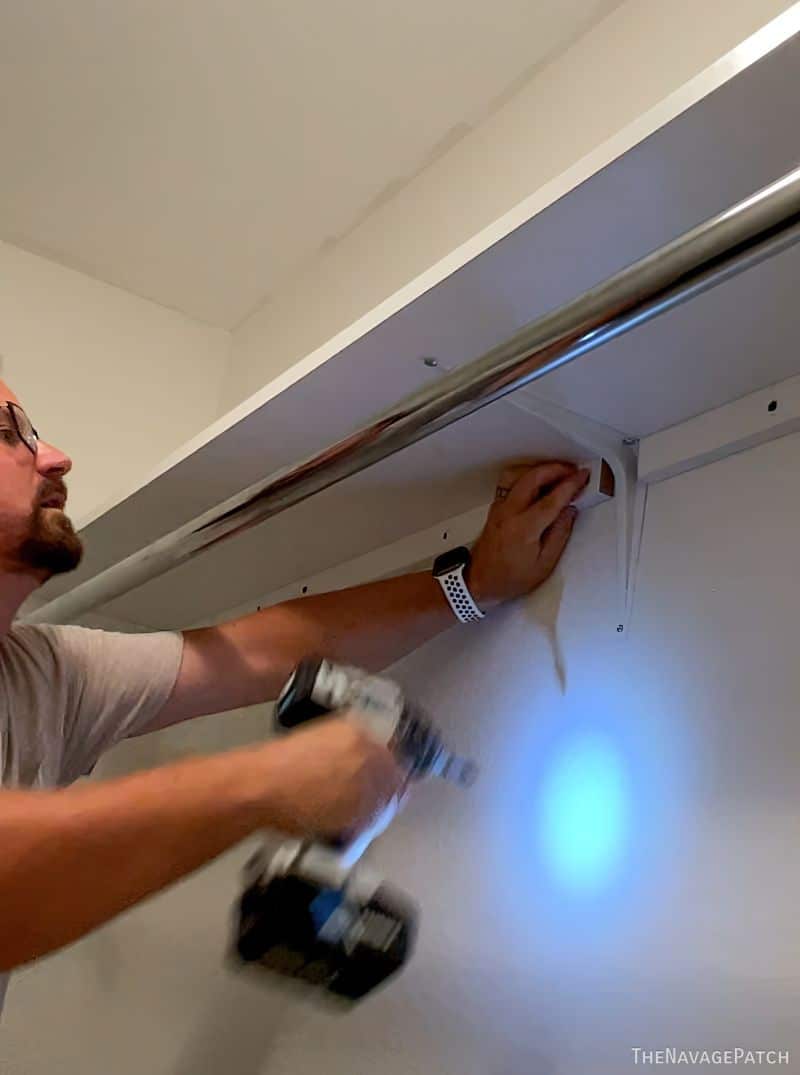
Instead of L-brackets, I made DIY shelf brackets from scrap primed slats I had leftover from the guest bedroom accent wall project.

I screwed them into one stud and one drywall anchor.
I repeated this on the other side, and then when my CameraBabes™️ went to field an engineering-related phone call, I man-handled the shelf into place and then installed two long brackets along the long wall, interrupted by an unavoidable L-bracket to support the middle of the 7-foot shelf.
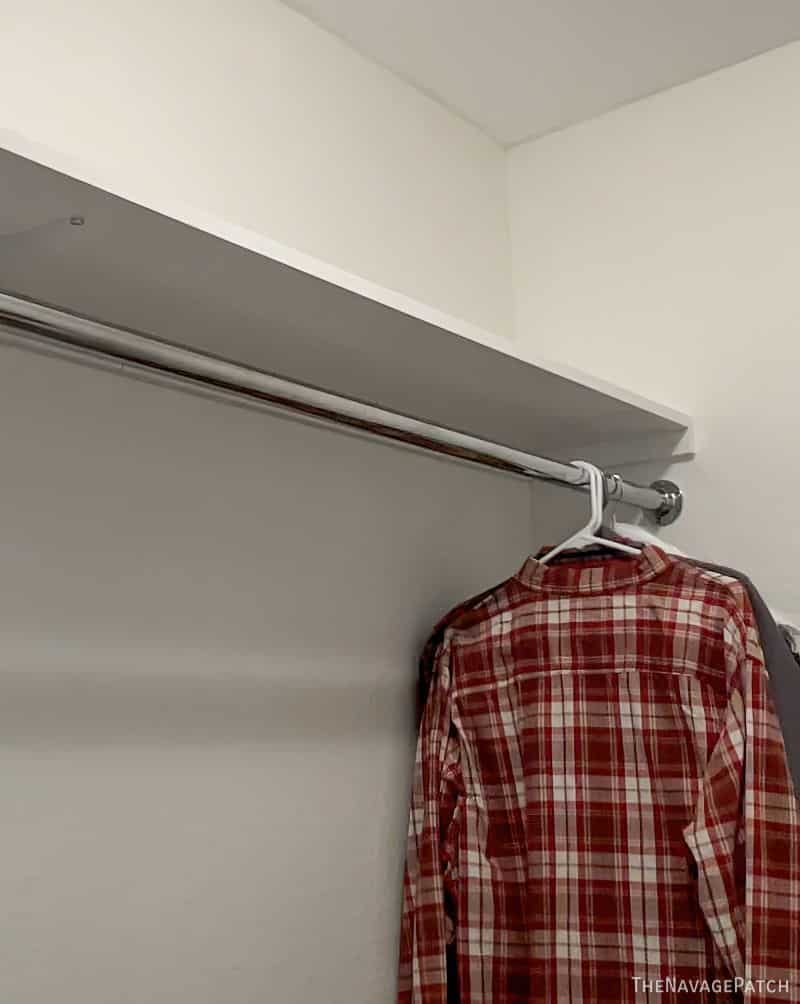
To give a professional look (because, well, when it comes to closets, I pretty much am a professional, I guess!), I filled all the screw holes and caulked all the edges and then painted everything white.
And just like that…clothing started to sprout on the closet pole! It was a Closet Miracle!
(she just can’t wait)
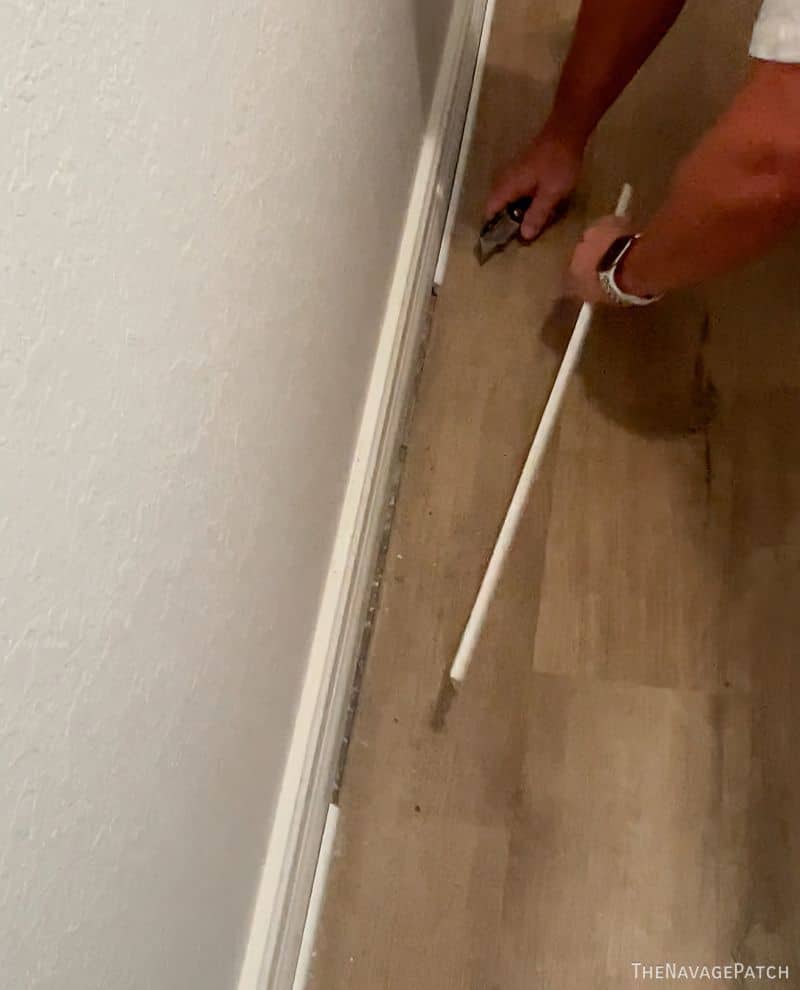
Next, I removed a section of shoe moulding so I could slide the Target chest of drawers closer to the wall. I didn’t want to remove the baseboard, and I’d be building an enclosure around the dresser, so the baseboard wasn’t an issue.
Fits like a glove.
The brainless part was finished, and now I needed a plan. With the help of my babes’ engineering mind, I drew up some highly-detailed plans for the two units I’d be building. Here is the first.
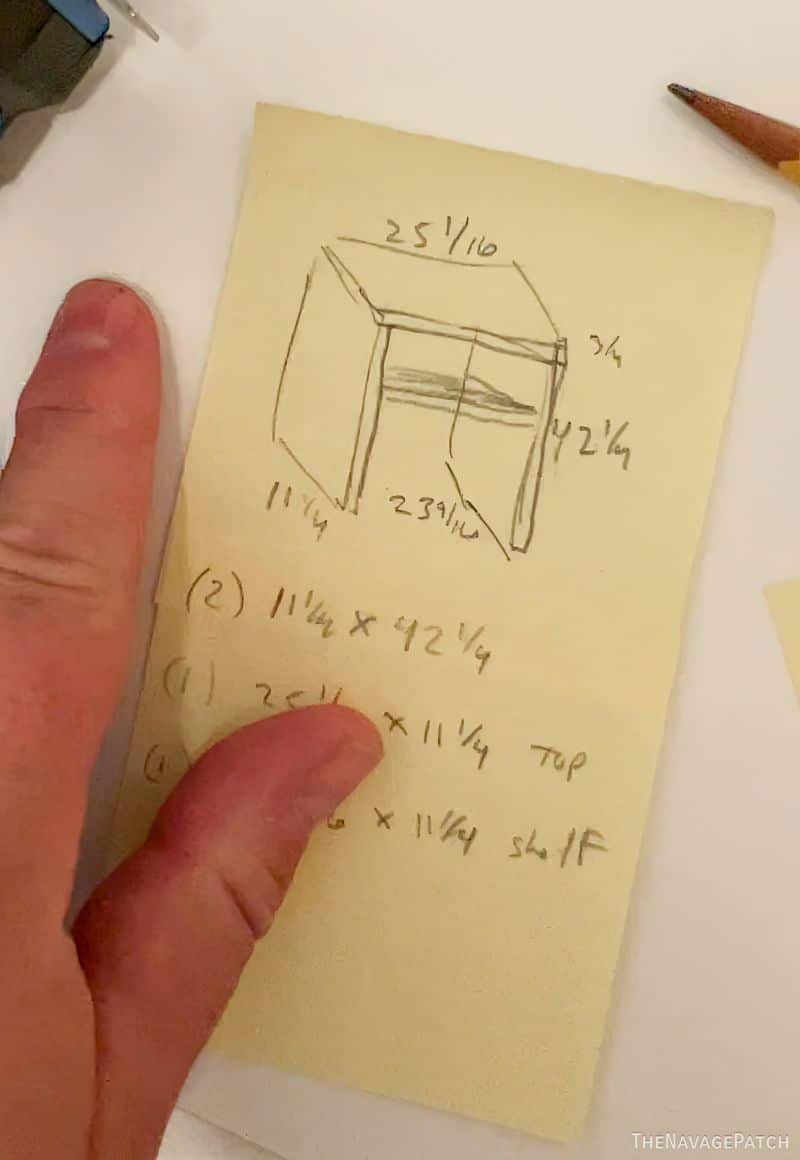
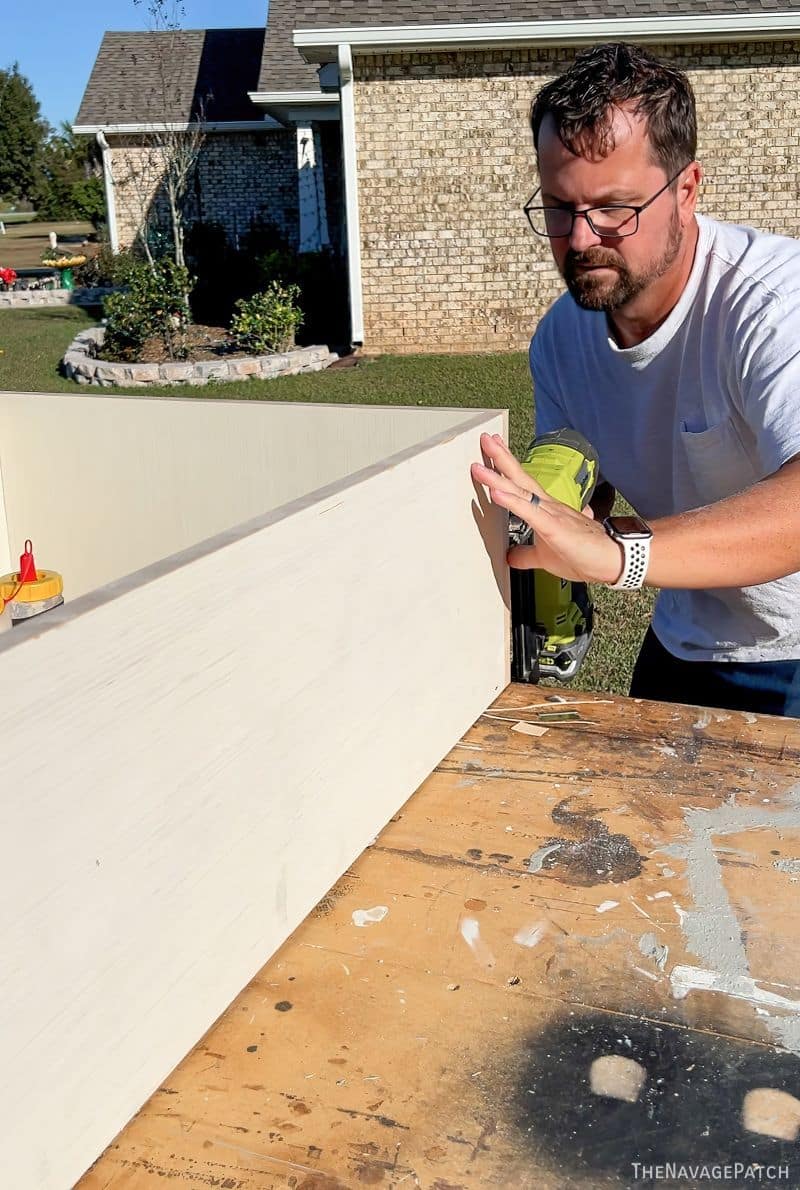
This plan would become the enclosure for the dresser. I dashed outside to start flinging sheets of 3/4 inch plywood around until they loosely resembled the drawing above.
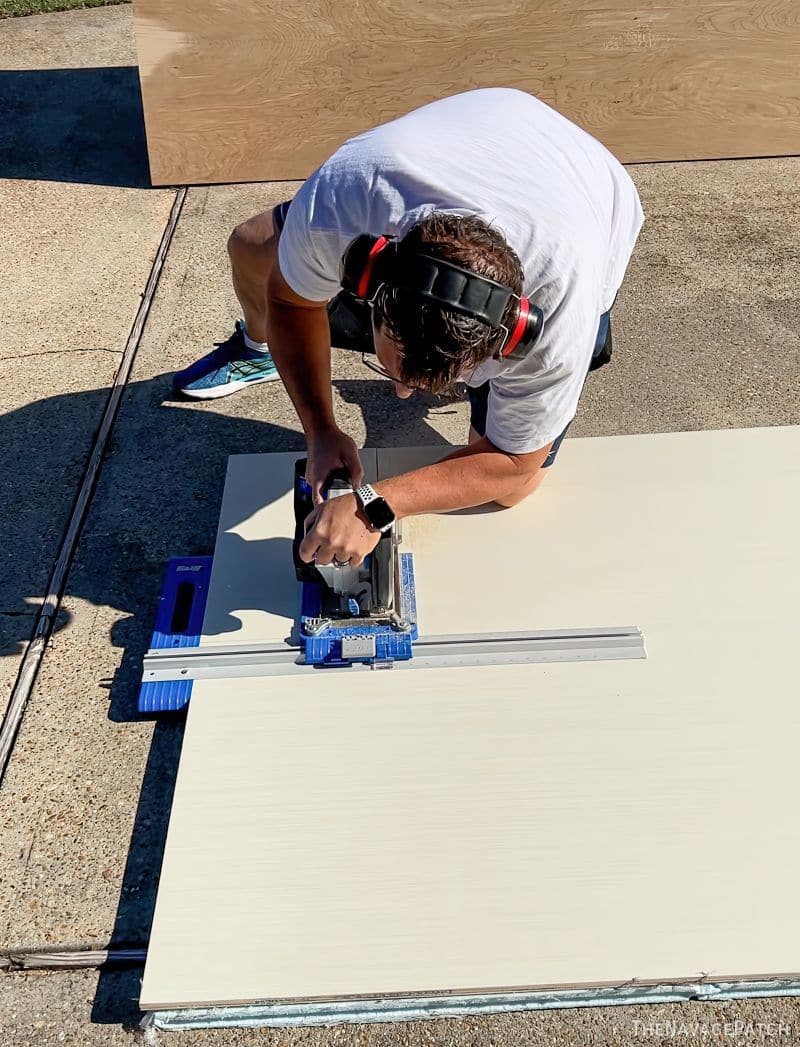
By the way, if you’re not cutting plywood this way, you’re doing it the hard way! The easiest way to chop a big sheet down to size without rupture your internals or splitting your bones is to first lay a 4×8 sheet of 1-inch foam insulation on the ground. Then you lay the plywood on top and cut it with Kreg’s unbelievably handy Rip Cut Circular Saw Guide.
I pair that Kreg guide with my HART cordless circular saw for a match made in carpentry heaven.
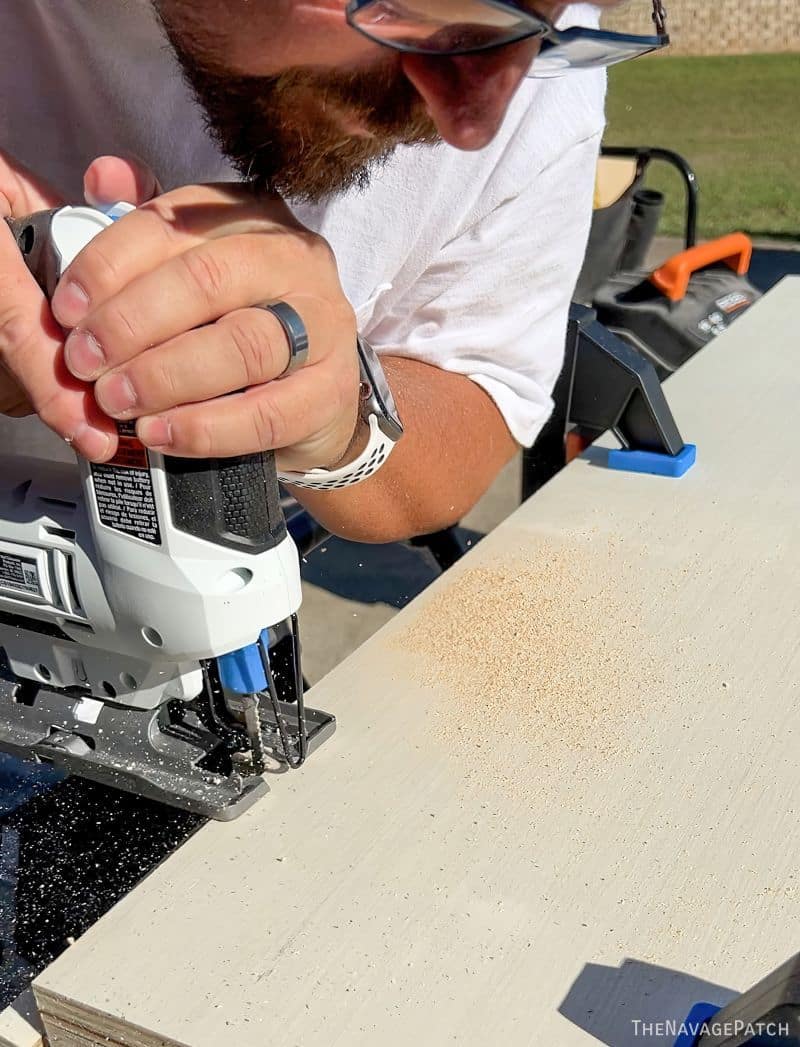
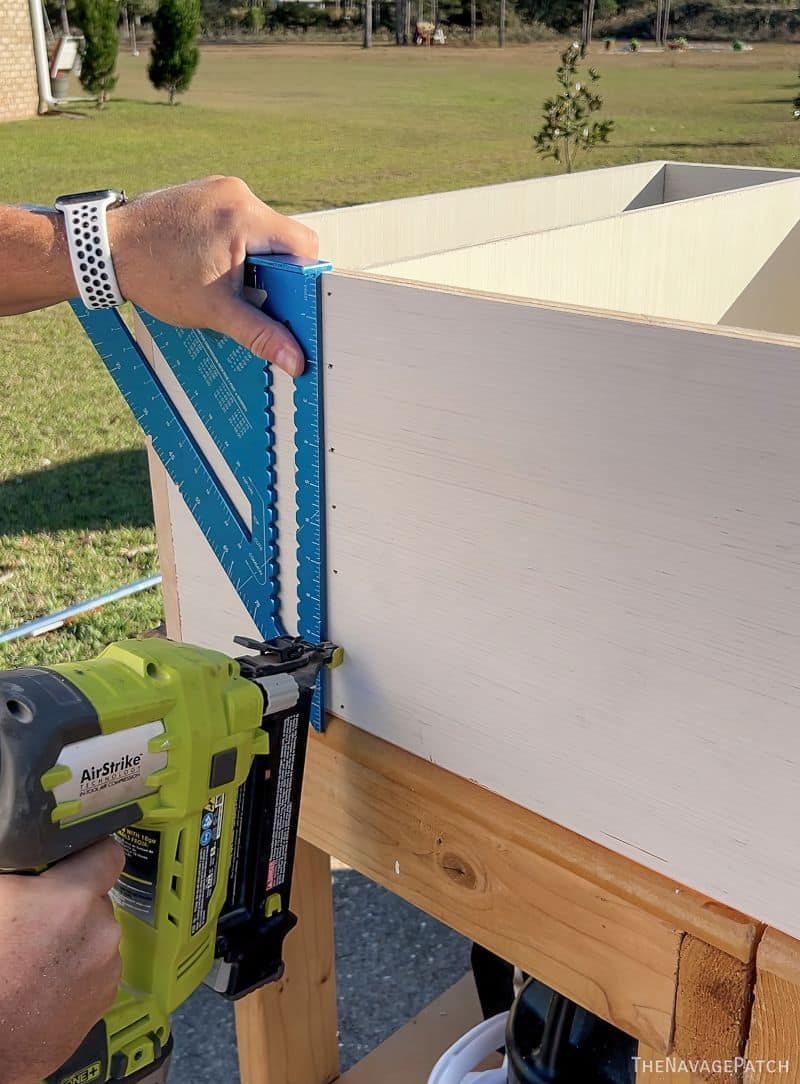
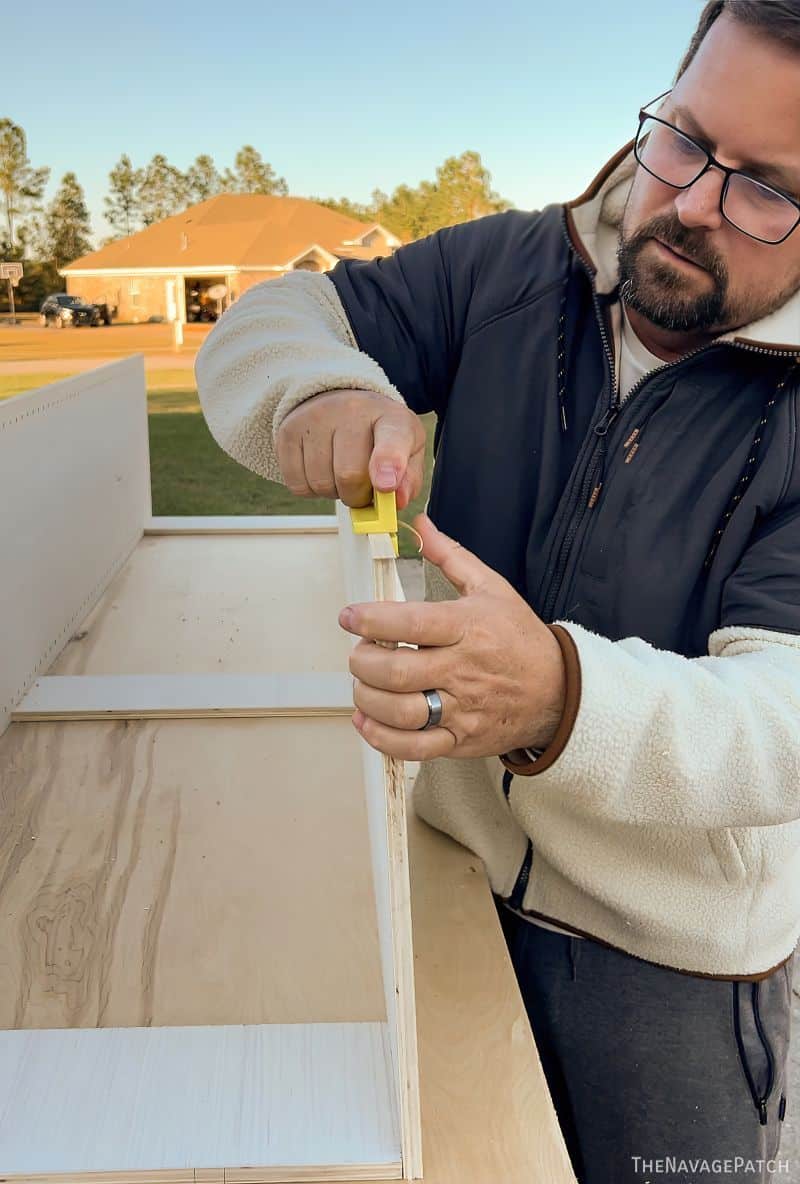
The enclosure for the dresser was pretty straightforward – just some plywood held together by glue and brad nails. Pocket screws would have worked just as well. To get around the baseboard, I used a jigsaw to cut out a 5-inch x 3/4-inch notch from the bottom back of the sides much like IKEA does with their BILLY shelving units.
It started as two sides and a top…
Into which I installed a single shelf.
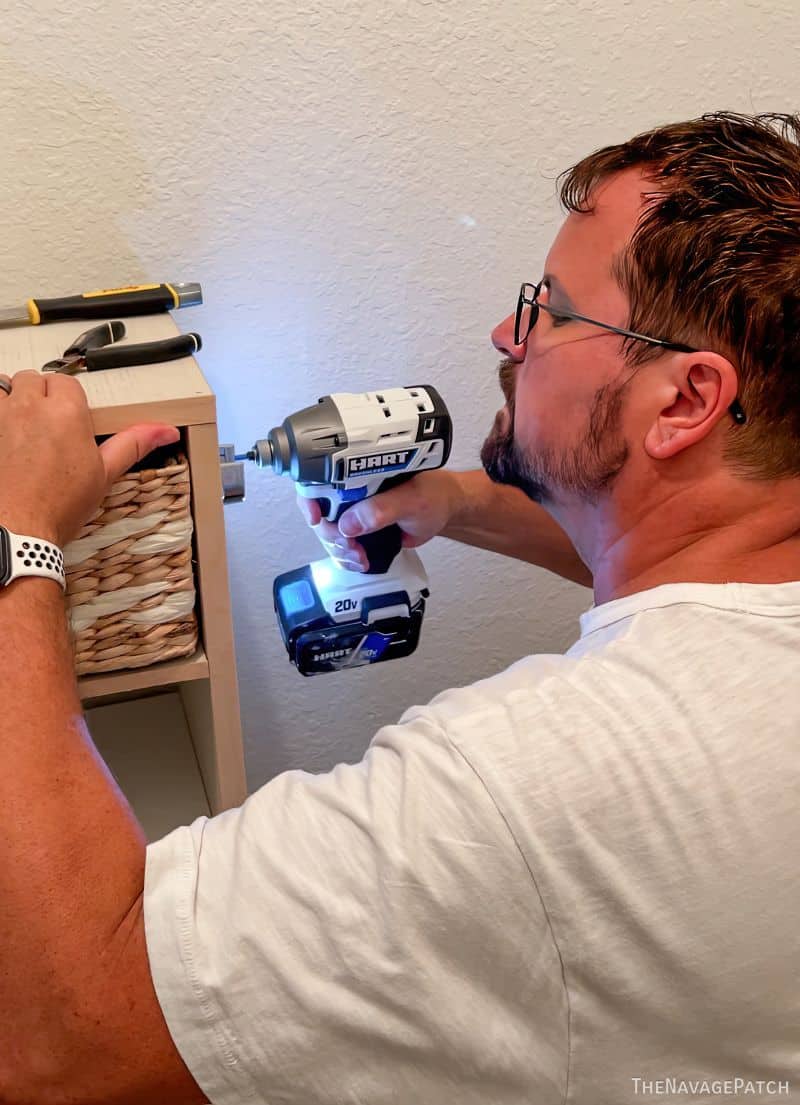
After applying edge-banding to the plywood edges, I brought the enclosure into the closet and placed it over the chest of drawers. Almost immediately, the shelf I had built sprouted 3 woven baskets.
It was another Closet Miracle!
To each side of the enclosure, I installed a closet pole, almost doubling the original amount of hanging space in this closet.
And just like that, more clothing sprouted from the poles! Truly this has been the most miraculous of makeovers! Each time I finish a step, clothing erupts!
With phase 1 complete, I turned my attention the the detailed plans for phase 2. These plans were so grand they require not one but two Post-It notes!
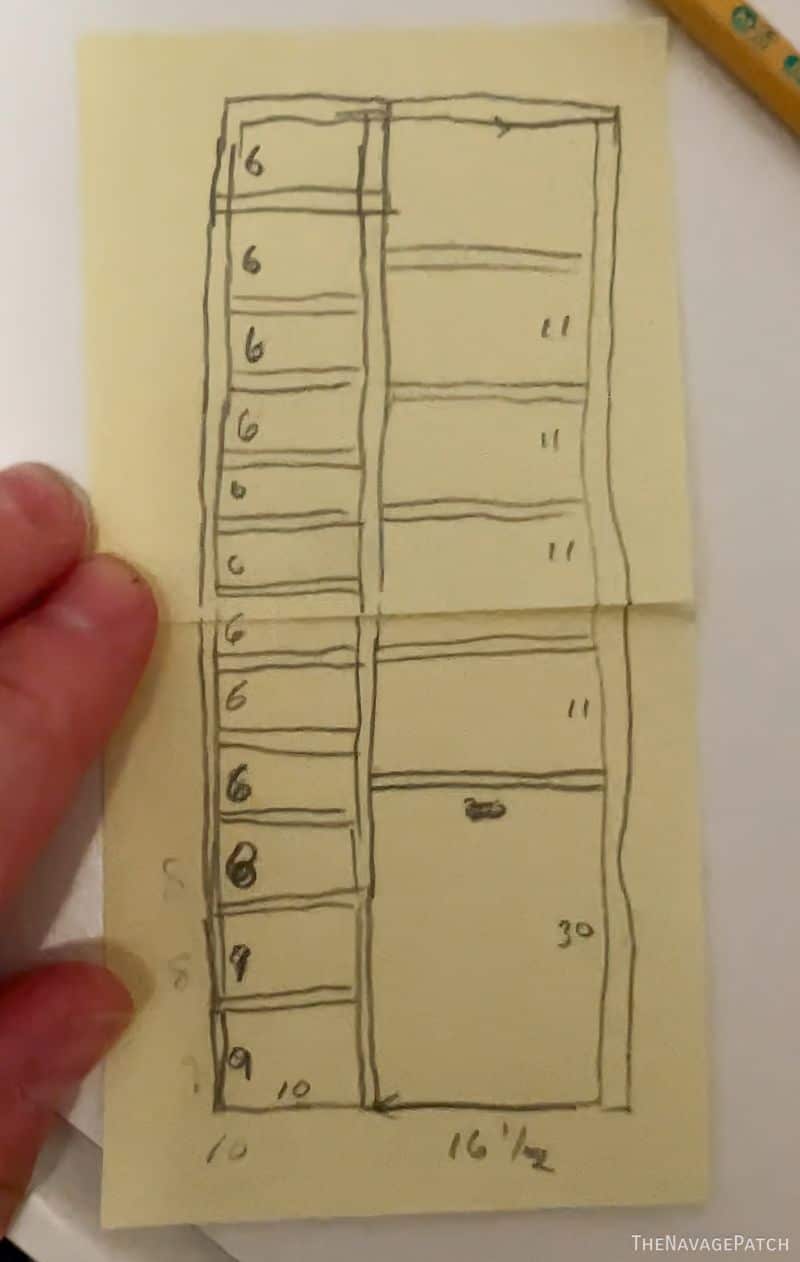
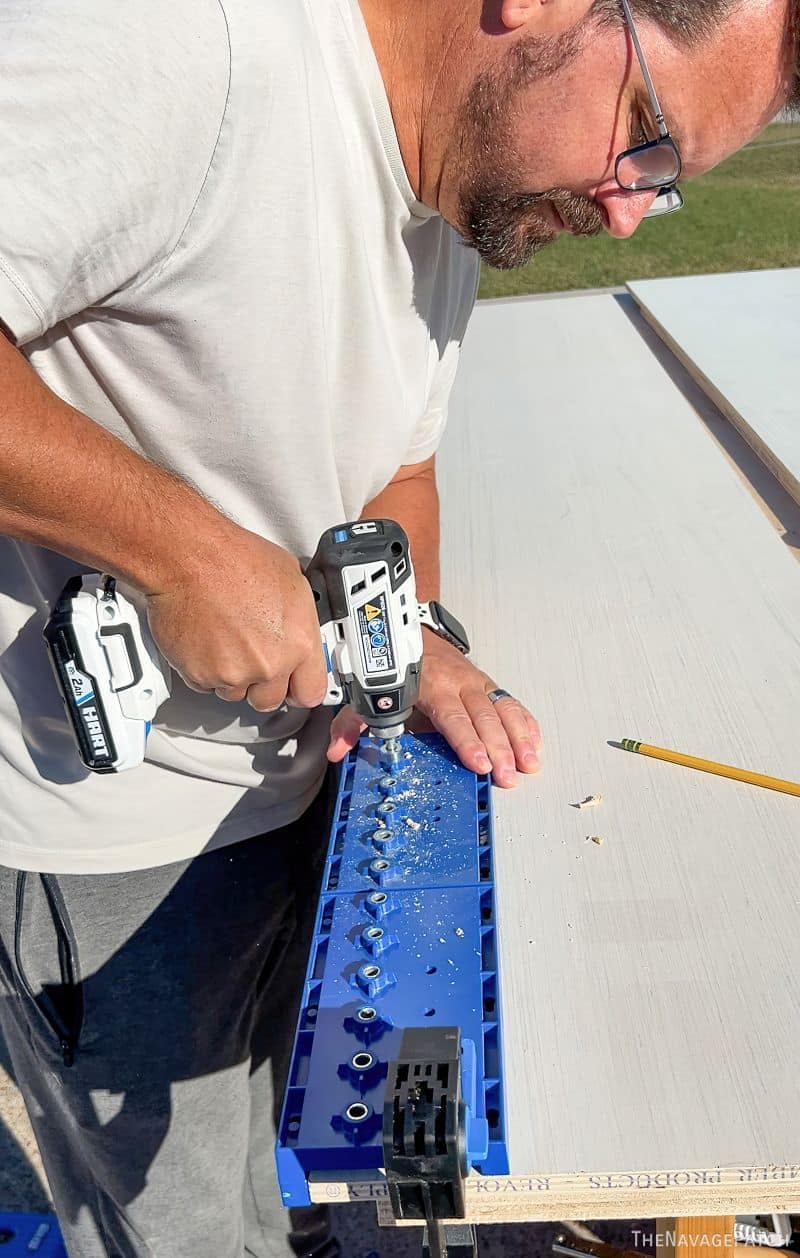
I built this shelfapalooza from 1/2 inch plywood, and the sheer number of shelves requested by She Who Keeps Me Busy necessitated the use of pin-based shelving. Fortunately I still have my Kreg Shelf Pin Jig back from the Connecticut days when I designed and built my very first built-in cabinet (it’s a beauty!)
I used my Cricut EasyPress Mini to apply edge banding to the plywood. This could be the best use for that little machine!

And then I trimmed the excess edge-banding with a handy little gizmo made for just that purpose.
I have since moved to a much better trimmer than the one shown in the picture above.
Back inside, I fit the cabinet carcass in place, screwed it to studs in the back, and before I knew what happened…

Yep, that cabinet sprouted shelves which in turn sprouted clothing and shoes!
As I cut and applied edge-banding to the shelves, a petit shelf elf would appear at my side, grab a few finished shelves and then scurry back to the closet. By the time I finished the last of the edge banding, the closet was pretty much finished!
Belt storage is convenient but out of the way.
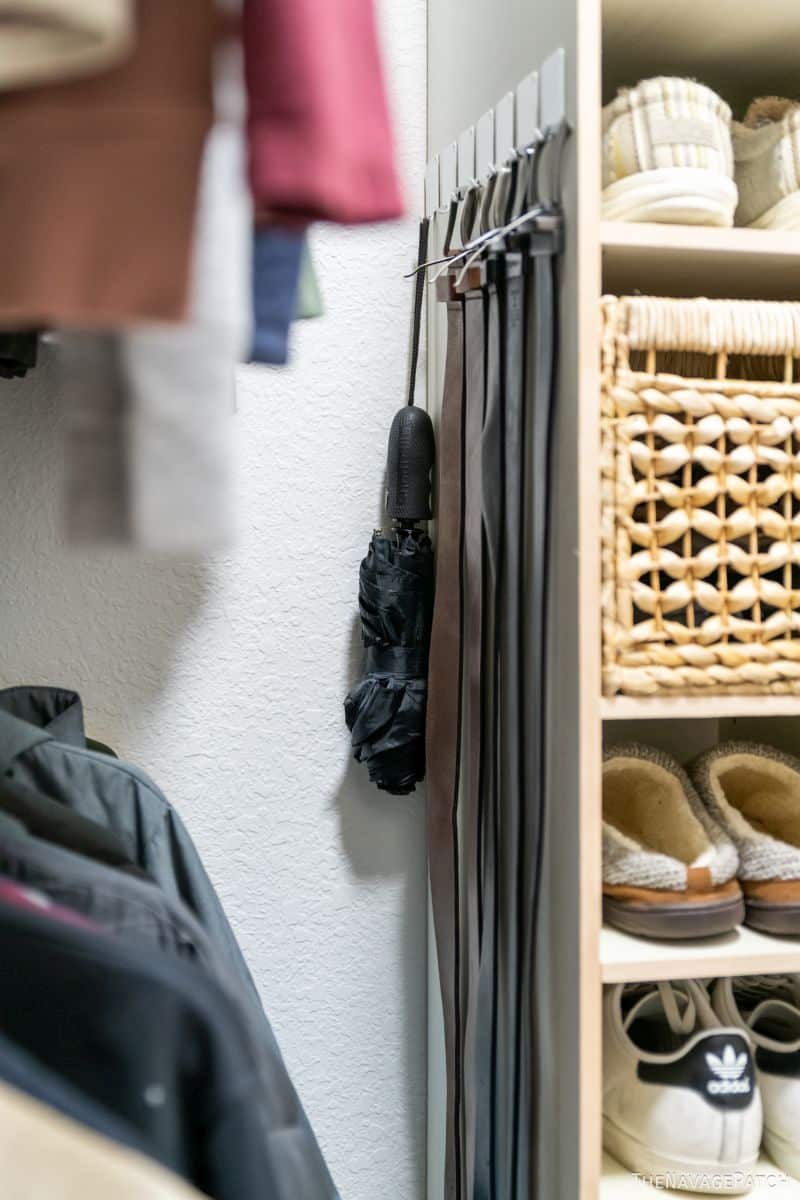
And my babes had a perfect idea for tie storage. This can also be used for belts of scarves. I’ll have a post on it soon!

This makeover provides the much-needed space that Baris’s closet should have had in the first place. Finally, he can fit all of his clothes – comfortably – in his closet.


Very nice! I did a similar project last year for my grandsons bedroom closet. I am no longer able to build which breaks my heart but I bought some nice units and added basket drawer type things to them on each end of the closet. I should have built shelving up the middle but didn’t t think about that. Instead I bought a narrow 6 drawer dresser so that you can maneuver to each side. The door is right in the middle and the closet is very long, approx 10 feet. Narrow at 3 feet or around 40 inches. Over the dresser I added shelves for his collections. Came out real nice. I eventually would like to open up part of the closet to make more space in the room itself. No child needs a space as big as his closet and we are planning to put a built in desk into the open part. The room is not big at 10×14 with 3 doors, the entry, the closet and the bathroom so it’s a little difficult to decorate. We also want to add a pocket door to the bathroom so as not to have to open it but slide it and the closet door the same. The room door will be changed to a barn style type door, therefore giving him much more room. I love your posts! Keep the coming!
Thank you, Shirley, we will keep them coming! That’s a great idea to reclaim part of the closet for the room if the closet space isn’t needed, and yes, pocket doors can be a real space-reclaimer too! Good luck with your renovations!
Wow! This turned out great and soooo organized! Our son is a clothes horse as well and he is only 13. I shudder to think about how much space he will need by the time he is Baris’s age! Luckily, you guys keep providing great ideas.
We’ll see how long that organization lasts once he’s living here over the summer, Mo! 😂
Love it & love you guys! I am surprised to see that you haven’t upgraded your plastic hangers to felt hangers. Just a thought!
Hi Michel, Handan can’t stand felt hangers for anything except silk, and Baris has none of that, lol! Its’ just too sticky for her (and therefore for all of us! 😂😂😂)
Oh you make everything look so easy! Great makeover!
Thank you so much, Susan! 🙂
great makeover. wish you could give me an idea on one of my closets (all?). why does the paint roller look funny?
Wow Greg this turned out amazing like everything else y’all do!!! I’m literally working on my 14.5 (God forbid we leave the HALF off) year old Daughter’s closet. Was looking for inspiration then I happened to check my email!! Just what I needed!! Lol but shoot don’t let this stop y’all from coming on to do my stupid, old, desperately needing help mobile home. Bwahahaha
Hey Erica! So happy we showed up in your inbox just in time for your daughter’s closet makeover! Good luck with it, and don’t hesitate to ask if you have any questions! 👊
Thank you, Susan! The paint roller looks funny because I use a 3/4-inch nap wool roller cover when I paint – I swear by it! I’ve been using the same roller cover since we moved to Georgia – that’s how long they last and how easy they are to clean! It looks funny in the photo because the left side has little paint left on it, while the right side is still matted down with paint. 🙂
Turned out really nice efficient use of space. What is edge banding?
Hey Regina, the edge banding is like a small strip of laminate or faux wood that you can attach to bare edges to seal the wood & make it look finished. Laminate counters use this one the edges that is not against a wall or cabinet edge. Normally you can use an iron or a heat gun to attach it to the wood. If this is something different than that, Greg will have to explain it to you & Me!! 🤣 hope this helps!!!
Erica nailed it! Thanks, Erica! 🙂