DIY Air Plant Holder
Our simple DIY air plant holder is made from old napkin rings and scrap wood. This quick and easy project is a great way to display your air plants!
Teenage boys aren’t generally known for their appreciation of decorative plants in the home. Plants lack some key features that most teen boys are looking for, namely:
- A video screen
- A joystick
- A headphone jack
- Boobs
So you can imagine my shock and joy when Barish told me how much he liked the faux greenery I’d been sneaking into his room to liven up the beauty shots for the various parts of his teen bedroom makeover.
It was a revelation!
If The Boy liked faux plants in his room, The Boy would have faux plants in his room! I told him he could keep the two plants I’d been staging around his room, and we also ordered him a faux Fiddle-Leaf Fig Tree from Hobby Lobby.
But it wasn’t enough. The Boy craved more greenery! He became aware of the existence of air plants, and he wanted them!
Handan and I asked if he wanted faux air plants – they look pretty good.
Nope. He wanted the real deal.
We cautioned him that they were living things. They’d need to be cared for (admittedly, they are pretty easy to look after).
The Boy understood. The Boy was ready and willing to care for the plants.
So off to The Internet Handan went in search of air plants.
Our happy little plants arrived over the weekend, and we gave them the recommended soaking. Handan also ordered a bunch of reindeer moss. We’d be using that for the extra air plants we ordered, but we wouldn’t need it for Barish’s.


Once our air plants had a nice drink, our next task was to figure out how to display them in Barish’s room.
Air plants are simple things, and you can put them practically anywhere. But we wanted to make something cool that would look good in his room and that he’d enjoy looking at.
The answer came, like so many good ideas, quite by accident.
I had been looking for a little doodad I had bought on Cape Cod back in 2010, a week after Handan and I were married. We were strolling around some pier in Provincetown, and we stumbled upon a little shack that sold driftwood art. I spied a small piece of wood with a simple sailboat drawing on it. The piece was probably 5 inches tall and an inch wide. It weighed next to nothing. I loved the rustic coastal look of it.
It was marked for sale at $10.
The Me of Now would laugh at that, and I’d come home and DIY it for free.
But the Me of Then knew nothing of DIY or woodwork. The Me of Then saw a pretty thing and decided he must have it.
So I shelled out 10 clams and took my prize home.
And it has been kicking around in storage ever since. It never made it up on a wall.
I know it is still around, because I have memories of seeing it – only I can never remember where.
This weekend, I was photographing a little vignette, and I decided that the driftwood sailboat would be the perfect accompaniment.
I searched everywhere.
Nada.
So then I got Handan involved. I hotly debated this decision with myself. Handan’s not the kind of person who will casually look for something and then easily let it go if the thing can’t be found.
And all I wanted was a quick search.
It wasn’t that important.
Handan got involved, and it was as I feared.
She wouldn’t let it go.
I begged for her to stop looking. She had started to search obscure places, and I kept telling her that there’s no way I’d have ever put the damn driftwood in such a place!
Kitchen cabinets. Really?
And then she started rooting through our dining room buffet.
“Jeezum crow, woman! Give it up!” I said. “It’s not important!”
Of course she ignored each and every one of my words and continued doing exactly as she pleased.
She’d reached the napkin drawer.
Nada.
Next was the drawer with table-y stuff like small candle holders and napkin rings.
NAPKIN RINGS!
“My Babes!” She said, and held up her hands.
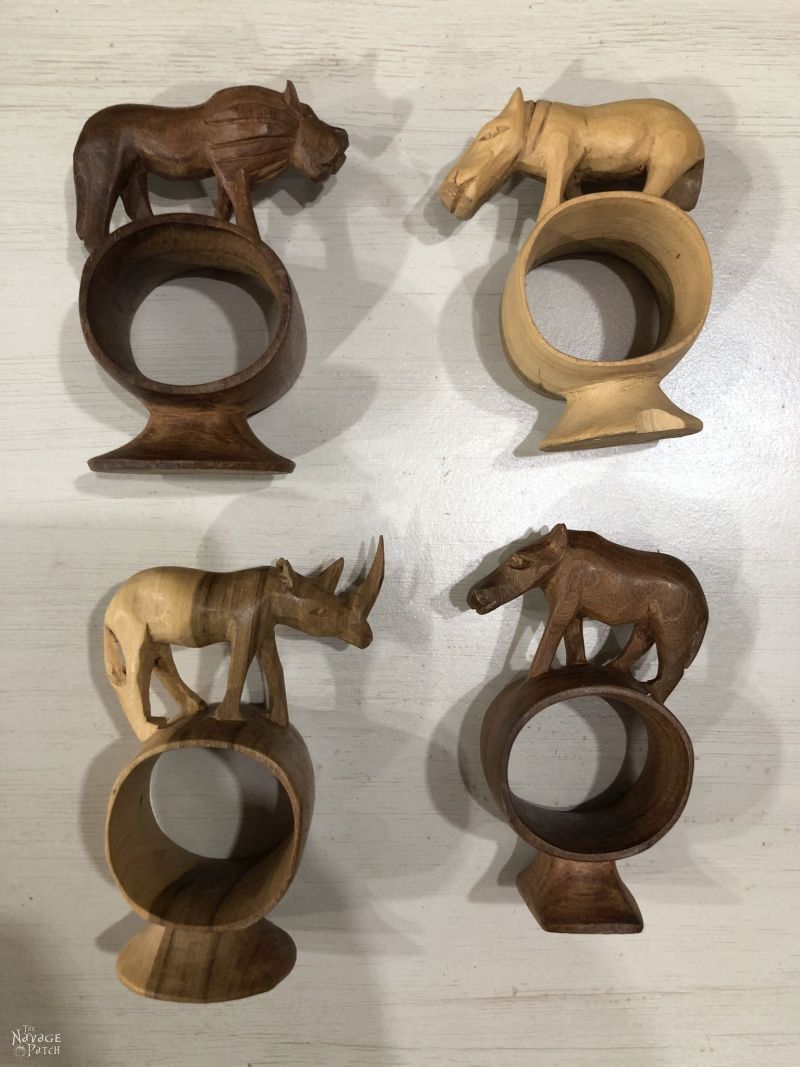
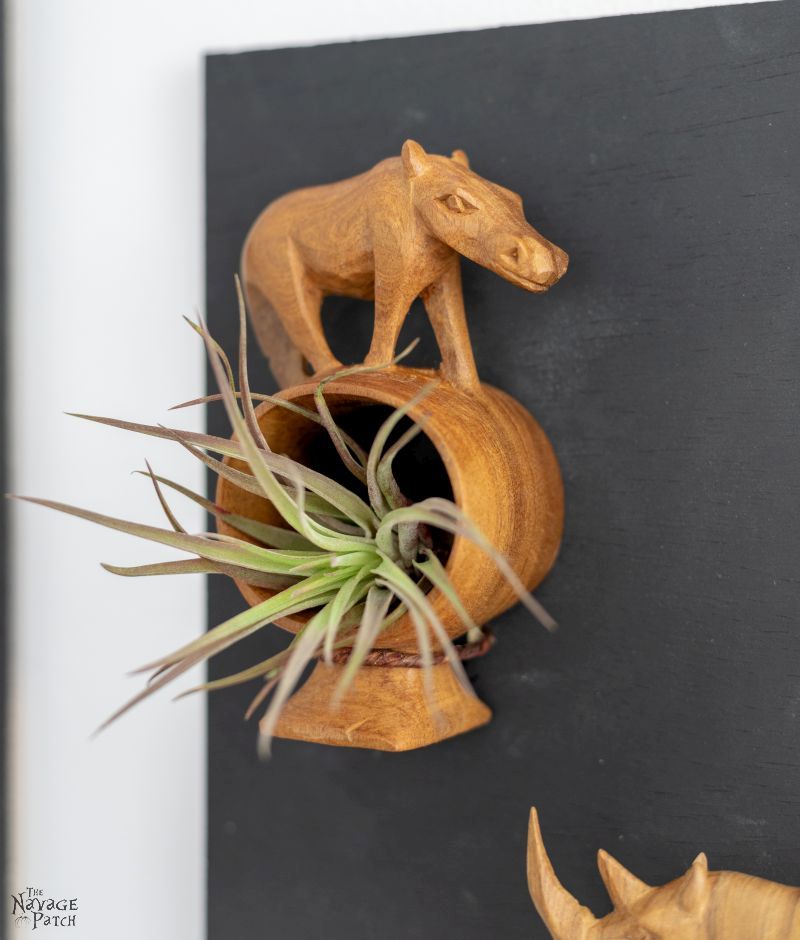
She held four napkin rings – wooden jobs with African animals on top. We’d gotten a set of six at a tag sale for $2 several years ago, but they’d been sitting unused in that drawer ever since.
The woman was a loon! I was looking for my driftwood, and she’s showing me napkin rings!
She sensed my confusion and ran to the other room.
She returned with an air plant, placed it in the napkin ring and smiled.
“My Babes, you’re a genius!” I said. “That looks awesome!”
“We’ll mount these to a piece of wood, and that’s that!” She said.
The driftwood faded from memory, and we dove into our new DIY air plant holder project.
DIY Air Plant Holder
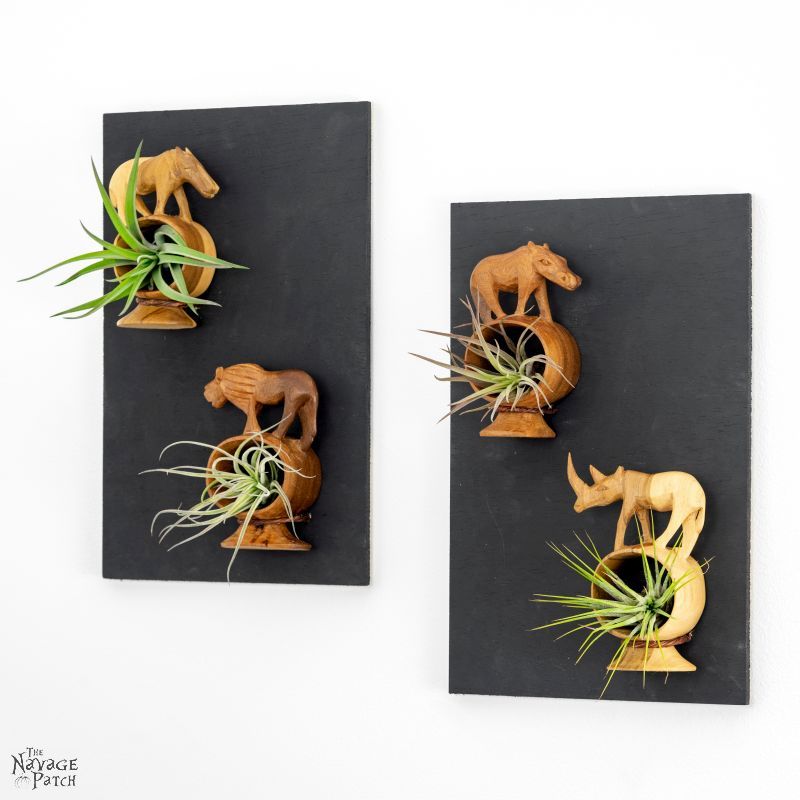
Though we had six rings, we only needed four for the project we had in mind.
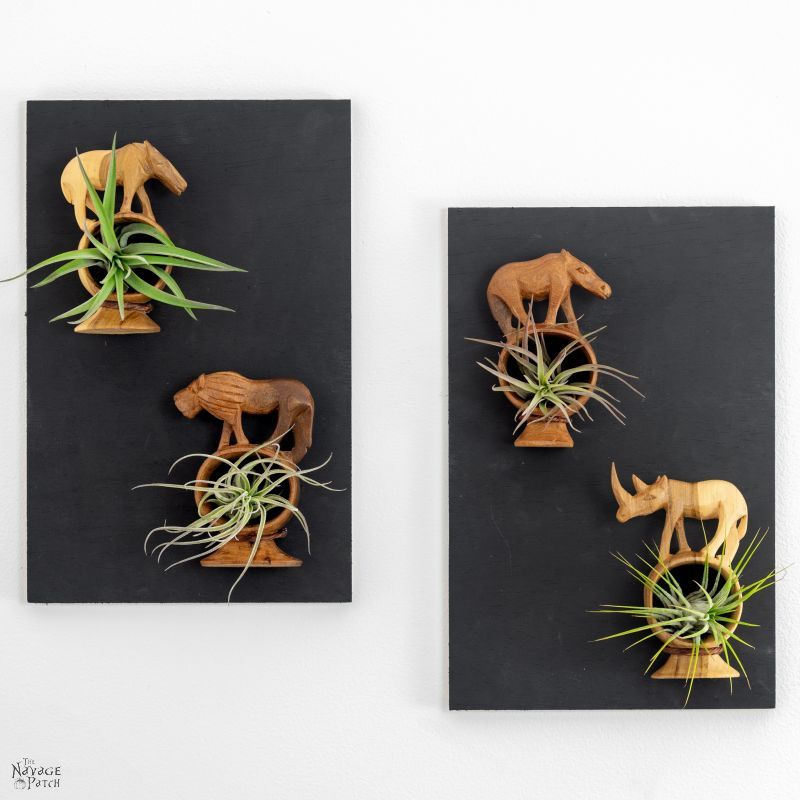
We decided that these napkin rings would look best against a black background. I had some scrap 1/4 inch plywood, so I cut two pieces to a size that looked good to our eyes (7 x 11 inches), and then I sprayed them black.
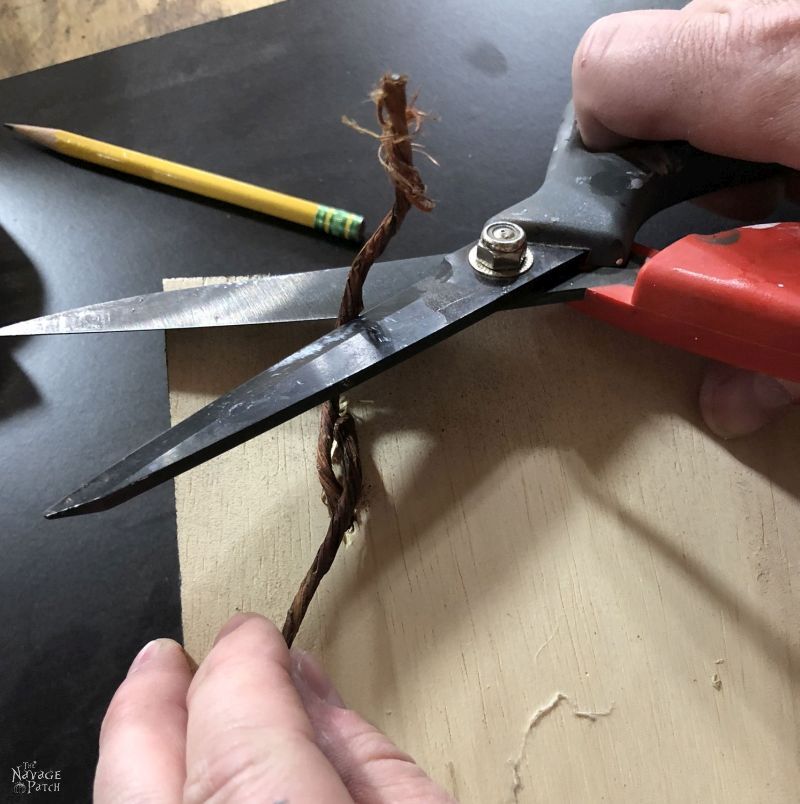
Handan came up with idea to secure the napkin rings to the plywood with craft wire. This eliminated the need for glue or any type of shelf for the rings to sit on.
We positioned the rings on the plywood, and I marked where I would drill the holes for the wire.
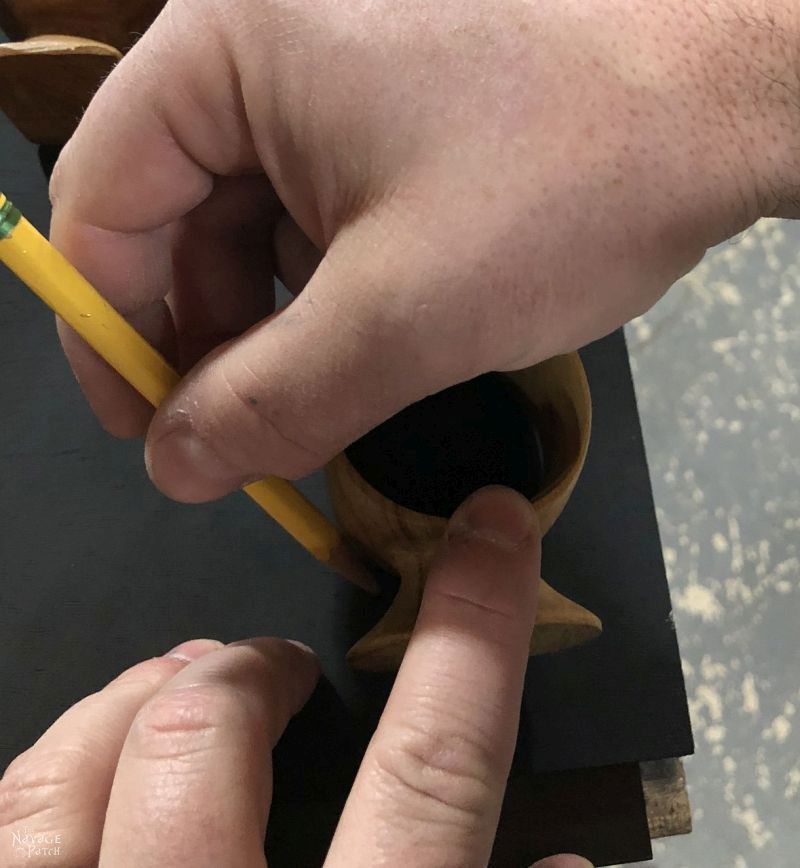
Next, I drilled the holes – two for each napkin ring.

I cut a length of craft wire and inserted the ends into the holes.


Then I inserted the napkin ring until the craft wire was circling the base.
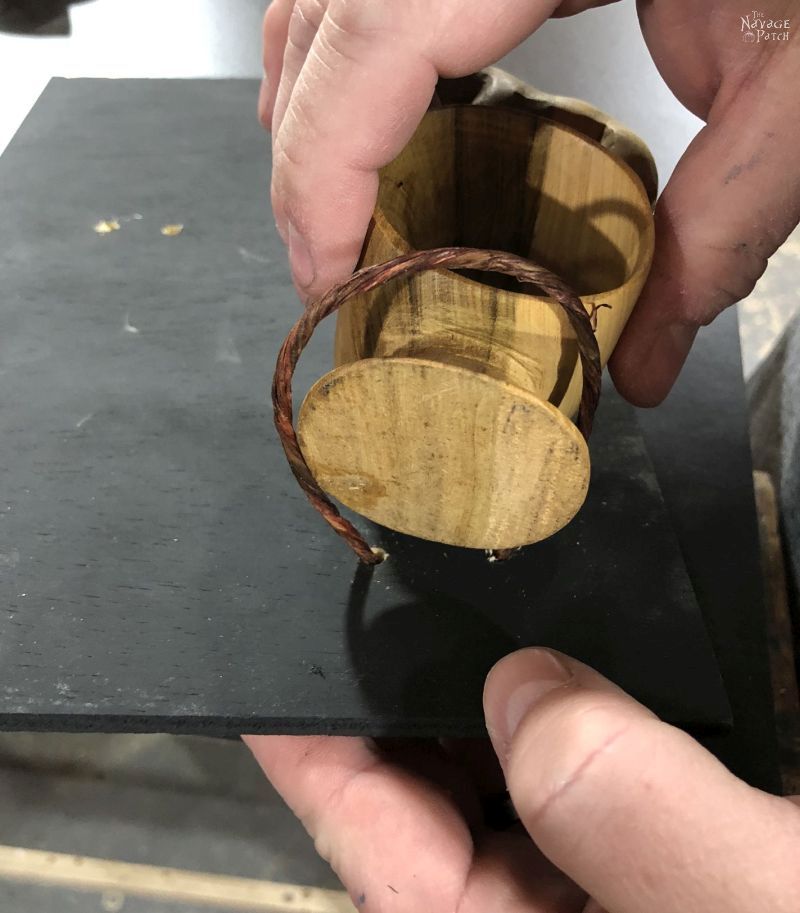
By pulling on the two ends at the back of the plywood, I secured the napkin ring in place.

I trimmed the excess craft wire and flattened the wire against the plywood. I repeated this with the other three napkin rings.
To keep the craft wire from loosening, I covered all the ends with duct tape. Handan then applied two Command Strips to each board, and they were ready to hang on Barish’s wall.

This was such a simple project, but the two DIY air plant holders look awesome in his room!
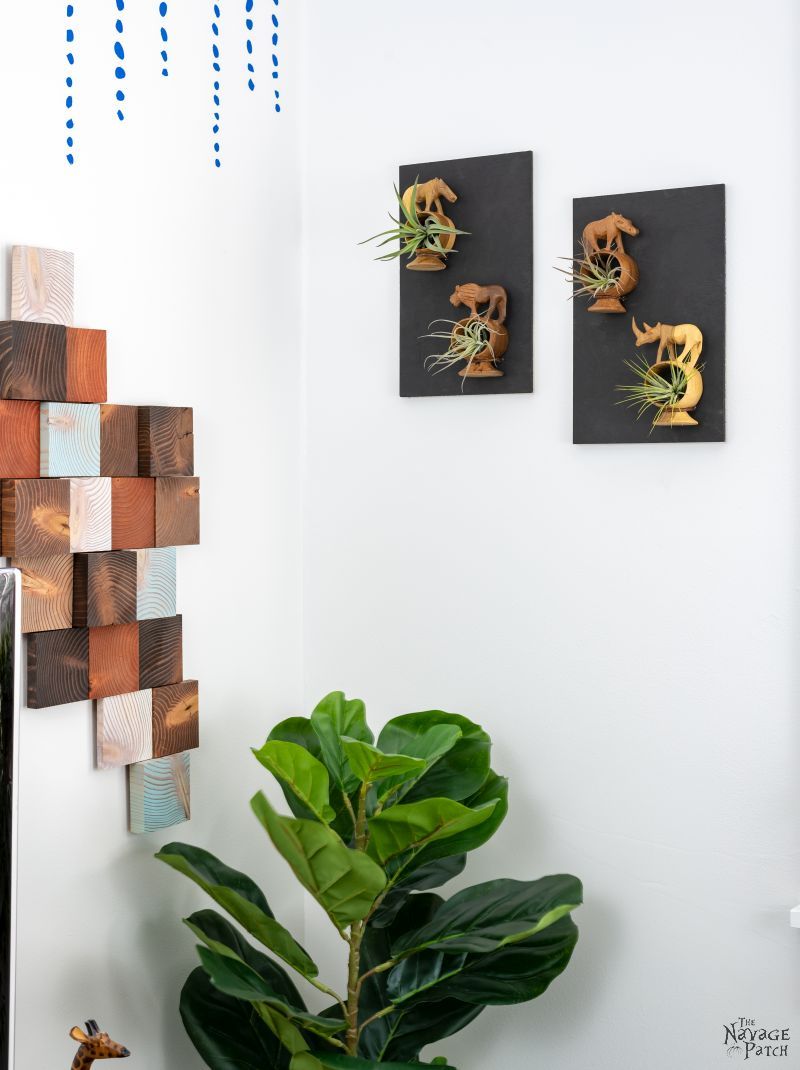
Barish is thrilled with his new air plant holders, and he’s actually looking forward to caring for the air plants!


If you’re following along with the teen bedroom makeover, here’s how we stand:
Teen Bedroom Makeover Checklist (for The First Room)
Teen bedroom ideas and laying out the game planDIY alcohol ink switch plates- Paint the walls
Build 2 IKEA Billy bookcasesBuild a daybedHack IKEA Kallax into a TV standCreate an accent wallBuy or DIY plugin sconcesMake wooden wall artBuild a vertical chess boardBuild 2 guitar display framesBuy a new deskChange the fanBuy or DIY colorful artHack IKEA Laptop StandBuy throw pillowsAdd greenery: faux plants, air plants, DIY air plant holders- Metal filing cabinet makeover
- DIY Craftsman style trim
- World map wall art
- Small closet makeover
- Barish’s first room reveal
Click here to see more teen bedroom makeover posts as we continue to cross items off our checklist!
We love it when you share our posts on Facebook and Pinterest!


There are two blogs I never miss and your family is one. I am just sending this in case the supplier forgot to tell you. Please turn them up side down to dry out after your weekly or so soaking. They can rot from way down down deep in the middle if water is left there. Chlorine and fluoride are often an issue too but, it is easily beat by setting the required water out for the a night.
Welcome to the life of plants Barish! Once they get ahold of you everywhere you look will be another interesting one.
Ooh, that is good advice, Lindy, thank you! I don’t remember reading that in the directions that came with ours. Duly noted! We have well water, so chlorine and fluoride are not an issue. Now, let’s talk about your two favorite blogs. Who’s the other one??? Inquiring minds must know! 🙂
I liked the air plant/napkins rings against the white when you were laying them out, but they are spectacular against the black. Silly me.
I know, they really pop against that black! 🙂
Those look fabulous. I love how you, Handan, come up with these creative ways to repurpose something and how you, Greg, build them.
Thank you, Laurie! Yep, she’s the brains, and I’m the brawn, lol! 🙂
I love this idea. Now I m going to the consignment shop and look for something interesting to put them on. My grandson just moved in to a new apartment this week, and they would work for him. I think he would like them. He told me that he liked the cactus in a little pot that i have on my bathroom shelf that I built myself off of pinterest. He thought it was real.(Ha Ha) So I think he’d like this.
Thank you, Cheryl! Yes, air plants are perfect for guys – especially ones with no prior experience caring for plants. I think your grandson will love them!
Very cool ideal! I’m going to my living room in hunting/ fishing theme. We hunt and fish so have lots of pictures of us in younger days. I think I will try to find something similar to go with my room !! Ty
Awesome! Handan and I love to fish, but we don’t have much free time to do it these days. I think she’d also enjoy hunting – one of these years I’ll get her out there with a shotgun in pheasant and partridge territory 🙂
This is such a fantastic idea! Love how Barish’s room is coming together and for all the incredible ideas that have come from this makeover. Keep up the great work!
Thanks, Barb! We’re getting close to finishing it – I can’t wait! 🙂
You may have sold me on air plants. These are wonderful!
They’re awesome, Derry, and they come in all sorts of wacky shapes. I think you’ll enjoy them!
I have some napkins very, very similar to those!!!! They were a gift from my sister who lived in Kenya many years ago and brought them back with her.
Cool! Now get yourself some air plants! 🙂
That should have said napkin RINGS.
Gotcha! 😉
Oh what fabulous napkin rings, you two are a joy to us would be D I Y/ Crafter’s another brilliant idea, love it! I’m rather frustrated at the moment beautiful spring weather, desperate to go out in my garden and to my allotment and i have been struck down with terrible muscle and back pain, so i’m useless. The only thing i can manage is my needle felting )-: Oh and reading your wonderful blogs (-:
Awww, thank you, Catherine! I hope your back gets better soon so you can get outside and enjoy the spring! Until then, we’ll keep posting to keep you occupied! 🙂
OK, So did I miss it? Did you ever f ind the driftwood piece?? Is it in the fridge? What about under the seat in the car?
LOL, nope! It’s whereabouts are currently unknown, but I’m sure it’ll turn up again someday! 🙂
This is so cool! They make great air plant holders! I bought my first air plant last year but I killed it in a few months. Don’t know what I did wrong. I was so Sad!
Oh no! Did you give them a bath every couple of weeks? Apparently they need that!