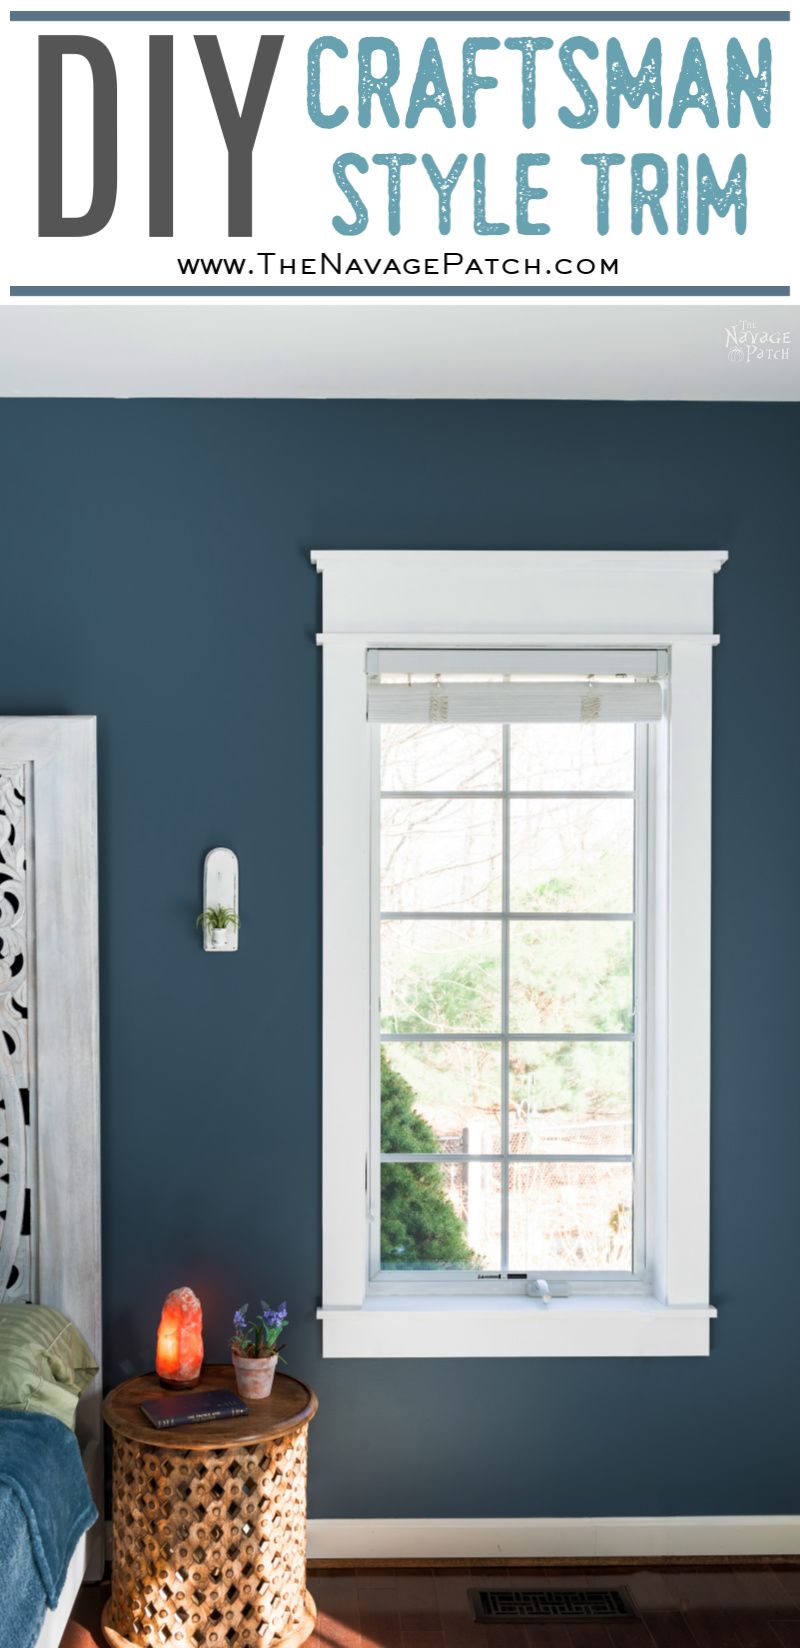
DIY Craftsman Style Trim for Windows and Doors
DIY Craftsman style trim is an easy upgrade to your existing window and door trim that will give a huge aesthetic boost to almost any room in your house!
Handan and I were big fans of the show Grimm. If you’ve never seen it, you may want to check it out on Amazon Prime or Netflix.
It’s one of the most fun shows we’ve ever watched!
We binged on it a few years back, and then we watched it all again last year with Barish.
The show is set in Portland, and many of the characters live in historic Craftsman houses.
The moment Handan saw those houses, she fell in love.
She started seeing that Craftsman style popping up in all sorts of shows and movies.
Hollywood loves Craftsman!
I had to explain to her that, no, not everyone on the West Coast lives in a Craftsman house, though you’d never guess it by watching what Hollywood throws at you on a daily basis. (Remember the young and broke characters on Friends living in what would today be a multi-million dollar apartment?)
Hollywood isn’t known for realism.
“Million-Dollar Mansions For All!” may be the rallying cry for some in this country, but only a small percentage of real people are blessed enough to live in a real Craftsman house.
But hey, that’s okay! We’re DIYers, right? We don’t need a Craftsman house to enjoy some of the Craftsman aesthetic!
So what did Handan do? Well, if she couldn’t magically transform The Navage Patch into a 1920s Craftsman classic, she could at least have a little Craftsman trim for the windows and doors. It’s one of the most beautiful interior elements of the Craftsman style, and it’s a pretty easy DIY!
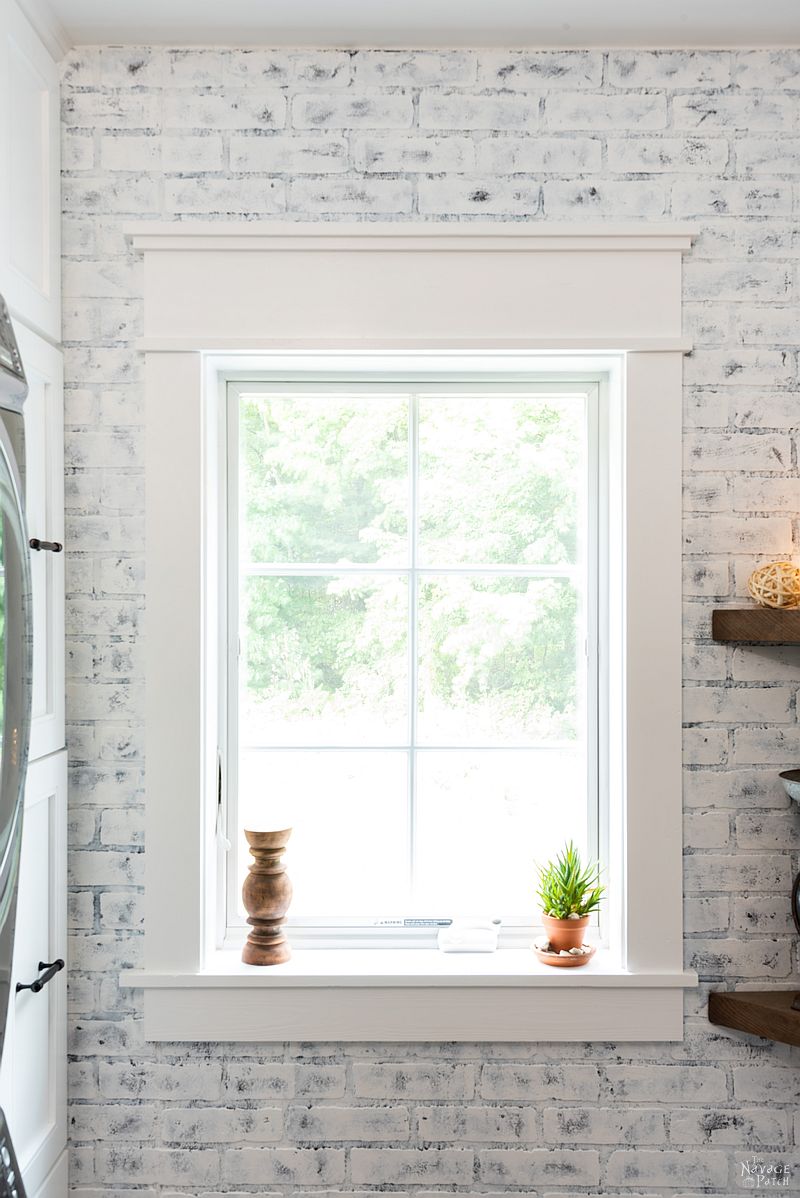
We came up with our own design for Craftsman style window and door trim and gave it a test run in our laundry room renovation.
Predictably, Handan loved it and wanted more.
Lots more.
Okay, look, she wants all the trim to be Craftsman!
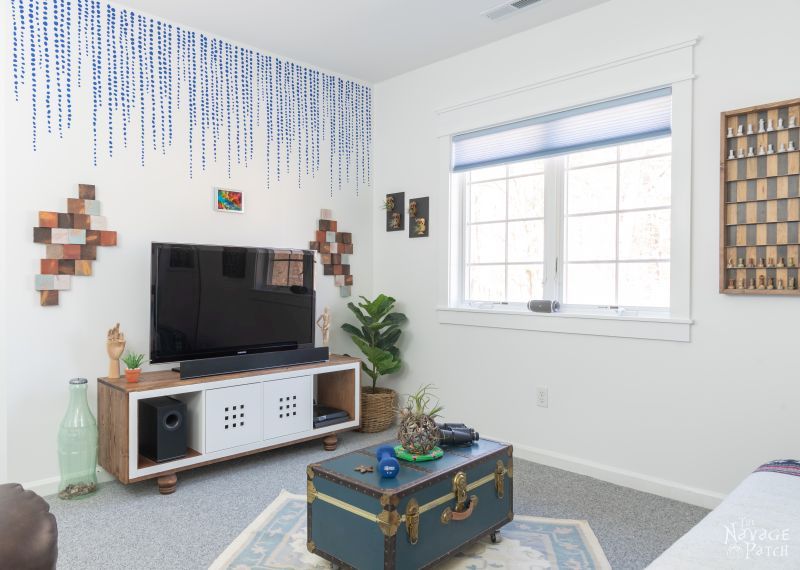
Since our next big project was the teen bedroom makeover, we decided to change the window and door trim in Barish’s two rooms to DIY Craftsman trim.
Since then, we’ve changed 4 big windows in our living room and all of the windows and doors in our master bedroom (that makeover will be coming up soon!). I still have a lot more to upgrade, but we’re taking it a little at a time.
Okay, back to Barish’s room. Here are some before pics of his window and door trim.
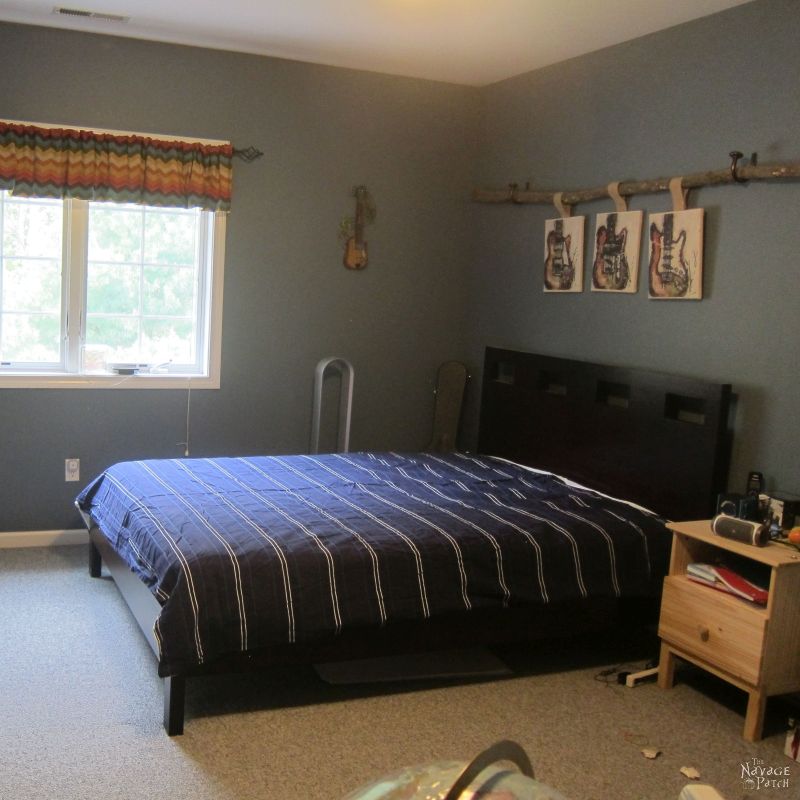
This one is way before, lol! That’s our real estate agent walking us through the house on our first visit.

The trim was the standard stuff found in most houses across the country. Builder grade, pleasant enough, but a little boring.
It was time for a Craftsman upgrade!
DIY Craftsman Style Trim
- 1 x 6 pre-primed pine boards (actual dimensions are 3/4 x 5 1/2)
- 1 x 4 pre-primed pine boards (actual dimensions are 3/4 x 3 1/2)
- Tape measure
- Table saw
- Chop saw/miter saw/hand saw
- Brad nailer or finish nailer
- Bondo wood filler (only for window trim)
- Random orbital sander, detail sander or palm sander (only for window trim)
- Spackle or other wood filler (to fill brad nail holes)
- Caulk
- Paint
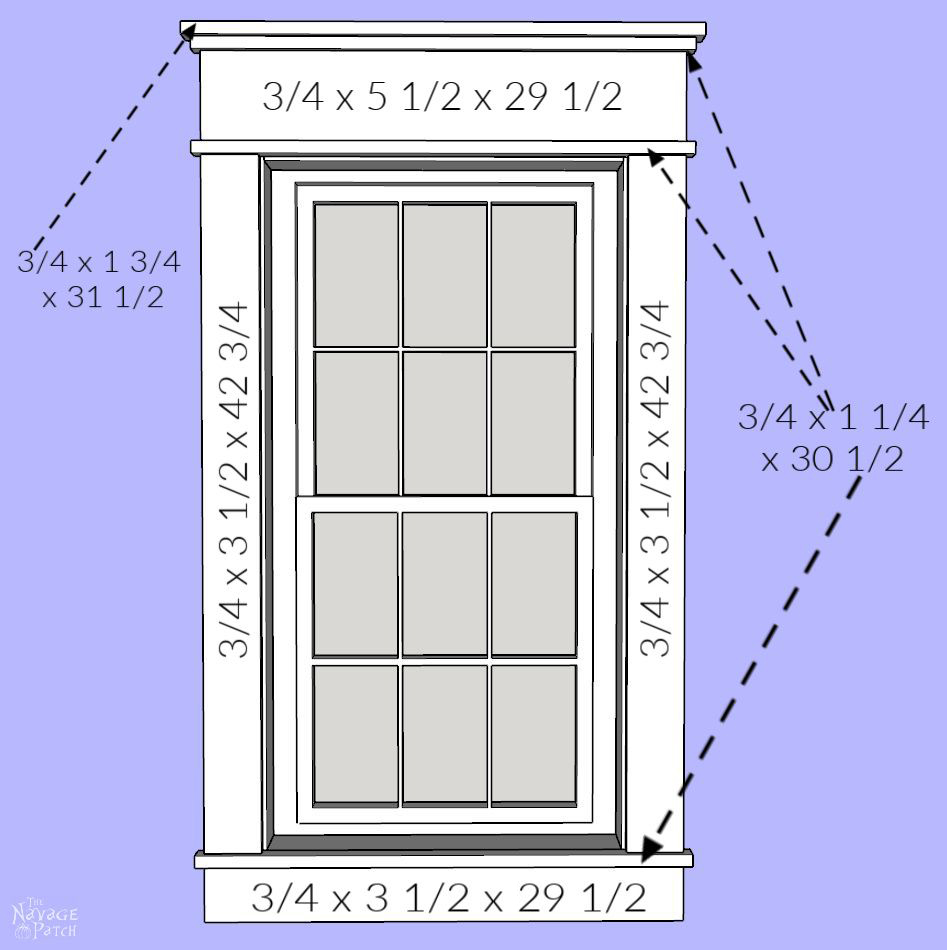
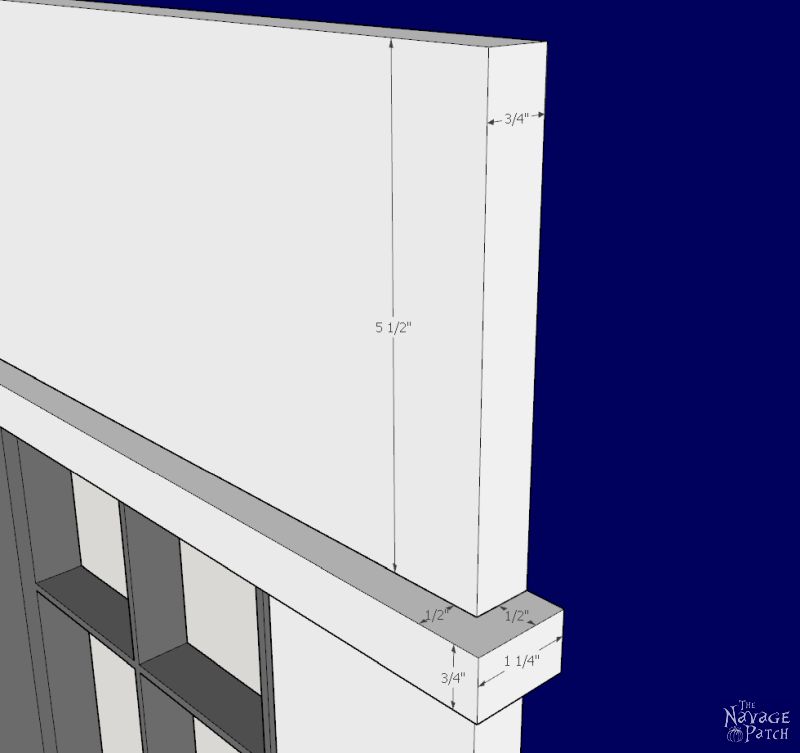
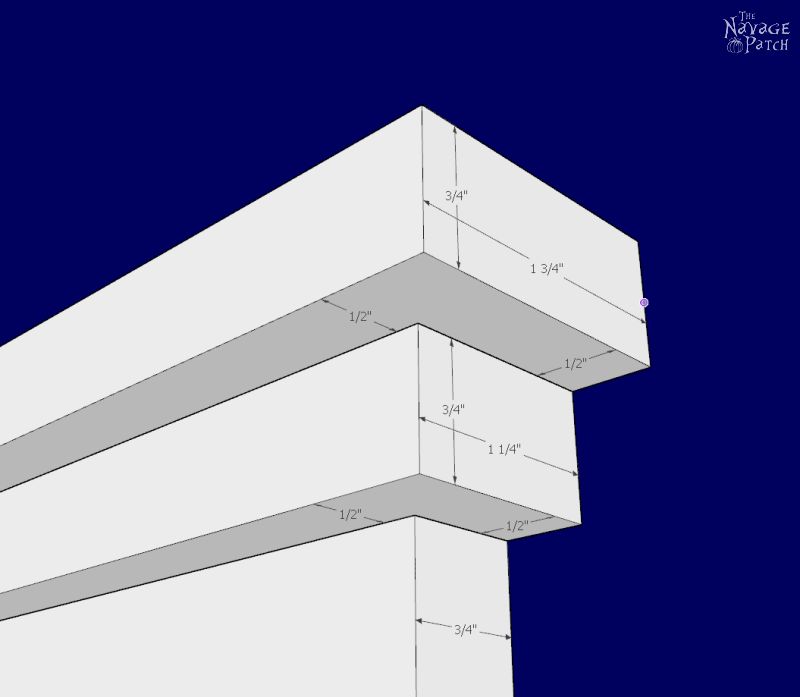
The 1 x 4 boards are used for everything except the big piece on top. They are used as-is on the sides and big bottom piece. They are ripped to 1 1/4 inches for three of the horizontal pieces and 1 3/4 inches for the very top piece. How much you will need depends entirely on the size of your windows and doors and how many of them you have. I’ll leave that heavy arithmetic up to you 🙂
DIY Craftsman Style Trim for Windows and Doors
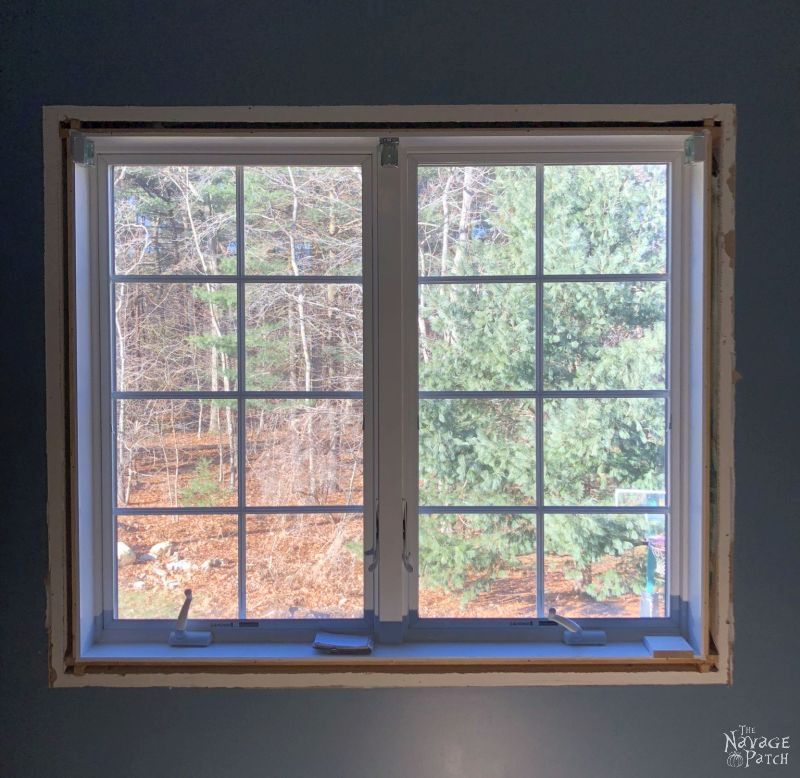
The first step in this process was to remove the old trim. The key to removing old trim is to use a utility knife to cut through the caulk and then to slowly and gently work off the trim pieces with a pry bar. Patience on this step saves drywall repair work later!
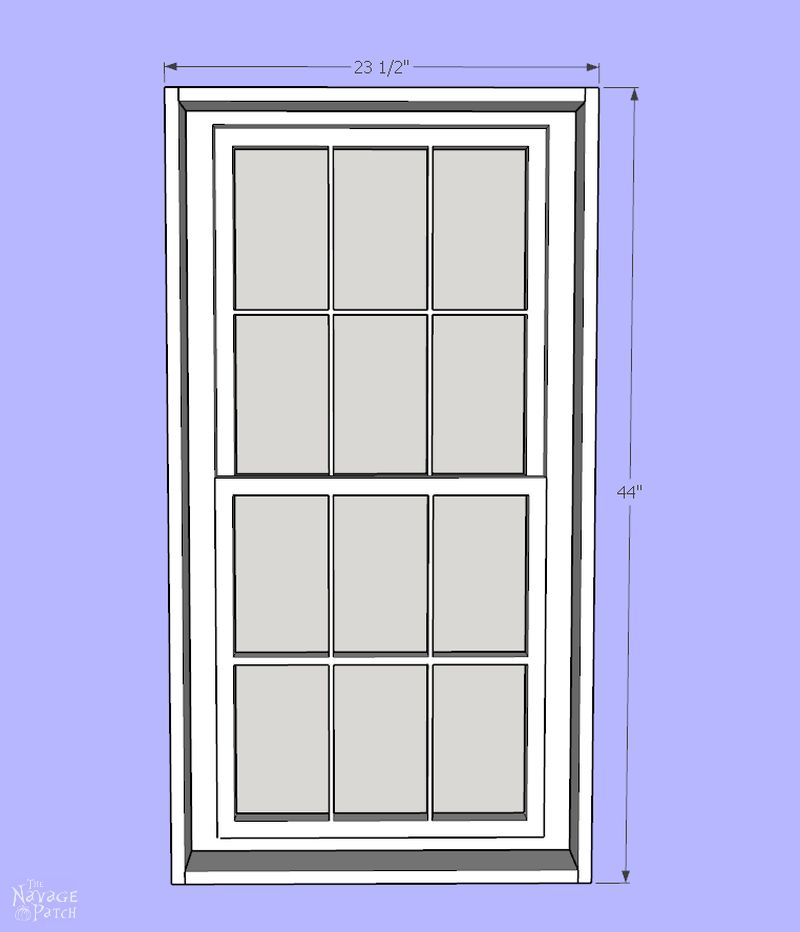
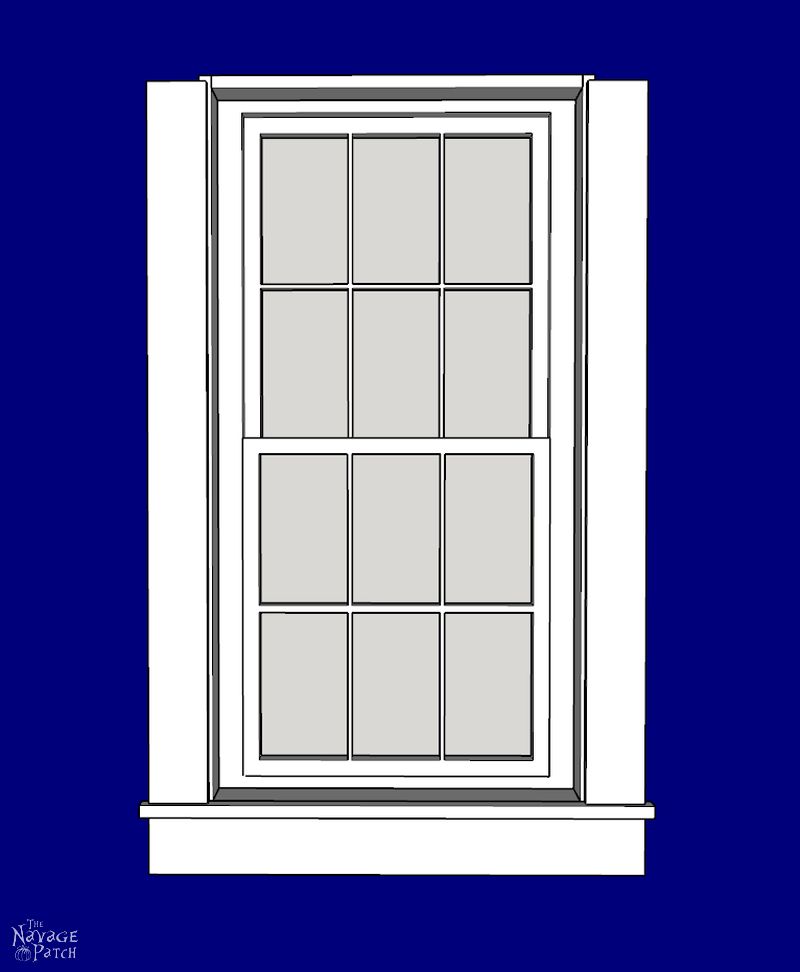
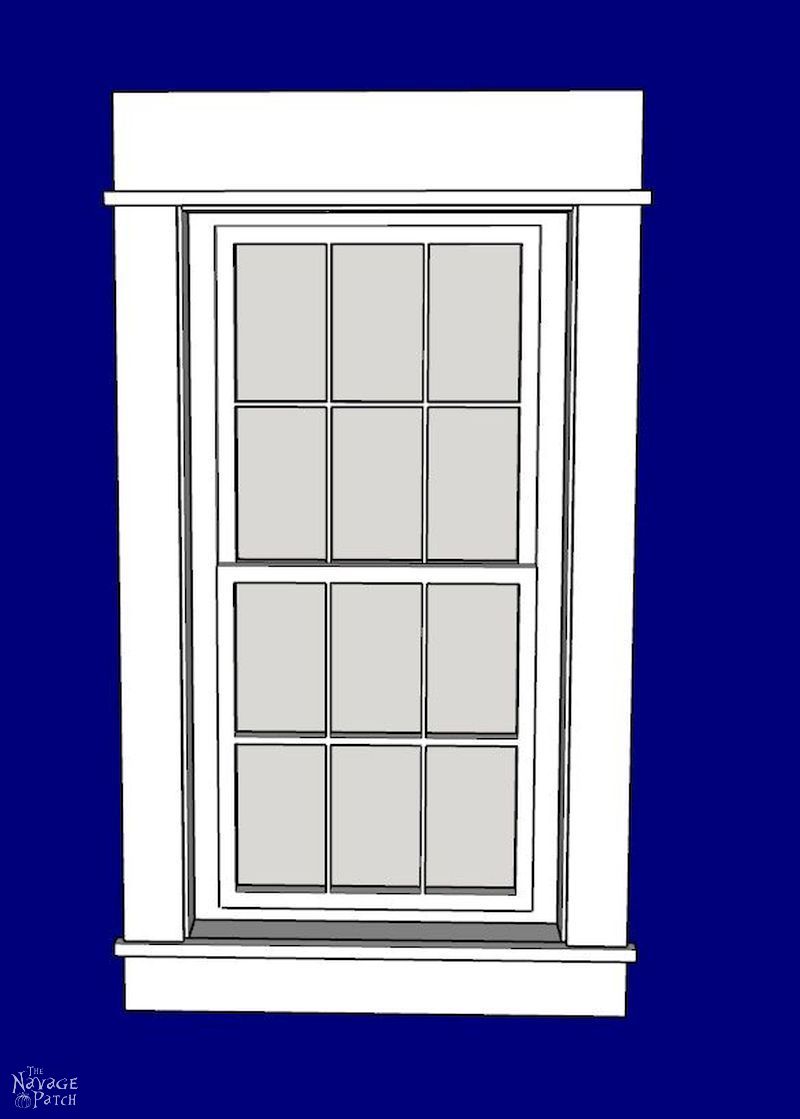
Most of this tutorial will consist of Sketchup drawings, as they are easier to follow. I made the Sketchup model according to a 23 1/2″ x 44″ window.
If you are making door trim, just skip the steps that have to do with the sill and the bottom piece.
For the trim pieces, we used pre-primed pine boards from Home Depot. The pre-primed boards are worth the extra money, as they’ll save time when it comes to painting.
Here are the dimensions of all the pieces needed for this hypothetical window.
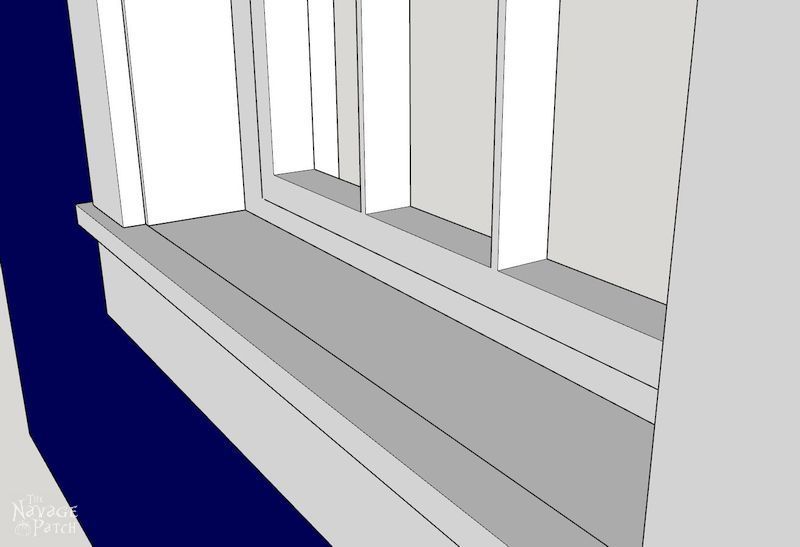
Step 1 – Attach the sill
Line up the sill piece and make sure it is flush with the existing sill. Shoot brad nails from the front, securing it in place. Later, the seam between the old and new sill will be filled with Bondo wood filler and sanded smooth, so don’t worry if it is not entirely perfect. An easy way to center the sill is to mark 3 1/2 inches in from each end and align those marks with the outer edges of the window casement.
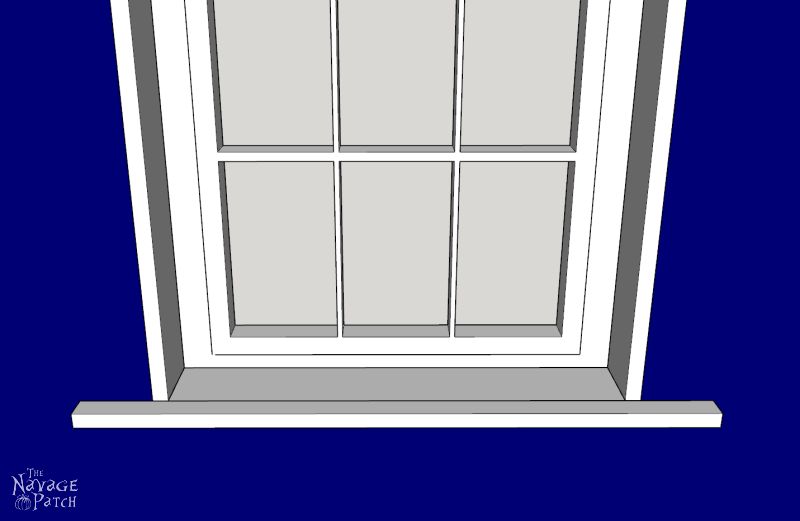
Step 2 – Attach the bottom piece
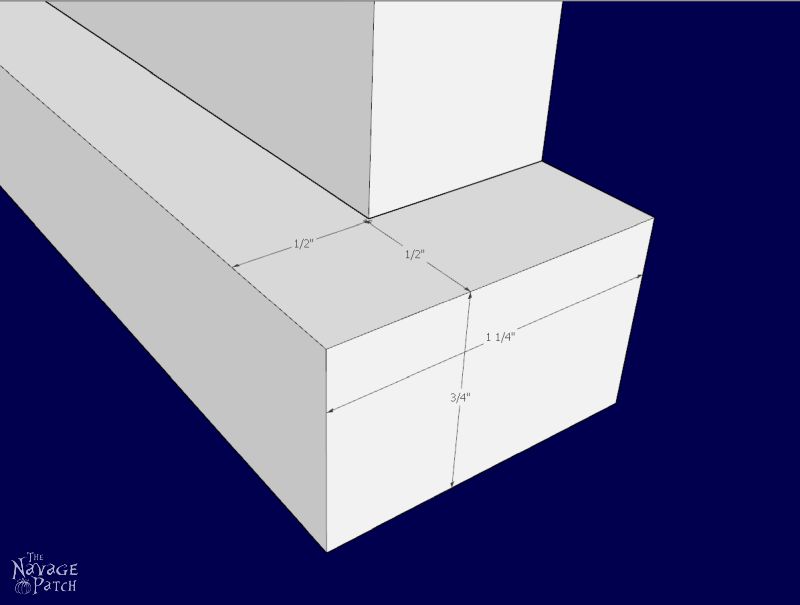
Center the bottom piece and secure with brad nails. The sill will have a 1/2 inch overhang.
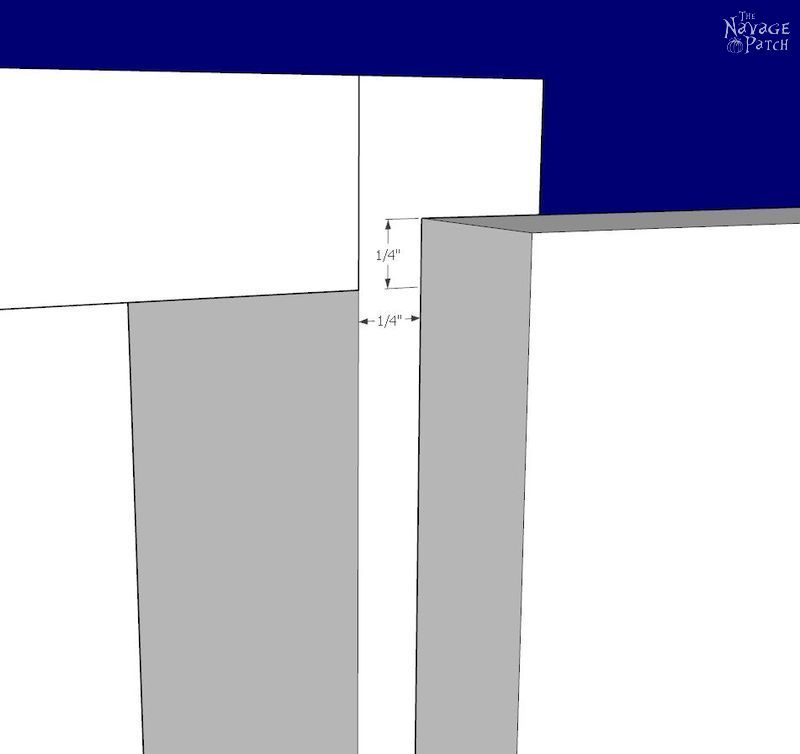
Step 3 – Attach the sides
Line up the sides, leaving 1/4 inch of casement showing on the inner edge.
Note that the sides should be long enough so that they extend above the bottom of the upper casement by 1/4 inch.
Also note that the sill should extend 1/2 inch past the sides, and it should protrude 1/2 inch out in front.
Step 4 – Attach the first top piece.
Line up the top piece and secure with brad nails. Note that there is 1/4 inch of casement showing all around except at the sill. This is purely an aesthetic consideration. In other words – it just looks better this way!
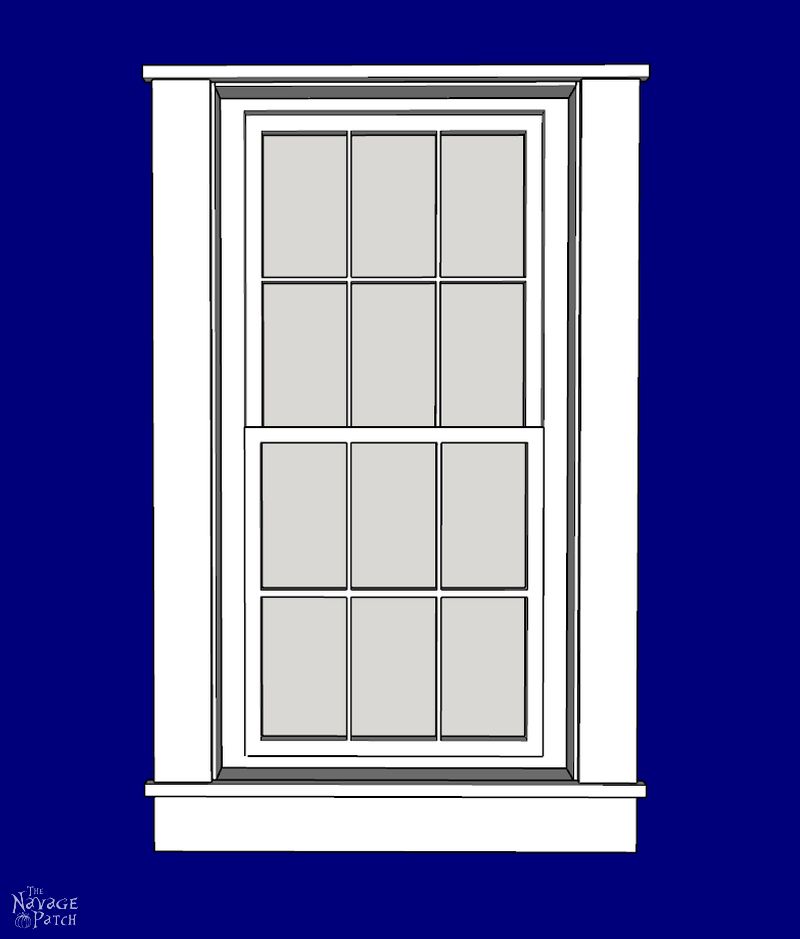
Step 5 – Attach the large top piece
Center the large top piece, making sure its ends align with the two sides below. Secure with brad nails.
Step 6 – Attach the next top piece
Align the next piece and secure it with brad nails. It should line up with the first top piece.
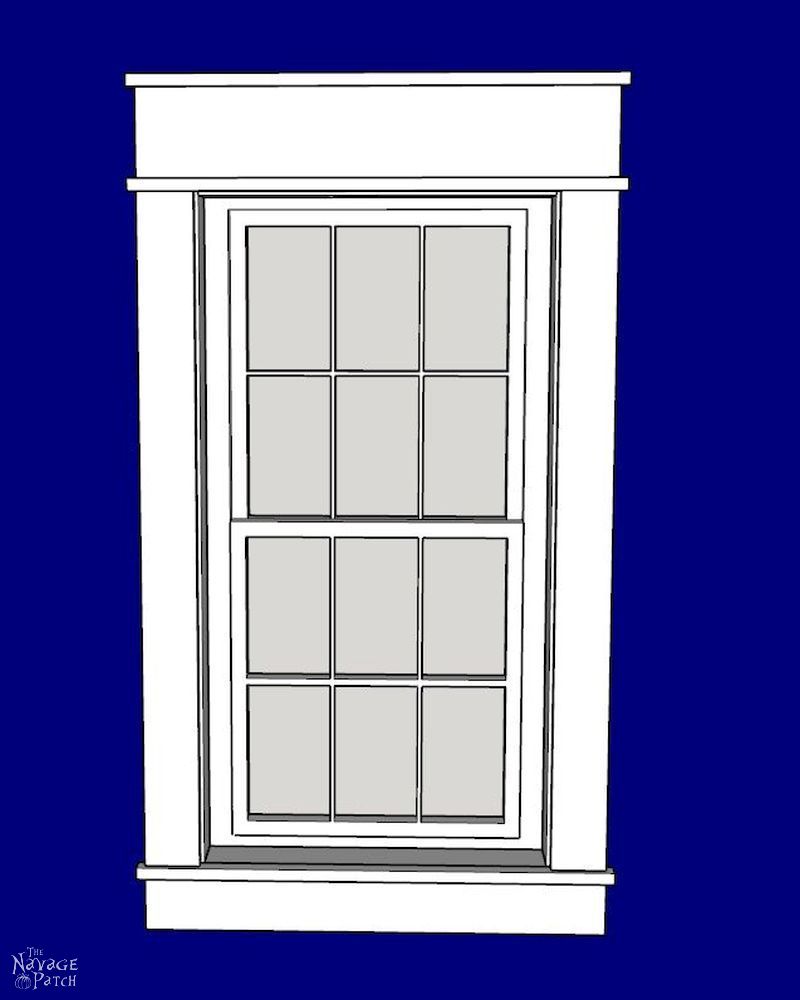
Step 7 – Attach the final piece
Attach the final top piece, ensuring it is centered and aligned.
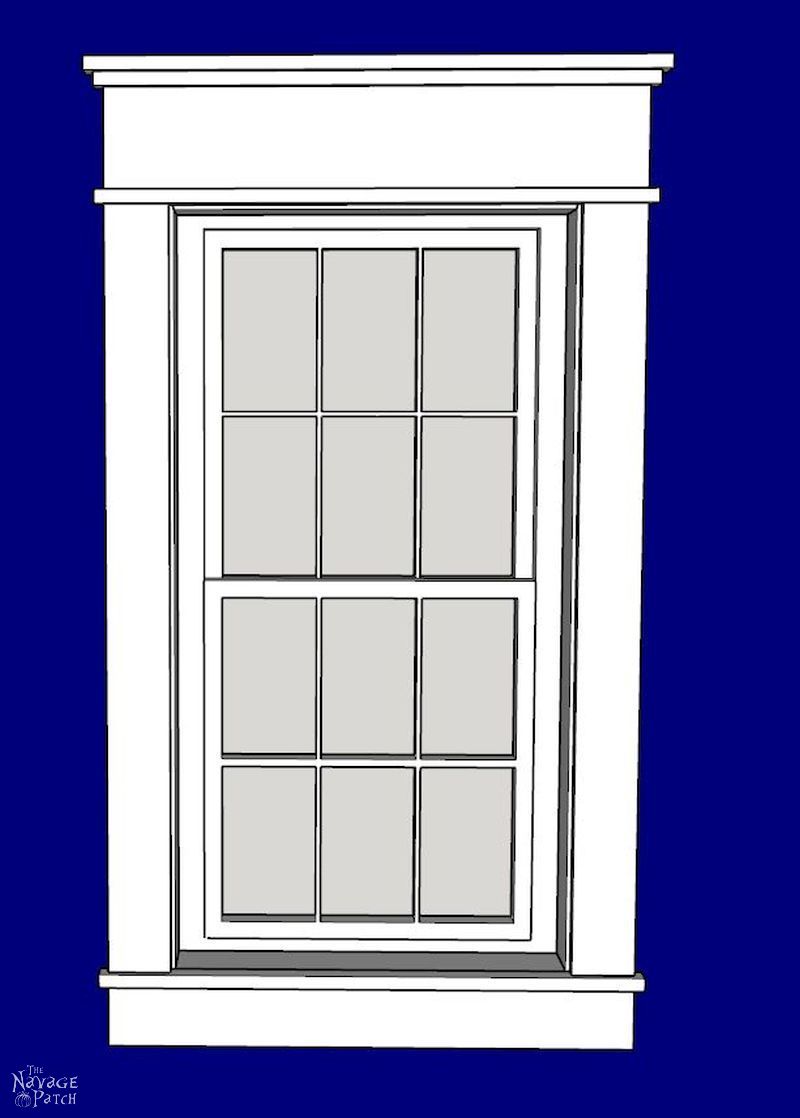
Step 8 – Fill the sill gap
Fill the sill gap with Bondo wood filler. When it is dry, sand it smooth with a random orbital sander with a 150 grit disc.
Step 9 – Prep for paint
Fill all the brad nail holes with spackle or wood filler, let dry and then sand.
Step 10 – Paint
I prefer to use ultra pure white semi-gloss paint with a small foam roller. I give at least 3-4 light coats.
Step 11 – Caulk
Caulk any gaps with with DAP trim and moulding caulk. If you live in a cold climate, I’d recommend using DAP Extreme Stretch for and exterior wall caulking to prevent excessive shrinkage and cracking.
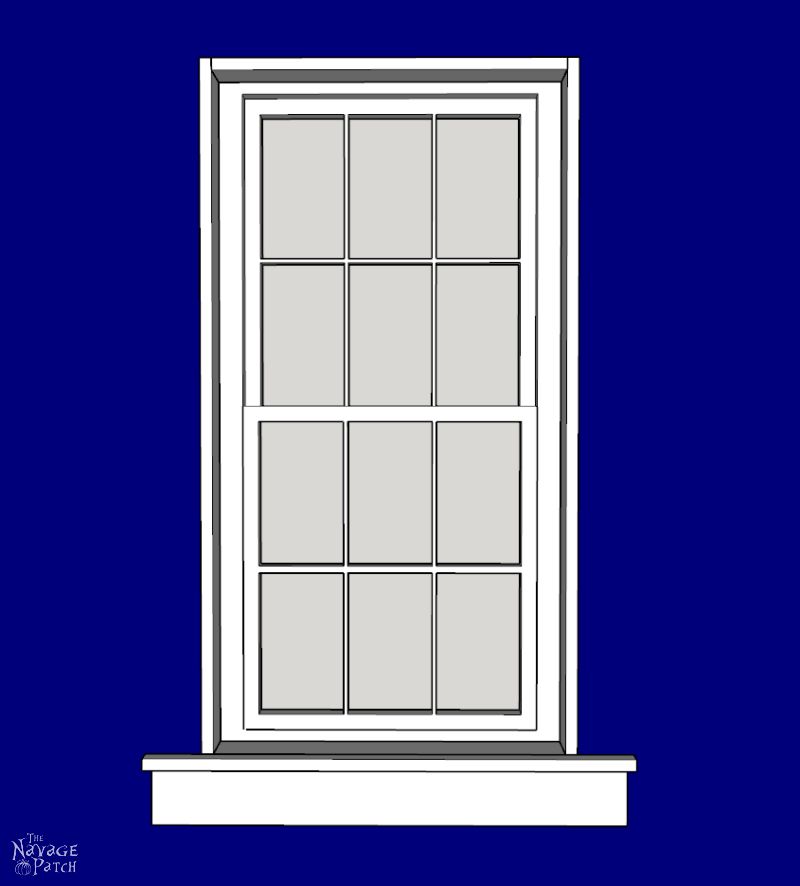
*****
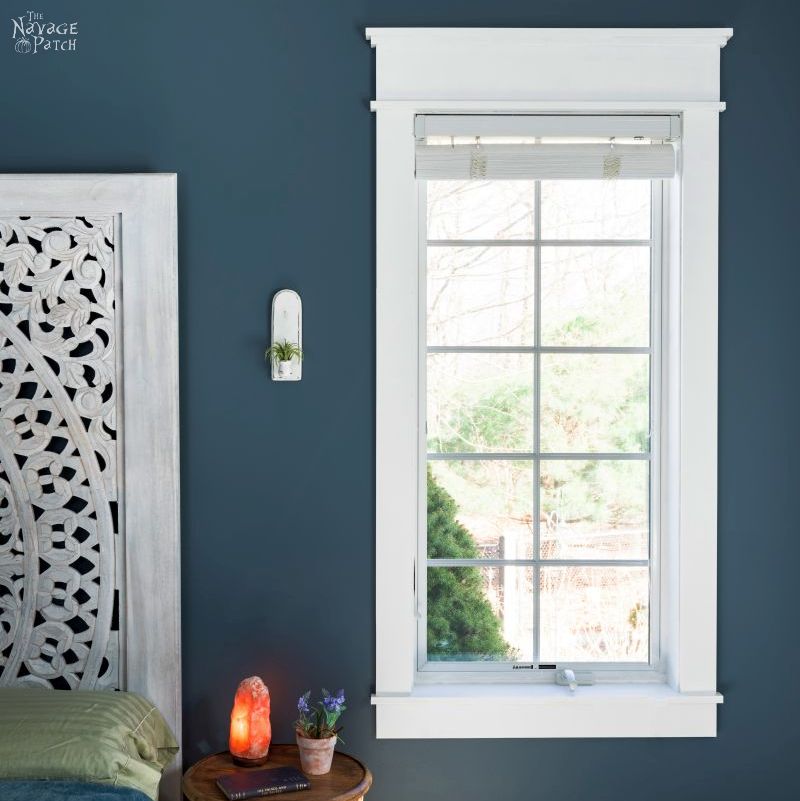
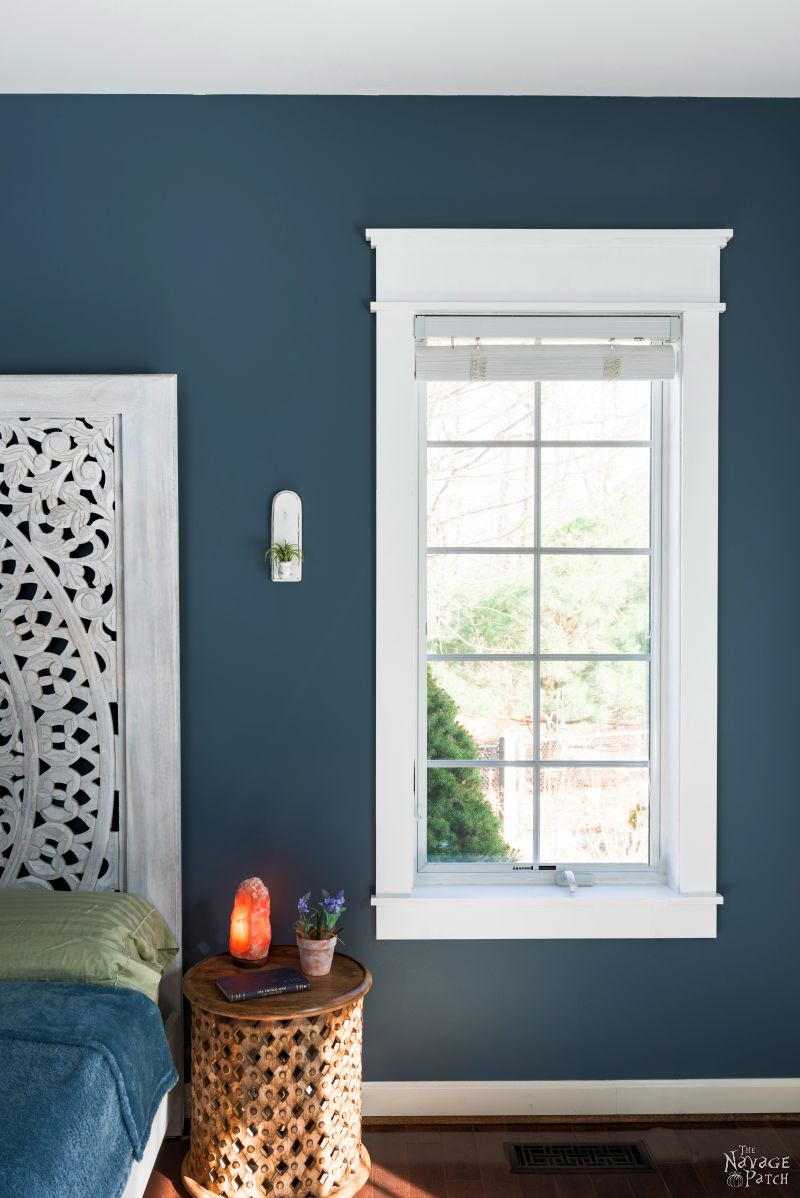
You won’t believe what a difference Craftsman style trim will make in your house. It is one of the classiest upgrades we’ve done since living here, and soon it’ll be all over the house!
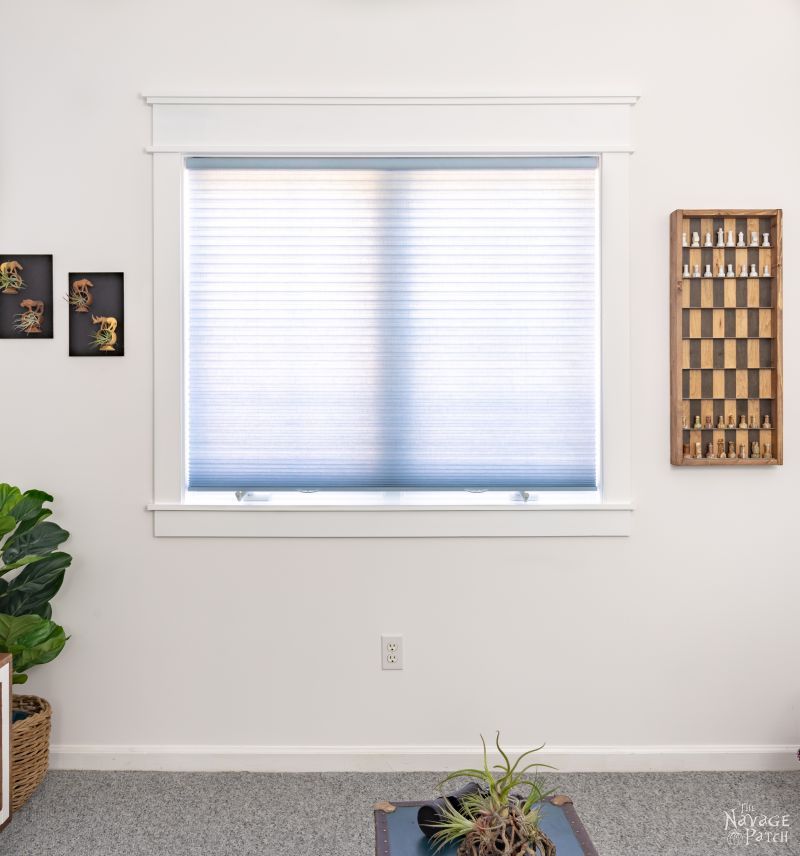
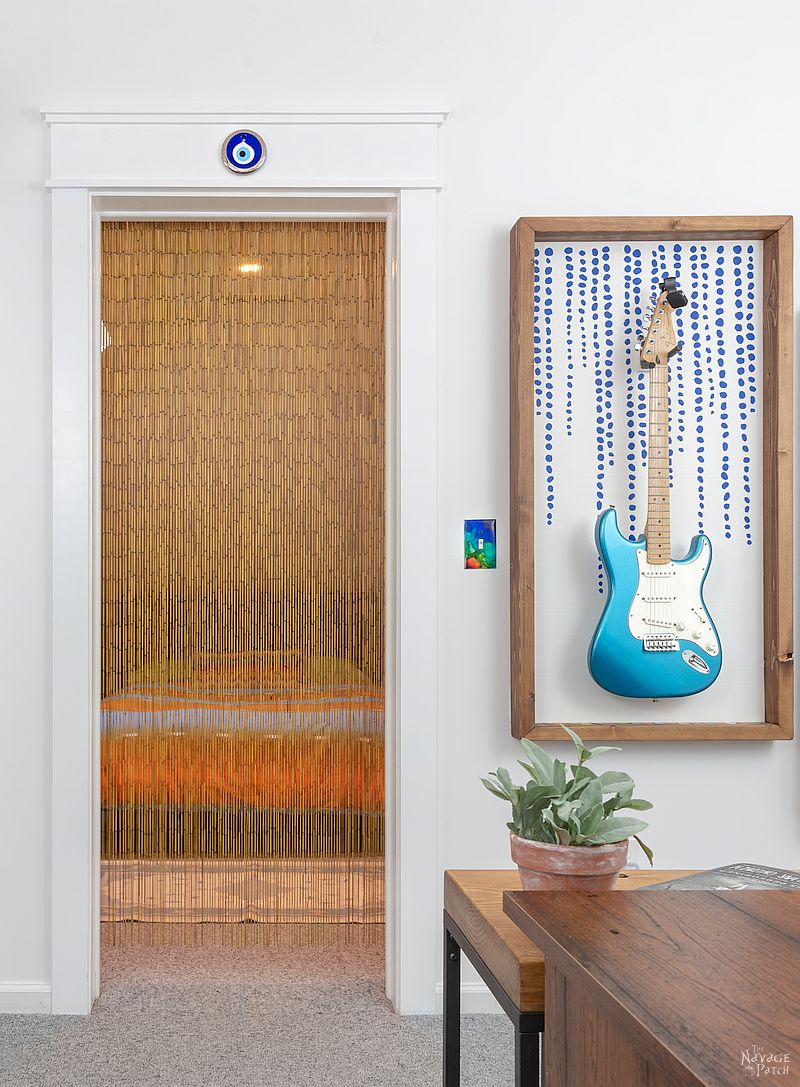
Though it looks great white on white, it’s even more striking with a contrasting wall!

If you’re following along with the teen bedroom makeover, here’s how we stand:
Teen Bedroom Makeover Checklist (for The First Room)
Teen bedroom ideas and laying out the game planDIY alcohol ink switch plates- Paint the walls
Build 2 IKEA Billy bookcasesBuild a daybedHack IKEA Kallax into a TV standCreate an accent wallBuy or DIY plugin sconcesMake wooden wall artBuild a vertical chess boardBuild 2 guitar display framesBuy a new deskChange the fanBuy or DIY colorful artHack IKEA Laptop StandBuy throw pillowsAdd greenery: faux plants, air plants, DIY air plant holdersMetal filing cabinet makeoverDIY Craftsman style trim- World map wall art
- Small closet makeover
- Barish’s first room reveal
Click here to see more teen bedroom makeover posts as we continue to cross items off our checklist!
We love it when you share our posts on Facebook and Pinterest!


Looks great, and so simple to DIY! Thanks for this post!
Thank you, Junette, and you’re welcome! 🙂
I love Craftsman trim!!! My dream house is an updated Craftsman style but with white wood trim work instead of the traditional stained wood. Of course, I live in a typical circa 1950’s New England Dutch Cape house with the classic, traditional-style trim but I can still dream of my next house to retire in someday, and it will be a Craftsman if I get to move somewhere else. LOL
Barish’s room is looking fabulous! Can’t wait to the full reveal. I bet he is loving his new space.
Hi Laurie, He is totally loving it! I agree that white looks better with this trim. The Craftsman style is beautiful, but it can feel a bit heavy with all the stained wood!
I so agreed. The white just lightens and brightens it so it looks fresh,. I love Craftsman style board and battan wainscotting too. It just makes a room especially when paired with hardwood flooring.
Our home is not craftsman style, but it is cottage-style. I love the look. Some of our doors and windows do have this type of trim but we are wanting to add it to the ones that don’t. Thanks for the tutorial. The hubster should be able to follow your instructions. I’m a chick and I measure “3 short ticks past that long one past the short one near the 3”. I don’t think he could follow anything I’m saying…LOL Have a great one!
Hi Benita, you measure like Handan does! She grew up with metric, so when I give her an American tape measure, she has no idea how to read it, LOL! 😀
We did this in our little cottage living room and absolutely love it! Very simple to do and cute!
Awesome! It’s the best!
Having lived in a 1917 Portland Oregon craftsman home that I miss dearly, my husband and I have done this in our new build as well as in the 1960s fixer-upper we bought, though we used MDF because we’re painting it all. That trim looks soooooooo much better than the skinny builders-grade trim most homes have now. Instead of using a plain smaller upper board, we used parting bead. It has just a bit more detail to it, and you can even get it at Home Depot, thought I don’t think they make it in MDF. I understand Handan wanting it in every room though, that woman is smart!
The Link for the Bead Moulding at Home Depot
Hi Karen, great idea on the parting bead! Send me a pic – I’d love to see it! 🙂
It looks great! How high are your ceilings? I would love to give our boring ranch more of a craftsman feel but I’m worried that our ceilings might be too low and it would look funny.
They are regular ceilings in Barish’s room. Our master bedroom and living room have higher ceilings. I think it would still look good with lower ceilings. You could always try a mockup from cardboard first to see how it looks.
I always love your post but like usual I don’t know inches can you put it in centimeters please.
It would help me
I always read your stuff and like it a lot.
Greetings from cold and wet South Africa
Willem
Absolutely LOVE the craftsman style trim. I’d love it around ever door and window in our house but there’s just no room. A lot of our windows are too close to the ceiling or to walls. My bedroom window is smack in the middle of the wall, though, and I’m thinking I might give it a go. I do have a question you might be able to help me with: All our walls are brick and plaster, so would the brad nails go into that or would I need to look at another method of attaching the pieces to the walls?
You know what we need: an Ask the Navage Patch once a month special. I bet there are loads of people who would love to ask questions of you and Handan, or questions you get in the comments! I know I would. And you’re both so knowledgeable about reno and DIY, plus stylish and designer minded and so many of us are…not.
Hi Jay, brad nails won’t work with your situation. You’ll need some construction adhesive to mount the trim panels to the plaster. I know they sell Loctite down under. You’ll need their Power Grab line – the one that grabs instantly (though cure time is 24 hours). To be safe, I’d also look into bracing the glued trim pieces with trim-head screws. While they wouldn’t be strong enough on their own in plaster, they’d serve to keep the trim pieces in place while the adhesive cures. If you tackle the project, take some before and after pics and send them to us!
I’ve been wanting to do something similar to our trim in hour country style home. Our home looks like an old farm house to me. I love it. Thank you so much for sharing this awesome tutorial.
You’re so welcome, Deborah! Good luck to you!
your first sketchup drawing has the bottom sill at 19 instead of 29
you give good directions, thank you
Oh jeez, good catch, Natalie! I’ve now fixed it. Thank you so much! 🙂
You got me at, ‘craftsman trim’. I love windows and doors with this design. Thank you for the step by step tutorial.
Happy First day of the New year.
Happy New Year to you, Ivory – I’m happy you like it! 🙂
How tall are your ceilings? I have 8ft ceilings, does this effect the dimensions you should use?
It really depends on how much space you have between the top of your window and your ceiling, Sarah. I did this in rooms with 18ft ceilings, 10ft ceilings, and my son’s room, which had 8ft ceilings, and it looked great in all those rooms.
Going to be adding as many craftsman touches as I can to our 2005 builder grade home in San Antonio suburb. Can’t paint the brick outside, so indoor changes it is. Found your site looking around. Love that window trim! Definitely saving this for summer indoor work. That teal-ish color is phenomenal- may I ask what it is?
It’s a great upgrade project, Carol – you’ll love the difference it makes! That paint is Behr Smokey Blue. Sherwin Williams also makes a really nice one, too.
What’s the name and company of the dark blue paint color?
…the dark blue paint color in the bathroom with a black floor. I love it! I want to put that exact paint in my bathroom, but don’t know the brand and color name of the paint
Hi Courtney, that’s Behr Smokey Blue!
I absolutely love this DIY trim project! The Craftsman style really adds so much character to windows and doors. Your step-by-step instructions and tips make it seem manageable even for a beginner like me. Can’t wait to give this a try in my home! Thanks for the inspiration!
This is such a fantastic DIY project! The Craftsman-style trim really transforms the entire look of the room from basic to elegant. I love how detailed and beginner-friendly your step-by-step guide is—it makes the whole process feel achievable even for someone with limited experience. The tip about taking time while removing the old trim to avoid wall damage is especially helpful. Also, using pre-primed boards is a smart way to save time and effort. Overall, this upgrade adds so much character and value to a space—definitely inspired to try this in my own home!
I absolutely love this DIY Craftsman style trim idea! The detailed instructions and photos make it so easy to follow. Can’t wait to give my windows and doors a makeover. Thanks for sharing such an inspiring post!