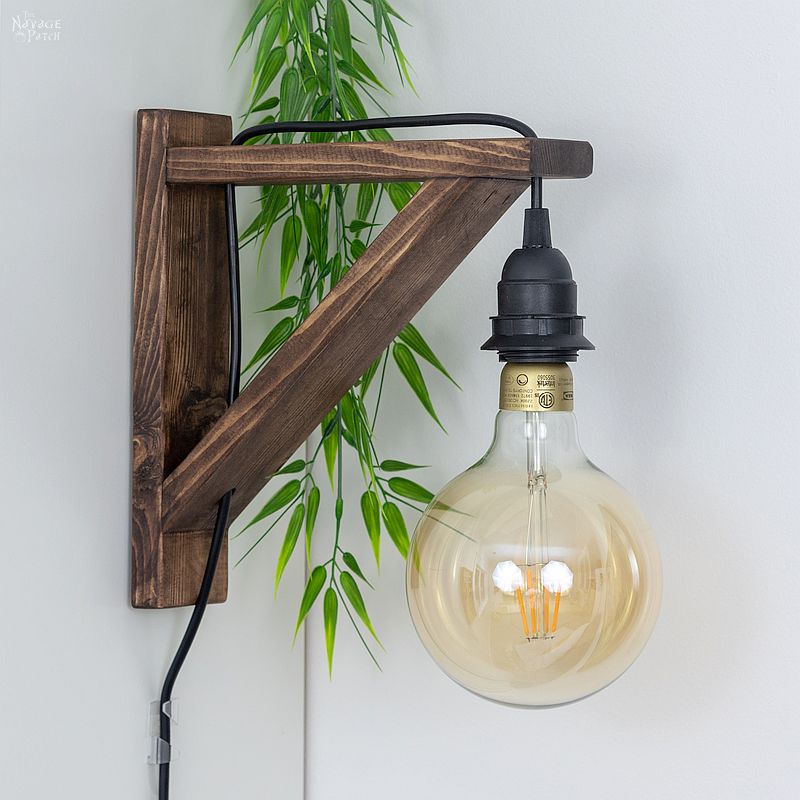
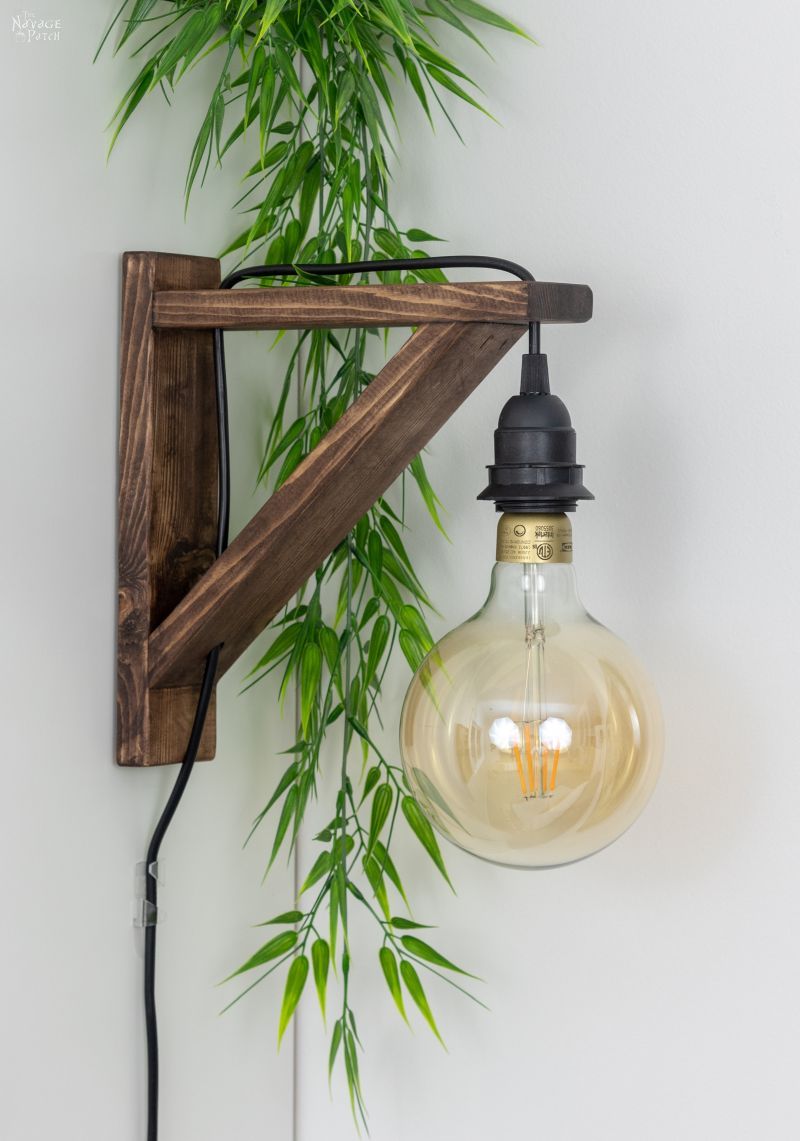
DIY Corbel Sconces
DIY Corbel Sconces are a quick and easy project that look great anywhere and can be used with many different kinds of lights.
Almost all DIY projects are born from the sudden realization that you can make or do something “professional” for a fraction of the price of “real” professionals – often with better results!
When we first moved into this house, we wanted an 8-foot-long x 3-foot-high dwarf wall to close off a large room entry off the main foyer. At that time, I barely knew a hammer from a ham sandwich, so naturally, we hired a “professional” to build the wall.
That puny little wall cost us over $1000, and still the contractor couldn’t manage to get the drywall right. To this day, there’s an obvious seam where the dwarf wall meets the regular wall. Oh, and that $1000+ didn’t include him actually painting the new wall to match or him painting the new window trim that he installed!

It’s a good thing I watched him, because I realized how little there is to building a wall. Shortly after, I built a few in our basement and in our garage. And after years of practice, I feel like I’m a better drywall taper than any contractor out there that isn’t actually a drywall specialist. Those guys are awesome!
Since then, Handan and I have DIY’d our way through hundreds of projects, from the very big, like our guest bathroom renovation, to the very small and simple like the DIY corbel sconces I’m going to show you today.
The funny thing about today’s DIY is that we actually bought a pair of these sconces for Barish’s bedroom makeover before realizing we should be making them!
Handan spent several nights combing through just about every sconce for sale on the internet. I don’t know how she does it – my eyes glaze over after one page. I would have been like, “yep, that one’s good enough for ya, Boy!” NEXT!
But not Handan!
Hours and hours and hours she searched. She’s got a mind like a computer when it comes to things like this. Not only can she quickly scan like 10,000 products from all over the globe, but she remembers every damn one of them!
You should see her browser when she’s doing stuff like this – it’s wall-to-wall tabs! How does she know which tab leads to which page?
Nobody knows.
Probably not even her.
Anyway, she finally narrowed it down to her favorite 3 dozen or so. Then I stepped in and whittled the list down to about 10.
Ten was a good number to show The Boy.
“BOY!!!” I shouted up at his room. It was a weekend, and he had his headphones on while he and his friends conspired to wipe out an enemy encampment on some teen-infested digital battlefield.
“BOY! Come Down!”
Waiting…
Waiting…
Waiting…
[From far away] “…yeah..?”
The typical teen response: lazy, leery and late. Shouts upstairs often ended in work for him, so I could understand his leeriness.
We were finally able to coax him out of his cave with the promise of a Coke and no work.
Of the ten offerings, he chose the following from Amazon:
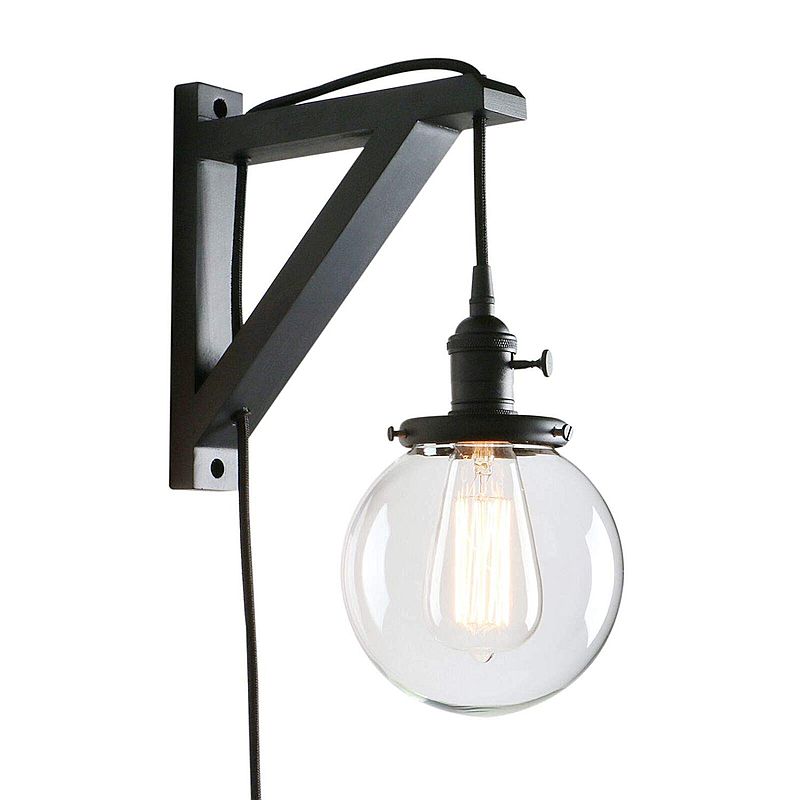
We ordered two, and The Boy returned to zapping aliens or whatever the heck he and his friends do in their digital hangout with their lasers and combat boots.
When they arrived and I opened the box, I just stared at them in disbelief.
Why the hell had we bought these, anyway?
And why the hell did we pay $120 for them??
I really couldn’t understand it! I left the box open for Handan to see when she came home from work that night. As she inspected the lights. I informed her that I’d be shipping them back.
I could make those corbel sconces!
Anyone could make those corbel sconces!
I’m pretty sure our gerbils could team up and make those sconces!
So back to Amazon they went, and down to the basement I went. I already had the scraps I needed, but for those playing along at home, a 6-foot piece of 1 x 3 pine will make two of these sconces.
DIY Corbel Sconces
- (1) 6-foot 1 x 3 pine board
- Wood glue
- Brad nailer
- Drill with 5/16″ bit
- Miter saw (powered or manual)
- 150 grit sandpaper
- Wood stain of your choice (I used Varathane Kona)
- Globe bulb of your choice (we used this one from IKEA, but Amazon also carry similar ones like this one and this one)
- Pendant light cord
DIY Corbel Sconces Tutorial
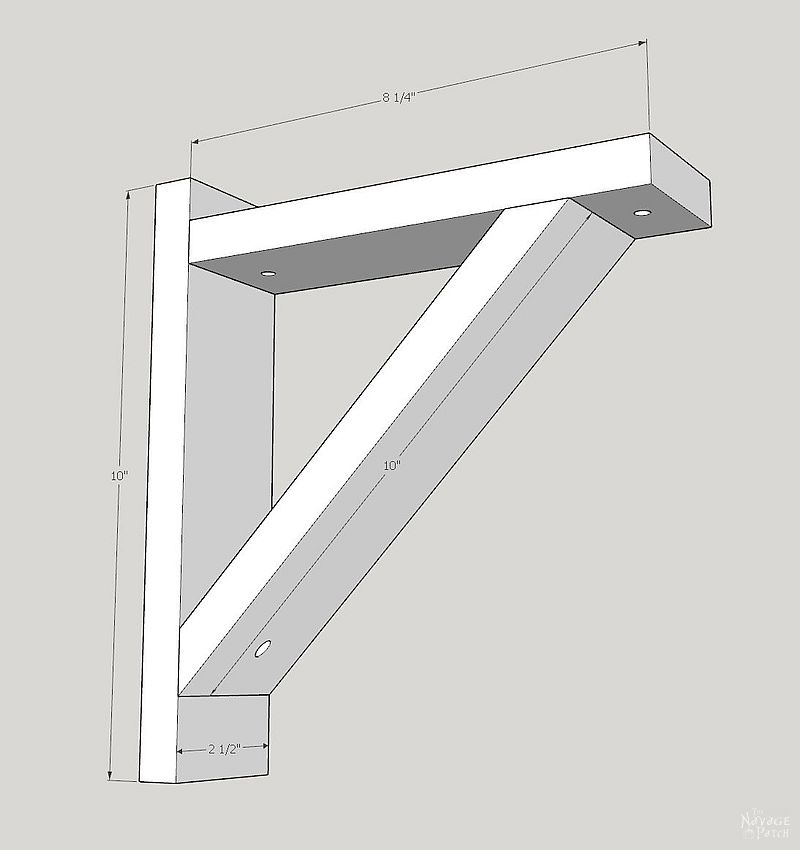
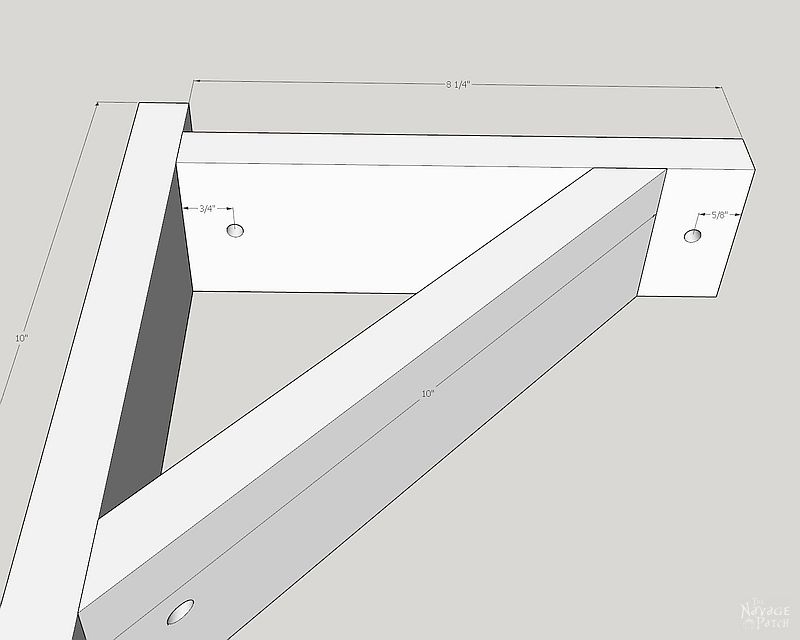
First, I cut the 1 x 3 into four 10-inch pieces and two 8 1/4-inch pieces.

Then I cut 45-degree angles with a miter saw on both ends of two 10-inch pieces.
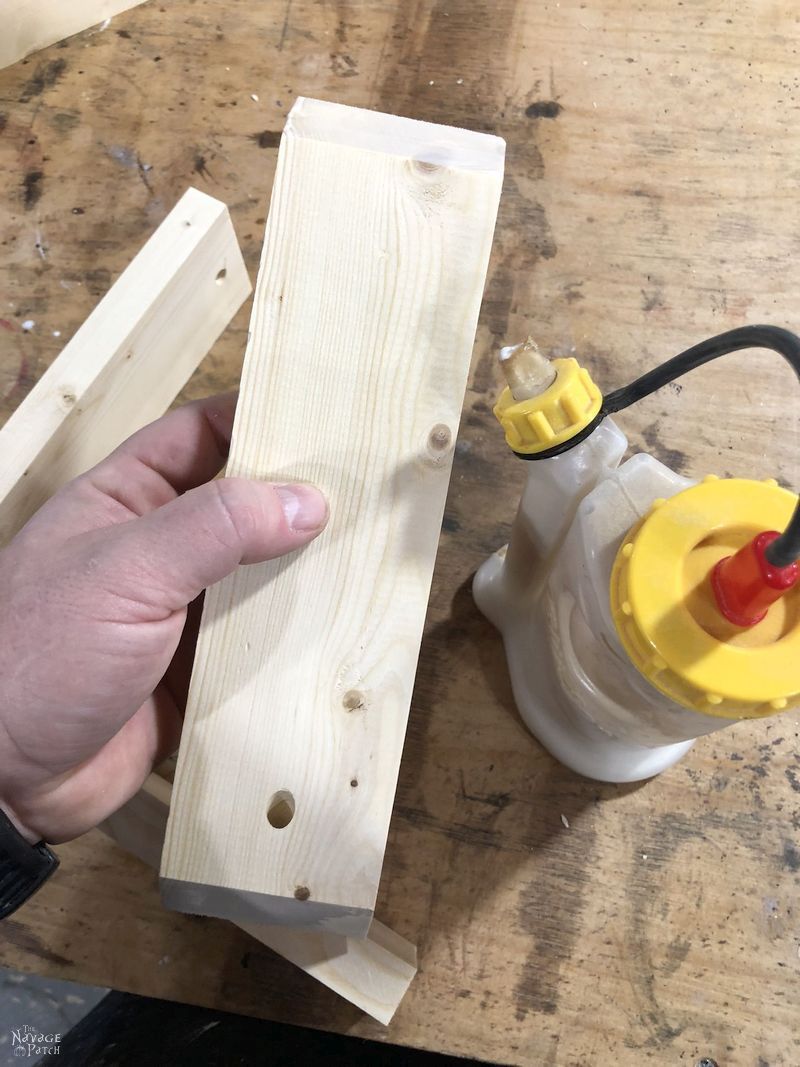
Before assembling the corbel sconces, I drilled the wire holes.
To drill the two holes in the top overhang, I first measured and marked 5/8 inch in from the front edge and 3/4 inch from the back edge.
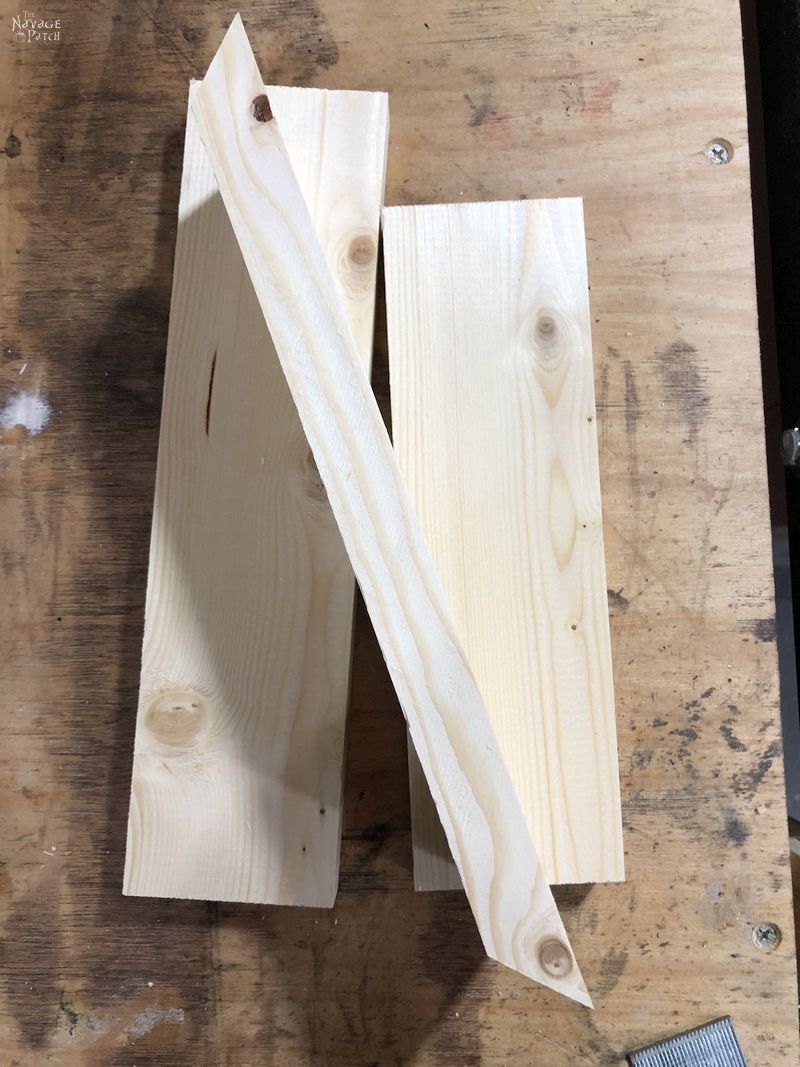
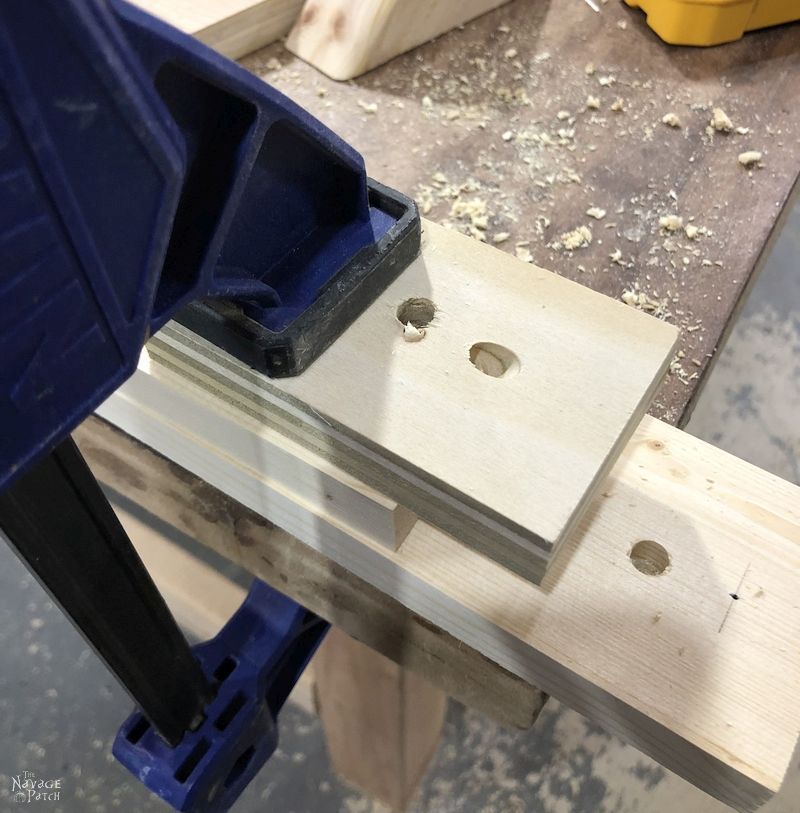
When drilling pine with a bit as large as 5/16 inch, tear-out is common on one or both sides of the wood. To prevent that, I sandwiched the board between two pieces of scrap. I had previously drilled a pilot hole in the scrap, so I just aligned the center of the pilot hole with the mark on the sconce board.
The project board is the middle one in the sandwich below. A clamp kept everything nicely in place and ensured that there would be no tear-out from the drill bit.
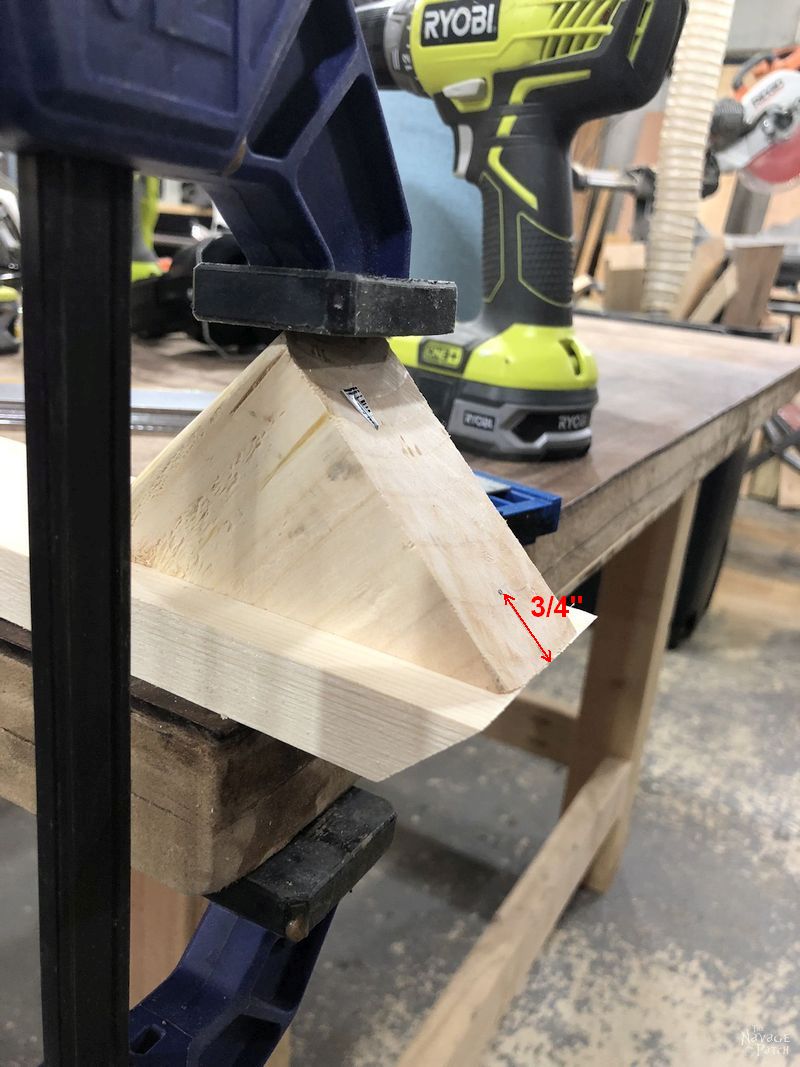
The more complicated hole was the angled one through the diagonal support piece. If you’ve ever tried to drill on an angle, you know what I’m talking about! But there’s a simple trick that makes angled holes a breeze! First, you’ll need a scrap piece with a 45 degree cut.
I used a scrap piece of 2 x 4, and I marked the center of the face and then measured and marked back 3/4 inch. I centered my 2 x 4 scrap on the diagonal support piece of my DIY corbel sconce and then clamped it all together. Note: I didn’t yet have a scrap piece under the diagonal support piece to prevent tear-out in the picture below. After these pics, I put it in there.
Keeping the drill as perpendicular to the surface as possible, I drilled through both pieces.

For that first hole, I started with a small drill bit and worked my way up to 5/16 inch. I realized though that with a scrap piece beneath, I could start right away with the 5/16 inch bit like in the picture below.

With the holes cut, it was time for the super simple assembly of my DIY corbel sconces.
I marked a line 3/4 inch down from the top of the other 10-inch pieces.

Next, I put a bead of wood glue on one end of the small piece (the end with hole that is 3/4 inch in).

I then placed the glued end just below the line and secured the pieces together with 3 brad nails.

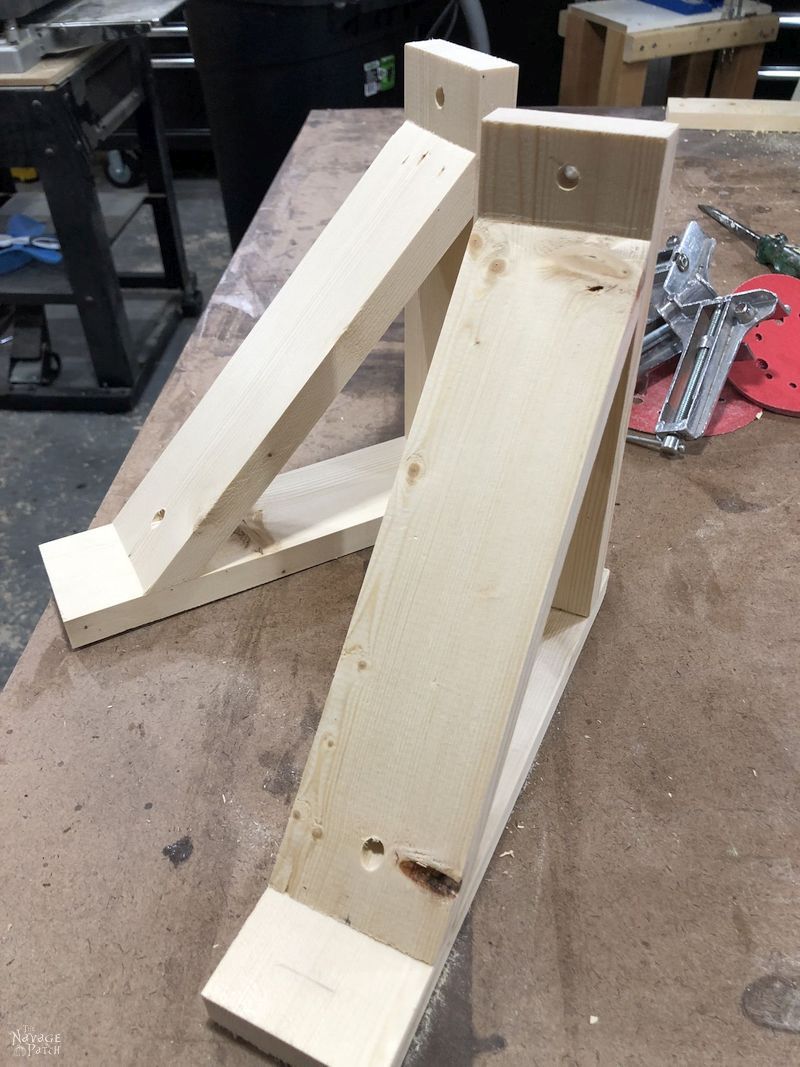
Fitting the diagonal support couldn’t be simpler – I just moved it around until both angled ends were resting flat against side and top pieces.
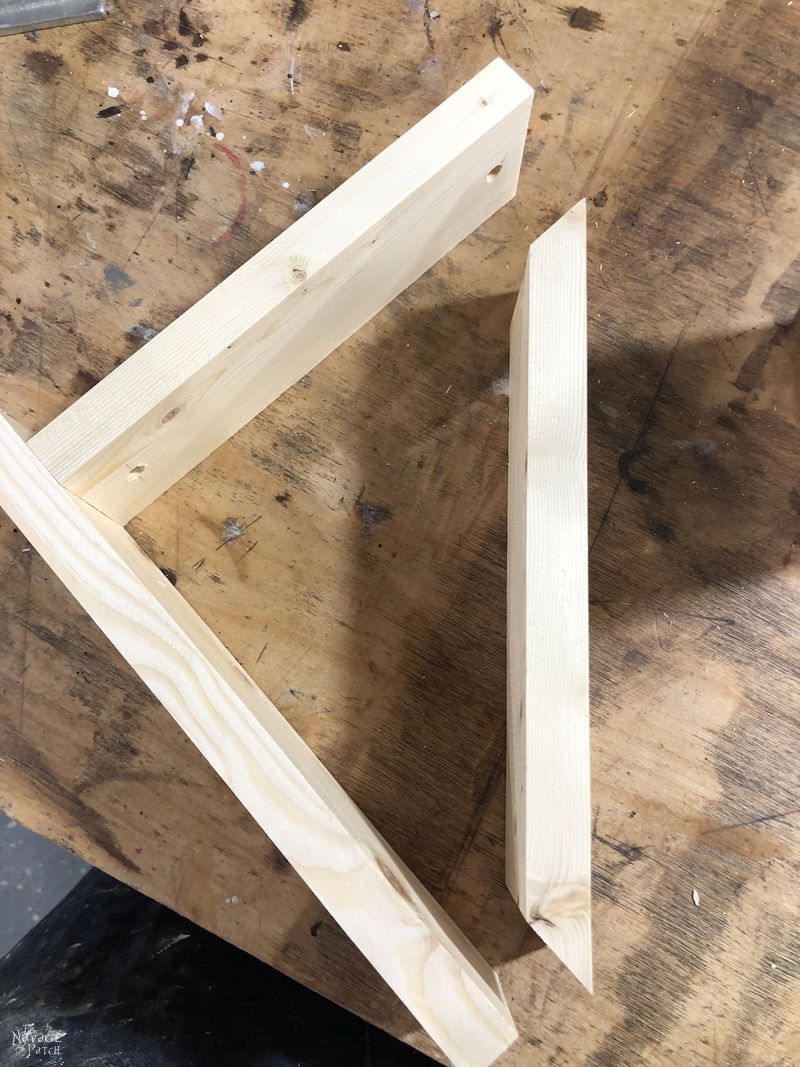
I put some glue on the two angled ends, situated the diagonal in place and then secured it with brad nails.
With that, the corbels were built and ready to be sanded.
I used 150 grit and just rounded the edges, dulled the corners and got rid of any mill marks and mill shine. With the sanding done, my corbel sconces were ready to stain. My initial thought was to give them a coat of Minwax Weathered Oak, followed by a coat of Minwax Special Walnut. It’s a combo that’s worked for me in the past.

But this time, the result was too light and not at all what I was going for. I didn’t take a picture but instead grabbed a can of Varathane Kona. I knew it would give me the color I wanted.
When the stain dried, I gave my corbel sconces a couple of coats of Greg’s Wonder Finish, the easiest and most forgiving finish I’ve used!
Greg’s Wonder Finish is made by mixing equal parts Varathane Satin Spar Urethane, Boiled Linseed Oil and Mineral Spirits. It’s applied with a rag like any wipe-on poly. Once it’s had a chance to soak in for a couple of minutes, I wipe off all the excess. I do 2-4 coats of this, depending on the project. Since these sconces won’t be handled, I just gave them two coats.
After the finish had dried, it was time to install the lights.
But first we had to cut the cord. Yep, there’s no way to do this project without exposing a little wire.
Now look, here’s the part where I have to warn you that if you don’t know what you’re doing with electricity, you should probably find someone who does. The last thing I need is for you to go zapping yourself and then pointing your smoldering blame-finger at me!
Okay, with my electrical safety disclaimer out of the way, let’s carry on. So after snipping the cord near the plug end, I threaded it up through the overhang…
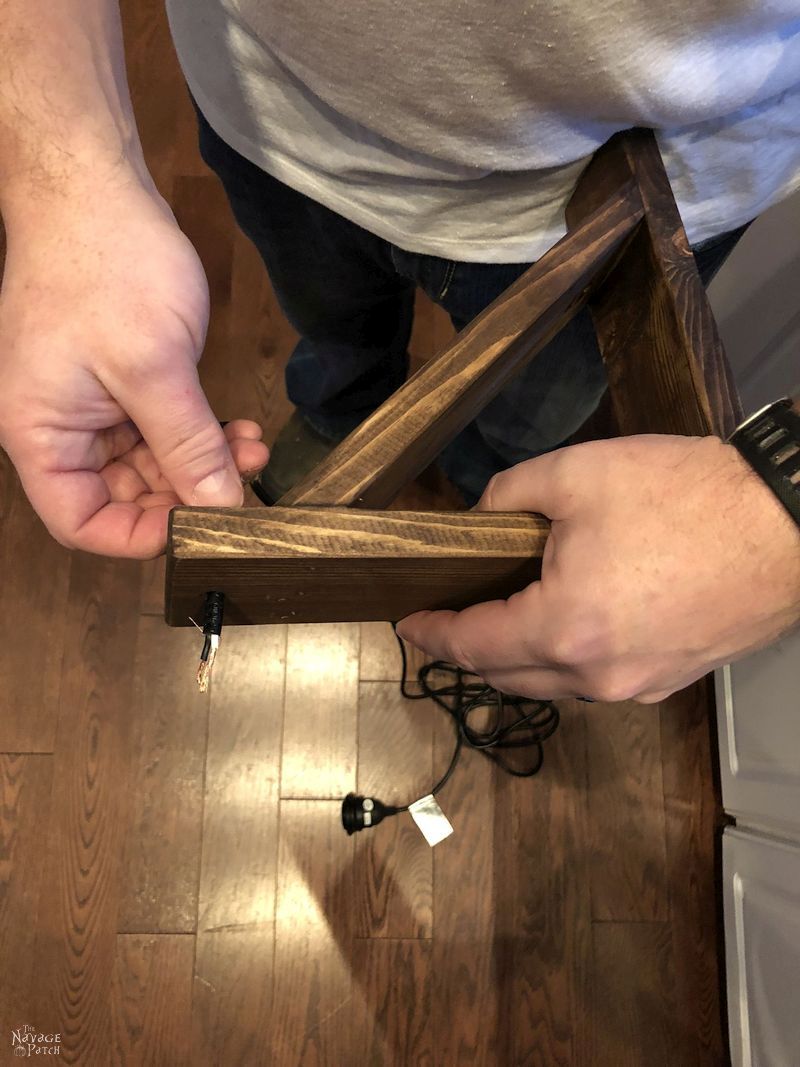
…and then I pulled all of the slack until the light socket was just below the overhang.

Then over the top and down.
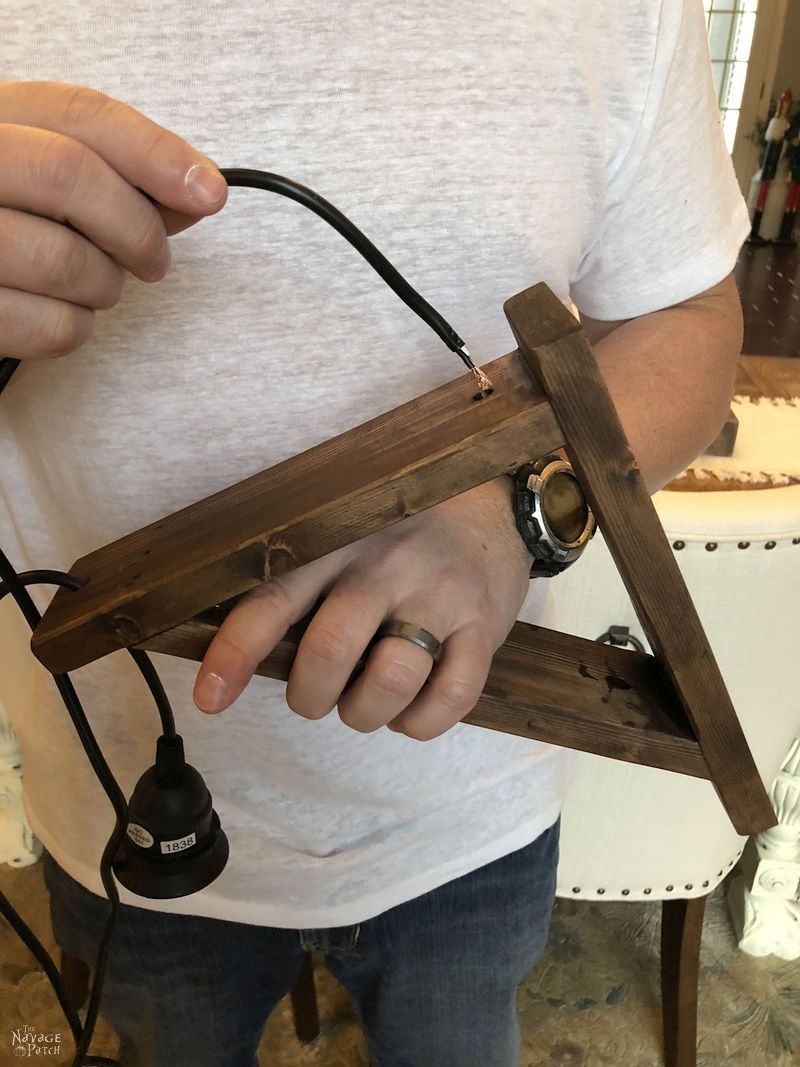
And finally out the bottom of the diagonal piece.

Ta-Daaaa! I told you it was easy!

To mount these DIY corbel sconces to the sides of Barish’s Billy bookcases, we decided to use Command Strips. Hell, if they’re still holding up our simple DIY coat rack and our DIY mudroom organizer, they can certainly handle these sconces!
To make the Command Strip’s adhesive stick better to the wood of the sconces, Handan first covered the back of the sconces with duct tape. This is a little trick of hers that we’ve had great success with.
Then we placed the Command Strips over the duct tape.

I used a level to help me mount the corbel sconces. Handan then tidied the wires using cable organizers, and we screwed in the bulbs.


If you’re following along with the teen bedroom makeover, here’s how we stand:
Teen Bedroom Makeover Checklist (for The First Room)
Teen bedroom ideas and laying out the game planDIY alcohol ink switch plates- Paint the walls
Build 2 IKEA Billy bookcasesBuild a daybedHack IKEA Kallax into a TV standCreate an accent wallBuy or DIY plugin sconces- Make wooden wall art
- Build a small chess table
- Build 2 guitar display frames
- Buy a new desk
- Change the fan
- DIY fired alcohol ink art
- Hack IKEA Laptop Stand
- Buy throw pillows
- Add greenery: faux plants, air plants, DIY air plant holders
- Metal filing cabinet makeover
- DIY Craftsman style trim
- World map wall art
- Small closet makeover
- Barish’s first room reveal
Click here to see more teen bedroom makeover posts as we continue to cross items off our checklist!
We love it when you share our posts on Facebook and Pinterest!


Those are awesome and would work so well over my crafting desk. Thanks for the great tutorial! I know my husband will appreciate it.
Thank you, Barb! 🙂
It’s “what we do!!” Looks fantastic!! franki
Thanks, Franki! 🙂
Love it! I was about to buy those on Amazon too. One question, where did you find those little clear cord clips that keep the cord attached to the wall?
Thank you so much, Geri! We bought those clear cord clips from Home Depot, but Amazon also has similar ones like this one: https://amzn.to/2tXN4QR
Loving the corbels. but not loving the cords. Could you somehow run them down behind the bookcases? Or try fixtures that could use ‘puck’ lights, no hardwiring and powered with batteries and a remote? Just wondering.
Hi Pamela, as we wanted to hang the sconces from the bookcases, hiding the wires would require drilling through the bookcase, and that’s something we didn’t want to do. For the same reason, hardwired lights were out, as that would make it impossible to change those bookcases in the future. The exposed cords don’t bother us – in fact we think they add to the overall look. All in all, we wanted lighting that is easily changeable in case we get tired of it in the future, and these sconces fit the bill!
Looks great! How do the lights turn on and off? I probably would have cut the light cord at a level just above the mattress for threading through the sconce and installed a switch there to turn the lights on an off. That just seems to be the easy way to do it to me.
Oh jeez, I totally forgot to mention that part! There’s an outlet right behind the daybed. We bought a remote controlled outlet for those lights that plugs into the existing outlet and lets Barish control the lights with a remote!
damn, freaking fantastic xx
Thank you, Chris! Good to see you again! 😀
Awesome . . . I am SO happy to be a member . . . I just keep saving all of your projects for my future home in GA. I will be moving there in a couple months and will start ‘thumbing thru’ my printouts. THANK YOU for a most marvelous web site!! PS – I’d like to see more pics of your home’s interior – great ideas there too!!
Thank you, Judith! We’re doing a lot of room makeovers this year, so you should get your fill of interior shots! 🙂
Fantastic! I love those kind of sconces – was considering them fo myself- but the price always seemed so ridiculous for three bits of wood and a plug in bulb. These look great and the colour stain really sets them off. Great work as usual.
Thank you, Jay! Yeah, it’s ridiculous what people charge for this kind of thing. Keeps this blog in business, I guess, lol! 🙂
Awesome as usual!
Thanks, Giselle 🙂
Let me start by saying… I really enjoy your blog. I have been a fan for about a year now. Anyways I have a question about these light fixtures. For the angled piece of wood, you had to drill a hole at an angle. I am pretty sure I would end up not doing that bad boy correctly. I ask, would one of those cool little Kreg jig things that I always see on different diy blogs work? It appears to be a guide for you to drill at a safe angle. Have you used it? If so, would it give the kind of angle you need for this project? Thanks in advance
Hi Carol, and thank you! Okay regarding the Keg Jig – it wouldn’t work for this purpose because it doesn’t go in at a 45 degree angle. I use Kreg jigs all the time to join wood – it is one of my most indispensable DIY tools – but to drill at a 45 degree angle, the method I showed in the post is the easiest way.
How did you reattach the cord to plug into the wall? I would have liked to see that part as well. Great tutorial though. I like these sconces very much and would love a pair in my dining room.
How do i stick the light back together once I make the sconce and cut it. I found that you can also make it with left over 2 by 4’s and deck screws.
Hi Cheryl, I used electrical tape to reattach the spliced ends. 🙂